Spring security 实现前后端分离登录拦截器及用户权限控制
目录
前言
一、准备工作
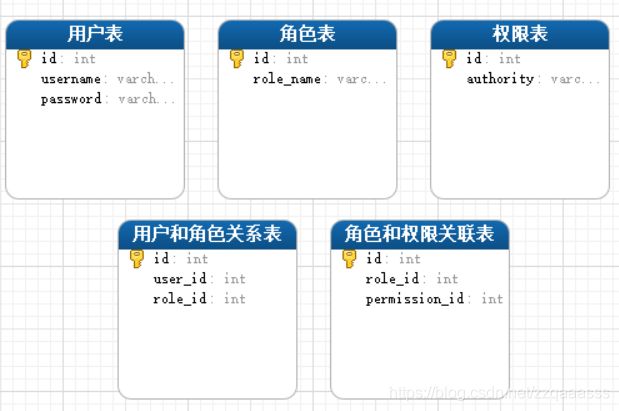
1.1、设计数据库(我的工程目录中的sql文件夹下有sql文件直接导入即可)
二、代码实现
2.1、数据操作
2.2、自定义登录逻辑
2.2.1、创建自定义UserDetailsService
2.2.2、自定义的密码加密类
2.3、自定义登录验证结果、登出结果、无权访问处理器
2.3.1、自定义登录成功处理器
2.3.2、自定义登录失败处理器
2.3.3、自定义退出成功处理器
2.3.4、自定义无权访问处理器
2.4、WebSecurityConfig配置
2.4.1、配置security
2.4.2、内置访问控制方法介绍
2.4.3、角色权限判断
2.5、编写测试用例
2.5.1、简单的json返回体
2.5.2、测试Controller类
三、测试
前言
本文基于spring boot +mybatis+spring security+postname 实现下面功能并进行测试。
主要实现功能:
1、前后端分离用户登录验证
2、实现用户权限控制
项目已经打包上传到github,下载地址:https://github.com/zzqgit/SpringSecurityDemo.git
一、准备工作
1.1、设计数据库(我的工程目录中的sql文件夹下有sql文件直接导入即可)
初始化数据如下:
--user表
INSERT INTO `security`.`user` (`id`, `username`, `password`) VALUES ('1', 'admin', '123456');
INSERT INTO `security`.`user` (`id`, `username`, `password`) VALUES ('2', 'user1', '123456');
INSERT INTO `security`.`user` (`id`, `username`, `password`) VALUES ('3', 'user2', '123456');

--role表
INSERT INTO `security`.`role` (`id`, `role_name`) VALUES ('1', 'admin');
INSERT INTO `security`.`role` (`id`, `role_name`) VALUES ('2', 'user');

--user_role_relation表
INSERT INTO `security`.`user_role_relation` (`id`, `user_id`, `role_id`) VALUES ('1', '1', '1');
INSERT INTO `security`.`user_role_relation` (`id`, `user_id`, `role_id`) VALUES ('2', '2', '2');
INSERT INTO `security`.`user_role_relation` (`id`, `user_id`, `role_id`) VALUES ('3', '3', '2');

--peimission表
INSERT INTO `security`.`permission` (`id`, `authority`) VALUES ('1', 'insert');
INSERT INTO `security`.`permission` (`id`, `authority`) VALUES ('2', 'update');
INSERT INTO `security`.`permission` (`id`, `authority`) VALUES ('3', 'select');

--role_peimission_relation表
INSERT INTO `security`.`role_permission_relation` (`id`, `role_id`, `permissin_id`) VALUES ('6', '1', '1');
INSERT INTO `security`.`role_permission_relation` (`id`, `role_id`, `permissin_id`) VALUES ('7', '1', '2');
INSERT INTO `security`.`role_permission_relation` (`id`, `role_id`, `permissin_id`) VALUES ('8', '1', '3');
INSERT INTO `security`.`role_permission_relation` (`id`, `role_id`, `permissin_id`) VALUES ('9', '2', '2');
INSERT INTO `security`.`role_permission_relation` (`id`, `role_id`, `permissin_id`) VALUES ('10', '2', '3');
INSERT INTO `security`.`role_permission_relation` (`id`, `role_id`, `permissin_id`) VALUES ('11', '3', '3');
1.2、pom.xml依赖
    4.0.0

        org.springframework.boot
        spring-boot-starter-parent
        2.2.0.RELEASE


    com.security
    demo
    0.0.1-SNAPSHOT
    demo
    Demo project for Spring Boot


        1.8


            org.springframework.boot
            spring-boot-starter-web


            org.springframework.boot
            spring-boot-starter-web-services


            org.springframework.boot
            spring-boot-starter-jdbc


            mysql
            mysql-connector-java
            runtime


            org.mybatis.spring.boot
            mybatis-spring-boot-starter
            2.1.0


            org.projectlombok
            lombok


            org.springframework.boot
            spring-boot-configuration-processor
            true


            org.springframework.boot
            spring-boot-starter-thymeleaf


            org.springframework.boot
            spring-boot-starter-security


            org.springframework.boot
            spring-boot-starter-test
            test


                    org.junit.vintage
                    junit-vintage-engine


        test


                org.springframework.boot
                spring-boot-maven-plugin


                            repackage
1.3、编辑application.yml配置文件
server:
  port: 8090
spring:

  datasource:
    url: jdbc:mysql://127.0.0.1/security?useUnicode=true&characterEncoding=UTF-8&useJDBCCompliantTimezoneShift=true&useLegacyDatetimeCode=false&serverTimezone=UTC
    username: root
    password: 123456
    driver-class-name: com.mysql.cj.jdbc.Driver

mybatis:
  mapper-locations: classpath:mapping/*.xml
  type-aliases-package: com.security.demo.Entity
二、代码实现
2.1、数据操作
这部分代码实现了对用户和用户权限查询的基本操作,学过mybatis的都应该知道,就不过多解释!
2.1.1、用户实体类(User.java)
public class User {
    private Integer id;
    private String username;
    private String password;

    public Integer getId() {
        return id;
    }
    public void setId(Integer id) {
        this.id = id;
    }
    public String getUsername() {
        return username;
    }
    public void setUsername(String username) {
        this.username = username;
    }
    public String getPassword() {
        return password;
    }
    public void setPassword(String password) {
        this.password = password;
    }
}
2.1.2、UserMapper
@Mapper
@Component(value = "UserMapper")
public interface UserMapper {

    User findByName( String username);

}
2.1.3、UserService
@Service
public class UserService {

    @Autowired
    private UserMapper userMapper;

    public User findByName(String username){
        return userMapper.findByName(username);
    }
}
2.1.4、UserMapping.xml
2.1.5、用户权限实体类(Permission.java)
public class Permission {
    private Integer id;
    private String authority;

    public Integer getId() {
        return id;
    }
    public void setId(Integer id) {
        this.id = id;
    }
    public String getAuthority() {
        return authority;
    }
    public void setAuthority(String authority) {
        this.authority = authority;
    }
}
2.1.6、用户角色实体类
public class Role {
    private Integer id;
    private String role_name;
    public Integer getId() {
        return id;
    }
    public void setId(Integer id) {
        this.id = id;
    }
    public String getRole_name() {
        return role_name;
    }
    public void setRole_name(String role_name) {
        this.role_name = role_name;
    }
}
2.1.7、PermissionMapper
@Mapper
@Component(value = "PermissionMapper")
public interface PermissionMapper {

    List selectListByUserId(Integer id);
    List selectRoleListByUserId(Integer id);
}
2.1.8、PermissionService
import java.util.List;

@Service
public class PermissionService {

    @Autowired
    private PermissionMapper permissionMapper;

    public List selectListByUserId(Integer id){
        return permissionMapper.selectListByUserId(id);
    }
    public List selectRoleListByUserId(Integer id){
        return permissionMapper.selectRoleListByUserId(id);
    }
}
2.1.9、PermissionMapping.xml
2.2、自定义登录逻辑
在实际项目中账号和密码都是从数据库中查询出来的。所以我们要通过自定义逻辑控制认证逻辑,只需要实现 UserDetailsService 接口即可。
2.2.1、创建自定义UserDetailsService
这是实现自定义用户认证的核心逻辑,loadUserByUsername(String username)的参数就是登录时提交的用户名,返回类型是一个叫UserDetails 的接口,需要在这里构造出他的一个实现类User,这是Spring security提供的用户信息实体。
package com.security.demo.Security.custom;
import com.security.demo.Entity.Permission;
import com.security.demo.Entity.Role;
import com.security.demo.Entity.User;
import com.security.demo.Service.PermissionService;
import com.security.demo.Service.UserService;
import org.springframework.beans.factory.annotation.Autowired;
import org.springframework.security.core.GrantedAuthority;
import org.springframework.security.core.authority.SimpleGrantedAuthority;
import org.springframework.security.core.userdetails.UserDetails;
import org.springframework.security.core.userdetails.UserDetailsService;
import org.springframework.security.core.userdetails.UsernameNotFoundException;
import org.springframework.stereotype.Service;
import java.util.ArrayList;
import java.util.List;

@Service
public class CustomUserDetailsService implements UserDetailsService {
    @Autowired
    private UserService userService;
    @Autowired
    private PermissionService permissionService;

    /**
     * 认证过程中 - 根据登录信息获取用户详细信息
     *
     * @param username 登录用户输入的用户名
     * @return
     * @throws UsernameNotFoundException
     */
    @Override
    public UserDetails loadUserByUsername(String username) throws UsernameNotFoundException {
        //根据用户输入的用户信息,查询数据库中已注册用户信息
        User user = userService.findByName(username);
        //如果用户不存在直接抛出UsernameNotFoundException异常
        if (user == null) throw new UsernameNotFoundException("用户不存在");
        System.out.println(username);
        //声明一个用于存放用户权限的列表
        List grantedAuthorities = new ArrayList<>();
        //获取该用户所拥有的权限
        List authority = permissionService.selectListByUserId(user.getId());
        //获取该用户所属角色
        List role = permissionService.selectRoleListByUserId(user.getId());
        //把用户所拥有的权限添加到列表中
        authority.forEach(permission -> {
            grantedAuthorities.add(new SimpleGrantedAuthority(permission.getAuthority()));
        });
        //把用户角色加到列表中
        role.forEach(role1 -> {
            //注意:添加角色的时候要在前面加ROLE_前缀
            grantedAuthorities.add(new SimpleGrantedAuthority("ROLE_"+role1.getRole_name()));
        });

        //创建并返回User对象,注意这里的User不是我们实体类里面的User
        return new org.springframework.security.core.userdetails.User(user.getUsername(),user.getPassword(), grantedAuthorities );
    }
}
2.2.2、自定义的密码加密类
@Component
public class CustomPasswordEncoder implements PasswordEncoder {
    @Override
    public String encode(CharSequence rawPassword) {
        return rawPassword.toString();
    }

    @Override
    public boolean matches(CharSequence rawPassword, String encodedPassword) {
        return encodedPassword.equals(rawPassword.toString());
    }
}
2.3、自定义登录验证结果、登出结果、无权访问处理器
Spring Security为我们封装好了登录、登出的接口。默认登入路径:/login,登出路径:/logout。当然我们可以也修改默认的名字。登录成功、失败和登出的后续处理逻辑如何编写会在下面解释。
当登录成功或登录失败都需要返回统一的json返回体给前台,前台才能知道对应的做什么处理。
而实现登录成功和失败的异常处理需要分别实现AuthenticationSuccessHandler和AuthenticationFailureHandler接口并在WebSecurityConfig中注入,然后在configure(HttpSecurity http)方法中然后声明,WebSecurityConfig配置后面慢慢解释。
2.3.1、自定义登录成功处理器
/**
 * 自定义验证成功处理器
 * @author
 *
 */
@Component
public class CustomAuthenticationSuccessHandler implements AuthenticationSuccessHandler {

    @Override
    public void onAuthenticationSuccess(HttpServletRequest httpServletRequest, HttpServletResponse httpServletResponse, Authentication authentication) throws IOException, ServletException {
        httpServletResponse.setContentType("application/json;charset=utf-8");
        PrintWriter out = httpServletResponse.getWriter();
        out.write("{\"status\":\"success\",\"msg\":\"登录成功\"}");
        out.flush();
        out.close();
    }
}
2.3.2、自定义登录失败处理器
/**
 * 自定义验证失败处理器
 * @author
 *
 */
@Component
public class CustomAuthenticationFailHandler implements AuthenticationFailureHandler {

    @Override
    public void onAuthenticationFailure(HttpServletRequest httpServletRequest, HttpServletResponse httpServletResponse, AuthenticationException e) throws IOException, ServletException {
        httpServletResponse.setContentType("application/json;charset=utf-8");
        PrintWriter out = httpServletResponse.getWriter();
        out.write("{\"status\":\"error\",\"msg\":\"登录失败\"}");
        out.flush();
        out.close();
    }

}
2.3.3、自定义退出成功处理器
/**
 * 退出登录成功的处理
 */
@Component
public class CustomLogoutSuccessHandler implements LogoutSuccessHandler {
    @Override
    public void onLogoutSuccess(HttpServletRequest httpServletRequest, HttpServletResponse httpServletResponse, Authentication authentication) throws IOException, ServletException {
        httpServletResponse.setContentType("application/json;charset=utf-8");
        PrintWriter out = httpServletResponse.getWriter();
        out.write("{\"status\":\"success\",\"msg\":\"退出成功\"}");
        out.flush();
        out.close();
    }
}
2.3.4、自定义无权访问处理器
/**
 * 自定义无权访问处理器
 */
@Component
public class CustomAccessDeniedHandler implements AccessDeniedHandler {

    @Override
    public void handle(HttpServletRequest request, HttpServletResponse response,
                       AccessDeniedException accessDeniedException) throws IOException, ServletException {

        //HttpServletResponse.SC_FORBIDDEN代表 403
        //response.setStatus(HttpServletResponse.SC_FORBIDDEN);
        response.setHeader("Content-Type","application/json;charset=utf-8");
        PrintWriter out = response.getWriter();
        out.write("{\"status\":\"error\",\"msg\":\"权限不足!\"}");
        out.flush();
        out.close();
    }

}
2.4、WebSecurityConfig配置
看代码接注释吧!
2.4.1、配置security
package com.security.demo.Security;

import com.security.demo.Security.custom.*;
import org.springframework.beans.factory.annotation.Autowired;
import org.springframework.context.annotation.Bean;
import org.springframework.context.annotation.Configuration;
import org.springframework.security.config.annotation.authentication.builders.AuthenticationManagerBuilder;
import org.springframework.security.config.annotation.method.configuration.EnableGlobalMethodSecurity;
import org.springframework.security.config.annotation.web.builders.HttpSecurity;
import org.springframework.security.config.annotation.web.configuration.EnableWebSecurity;
import org.springframework.security.config.annotation.web.configuration.WebSecurityConfigurerAdapter;
import org.springframework.security.crypto.bcrypt.BCryptPasswordEncoder;
import org.springframework.security.crypto.password.PasswordEncoder;

@Configuration
@EnableWebSecurity
@EnableGlobalMethodSecurity(prePostEnabled = true)

public class SecurityConfig extends WebSecurityConfigurerAdapter {

    @Autowired
    private CustomUserDetailsService customUserDetailsService;
    @Autowired
    private CustomAuthenticationSuccessHandler customAuthenticationSuccessHandler;
    @Autowired
    private CustomAuthenticationFailHandler customAuthenticationFailHandler;
    @Autowired
    private CustomAccessDeniedHandler customAccessDeniedHandler;
    @Autowired
    private CustomLogoutSuccessHandler customLogoutSuccessHandler;


    @Override
    protected void configure(AuthenticationManagerBuilder auth) throws Exception {

        //将自定的CustomUserDetailsService装配到AuthenticationManagerBuilder
        auth.userDetailsService(customUserDetailsService).passwordEncoder(new CustomPasswordEncoder());
    }


    @Override
    protected void configure(HttpSecurity http) throws Exception {

        http

                /*匿名请求:不需要进行登录拦截的url*/
                .authorizeRequests()
                 .antMatchers("/hello").permitAll() //允许任何人访问
                .antMatchers("/admin").hasRole("admin")//当用户的角色是为admin时可以访问这个目录
                .antMatchers("/getUser").hasAuthority("select") //当用户具有select权限时才可以访问这个方法
                .anyRequest().authenticated()//其他的路径都是登录后才可访问
                .and()
                /*登录配置*/
                .formLogin()
                .loginPage("/login_page")//登录页,当未登录时会重定向到该页面
                .successHandler(customAuthenticationSuccessHandler)//登录成功处理
                .failureHandler(customAuthenticationFailHandler)//登录失败处理
                .loginProcessingUrl("/login")//前端登录请求地址
                .usernameParameter("username")//默认的用户名参数
                .passwordParameter("password")//默认的密码参数
                .permitAll()
                .and()
                /*登出配置*/
                .logout()
                .permitAll()
                .logoutSuccessHandler(customLogoutSuccessHandler) //退出处理
                .and()
                .exceptionHandling()
                .accessDeniedHandler(customAccessDeniedHandler)  //无权限时的处理
                .and()
                .cors() //跨域
                .and()
                //关闭csrf防护,类似于防火墙,不关闭上面的设置不会真正生效。
                .csrf().disable();
    }

    //密码加密配置
    @Bean
    public PasswordEncoder passwordEncoder() {

        return new BCryptPasswordEncoder();
    }

}
2.4.2、内置访问控制方法介绍
刚才在上面的配置类中我们也看到了.antMatchers("/hello").permitAll()配置之后/hello接口就何人都可以访问,
类似这种控制方法security一共定义了6种访问控制方法:
| permitAll() |
表示所匹配的URL 任何人都允许访问 |
| denyAll() |
表示所匹配的URL 都不允许被访问 |
| anonymous() |
表示可以匿名访问匹配的URL。和permitAll()效果类似 |
| authenticated() |
表示所匹配的URL 都需要被认证才能访问 |
| fullyAuthenticated() |
如果用户不是被remember me 的,才可以访问 |
| rememberMe() |
被“remember me”的用户允许访问 |
2.4.3、角色权限判断
除了之前讲的内置权限控制 , Spring Security 中还支持很多其他权限控制。
这些方法一般都用于用户已经被认证后,判断用户是否具有特定的权限或角色。
就比如我们在上面的配置中的
.antMatchers("/admin").hasRole("admin")//当用户的角色是为admin时可以访问这个目录
.antMatchers("/getUser").hasAuthority("select") //当用户具有select权限时才可以访问这个方法
1、hasAuthority(String)
判断用户是否具有特定的权限,用户的权限是在自定义登录逻辑中创建User 对象时指定的。
2、hasAnyAuthority(String …)
如果用户具备给定权限中某一个,就允许访问。
.antMatchers("/hello").hasAnyAuthority("adMin","admiN")
3、hasRole(String)
如果用户具备给定角色就允许访问。
参数取值来源于自定义登录逻辑UserDetailsService 实现类中创建User 对象时给User 赋予的授权。
在给用户赋予角色时角色需要以:ROLE_ 开头,后面添加角色名称。
例如:ROLE_abc 其中abc 是角色名,ROLE_是固定的字符开头。
在使用的时候可以直接不用加ROLE_
4、hasAnyRole
如果用户具备给定角色的任意一个,就允许被访问
例如:
.antMatchers("/hello").hasAnyRole("abC","abc","ABC") //判断用户是否用户具备给定角色的任意一个,是就允许被访问5、hasIpAddress(String)
如果请求是指定的IP 就可以访问。
.antMatchers("/main.html").hasIpAddress("127.0.0.1") //如果请求是指定的IP 就运行访问。
除了在webSecurityConfig配置文件中声明某个接口需要特定的权限,我们还可以在Controller类中声明,但前提是在配置类中加上@EnableGlobalMethodSecurity(prePostEnabled = true)注解。我已经在上面配置类中加入了,关于使用请继续看下面2.5.2的代码。
2.5、编写测试用例
2.5.1、简单的json返回体
package com.security.demo.Security.utils;
import lombok.Data;
@Data
public class Response {
    private String code;
    private String msg;
    private Object data;
    public Response() {
        this.code = "200";
        this.msg = "SUCCESS";
    }
    public Response(String code, String msg){
        this.code = code;
        this.msg = msg;
    }
}
2.5.2、测试Controller类
import com.security.demo.Entity.User;
import com.security.demo.Security.utils.Response;
import com.security.demo.Service.UserService;
import org.springframework.beans.factory.annotation.Autowired;
import org.springframework.security.access.prepost.PreAuthorize;
import org.springframework.security.core.context.SecurityContextHolder;
import org.springframework.stereotype.Controller;
import org.springframework.web.bind.annotation.RequestMapping;
import org.springframework.web.bind.annotation.ResponseBody;

@Controller
public class DemoController {

    @Autowired
    private UserService userService;

    @RequestMapping("/hello")
    @ResponseBody
    public Response hello(){
        return new Response("200","hello!");
    }
    //该方法我们在security配置类中指定了admin角色才可以访问
    @RequestMapping("/admin")
    @ResponseBody
    public Response admin(){
        return new Response("200","admin!");
    }
    //当用户具有select权限时才可以访问该方法
    @PreAuthorize("hasAuthority('select')")
    @RequestMapping("/select")
    @ResponseBody
    public Response select(){
        return new Response("200","select");
    }
    //当用户具有insert权限时才可以访问该方法
    @PreAuthorize("hasAuthority('insert')")
    @RequestMapping("/insert")
    @ResponseBody
    public Response insert(){
        return new Response("200","insert");
    }
    //当用户具有update权限时才可以访问该方法
    @PreAuthorize("hasAuthority('update')")
    @RequestMapping("/update")
    @ResponseBody
    public Response update(){
        return new Response("200","update");
    }
    //如果访问需要登录的接口,如果用户还没登录就会跳转到这个接口
    @RequestMapping("/login_page")
    @ResponseBody
    public Response root(){
        Response response = new Response("-200","未登录!");
        return response;
    }

    @RequestMapping("/getUser")
    @ResponseBody
    public User getUser(){
        //获取我们正在登陆的用户信息
        //注意这里的User是security的
        org.springframework.security.core.userdetails.User userDetails = (org.springframework.security.core.userdetails.User) SecurityContextHolder.getContext().getAuthentication().getPrincipal();
        //这里的User才是我们实体类里面的
        User user = userService.findByName(userDetails.getUsername());
        return user;
    }
}
编辑好之后继续干菜我们上面说到的通过使用@EnableGlobalMethodSecurity(prePostEnabled = true)注解就可以直接在控制类中通过加入@PreAuthorize等注解就可以对方法实现用户权限或角色判断。
@PreAuthorize:在方法执行之前执行进行判断
使用示例:
@PreAuthorize("hasAuthority('select')") 判断用户是否具有select权限
@PreAuthorize("hasRole('admin')") 判断用户是否具有admin角色身份
@PostAuthorize:在方法执行之后执行
三、测试
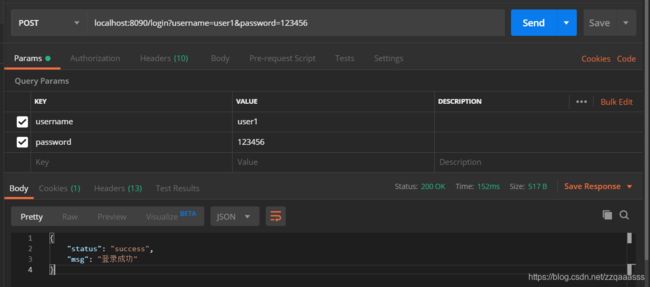
在测试前先说一下,用浏览器来测试需要登录的接口是不行的,它会直接跳转到login_page,然后这个接口只是返回未登录的提示,此时你想在浏览器发起/login?username=user1&password=123456类似这样的登录请求是不行的,因为security的/login接口默认是POST请求,我们浏览器发起的是GET请求所以不行,当然你用js来请求,改下请求类型就行了,我这里用postname这个软件来测试。地址:https://www.getpostman.com/ 下载下来安装就能用了。
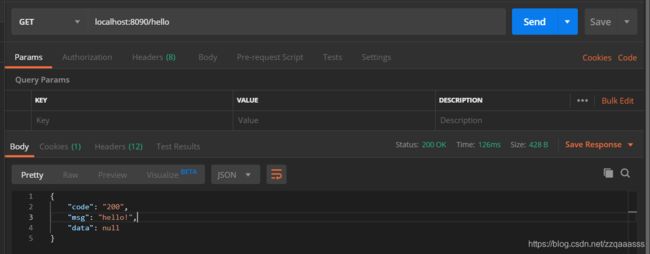
1、测试hello接口,不登录的情况下是可以访问的
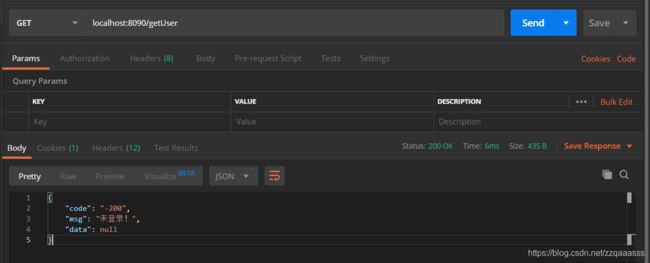
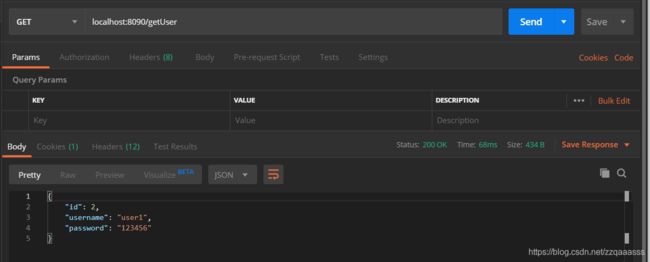
2、测试getUser接口,该接口是需要登录后才能访问的
我们可以登录之后再进行访问,我们用user1账号来登录
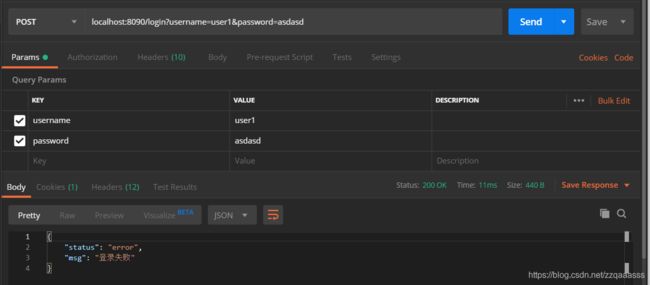
使用错误密码登录:
使用正确密码登录:
这时再进行访问就不会提示未登录了
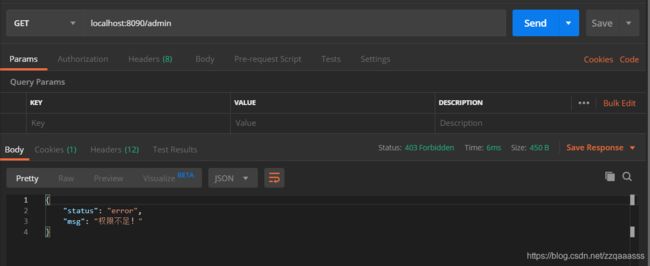
3、无角色权限测试,admin接口是需要具有admin角色身份才可以访问的。
我们直接用上面登录的user1来测:
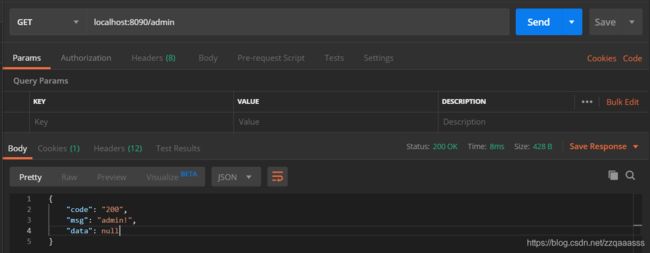
会提示我们权限不足,接下来再用admin账号去登录再进行测试会的得到如下结果:
4、用户权限测试
根据我们最数据库中初始化的数据,user1、user2这个两个用户对应的user角色是没有insert权限的,我们接下来登录user1来测试一下:
很明显是合理的。好了到这里就结束了,项目代码我已经传到githun,可直接下载
地址:https://github.com/zzqgit/SpringSecurityDemo.git
