CANN训练营第三季_昇腾CANN算子精讲课_TBE算子Sinh开发笔记_算子开发(二)
1.作业算子要求
2.检查版本对应关系
在Mindstudio软件包下载界面可以检查安装的mindstudio版本和cann版本是否一致,如果不一致可能会导致后面算子工程创建出错。
这里我用的MindStudio5.0RC3对应的CANN商用版本为6.0RC1,我使用6.0.RC1.alpha001也没有问题。
查看CANN版本
cd /usr/local/Ascend/ascend-toolkit/latest/x86-64-linux
cat ascend_toolkit_install.info
3.安装算子开发依赖
pip3 install xlrd==1.2.0 --user
pip3 install gnureadline --user
pip3 install absl-py --user
pip3 install coverage --user
pip3 install jinja2 --user
pip3 install onnx --user
pip3 install tensorflow==1.15.0 --user
pip3 install python-csv --user
pip3 install google --user
参考:https://www.hiascend.com/document/detail/zh/mindstudio/50RC3/msug/msug_000392.html
4.打开软件
cd MindStudio/bin./MindStudio.sh
./MindStudio.sh
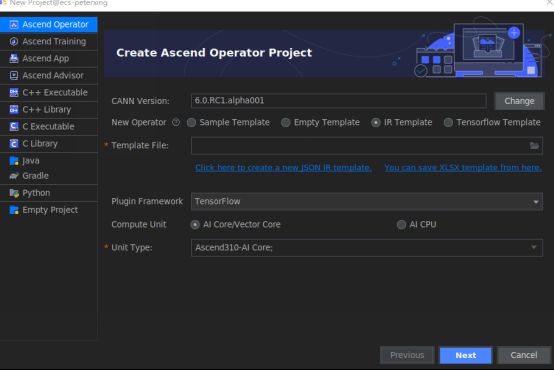
5.配置算子工程

这里可以根据实际上硬件选择昇腾310或者910,我的环境里面只有310。

成功配置的工程目录里面应该有除了testcases之外的所有目录。

6.配置python环境
因为我的python3.7.5是云服务器系统配置时自带的,CANN是后面自己安装的,导致Mindstudio在运行python找不到tbe库。
我在菜单栏File – Project Structure – SDKS,配置env环境,包含所有路径。(可选,如果不存在这个问题可以不用配置虚拟环境)

在modules里面添加env环境,python解析器就配置好了。

7.算子开发
1) 原型定义(注册)
sin.h
文件路径Sinh/framework/op_proto/sin.h
    #ifndef GE_OP_SINH_H
    #define GE_OP_SINH_H
    #include "graph/operator_reg.h"
    namespace ge {
    REG_OP(Sinh)
        .INPUT(x, TensorType({DT_FLOAT16}))
        .OUTPUT(y, TensorType({DT_FLOAT16}))
        .OP_END_FACTORY_REG(Sinh)
    }
    #endif //GE_OP_SINH_H
2)原型实现
sinh.cc
文件路径Sinh/framework/op_proto/sin.cc
    #include "sinh.h"
    namespace ge {

    IMPLEMT_COMMON_INFERFUNC(SinhInferShape)
    {
        auto input_x = op.GetInputDescByName("x");
        auto input_type = input_x.GetDataType();
        auto input_shape = input_x.GetShape();
        auto out_y = op.GetOutputDescByName("y");
        out_y.SetDataType(input_type);
        out_y.SetShape(input_shape);
        op.UpdateOutputDesc("y",out_y);
        return GRAPH_SUCCESS;
    }

    IMPLEMT_VERIFIER(Sinh, SinhVerify)
    {
        DataType input_type_x = op.GetInputDescByName("x").GetDataType();
        DataType input_type_y = op.GetInputDescByName("y").GetDataType();
        if (input_type_x != input_type_y) {
            return GRAPH_FAILED;
        }
        return GRAPH_SUCCESS;
    }

    COMMON_INFER_FUNC_REG(Sinh, SinhInferShape);
    VERIFY_FUNC_REG(Sinh, SinhVerify);

    }  // namespace ge
3)算子实现
sinh.py
文件路径:Sinh/tbe/impl/sinh.py
    import tbe.dsl as tbe
    from tbe import tvm
    from tbe.common.register import register_op_compute
    from tbe.common.utils import para_check

    @register_op_compute("sinh")
    def sinh_compute(x, y, kernel_name="sinh"):

        input_type = x.dtype
        input_shape = x.shape
        half_tensor =tbe.broadcast(0.5,input_shape,input_type)
        res_exp1 = tbe.vexp(x)
        res_exp2 = tbe.vrec(res_exp1)
        res_sub = tbe.vsub(res_exp1,res_exp2)
        res = tbe.vmul(res_sub,half_tensor)
        return res

    @para_check.check_op_params(para_check.REQUIRED_INPUT, para_check.REQUIRED_OUTPUT, para_check.KERNEL_NAME)
    def sinh(x, y, kernel_name="sinh"):
        data_x = tvm.placeholder(x.get("shape"), dtype=x.get("dtype"), name="data_x")
        res = sinh_compute(data_x, y, kernel_name)
        # auto schedule
        with tvm.target.cce():
            schedule = tbe.auto_schedule(res)
        # operator build
        config = {"name": kernel_name,
                  "tensor_list": [data_x, res]}
        tbe.build(schedule, config)
4)算子调试
sinh_debug.py
文件路径:Sinh/sinh_debug.py
    import tbe.dsl as tbe
    from tbe import tvm
    from tbe.common.testing.testing import *
    import numpy as np

    def sinh_test():
        with debug():
            ctx = get_ctx()
            x_value = tvm.nd.array(np.random.uniform(size=[2,2]).astype("float16"),ctx)
            print("x_value = ", x_value)
            out = tvm.nd.array(np.zeros([2,2],dtype="float16"),ctx)

            x_placeholder = tvm.placeholder([2,2],name="data_1",dtype="float16")
            half_tensor =tbe.broadcast(0.5,x_placeholder.shape,"float16")
            res_exp1 = tbe.vexp(x_placeholder)
            print_tensor(res_exp1)
            res_exp2 = tbe.vrec(res_exp1)
            print_tensor(res_exp2)
            res_sub = tbe.vsub(res_exp1,res_exp2)
            print_tensor(res_sub)
            res = tbe.vmul(res_sub,half_tensor)
            print_tensor(res)
            desired = np.sinh(x_value.asnumpy())
            print('desired =',desired)
            assert_allclose(res,desired, tol=[1e-3,1e-3])

            op_test = tvm.create_schedule(res.op)
            build(op_test,[x_placeholder,res],name="sin_test")
            run(x_value,out)

    if __name__ == "__main__":
    sinh_test()
5)算子信息库定义(自动生成,这里不用改)
sinh.ini
Sinh/tbe/op_info_cfg.ai_core/ascend310/sin.ini
    [Sinh]
    input0.name=x
    input0.dtype=float16
    input0.paramType=required
    input0.format=ND
    output0.name=y
    output0.dtype=float16
    output0.paramType=required
    output0.format=ND
    opFile.value=sinh
    opInterface.value=sinh
6)算子适配插件信息(自动生成,这里不用改)
tensorflow_sinh_plugin.cc
文件路径Sinh/framework/tf_plugin/tensorflow_sinh_plugin.cc
    namespace domi {
    // register op info to GE
    REGISTER_CUSTOM_OP("Sin")
        .FrameworkType(TENSORFLOW)   // type: CAFFE, TENSORFLOW
        .OriginOpType("Sin")      // name in tf module
        .ParseParamsByOperatorFn(AutoMappingByOpFn);
    }  // namespace domi
7)UT测试(作业可选)
参考:https://www.hiascend.com/document/detail/zh/mindstudio/50RC2/msug/msug_000125.html
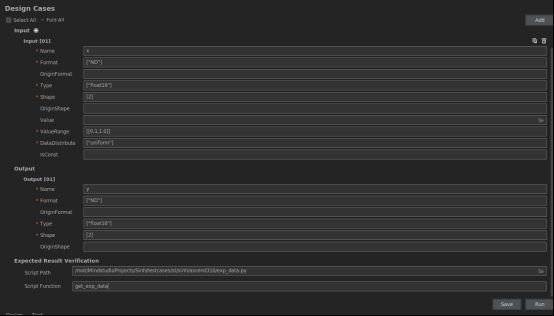
8)ST测试
ST测试是实际在硬件上运行编译的算子的测试方法。当算子调试、UT测试、ST测试三种结果精度不同时,以ST测试为准。
参考:
https://www.hiascend.com/document/detail/zh/mindstudio/50RC2/msug/msug_000130.html
参数配置

ST测试正确运行结果:

9)碰到问题:
1.ST测试运行时,因为我的驱动版本为服务器自带的旧版驱动,导致报错[ERROR] Failed to set device.,
卸载旧的驱动,并安装自己服务器匹配的驱动版本即可。
a) 查看硬件驱动没装好,npu-smi

b) 在原安装文件下卸载原驱动
<install-path>/driver/script/uninstall.sh
./A300-3010-npu-driver_5.1.rc2_linux-x86_64.run --check
./A300-3010-npu-driver_5.1.rc2_linux-x86_64.run --full
e) 查看新驱动是否装好,npu-smi

2. import pandas 失败报错
/usr/local/python3.7.5/lib/python3.7/site-packages/pandas/compat/__init__.py:124: UserWarning: Could not import the lzma module. Your installed Python is incomplete. Attempting to use lzma compression will result in a RuntimeError.
sudo apt install -y liblzma-dev
sudo pip3 install backports.lzma
sudo find / -name lzma.py
vim <lzma.py-path>  (我的路径是/usr/local/python3.7.5/lib/python3.7/lzma.py)
将:
    from _lzma import *
    from _lzma import _encode_filter_properties, _decode_filter_properties
更改为:
  try:
    from _lzma import *
    from _lzma import _encode_filter_properties, _decode_filter_properties
except ImportError:
    from backports.lzma import *


