huggingface.transformers速成笔记:Pipeline推理和AutoClass
诸神缄默不语-个人CSDN博文目录
本文属于huggingface.transformers全部文档学习笔记博文的一部分。
全文链接:huggingface transformers包 文档学习笔记(持续更新ing…)
本部分是transformers文档中以下三部分内容的集合:
- get started - quicktour部分:https://huggingface.co/docs/transformers/master/en/quicktour
- tutorial - Pipelines for inference部分:https://huggingface.co/docs/transformers/master/en/pipeline_tutorial
(其中Audio pipeline和Vision pipeline没写,因为我是做NLP的) - tutorial - Load pretrained instances with an AutoClass部分:https://huggingface.co/docs/transformers/master/en/autoclass_tutorial
本部分首先介绍如何使用pipeline()进行快速推理,然后介绍AutoClass:用AutoModel加载预训练模型、用tokenizer将文本转化为模型的数字输入、用AutoConfig来改变模型超参、用AutoFeatureExtractor加载预训练的feature extractor、用AutoProcessor加载预训练的processor。
本文将仅关注PyTorch语言,但对TensorFlow语言的适配在本部分文档也有描述。
文章目录
- 1. Pipeline
- 2. AutoClass
-
- 2.1 AutoTokenizer
- 2.2 AutoModel
- 2.3 AutoConfig
- 2.4 AutoFeatureExtractor
- 2.5 AutoProcessor
- 2.6 保存模型
1. Pipeline
以下代码输出内容都是jupyter notebook的输出效果。
每个任务都有其关联的pipeline(),也可以用通用的pipeline()(包含了所有任务的pipelines)。pipeline()会自动加载用于指定任务的默认模型和tokenizer。
本文用以作为示例的任务是文本摘要(文档:transformers.SummarizationPipeline)。
① import pipeline():
from transformers import pipeline
② 指定pipeline的任务,得到Pipeline对象:
summarizer = pipeline("summarization")
输出:
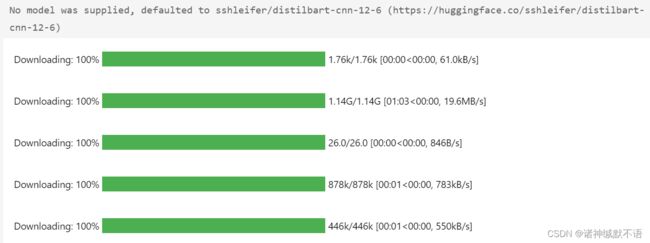
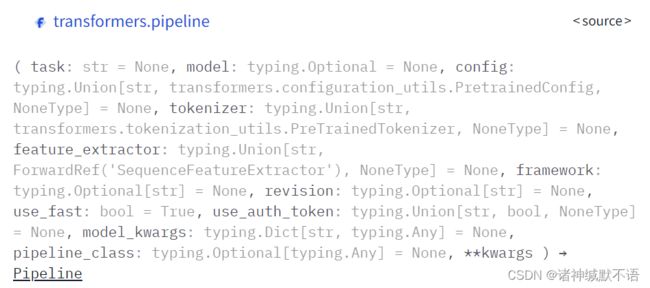
对各入参的详细介绍将在后文撰写到对应类/函数时进行详细介绍,在简单介绍部分将仅介绍重要入参。以后各函数情况类似,不再赘述。
这里的第一个入参task文本与任务相对应的选择可参照这一部分文档:https://huggingface.co/docs/transformers/master/en/main_classes/pipelines#transformers.pipeline.task
如指定task="summarization",就会返回SummarizationPipeline。
注意这里没有指定model,所以使用了默认的sshleifer/distilbart-cnn-12-6模型。tokenizer也默认用了一样的,以下没专门加tokenizer入参的情况都默认如此。
第二个入参model可用于指定模型。本句代码等价于下列代码:
summarizer=pipeline('summarization','sshleifer/distilbart-cnn-12-6')
此外SummarizationPipeline的模型名还可以更换成任何在这一网页:https://huggingface.co/models?filter=summarization 中的模型。
也可以将模型对应文件下载到本地(从sshleifer/distilbart-cnn-12-6 at main下载)。PyTorch代码至少需要下载如下文件:
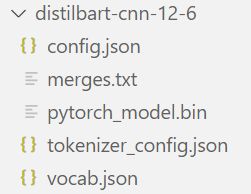
然后调用如下代码,将该文件夹作为model入参传入pipleline()函数,从本地调用模型,实现相同功能:
summarizer=pipeline('summarization','mypath/distilbart-cnn-12-6')
此外这个model入参也可以直接以PreTrainedModel对象的形式传入,tokenizer也可以直接以PreTrainedTokenizer对象的形式传入。这种传入形式的写法示例:
from transformers import AutoTokenizer, AutoModelForSeq2SeqLM

tokenizer = AutoTokenizer.from_pretrained("mypath/distilbart-cnn-12-6")
model = AutoModelForSeq2SeqLM.from_pretrained("mypath/distilbart-cnn-12-6")

summarizer=pipeline('summarization',model=model,tokenizer=tokenizer)
所使用对应的AutoClass类的选择是直接从sshleifer/distilbart-cnn-12-6首页 Use in Transformers 按钮弹窗复制过来的。
同样,这个路径名称可以替换成模型名称,以下这种情况如再次出现将不再赘述。
(本文第二节就是对AutoClass的详细介绍)
③ 单文本输出示例:
以str形式传入Pipeline
example1='The tower is 324 metres (1,063 ft) tall, about the same height as an 81-storey building, and the tallest structure in Paris. Its base is square, measuring 125 metres (410 ft) on each side. During its construction, the Eiffel Tower surpassed the Washington Monument to become the tallest man-made structure in the world, a title it held for 41 years until the Chrysler Building in New York City was finished in 1930. It was the first structure to reach a height of 300 metres. Due to the addition of a broadcasting aerial at the top of the tower in 1957, it is now taller than the Chrysler Building by 5.2 metres (17 ft). Excluding transmitters, the Eiffel Tower is the second tallest free-standing structure in France after the Millau Viaduct.'
summarizer(example1, min_length=5, max_length=20)
输出:
[{'summary_text': ' The tower is 324 metres (1,063 ft) tall, about the same'}]
这个模型基于英文数据集进行的预训练,所以我用了sshleifer/distilbart-cnn-12-6首页直接提供的英文文本作为摘要样例。
结果……?有点人工智障反正。
参考summary of the tasks中文本摘要部分的介绍,文本摘要的pipeline是基于PreTrainedModel.generate()方法的。(SummarizationPipeline继承自Text2TextGenerationPipeline类,见https://github.com/huggingface/transformers/blob/master/src/transformers/pipelines/text2text_generation.py#L186,后面的源代码逻辑我就没咋看懂了)
这个方法的输入参数可以在pipeline中override,具体可选的输入参数见:https://huggingface.co/docs/transformers/master/en/main_classes/text_generation#transformers.generation_utils.GenerationMixin.generate:
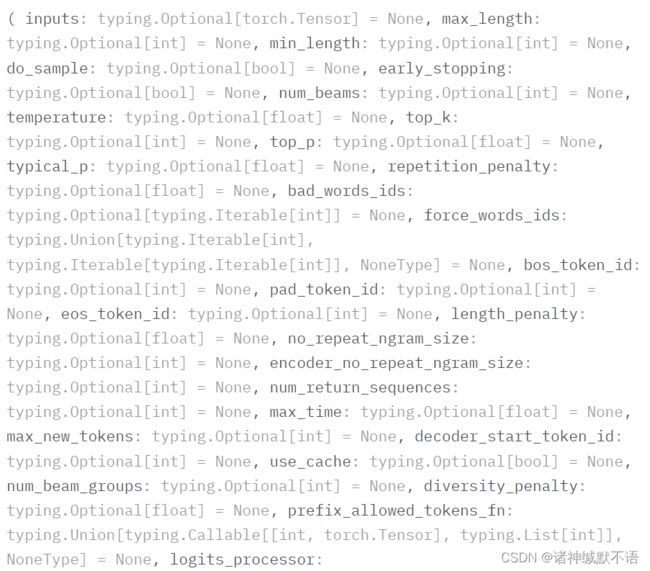
(截图不完全)
④ 多文本输出示例:
以str的list形式传入Pipeline
example1='The tower is 324 metres (1,063 ft) tall, about the same height as an 81-storey building, and the tallest structure in Paris. Its base is square, measuring 125 metres (410 ft) on each side. During its construction, the Eiffel Tower surpassed the Washington Monument to become the tallest man-made structure in the world, a title it held for 41 years until the Chrysler Building in New York City was finished in 1930. It was the first structure to reach a height of 300 metres. Due to the addition of a broadcasting aerial at the top of the tower in 1957, it is now taller than the Chrysler Building by 5.2 metres (17 ft). Excluding transmitters, the Eiffel Tower is the second tallest free-standing structure in France after the Millau Viaduct.'
example2="(CNN) -- An American woman died aboard a cruise ship that docked at Rio de Janeiro on Tuesday, the same ship on which 86 passengers previously fell ill, according to the state-run Brazilian news agency, Agencia Brasil. The American tourist died aboard the MS Veendam, owned by cruise operator Holland America. Federal Police told Agencia Brasil that forensic doctors were investigating her death. The ship's doctors told police that the woman was elderly and suffered from diabetes and hypertension, according the agency. The other passengers came down with diarrhea prior to her death during an earlier part of the trip, the ship's doctors said. The Veendam left New York 36 days ago for a South America tour."
summarizer([example1,example2], min_length=5, max_length=20)
输出:
[{'summary_text': ' The tower is 324 metres (1,063 ft) tall, about the same'},
 {'summary_text': ' The MS Veendam left New York 36 days ago for a South America tour .'}]
⑤遍历整个datasets的dataset
由于datasets包我没用到过,所以此处略,以后用到了再回来详细介绍。简单来说就是在循环里面遍历每一个样本。
⑥其他
文本摘要pipeline提供的模型里面没有专门适配于中文的,我唯一看到的多语言模型是csebuetnlp/mT5_multilingual_XLSum · Hugging Face。
这个的效果,我直接在这个网站上面跑它提供的推理模型。原数据来自LCSTS数据集1,真实值摘要是“雅虎宣布剥离阿里巴巴股份。”
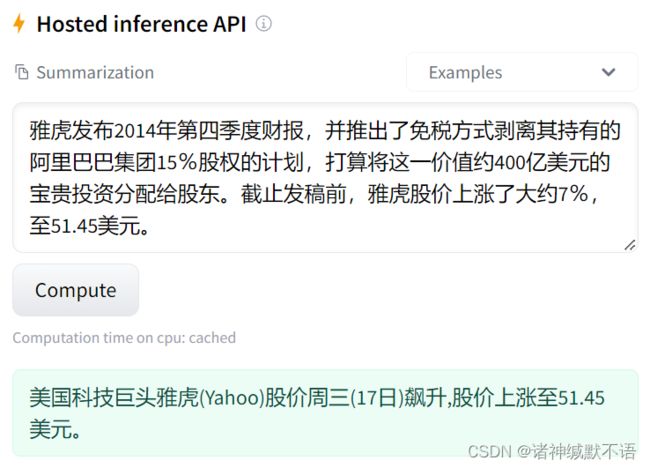
倒也不是太离谱,这个雅虎的补充信息居然还是正确的。预训练模型恐怖如斯。
但是这个周三(17日)是哪来的啊??
2. AutoClass
Pipeline实际上就是用AutoClass实现的。
本部分将主要介绍AutoClass中的AutoConfig、AutoModel、AutoTokenizer、AutoFeatureExtractor和AutoProcessor。
对其他类的介绍将在文档其他部分的笔记中进行。
文档:Auto Classes
以下的architecture指模型架构,checkpoint指特定architecture的模型权重。举例来说,BERT是architecture,bert-base-uncased是checkpoint。model则是泛指architecture或checkpoint。
前面Pipeline部分已经介绍过了一点AutoClass(使用的是AutoTokenizer和AutoModelForSeq2SeqLM)。
AutoClass的from_pretrained()方法自动根据预训练模型的名称或路径提取其architecture,使用户可以迅速加载任何architecture的预训练模型,只需要根据任务选择特定的AutoClass即可直接调用模型。
以下以文本摘要任务为例:
(由于文本摘要的全pipeline比较麻烦,不像原文档中的sequence classification任务只要得到输出结果就能得到概率、标签,而需要经过beam search、decode等一系列复杂操作……所以没有完全复现上一小节中的pipeline,就只到AutoModel得到输出结果这一环节)
2.1 AutoTokenizer
tokenizer用于对文本数据进行预处理,将文本处理为模型可识别的数值形式。
注意tokenizer需要和预训练模型匹配,以保证tokenize结果和模型预训练时的输入场景相符。
第一步:tokenizer会把文本分割为tokens,并添加所需的special tokens。(tokenize()函数)
注意传统的NLP说tokenize一般都是指分词,将文本以词(word)为单位分割,英文等自带空格等一般可以自然分割(但也不一定,比如词组),中文就需要专门的分词工具(如著名的jieba包等)来实现分词功能。
但是在这里不一定,有一些复杂的规定,包括如何分割、分割到什么级别(word-level, character-level, subword level等)。此处不细讲。在后文2.9部分会对tokenizer进行更多的简单介绍。
使用AutoTokenizer加载tokenizer:
from transformers import AutoTokenizer

tokenizer = AutoTokenizer.from_pretrained("mypath/distilbart-cnn-12-6")
第二步:tokenizer将tokens依序转化为数字(ID)(将tokens转换为IDs使用convert_tokens_to_ids()函数(不会自动加special tokens),将原始文本直接转化为IDs使用encode()函数(会自动加special tokens),将IDs转换为文本则使用decode()函数(注意不是转换为原始文本,而是带空格、special tokens的文本)),构建为一个可以传入模型的tensor
这个tokens-to-index的映射关系就是模型的vocabulary。
(tokenizer的vocab属性是一个dict,key为token原文,value为对应的数字)
仅以文本作为tokenizer入参:
encoding = tokenizer("We are very happy to show you the  Transformers library.")
print(encoding)
输出:
{'input_ids': [0, 170, 32, 182, 1372, 7, 311, 47, 5, 8103, 10470, 6800, 34379, 5560, 4, 2],
 'attention_mask': [1, 1, 1, 1, 1, 1, 1, 1, 1, 1, 1, 1, 1, 1, 1, 1]}
直接传入单个文本,tokenizer的返回值是一个字典,value都是list。inputs_id键的值是token的数值表示(每个值对应一个token),attention_mask表示哪些token是需要进入模型(每个值对应一个token,数值为1表示对应的token需要进入模型)。
在后文glossary部分(我撰写的笔记博文:huggingface.transformers术语表)对这些键的意义有更详细的介绍。
(注意:这里由于是摘要模型,所以在tokenize时在文本最前面加了个(1),别的token才是输入文本对应的token。有些tokenizer不加这个,或者加别的,看各个tokenizer的具体情况来分辨)
其他可传入tokenizer的参数(PretrainedTokenizer的__call__()函数的入参):
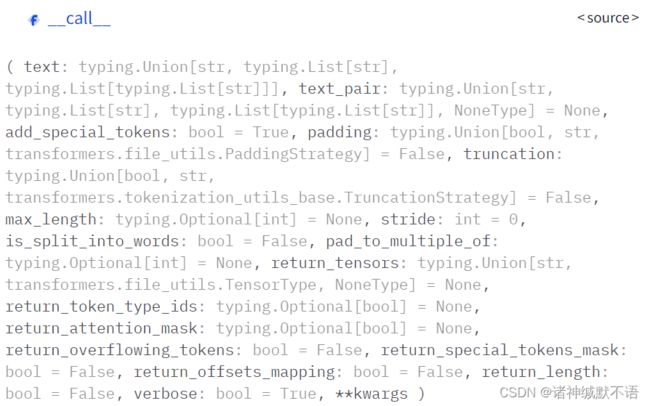
使用其他入参,如padding、truncate等,限制每句话的token长度,将最后返回字典中的value转换为torch.Tensor格式的对象(return_tensors="pt"):
pt_batch = tokenizer(
    ["We are very happy to show you the  Transformers library.", "We hope you don't hate it."],
    padding=True,
    truncation=True,
    max_length=512,
    return_tensors="pt",
)
2.2 AutoModel
AutoModel用于加载预训练模型实例,返回一个标准的torch.nn.Module对象。
需要根据任务选择对应的AutoModel,如属于Seq2seq任务的文本摘要任务,需要使用AutoModelForSeq2SeqLM:
from transformers import AutoModelForSeq2SeqLM

pt_model = AutoModelForSeq2SeqLM.from_pretrained("mypath/distilbart-cnn-12-6")
选择任务对应的AutoModel可以参考Summary of the tasks,后文我也会详细对这一部分进行撰写。
将根据AutoTokenizer得到的pt_batch字典直接以键值对的形式传入pt_model:
pt_outputs = pt_model(**pt_batch)
pt_outputs包含3个键:logits, past_key_values, encoder_last_hidden_state
对应的值可以通过类似dict的取值方式(pt_outputs['logits']),也可以作为属性(pt_outputs.logits)来获取。
这个logits应该就是模型最后一层的输出值(激活函数之前的)。在原文档所提供的sequence classification任务(对应的AutoModel是AutoModelForSequenceClassification)中,这个值经softmax后就得到了概率。在本示例中的输出是一个尺寸为[2, 16, 50264]的向量,分别是样本数-单个样本的token数-词表长度。这一部分我还没搞懂。在后文5.1.9部分介绍模型输出的时候我会再详细学习各值的意义,回来再补充这一部分。
之所以输出的是激活函数之前的输出,是因为激活函数往往和loss相关。这里意思应该就是说,直接输出激活函数之前的输出,就最后loss可以根据用户需要随便改了,不至于需要限定于特定的loss和激活函数。
2.3 AutoConfig
AutoTokenizer用于加载预训练模型的超参,from_pretrained()函数中可以传入修改特定超参的入参。
依然以sshleifer/distilbart-cnn-12-6的config文件举例,在AutoConfig的from_pretrained()函数中修改其num_hidden_layers超参,然后传入BartForConditionalGeneration模型(可以通过config.architectures查看到返回值是['BartForConditionalGeneration']):
from transformers import AutoConfig,BartForConditionalGeneration

config=AutoConfig.from_pretrained("mypath/distilbart-cnn-12-6",num_hidden_layers=10)
model=BartForConditionalGeneration(config)
model.from_pretrained("mypath/distilbart-cnn-12-6")
如果对config做了核心改变(如改变了隐藏层维度),就不能再加载原来的预训练模型了,只能从0开始训练模型(也就是上代码最后一行将无法使用)。
但是如果仅改变模型头部(如标签数等),你仍然可以对整体模型加载预训练模型的参数。这种情况下,除了先加载config、再建立模型、再加载预训练模型的参数外(例子如上代码所示),还可以直接用from_pretrained()入参中更新默认config:
from transformers import BartForConditionalGeneration
model=BartForConditionalGeneration.from_pretrained("mypath/distilbart-cnn-12-6",num_hidden_layers=10)
2.4 AutoFeatureExtractor
对于audio和vision任务,feature extractor将audio signal或图像转换为正确的输入格式。
由于我专注于NLP任务,因此在此仅展示文档中的代码,不做实际实验示例的介绍:
from transformers import AutoFeatureExtractor

feature_extractor = AutoFeatureExtractor.from_pretrained(
    "ehcalabres/wav2vec2-lg-xlsr-en-speech-emotion-recognition"
)
2.5 AutoProcessor
多模态任务需要用processor结合2种预处理工具。举例来说,LayoutLMV2模型需要一个feature extractor来处理图像,一个tokenizer来处理文本,processor就将这二者结合。
和上一节的情况一样,由于我专注于NLP任务,因此在此仅展示文档中的代码,不做实际实验示例的介绍:
from transformers import AutoProcessor

processor = AutoProcessor.from_pretrained("microsoft/layoutlmv2-base-uncased")
2.6 保存模型
模型可以直接使用PreTrainedModel.save_pretrained()进行保存:
pt_save_directory = "./pt_save_pretrained"
tokenizer.save_pretrained(pt_save_directory)
pt_model.save_pretrained(pt_save_directory)
使用PreTrainedModel.from_pretrained()重新加载预训练模型:
pt_model = AutoModelForSequenceClassification.from_pretrained("./pt_save_pretrained")
PyTorch也可以直接加载TensorFlow的模型,只要在from_pretrained()中将入参from_tf置为True。
可参考我之前撰写的博文文本摘要数据集的整理、总结及介绍(持续更新ing…)_诸神缄默不语的博客-CSDN博客 1.1.1 LCSTS数据集 部分。 ↩︎