Python OpenCV识别行人入口进出人数统计
程序示例精选
Python OpenCV识别行人入口进出人数统计
如需安装运行环境或远程调试,见文章底部微信名片,由专业技术人员远程协助!
前言
这篇博客针对《Python OpenCV识别行人入口进出人数统计》编写代码,功能包括了入口行人识别,人数统计。代码整洁,规则,易读。应用推荐首选。
文章目录
一、所需工具软件
二、使用步骤
1. 引入库
2. 识别特征图像
3. 运行结果
三、在线协助
一、所需工具软件
1. Python3.6以上
2. Pycharm代码编辑器
3. OpenCV, Numpy库
二、使用步骤
1.引入库
代码如下(示例):
#导入需要的包
import numpy as np
import cv2
import Person
import time
2.识别特征图像
代码如下(示例):
video=cv2.VideoCapture("counting_test.avi")
#输出视频
fourcc = cv2.VideoWriter_fourcc(*'XVID')#输出视频制编码
out = cv2.VideoWriter('output.avi',fourcc, 20.0, (640,480))

w = video.get(3)
h = video.get(4)
print("视频的原宽度为:")
print(int(w))
print("视频的原高度为:")
area = h*w
print(int(h))
areaTHreshold = area/500
print('Area Threshold', areaTHreshold)

#计算画线的位置
line_up = int(1*(h/4))
line_down = int(2.7*(h/4))
up_limit = int(.5*(h/4))
down_limit = int(3.2*(h/4))
print ("Red line y:",str(line_down))
print ("Green line y:", str(line_up))

pt5 = [0, up_limit]
pt6 = [w, up_limit]
pts_L3 = np.array([pt5,pt6], np.int32)
pts_L3 = pts_L3.reshape((-1,1,2))
pt7 =  [0, down_limit]
pt8 =  [w, down_limit]
pts_L4 = np.array([pt7,pt8], np.int32)
pts_L4 = pts_L4.reshape((-1,1,2))
#背景剔除
# fgbg = cv2.createBackgroundSubtractorMOG2(detectShadows = True)
fgbg = cv2.createBackgroundSubtractorKNN()
#用于后面形态学处理的核
kernel = np.ones((3,3),np.uint8)
kerne2 = np.ones((5,5),np.uint8)
kerne3 = np.ones((11,11),np.uint8)

while(video.isOpened()):
    ret,frame=video.read()
    if frame is None:
        break
    #应用背景剔除
    gray = cv2.GaussianBlur(frame, (31, 31), 0)
    #cv2.imshow('GaussianBlur', frame)
    #cv2.imshow('GaussianBlur', gray)
    fgmask = fgbg.apply(gray)
    fgmask2 = fgbg.apply(gray)

    try:
        #***************************************************************
        #二值化
        ret,imBin= cv2.threshold(fgmask,200,255,cv2.THRESH_BINARY)
        ret,imBin2 = cv2.threshold(fgmask2,200,255,cv2.THRESH_BINARY)
        #cv2.imshow('imBin', imBin2)
        #开操作(腐蚀->膨胀)消除噪声
        mask = cv2.morphologyEx(imBin, cv2.MORPH_OPEN, kerne3)
        mask2 = cv2.morphologyEx(imBin2, cv2.MORPH_OPEN, kerne3)
        #闭操作(膨胀->腐蚀)将区域连接起来
        mask =  cv2.morphologyEx(mask , cv2.MORPH_CLOSE, kerne3)
        mask2 = cv2.morphologyEx(mask2, cv2.MORPH_CLOSE, kerne3)
        #cv2.imshow('closing_mask', mask2)
        #*************************************************************
    except:
        print('EOF')
        print ('IN:',cnt_in+count_in)
        print ('OUT:',cnt_in+count_in)
        break

    #找到边界
    _mask2,contours0, hierarchy = cv2.findContours(mask2, cv2.RETR_EXTERNAL, cv2.CHAIN_APPROX_SIMPLE)
    for cnt in contours0:
        rect = cv2.boundingRect(cnt)#矩形边框
        area=cv2.contourArea(cnt)#每个矩形框的面积
        if area>areaTHreshold:
            #************************************************
            #moments里包含了许多有用的信息
            M=cv2.moments(cnt)
            cx=int(M['m10']/M['m00'])#计算重心
            cy=int(M['m01']/M['m00'])
            x, y, w, h = cv2.boundingRect(cnt)#x,y为矩形框左上方点的坐标,w为宽,h为高
            new=True
            if cy in range(up_limit,down_limit):
                for i in persons:
                    if abs(cx-i.getX())<=w and abs(cy-i.getY())<=h:
                        new=False
                        i.updateCoords(cx,cy)
                        if i.going_UP(line_down,line_up)==True:
                            # cv2.circle(frame, (cx, cy), 5, line_up_color, -1)
                            # img = cv2.rectangle(frame, (x, y), (x + w, y + h), line_up_color, 2)
                            if w>80:
                                count_in=w/40
                                print("In:执行了/60")
               time.strftime("%c"))
                        elif i.going_DOWN(line_down,line_up)==True:
                            # cv2.circle(frame, (cx, cy), 5, (0, 0, 255), -1)
                            # img = cv2.rectangle(frame, (x, y), (x + w, y + h), line_down_color, 2)
time.strftime("%c"))
                        break
                        #状态为1表明
                    if i.getState() == '1':
                        if i.getDir() == 'down' and i.getY() > down_limit:
                            i.setDone()
                        elif i.getDir() == 'up' and i.getY() < up_limit:
                            i.setDone()
                    if i.timedOut():
                        # 已经记过数且超出边界将其移出persons队列
                        index = persons.index(i)
                        persons.pop(index)
                        del i  # 清楚内存中的第i个人
                if new == True:
                    p = Person.MyPerson(pid, cx, cy, max_p_age)
                    persons.append(p)
                    pid += 1

print("进入的总人数为:")
print(cnt_in)
print("出去的总人数为:")
print(cnt_out)
video.release();
cv2.destroyAllWindows()
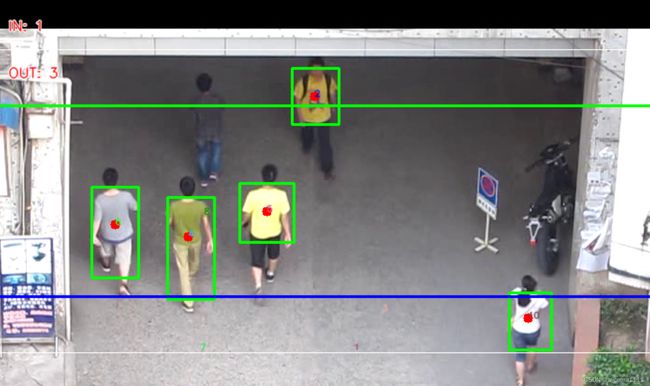
3.运行结果如下:
三、在线协助:
如需安装运行环境或远程调试,见文章底部微信名片,由专业技术人员远程协助!
