CoreNLP-4.2.0 使用以及踩坑
CoreNLP是什么就不多解释了。本文记录入门使用CoreNLP-4.2.0中遇到的坑(因为官网文档落后,且默认针对ubuntu中分析英文,加上网上中文教程多针对3.9.0。而4.2.0有部分改动)
参考:
- CoreNLP官网
- CoreNLP中文使用(3.9.0)
1.环境
- Jdk8:版本低没法用。版本高(9/10/11)的话,由于java本身抛弃了一些东西,因此运行时候需要添加其他参数。根据官方文档,需要添加
--add-modules java.se.ee来避免错误。综上,直接用Jdk8来弄。 - windows10:官网是默认你用linux,因此有些设置,对于win有点坑。下面也会记录。
- IDEA:不多说,用来创建Maven项目,这个是使用方式1
- Shell:可以在win下实现类似linux命令的工具,这个是使用方式2
2.运行方式1——CMD命令行
这里记录在win下如何运行,如果你是linux,直接跟着官网走即可。当然也能参考
- 下载并解压CoreNLP4.2.0,解压后得到文档"stanford-corenlp-4.2.0"
- 下载中文模型包和英语模型包,获取两个jar包后,放入"stanford-corenlp-4.2.0"。(若你想要其他语言模型包,请在此翻到最后,找到对应的语言包)
- 打开shell(我用的cmder,下载可能要科学上网下载安装)。依次运行以下命令
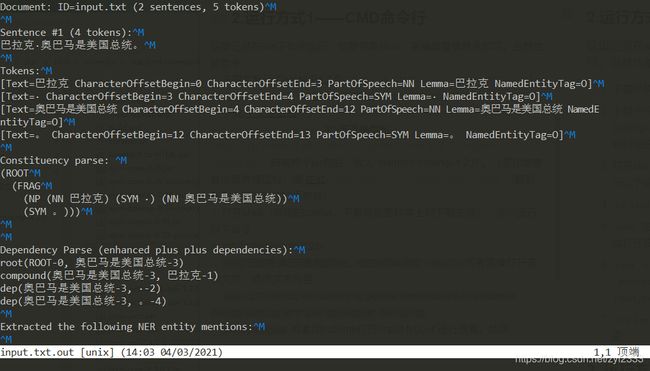
cd stanford-corenlp-4.2.0echo "巴拉克·奥巴马是美国总统。他在2008年当选" > input.txt或者直接打开txt文件,修改文本内容java -cp "*" -Xmx2g edu.stanford.nlp.pipeline.StanfordCoreNLP -annotators tokenize,ssplit,pos,lemma,ner,parse,dcoref -file input.txtvim input.txt.out或者用sublime打开"input.txt.out"进行查看。结束

遇到的坑&命令解释:
- 运行第6步之前,官方文档会要求我们添加类路径。由于我们是win,因此直接忽略这一步是ok的,之前试过其他人添加path,没用。
- 第6步中的
-cp "*":用来识别当前目录下所有的jar包。若是不添加,那么就会出现错误: 找不到或无法加载主类 edu.stanford.nlp.pipeline.StanfordCoreNLP。这也是官网中,要我们添加类路径的原因。- 第6步中的
-Xmx2g:分配Jdk能使用的内存大小,普通的64位电脑,起码分配1g起步。- 第6步中的
-annotators tokenize...,dcoref:官方名称是“注释器”。但是个人理解成功能选择即可。比如,我如果只写成-annotators ssplit那么就只会分割词语。因此可以根据自己需求进行参数加减。若是不带-annotators,那么就会使用默认参数。- 如何自定义?这个不太好弄,建议可以看下面的用Maven使用。
3. 运行方式2——IDEA创建maven项目运行Java
官网上介绍的方式,是通过git clone,然后自己进行打包成jar,最后和方式1一样用命令行。这里我介绍如何自建maven项目:
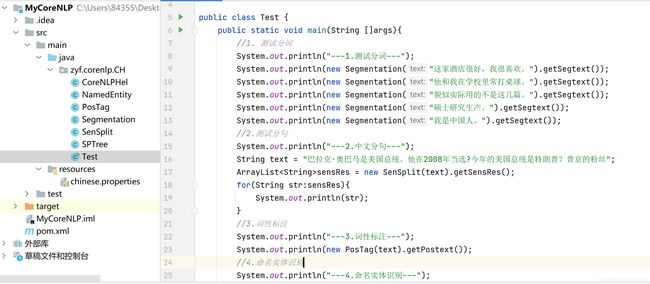
- 打开IDEA,新建maven项目(无需任何模板,就最原始的maven项目即可),建好后,有main和resources和pom.xml即可。这里放上我的目录图:

- 依次输入代码。注意!如果你跟着网上3.9.0版本,应该会遇到一些错误,下面跟着我一步步走。
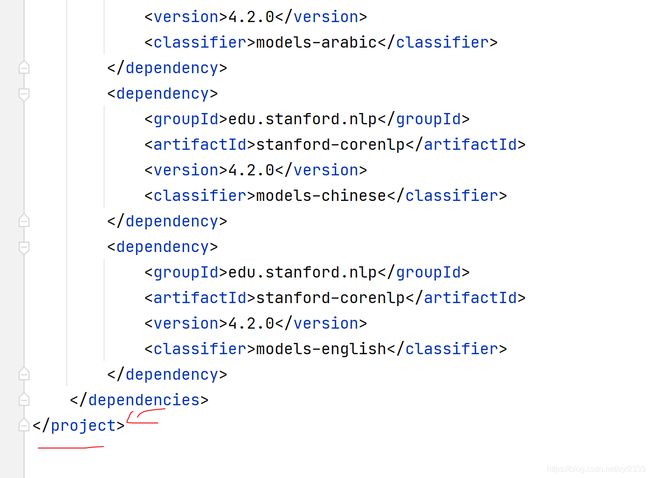
- 在
pom.xml中,标签内部,添加如下代码:如图,放在最后即可

            junit
            junit
            4.13.1
            test


            edu.stanford.nlp
            stanford-corenlp
            4.2.0
            compile


            edu.stanford.nlp
            stanford-corenlp
            4.2.0


            edu.stanford.nlp
            stanford-corenlp
            4.2.0
            javadoc


            edu.stanford.nlp
            stanford-corenlp
            4.2.0
            sources


            edu.stanford.nlp
            stanford-corenlp
            4.2.0
            models


            edu.stanford.nlp
            stanford-corenlp
            4.2.0
            models-arabic


            edu.stanford.nlp
            stanford-corenlp
            4.2.0
            models-chinese


            edu.stanford.nlp
            stanford-corenlp
            4.2.0
            models-english
resources/chinese.properties:这个是参数设置,有坑,因为4.2.0比起3.9.0有些包换位置了。
# Pipeline options - lemma is no-op for Chinese but currently needed because coref demands it (bad old requirements system)
annotators = tokenize, ssplit, pos, lemma, ner, parse, coref

# segment
tokenize.language = zh
segment.model = edu/stanford/nlp/models/segmenter/chinese/ctb.gz
segment.sighanCorporaDict = edu/stanford/nlp/models/segmenter/chinese
segment.serDictionary = edu/stanford/nlp/models/segmenter/chinese/dict-chris6.ser.gz
segment.sighanPostProcessing = true

# sentence split,效果貌似不太行
ssplit.boundaryTokenRegex = [.。]|[!?!?]+

# pos:报错提示我没这个包,然后使用词性标注功能时候会报错。原因在于,4.2.0之后,路径变了,修改成我这样即可
pos.model = edu/stanford/nlp/models/pos-tagger/chinese-distsim.tagger


# ner 此处设定了ner使用的语言、模型(crf),目前SUTime只支持英文,不支持中文,所以设置为false。
ner.language = chinese
ner.model = edu/stanford/nlp/models/ner/chinese.misc.distsim.crf.ser.gz
ner.applyNumericClassifiers = true
ner.useSUTime = false

# regexner,同上,4.2.0以后,这里的地址也改了
ner.fine.regexner.mapping = edu/stanford/nlp/models/kbp/chinese/gazetteers/cn_regexner_mapping.tab
ner.fine.regexner.noDefaultOverwriteLabels = CITY,COUNTRY,STATE_OR_PROVINCE

# parse
parse.model = edu/stanford/nlp/models/srparser/chineseSR.ser.gz

# depparse
depparse.model    = edu/stanford/nlp/models/parser/nndep/UD_Chinese.gz
depparse.language = chinese

# coref
coref.sieves = ChineseHeadMatch, ExactStringMatch, PreciseConstructs, StrictHeadMatch1, StrictHeadMatch2, StrictHeadMatch3, StrictHeadMatch4, PronounMatch
coref.input.type = raw
coref.postprocessing = true
coref.calculateFeatureImportance = false
coref.useConstituencyTree = true
coref.useSemantics = false
coref.algorithm = hybrid
coref.path.word2vec =
coref.language = zh
coref.defaultPronounAgreement = true
coref.zh.dict = edu/stanford/nlp/models/dcoref/zh-attributes.txt.gz
coref.print.md.log = false
coref.md.type = RULE
coref.md.liberalChineseMD = false

# kbp
kbp.semgrex = edu/stanford/nlp/models/kbp/chinese/semgrex
kbp.tokensregex = edu/stanford/nlp/models/kbp/chinese/tokensregex
kbp.language = zh
kbp.model = none

# entitylink
entitylink.wikidict = edu/stanford/nlp/models/kbp/chinese/wikidict_chinese.tsv.gz
src/xxx/CoreNLPHel.java:读取properties参数文件
package zyf.corenlp.CH;

import edu.stanford.nlp.pipeline.StanfordCoreNLP;

import java.util.Properties;

public class CoreNLPHel {
    private static CoreNLPHel instance = new CoreNLPHel();
    private StanfordCoreNLP pipeline;
    private CoreNLPHel(){
        String props="chinese.properties";  //第三步骤的配置文件,放在main/resources目录下
        pipeline = new StanfordCoreNLP(props);
    };
    public static CoreNLPHel getInstance(){
        return instance;
    }
    public StanfordCoreNLP getPipeline(){
        return pipeline;
    }
}
src/xxx/NamedEntity.java:命名实体识别
package zyf.corenlp.CH;

import edu.stanford.nlp.ling.CoreAnnotations;
import edu.stanford.nlp.ling.CoreLabel;
import edu.stanford.nlp.pipeline.Annotation;
import edu.stanford.nlp.pipeline.StanfordCoreNLP;
import edu.stanford.nlp.util.CoreMap;

import java.util.List;

public class NamedEntity {

    private String nertext = "";

    public String getNertext() {
        return nertext;
    }

    public NamedEntity(String text){
        CoreNLPHel coreNLPHel = CoreNLPHel.getInstance();
        StanfordCoreNLP pipeline = coreNLPHel.getPipeline();
        Annotation annotation = new Annotation(text);
        pipeline.annotate(annotation);
        List sentences = annotation.get(CoreAnnotations.SentencesAnnotation.class);
        StringBuffer sb = new StringBuffer();
        for (CoreMap sentence:sentences){
            // 获取句子的token(可以是作为分词后的词语)
            for (CoreLabel token : sentence.get(CoreAnnotations.TokensAnnotation.class)){
                String word = token.get(CoreAnnotations.TextAnnotation.class);
                //String pos = token.get(CoreAnnotations.PartOfSpeechAnnotation.class);
                //String ne = token.get(CoreAnnotations.NormalizedNamedEntityTagAnnotation.class);
                String ner = token.get(CoreAnnotations.NamedEntityTagAnnotation.class);
                //System.out.println(word + "\t" + pos + " | analysis : {  original : " + ner + "," + " normalized : " + ne + "}");
                sb.append(word);
                sb.append("/");
                sb.append(ner);
                sb.append(" ");
            }
        }
        nertext = sb.toString().trim();
    }
}
src/xxx/PosTag.java:词性标注
package zyf.corenlp.CH;

import edu.stanford.nlp.ling.CoreAnnotations;
import edu.stanford.nlp.ling.CoreLabel;
import edu.stanford.nlp.pipeline.Annotation;
import edu.stanford.nlp.pipeline.StanfordCoreNLP;
import edu.stanford.nlp.util.CoreMap;

import java.util.List;

public class PosTag {

    private String postext = "";

    public String getPostext() {
        return postext;
    }
    public PosTag(String text){

        CoreNLPHel coreNLPHel = CoreNLPHel.getInstance();
        StanfordCoreNLP pipeline = coreNLPHel.getPipeline();
        Annotation annotation = new Annotation(text);
        pipeline.annotate(annotation);
        List sentences = annotation.get(CoreAnnotations.SentencesAnnotation.class);
        StringBuffer sb = new StringBuffer();
        for (CoreMap sentence:sentences){
            for (CoreLabel token : sentence.get(CoreAnnotations.TokensAnnotation.class)){
                String word = token.get(CoreAnnotations.TextAnnotation.class);
                String pos = token.get(CoreAnnotations.PartOfSpeechAnnotation.class);
                sb.append(word);
                sb.append("/");
                sb.append(pos);
                sb.append(" ");
            }
        }
        postext = sb.toString().trim();
    }
}
src/xxx/Segmentation.java:中文分词
package zyf.corenlp.CH;

import edu.stanford.nlp.ling.CoreAnnotations;
import edu.stanford.nlp.ling.CoreLabel;
import edu.stanford.nlp.pipeline.Annotation;
import edu.stanford.nlp.pipeline.StanfordCoreNLP;
import edu.stanford.nlp.util.CoreMap;

import java.util.List;

//annotators=segment,ssplit
public class Segmentation {
    private String segtext="";

    public String getSegtext() {
        return segtext;
    }
    public Segmentation(String text){
        CoreNLPHel coreNLPHel = CoreNLPHel.getInstance();
        StanfordCoreNLP pipeline = coreNLPHel.getPipeline();
        Annotation annotation = new Annotation(text);
        pipeline.annotate(annotation);
        List sentences = annotation.get(CoreAnnotations.SentencesAnnotation.class);
        //ArrayList array = new ArrayList();
        StringBuffer sb = new StringBuffer();
        for (CoreMap sentence:sentences){
            for (CoreLabel token : sentence.get(CoreAnnotations.TokensAnnotation.class)){
                String word = token.get(CoreAnnotations.TextAnnotation.class);
                sb.append(word);
                sb.append(" ");
            }
        }
        segtext = sb.toString().trim();
        //segtext = array.toString();
    }

}
src/xxx/SenSplit.java:断句。不知道为啥,我这效果不太行,可能正则没写对
package zyf.corenlp.CH;
import edu.stanford.nlp.ling.CoreAnnotations;
import edu.stanford.nlp.pipeline.Annotation;
import edu.stanford.nlp.pipeline.StanfordCoreNLP;
import edu.stanford.nlp.util.CoreMap;

import java.util.ArrayList;
import java.util.List;

public class SenSplit {

    private ArrayListsensRes = new ArrayList();

    public ArrayList getSensRes() {
        return sensRes;   //返回存储句子的数组(ArrayList类型)
    }
    public SenSplit(String text){
        CoreNLPHel coreNLPHel = CoreNLPHel.getInstance();
        StanfordCoreNLP pipeline = coreNLPHel.getPipeline();
        Annotation annotation = new Annotation(text);
        pipeline.annotate(annotation);
        Listsentences = annotation.get(CoreAnnotations.SentencesAnnotation.class);
        for (CoreMap setence:sentences){
            sensRes.add(setence.get(CoreAnnotations.TextAnnotation.class));
        }
    }
}
src/xxx/SPTree.java:句子的解析树&句子依存分析。
package zyf.corenlp.CH;

import edu.stanford.nlp.ling.CoreAnnotations;
import edu.stanford.nlp.pipeline.Annotation;
import edu.stanford.nlp.pipeline.StanfordCoreNLP;
import edu.stanford.nlp.semgraph.SemanticGraph;
import edu.stanford.nlp.semgraph.SemanticGraphCoreAnnotations;
import edu.stanford.nlp.trees.Tree;
import edu.stanford.nlp.trees.TreeCoreAnnotations;
import edu.stanford.nlp.util.CoreMap;
import java.util.List;

public class SPTree {
    Listsentences;

    public SPTree(String text){
        CoreNLPHel coreNLPHel = CoreNLPHel.getInstance();
        StanfordCoreNLP pipeline = coreNLPHel.getPipeline();
        Annotation annotation = new Annotation(text);
        pipeline.annotate(annotation);
        sentences = annotation.get(CoreAnnotations.SentencesAnnotation.class);
    }

    //句子的依赖图(依存分析)
    public String getDepprasetext() {
        StringBuffer sb2 = new StringBuffer();
        for (CoreMap sentence:sentences){
            String sentext = sentence.get(CoreAnnotations.TextAnnotation.class);
            SemanticGraph graph = sentence.get(SemanticGraphCoreAnnotations.BasicDependenciesAnnotation.class);
            //System.out.println("句子的依赖图");
            sb2.append(sentext);
            sb2.append("\n");
            sb2.append(graph.toString(SemanticGraph.OutputFormat.LIST));
            sb2.append("\n");
        }
        return sb2.toString().trim();
    }
    // 句子的解析树
    public String getPrasetext() {
        StringBuffer sb1 = new StringBuffer();
        for (CoreMap sentence:sentences){
            Tree tree = sentence.get(TreeCoreAnnotations.TreeAnnotation.class);
            String sentext = sentence.get(CoreAnnotations.TextAnnotation.class);
            sb1.append(sentext);
            sb1.append("/");
            sb1.append(tree.toString());
            sb1.append("\n");
        }
        return sb1.toString().trim();
    }
}
src/xxx/Test.java:测试以上功能
package zyf.corenlp.CH;

import java.util.ArrayList;

public class Test {
    public static void main(String []args){
        //1. 测试分词
        System.out.println("---1.测试分词---");
        System.out.println(new Segmentation("这家酒店很好,我很喜欢。").getSegtext());
        System.out.println(new Segmentation("他和我在学校里常打桌球。").getSegtext());
        System.out.println(new Segmentation("貌似实际用的不是这几篇。").getSegtext());
        System.out.println(new Segmentation("硕士研究生产。").getSegtext());
        System.out.println(new Segmentation("我是中国人。").getSegtext());
        //2.测试分句
        System.out.println("---2.中文分句---");
        String text = "巴拉克·奥巴马是美国总统。他在2008年当选?今年的美国总统是特朗普?普京的粉丝";
        ArrayListsensRes = new SenSplit(text).getSensRes();
        for(String str:sensRes){
            System.out.println(str);
        }
        //3.词性标注
        System.out.println("---3.词性标注---");
        System.out.println(new PosTag(text).getPostext());
        //4.命名实体识别
        System.out.println("---4.命名实体识别---");
        System.out.println(new NamedEntity(text).getNertext());
        //5.句子的解析树&句子依存分析
        System.out.println("---5-1.句子解析树---");
        SPTree spTree = new SPTree(text);
        System.out.println(spTree.getPrasetext());
        System.out.println("---5-2.句子依存---");
        System.out.println(spTree.getDepprasetext());
    }
}
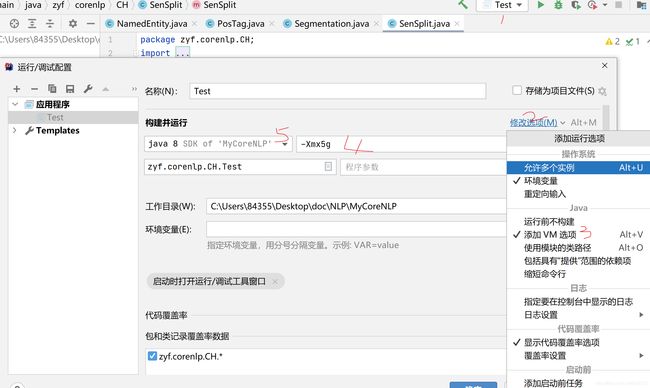
- 运行Test前的设置:若是无这一步,那么普通电脑很容易报错:内存溢出or堆栈出问题:如图顺序,要添加Jdk运行时候的参数,就像方式1中的
-Xmx2g一样,你这里自己设置确定,然后运行

最后排查完坑,运行成功:

1.
Unable to open "edu/stanford/nlp/models/pos-tagger/chinese-distsim/chinese-distsim.tagger" as class path, filename or URL:这个是因为版本问题,导致文件位置变化报的错。你可以解压方式1中下载过的"stanford-corenlp-4.2.0-models-chinese.jar",然后看看报错文件的位置。就能发现该问题。如果有其他的类似报错,就用这个方法。当然,你也可以直接用我上文中的resources/chinese.properties的配置,我已经在该配置文件中修改好了目录地址,并且写了注释。
2. 运行时候内存不够:缺少第12步的分配内存。
4. 运行方式3——使用python来运行
这个我没深入研究,但是遇到过问题。应该能解答:
现阶段,网上使用的还是CoreNLP3.9.0版本。其对应的py-CoreNLP也是3.9.0版本。但是官方已经更新到4.2.0,而python的包却还停留在3.9.0,因此如果直接下载最新的"stanford-corenlp-4.2.0"然后运行python,应该是会报错的。个人想法你应该去下载老的版本和老的语言包。
5. 其他一些问题
Stanford-CoreNLP还有一些其他问题,比如说一些功能(OpenIE:开放信息抽取)只能适用于英文。这也是比较遗憾的地方,毕竟我就是想找个能用的中文OpenIE。剩下的就自己看看官方文档,研究具体注释器使用好了。