数据增强实测之Random Erasing
Random Erasing是2017年与cutout同时期提出的另一种数据增强方法,两种方法的思想非常相似。Random Erasing的论文在网上可以找到两个版本:2017年arXiv的版本和2020年AAAI的版本。估计作者是经历了不少的质疑才发表出来的,不容易啊。
Random Erasing Data Augmentation
paper (arXiv): https://arxiv.org/pdf/1708.04896v2.pdf
paper (AAAI20): https://ojs.aaai.org/index.php/AAAI/article/view/7000/6854
code: GitHub - zhunzhong07/Random-Erasing: Random Erasing Data Augmentation. Experiments on CIFAR10, CIFAR100 and Fashion-MNIST
Random Erasing与cutout的不同之处,主要有三点:(1)随机擦除的不是正方形,而是具有随机比例和大小的矩形;(2)没有采用0填充的方式,而是采用了随机生成的数值或ImageNet上的像素均值;(3)除了图像分类,作者还在目标检测和行人重识别上做了实验验证。
实现代码比较简单,random_erasing.py,如下:
from __future__ import absolute_import

from torchvision.transforms import *

from PIL import Image
import random
import math
import numpy as np
import torch


class RandomErasing(object):
    '''
    Class that performs Random Erasing in Random Erasing Data Augmentation by Zhong et al.
    -------------------------------------------------------------------------------------
    probability: The probability that the operation will be performed.
    sl: min erasing area
    sh: max erasing area
    r1: min aspect ratio
    mean: erasing value
    -------------------------------------------------------------------------------------
    '''

    def __init__(self, probability=0.5, sl=0.02, sh=0.4, r1=0.3, mean=[0.4914, 0.4822, 0.4465]):
        self.probability = probability
        self.mean = mean
        self.sl = sl
        self.sh = sh
        self.r1 = r1

    def __call__(self, img):

        if random.uniform(0, 1) > self.probability:
            return img

        for attempt in range(100):
            area = img.size()[1] * img.size()[2]

            target_area = random.uniform(self.sl, self.sh) * area
            aspect_ratio = random.uniform(self.r1, 1 / self.r1)

            h = int(round(math.sqrt(target_area * aspect_ratio)))
            w = int(round(math.sqrt(target_area / aspect_ratio)))

            if w < img.size()[2] and h < img.size()[1]:
                x1 = random.randint(0, img.size()[1] - h)
                y1 = random.randint(0, img.size()[2] - w)
                if img.size()[0] == 3:
                    img[0, x1:x1 + h, y1:y1 + w] = self.mean[0]
                    img[1, x1:x1 + h, y1:y1 + w] = self.mean[1]
                    img[2, x1:x1 + h, y1:y1 + w] = self.mean[2]
                else:
                    img[0, x1:x1 + h, y1:y1 + w] = self.mean[0]
                return img

        return img
上面代码中有5个参数,具体如下:
probability:执行Random Erasing的概率,默认是0.5;
sl:最小的擦除面积,这里是相对原图的面积比例,默认是0.02;
sh:最大的擦除面积,默认是0.4;
r1:最小的长宽比,默认是0.3,实际长宽比是[0.3,1/0.3]之间的随机值;
mean:擦除的块中填充的数值,默认是ImageNet的像素归一化均值[0.4914, 0.4822, 0.4465]。
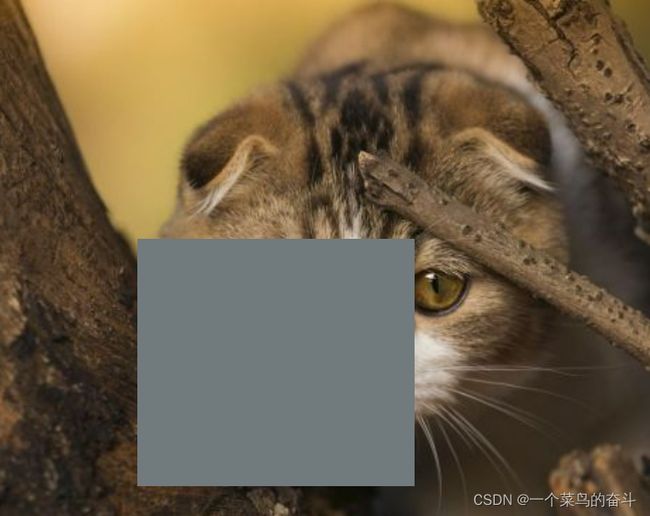
看看在图像上执行Random Erasing是什么效果,代码如下:
import cv2
from torchvision import transforms
from random_erasing import RandomErasing

# 执行Random Erasing
img = cv2.imread('cat.png')
img = transforms.ToTensor()(img)
re = RandomErasing()
img = re(img)

# Random Erasing图像写入本地
img = img.mul(255).byte()
img = img.numpy().transpose((1, 2, 0))
cv2.imwrite('re.png', img)
需要注意的是,由于代码中是以0.5的概率来执行擦除操作的,因此可能会返回原图。Random Erasing的效果如下:
训练的参数配置与cutout相同,结果见下表。
| Method | CIFAR-10 | CIFAR-100 |
| ResNet-50 | 96.76/96.82/96.81/96.79 96.72/96.69/96.60/96.82 (96.75) |
83.80/83.66/84.19/83.26 83.89/83.90/83.57/83.69 (83.74) |
| ResNet-50+Random Erasing | 97.13/96.52/96.74/96.71 96.57/96.79/96.82/96.82 (96.76) |
83.55/83.38/83.76/83.28 83.46/83.43/83.73/83.46 (83.51) |
从上表中的结果来看,在CIFAR10和CIFAR100两个数据集上使用Random Erasing都没能提高模型的性能。与cutout一样的尴尬,o(╯□╰)o。
数据增强实测之cutout_一个菜鸟的奋斗-CSDN博客
数据增强实测之mixup_一个菜鸟的奋斗-CSDN博客
数据增强实测之RICAP_一个菜鸟的奋斗-CSDN博客
数据增强实测之GridMask_一个菜鸟的奋斗-CSDN博客
数据增强实测之Hide-and-Seek_一个菜鸟的奋斗-CSDN博客
