Pytorch英文官方文档学习笔记(三、Torch.nn及torch.optim)
一、nn.Module的使用
Every module in PyTorch subclasses the nn.Module
自己定义的每个module都一定是nn.Module的子类
pytorch在nn.Module中,实现了__call__方法,而在__call__方法中调用了forward函数。
主要自带参数和方法:
model.state_dict()方法和model.parameters()方法
weight和bias两个参数
class Ethan(nn.Module):
    def __init__(self):
        super().__init__()

    def forward(self, input):
        out_put = input + 1
        return out_put

if __name__ == '__main__':
    ethan=Ethan()
    x=torch.tensor(1.0)
    output=ethan(x)
    #此步代码调用的是pytorch内置的__call__()函数,然后这个__call__函数会做很多事情,其中包括调用forward函数
    print(output)
torch.nn.Module.eval
Sets the module in evaluation mode.
This has any effect only on certain modules. See documentations of particular modules for details of their behaviors in training/evaluation mode, if they are affected, e.g. Dropout, BatchNorm, etc.
This is equivalent with self.train(False).
torch.nn.Module.train
Sets the module in training mode.
This has any effect only on certain modules. See documentations of particular modules for details of their behaviors in training/evaluation mode, if they are affected, e.g. Dropout, BatchNorm, etc.
二、nn.functional.conv2d() → Tensor
torch.nn.functional.conv2d(input, weight, bias=None, stride=1, padding=0, dilation=1, groups=1)
→ Tensor
Parameters
input – input tensor of shape ( m i n i b a t c h \text minibatch minibatch , i n _ c h a n n e l s \text in\_channels in_channels, i H \text iH iH , i W \text iW iW)
weight – filters of shape ( o u t _ c h a n n e l s \text out\_channels out_channels , in_channels groups \frac{\text{in\_channels}}{\text{groups}} groupsin_channels , k H \text kH kH , k W \text kW kW)
bias – optional bias tensor of shape ( out_channels \text{out\_channels} out_channels). Default: None
stride – the stride of the convolving kernel. Can be a single number or a tuple ( s H \text sH sH, s W \text sW sW). Default: 1
stride即可代表kernel核移动一步的距离
padding – implicit paddings on both sides of the input. Can be a string {‘valid’, ‘same’}, single number or a tuple ( p a d H \text padH padH, p a d W \text padW padW). Default: 0. padding=‘valid’ is the same as no padding. padding=‘same’ pads the input so the output has the same shape as the input. However, this mode doesn’t support any stride values other than 1.
padding指在tensor四周都填充一层,默认填充0
WARNING:For padding=‘same’, if the weight is even-length and dilation is odd in any dimension, a full pad() operation may be needed internally. Lowering performance.
dilation – the spacing between kernel elements. Can be a single number or a tuple ( d H \text dH dH, d W \text dW dW). Default: 1
groups – split input into groups, in_channels \text{in\_channels} in_channels should be divisible by the number of groups. Default: 1
	input=torch.tensor([[1,2,0,3,1],
                        [0,1,2,3,1],
                        [1,2,1,0,0],
                        [5,2,3,1,1],
                        [2,1,0,1,1]])
    kernel=torch.tensor([[1,2,1],
                         [0,1,0],
                         [2,1,0]])

    input=torch.reshape(input,(1,1,5,5))
    kernel=torch.reshape(kernel,(1,1,3,3))

    output1=nn.functional.conv2d(input,kernel,stride=1)
    print(output1)

    output2=nn.functional.conv2d(input,kernel,stride=2)
    print(output2)

    output3 = nn.functional.conv2d(input, kernel, stride=1,padding=1)
    print(output3)
	# tensor([[[[10, 12, 12],
    #           [18, 16, 16],
    #           [13, 9, 3]]]])
    # tensor([[[[10, 12],
    #           [13, 3]]]])
    # tensor([[[[1, 3, 4, 10, 8],
    #           [5, 10, 12, 12, 6],
    #           [7, 18, 16, 16, 8],
    #           [11, 13, 9, 3, 4],
    #           [14, 13, 9, 7, 4]]]])
三、torch.nn.Conv2d()、torch.nn.ConvTranspose2d()
1、torch.nn.Conv2d()
torch.nn.Conv2d(in_channels, out_channels, kernel_size, stride=1, padding=0,
				dilation=1, groups=1, bias=True, padding_mode='zeros',
				device=None, dtype=None)
Parameters:
in_channels (int) – Number of channels in the input image
out_channels (int) – Number of channels produced by the convolution
out_channel>1时,每次都会随机生成不同的卷积核进行训练。
kernel_size (int or tuple) – Size of the convolving kernel
stride (int or tuple, optional) – Stride of the convolution. Default: 1
padding (int, tuple or str, optional) – Padding added to all four sides of the input. Default: 0
padding_mode (string, optional) – ‘zeros’, ‘reflect’, ‘replicate’ or ‘circular’. Default: ‘zeros’
dilation (int or tuple, optional) – Spacing between kernel elements. Default: 1
d i l a t i o n 默 认 是 1 \color{red}dilation默认是1 dilation默认是1
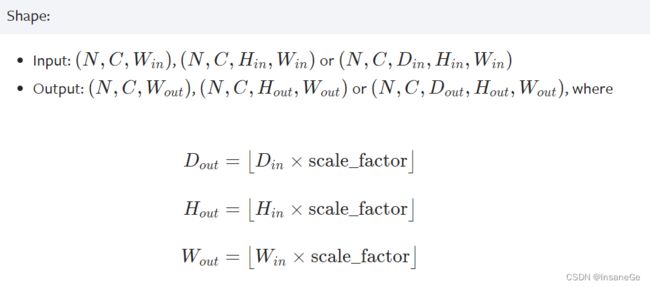
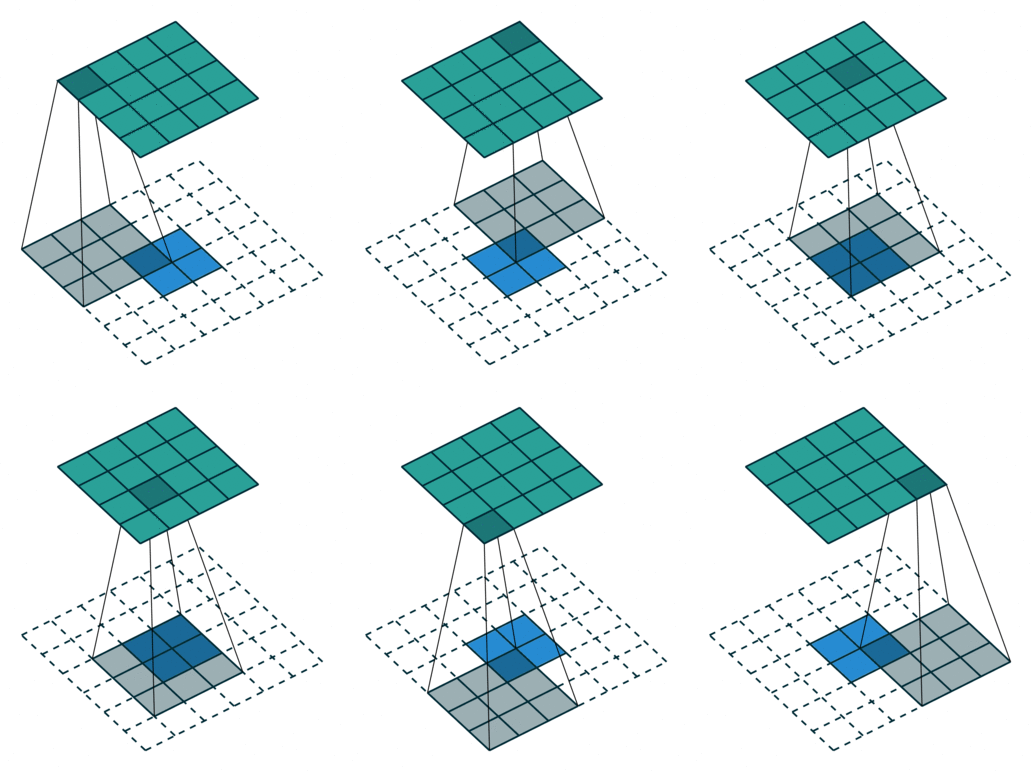
dilation演示效果图如下,kernel_size为3的卷积核在dilation为1时的shape是5×5,从而dilation的值会影响Hout和Wout

groups (int, optional) – Number of blocked connections from input channels to output channels. Default: 1
bias (bool, optional) – If True, adds a learnable bias to the output. Default: True
Hout和Wout的计算公式如下图
参数padding和dilation和kernel_size为int时,padding[0]=padding[1]、dilation[0]=dilation[1]、kernel_size[0]=kernel_size[1]都为参数中的int值
此链接非常直观形象的展示出了stride、padding、dilation三个参数的作用

dataset=datasets.CIFAR10("./数据集",train=False,download=True,
						transform=transforms.ToTensor())
dataLoader=DataLoader(dataset,batch_size=64,drop_last=True)
class Ethan(nn.Module):
    def __init__(self):
        super(Ethan,self).__init__()
        self.conv=nn.Conv2d(in_channels=3,out_channels=6,kernel_size=3,
        					stride=1,padding=0)

    def forward(self,input):
        output=self.conv(input)
        return output

ethan=Ethan()
step=0
writer=SummaryWriter("./log1")
for data in dataLoader:
    imgs,targets=data
    output=ethan(imgs)
    print(imgs.shape)#torch.Size([64, 3, 32, 32])
    print(output.shape)#torch.Size([64, 6, 30, 30])
    #由Conv2d的形参stride=1等可以推断出为何是[64, 6, 30, 30]
    writer.add_images("input",imgs,step)
    output=torch.reshape(output,(-1,3,30,30))#add_image要求channel为3
    print(output.shape)#torch.Size([128, 3, 30, 30])
    writer.add_images("output",output,step)
    step+=1

每次跑的效果都是不一样的,因为nn.Conv2d()每次是随机生成新卷积核,所以会导致不同的结果。
在这个简易模型中我们并没有去训练随机生成的卷积核中参数。
2、torch.nn.ConvTranspose2d()
torch.nn.ConvTranspose2d(in_channels, out_channels, kernel_size,
	stride=1, padding=0, output_padding=0, groups=1, bias=True,
	dilation=1, padding_mode='zeros', device=None, dtype=None)
Parameters:
in_channels (int) – Number of channels in the input image
out_channels (int) – Number of channels produced by the convolution
kernel_size (int or tuple) – Size of the convolving kernel
stride (int or tuple, optional) – Stride of the convolution. Default: 1
padding (int or tuple, optional)– dilation * (kernel_size - 1) - padding zero-padding will be added to both sides of each dimension in the input. Default: 0
output_padding (int or tuple, optional) – Additional size added to one side of each dimension in the output shape. Default: 0
groups (int, optional) – Number of blocked connections from input channels to output channels. Default: 1
bias (bool, optional) – If True, adds a learnable bias to the output. Default: True
dilation (int or tuple, optional) – Spacing between kernel elements. Default: 1
Hout和Wout的计算公式如下:
H o u t = ( H i n − 1 ) × s t r i d e [ 0 ] − 2 × p a d d i n g [ 0 ] + d i l a t i o n [ 0 ] × ( k e r n e l _ s i z e [ 0 ] − 1 ) + o u t p u t _ p a d d i n g [ 0 ] + 1 H_{out}=(H_{in}-1)×stride[0]-2×padding[0]+dilation[0]×(kernel\_size[0]-1)+output\_padding[0]+1 Hout=(Hin−1)×stride[0]−2×padding[0]+dilation[0]×(kernel_size[0]−1)+output_padding[0]+1
W o u t = ( W i n − 1 ) × s t r i d e [ 1 ] − 2 × p a d d i n g [ 1 ] + d i l a t i o n [ 1 ] × ( k e r n e l _ s i z e [ 1 ] − 1 ) + o u t p u t _ p a d d i n g [ 1 ] + 1 W_{out}=(W_{in}-1)×stride[1]-2×padding[1]+dilation[1]×(kernel\_size[1]-1)+output\_padding[1]+1 Wout=(Win−1)×stride[1]−2×padding[1]+dilation[1]×(kernel_size[1]−1)+output_padding[1]+1
装置卷积所执行操作:
①对输入的特征图进行插值(interpolation)操作,得到新的特征图;
②随机初始化一定尺寸的卷积核;最后,用随机初始化的一定尺寸的卷积核在新的特征图上进行卷积操作。
关键在于如何得到新的feature map,分stride=1和stride>1,stride>1时就会在原有的feature map中的每相邻行插入(stride-1)行,相邻列插入(stride-1)列;stride=1时就在四周填充两层,默认为0(根据)。之后再依据padding值在四周填充,最后得到新的feature map。
input = torch.rand(1,2,3,4)
model1=nn.ConvTranspose2d(in_channels=2,out_channels=4,kernel_size=4,stride=1,padding=0)
model2 = nn.ConvTranspose2d(in_channels=2, out_channels=4, kernel_size=4, stride=1, padding=1)
output1 = model1(input)
output2 = model2(input)
print (output1.shape)#torch.Size([1, 4, 6, 7])
print (output2.shape)#torch.Size([1, 4, 4, 5])
上采样方式还有
1、
CLASS torch.nn.Upsample(size=None, scale_factor=None, mode=‘nearest’, align_corners=None, recompute_scale_factor=None)
Parameters:
align_corners (bool, optional) – if True, the corner pixels of the input and output tensors are aligned, and thus preserving the values at those pixels. This only has effect when mode is ‘linear’, ‘bilinear’, ‘bicubic’, or ‘trilinear’. Default: False

mode='nearest’和mode='bilinear’的区别看下面示例很容易明白。
>>> input = torch.arange(1, 5, dtype=torch.float32).view(1, 1, 2, 2)
>>> input
tensor([[[[1., 2.],
          [3., 4.]]]])

>>> m = nn.Upsample(scale_factor=2, mode='nearest')
>>> m(input)
tensor([[[[1., 1., 2., 2.],
          [1., 1., 2., 2.],
          [3., 3., 4., 4.],
          [3., 3., 4., 4.]]]])

>>> m = nn.Upsample(scale_factor=2, mode='bilinear')  # align_corners=False
>>> m(input)
tensor([[[[1.0000, 1.2500, 1.7500, 2.0000],
          [1.5000, 1.7500, 2.2500, 2.5000],
          [2.5000, 2.7500, 3.2500, 3.5000],
          [3.0000, 3.2500, 3.7500, 4.0000]]]])

>>> m = nn.Upsample(scale_factor=2, mode='bilinear', align_corners=True)
>>> m(input)
tensor([[[[1.0000, 1.3333, 1.6667, 2.0000],
          [1.6667, 2.0000, 2.3333, 2.6667],
          [2.3333, 2.6667, 3.0000, 3.3333],
          [3.0000, 3.3333, 3.6667, 4.0000]]]])

>>> # Try scaling the same data in a larger tensor
>>> input_3x3 = torch.zeros(3, 3).view(1, 1, 3, 3)
>>> input_3x3[:, :, :2, :2].copy_(input)
tensor([[[[1., 2.],
          [3., 4.]]]])
>>> input_3x3
tensor([[[[1., 2., 0.],
          [3., 4., 0.],
          [0., 0., 0.]]]])

>>> m = nn.Upsample(scale_factor=2, mode='bilinear')  # align_corners=False
>>> # Notice that values in top left corner are the same with the small input (except at boundary)
>>> m(input_3x3)
tensor([[[[1.0000, 1.2500, 1.7500, 1.5000, 0.5000, 0.0000],
          [1.5000, 1.7500, 2.2500, 1.8750, 0.6250, 0.0000],
          [2.5000, 2.7500, 3.2500, 2.6250, 0.8750, 0.0000],
          [2.2500, 2.4375, 2.8125, 2.2500, 0.7500, 0.0000],
          [0.7500, 0.8125, 0.9375, 0.7500, 0.2500, 0.0000],
          [0.0000, 0.0000, 0.0000, 0.0000, 0.0000, 0.0000]]]])

>>> m = nn.Upsample(scale_factor=2, mode='bilinear', align_corners=True)
>>> # Notice that values in top left corner are now changed
>>> m(input_3x3)
tensor([[[[1.0000, 1.4000, 1.8000, 1.6000, 0.8000, 0.0000],
          [1.8000, 2.2000, 2.6000, 2.2400, 1.1200, 0.0000],
          [2.6000, 3.0000, 3.4000, 2.8800, 1.4400, 0.0000],
          [2.4000, 2.7200, 3.0400, 2.5600, 1.2800, 0.0000],
          [1.2000, 1.3600, 1.5200, 1.2800, 0.6400, 0.0000],
          [0.0000, 0.0000, 0.0000, 0.0000, 0.0000, 0.0000]]]])
2、
torch.nn.functional.interpolate(input, size=None, scale_factor=None, mode=‘nearest’, align_corners=None, recompute_scale_factor=None, antialias=False)
三、torch.nn.MaxPool2d()
torch.nn.MaxPool2d(kernel_size, stride=None, padding=0, dilation=1,
					return_indices=False, ceil_mode=False)
kernel_size – the size of the window to take a max over
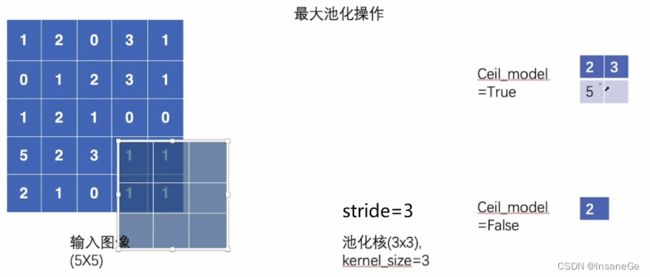
s t r i d e 若 不 设 置 , 默 认 值 等 于 k e r n e l s i z e \color{red}stride若不设置,默认值等于kernel_size stride若不设置,默认值等于kernelsize
ceil_mode – when True, will use ceil instead of floor to compute the output shape
下图展示ceil_mode为true时的作用,以下图来描述,当kernel有部分超出输入图像是否还要考虑输出就是ceil_mode的作用

class Ethan(nn.Module):
    def __init__(self):
        super(Ethan,self).__init__()
        self.maxpool=nn.MaxPool2d(kernel_size=3,ceil_mode=False)
    def forward(self,input):
        output=self.maxpool(input)
        return output
input = torch.tensor([[1, 2, 0, 3, 1],
                      [0, 1, 2, 3, 1],
                      [1, 2, 1, 0, 0],
                      [5, 2, 3, 1, 1],
                      [2, 1, 0, 1, 1]], dtype=torch.float32)  # 池化核不能处理Long型变量

if torch.cuda.is_available():
	input = input.to("cuda")
input = torch.reshape(input, (-1, 1, 5, 5))
ethan = Ethan()
output = ethan(input)
print(output)
#tensor([[[[2.]]]], device='cuda:0')
#ceil_mode=True时的输出
#tensor([[[[2., 3.],
#          [5., 1.]]]], device='cuda:0')
最大池化的作用:能将图像的特征提取出来,大大减小神经网络训练时的工作量!
四、BatchNorm2d()及LN、IN、GN。不会改变shape
在卷积神经网络的卷积层之后总会添加BatchNorm2d进行数据的归一化处理,这使得数据在进行Relu之前不会因为数据过大而导致网络性能的不稳定。
torch.nn.BatchNorm2d(num_features, eps=1e-05, momentum=0.1, affine=True,
					 track_running_stats=True, device=None, dtype=None)
Parameters:
num_features – C,C from an expected input of size
:math:(N, C, H, W),即设置为input的channel值
eps – a value added to the denominator for numerical stability. Default: 1e-5
momentum – the value used for the running_mean and running_var computation. Can be set to None for cumulative moving average (i.e. simple average). Default: 0.1
affine – a boolean value that when set to True, this module has learnable affine parameters. Default: True
#affine参数设为True表示nn.Module模型自带的weight和bias参数将被使用
track_running_stats – a boolean value that when set to True, this module tracks the running mean and variance, and when set to False, this module does not track such statistics, and initializes statistics buffers running_mean and running_var as None. When these buffers are None, this module always uses batch statistics. in both training and eval modes. Default: True
BatchNorm2d()函数数学原理如下:

每个channel都有一个对应的weight(上图的γ)和bias(上图的β)参数,E[x],Var[x]
BatchNorm2d()实例运算过程见此博客
    def _block(self, in_channels, out_channels, kernel_size, stride, padding):
        return nn.Sequential(
            nn.Conv2d(
                in_channels,
                out_channels,
                kernel_size,
                stride,
                padding,
                bias=False,
            ),
            #nn.BatchNorm2d(out_channels),
            nn.LeakyReLU(0.2),
        )
关于BN,LN,IN,GN的对比博客
官方LayerNorm文档
CLASS torch.nn.LayerNorm(normalized_shape, eps=1e-05, elementwise_affine=True, device=None, dtype=None)
官方GroupNorm文档
CLASS torch.nn.GroupNorm(num_groups, num_channels, eps=1e-05, affine=True, device=None, dtype=None)
官方InstanceNorm2d文档
CLASS torch.nn.InstanceNorm2d(num_features, eps=1e-05, momentum=0.1, affine=False, track_running_stats=False, device=None, dtype=None
五、非线性激活函数
nn.ReLU(inplace=False)
inplace – can optionally do the operation in-place. Default: False 即决定对不对原来的变量直接进行替换。
还有类如Sigmoid、Tanh、LeakyReLU等非线性激活函数,他们的作用是使网络具有更多非线性特征。
torch.nn.LeakyReLU(negative_slope=0.01, inplace=False)
class Ethan(nn.Module):
    def __init__(self):
        super(Ethan,self).__init__()
        self.sigmoid=Sigmoid()
    def forward(self,input):
        output=self.sigmoid(input)
        return output
dataset=datasets.CIFAR10("./数据集",train=False,download=True,transform=transforms.ToTensor())
dataLoader=DataLoader(dataset,batch_size=64)
ethan = Ethan()

writer=SummaryWriter("./log2")
step=0
for data in dataLoader:
    imgs,target=data
    writer.add_images("input",imgs,step)
    output = ethan(imgs)
    writer.add_images("output",output,step)
    step+=1
writer.close()
六、nn.Linear()
nn.Linear(in_features, out_features, bias=True,
		  device=None, dtype=None)
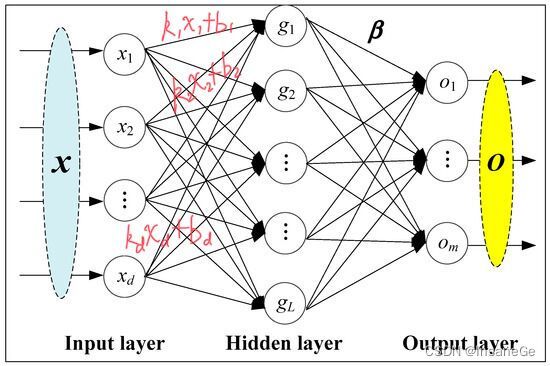
bias指的就是下图中b参数是否有
Applies a linear transformation to the incoming data: y = x A T + b y = xA^T + b y=xAT+b
上图红线处说明Linear只改变最后一维
m = nn.Linear(2, 3)
input = torch.tensor([[-0.6547, -1.5076],[-1.9709, -2.0016]])
output = m(input)
print(output.size())
print(output)
上面代码运行多次,print(output)的结果是不同的,模型训练的时候也在训练Linear线性层的参数
'''
介绍flatten函数
torch.flatten(input, start_dim=0, end_dim=- 1)
Parameters:
	input (Tensor) – the input tensor.
	start_dim (int) – the first dim to flatten
	end_dim (int) – the last dim to flatten
'''
t = torch.tensor([[[1, 2],
                   [3, 4]],
                  [[5, 6],
                   [7, 8]]])
torch.flatten(t)
#tensor([1, 2, 3, 4, 5, 6, 7, 8])
torch.flatten(t, start_dim=1)
#tensor([[1, 2, 3, 4],
#        [5, 6, 7, 8]])
七、nn.Sequential(具体实例见九)
torch.nn.Sequential(*args)
如下两种方式构造Sequential效果相同,OrderedDict只是可以给里面的每个操作取别名
model = nn.Sequential(
          nn.Conv2d(1,20,5),
          nn.ReLU(),
          nn.Conv2d(20,64,5),
          nn.ReLU()
        )

# Using Sequential with OrderedDict. This is functionally the
# same as the above code
model = nn.Sequential(OrderedDict([
          ('conv1', nn.Conv2d(1,20,5)),
          ('relu1', nn.ReLU()),
          ('conv2', nn.Conv2d(20,64,5)),
          ('relu2', nn.ReLU())
        ]))
八、nn.Dropout
torch.nn.Dropout(p=0.5, inplace=False)
Parameters
p – probability of an element to be zeroed. Default: 0.5
inplace – If set to True, will do this operation in-place. Default: False
Shape:
Input: ()(∗). Input can be of any shape
Output: ()(∗). Output is of the same shape as input
Furthermore, the outputs are scaled by a factor of 1 1 − p \frac{1}{1-p} 1−p1 during training. This means that during evaluation the module simply computes an identity function.(意即其他不是0的元素会乘上 1 1 − p \frac{1}{1-p} 1−p1)
	m = nn.Dropout(p=0.5)
    input = torch.randn(3, 4)
    print(input)
    output = m(input)
    print(output)
'''
tensor([[-0.6425, -0.2633, -0.6924, -1.8469],
        [ 1.0353, -1.3861,  1.1678,  1.1759],
        [ 0.9972, -0.5695, -0.1986,  0.2483]])
tensor([[-1.2851, -0.0000, -0.0000, -0.0000],
        [ 2.0705, -2.7722,  2.3356,  0.0000],
        [ 1.9943, -1.1390, -0.0000,  0.0000]])
没有变成0的元素都乘了1/(1-0.5)=2倍
'''
九、优化器torch.optim和backward()
每个优化器基本都会有两个参数params、(lr)learning rate
以cifar10数据模型为例

device = "cuda" if torch.cuda.is_available() else "cpu"
dataset=datasets.CIFAR10("./数据集",train=False,download=True,transform=transforms.ToTensor())
dataLoader=DataLoader(dataset,batch_size=1,drop_last=True)
class Ethan(nn.Module):
    def __init__(self):
        super(Ethan,self).__init__()
        self.model=nn.Sequential(
            nn.Conv2d(3,32,5,padding=2),
            nn.MaxPool2d(2),
            nn.Conv2d(32,32,5,padding=2),
            nn.MaxPool2d(2),
            nn.Conv2d(32,64,5,padding=2),
            nn.MaxPool2d(2),
            nn.Flatten(),
            nn.Linear(1024,64),
            nn.Linear(64,10)
        )

    def forward(self,input):
        output=self.model(input)
        return output
loss=nn.CrossEntropyLoss()
if torch.cuda.is_available():
	loss = loss.to("cuda")
ethan=Ethan().to(device)
optim=torch.optim.SGD(ethan.parameters(),lr=0.01)
for epoch in range(20):
    running_loss=0.0
    for data in dataLoader:
        img,target=data
        img=img.to(device)
        '''
        一定要有这步处理,否则会报如下错
        Input type (torch.FloatTensor) and weight type (torch.cuda.FloatTensor) should be the same
        '''
        output=ethan(img)
        if torch.cuda.is_available():
            output = output.to("cuda")
        if torch.cuda.is_available():
            target = target.to("cuda")
        result_loss=loss(output,target)

        optim.zero_grad()#有些调用的是model.zero_grad()
        result_loss.backward()#损失函数调用backward()把ethan模型的梯度grad参数计算出来
        optim.step()#优化器模型调用step(),对权重或特征的值进行更新
	#以随机梯度下降SGD为例:学习率lr(learning rate)来控制步幅,即:x=x-lr *x.grad
        running_loss+=result_loss
    print(running_loss)
backward(retain_graph)解析:
每次 backward() 时,默认会把整个计算图free掉。一般情况下是每次迭代,只需一次 forward() 和一次 backward() ,前向运算forward() 和反向传播backward()是成对存在的,一般一次backward()也是够用的。
但是不排除,由于自定义loss等的复杂性,需要一次forward(),多个不同loss的backward()来累积同一个网络的grad,来更新参数。于是,若在当前backward()后,不执行forward() 而是执行另一个backward(),需要在当前backward()时,指定保留计算图,backward(retain_graph)。
model.zero_grad()和optimizer.zero_grad()区别:
model.zero_grad()的作用是将所有模型参数的梯度置为0。其源码如下:
for p in self.parameters():
    if p.grad is not None:
        p.grad.detach_()
        p.grad.zero_()
optimizer.zero_grad()的作用是清除所有可训练的torch.Tensor的梯度。其源码如下:
for group in self.param_groups:
    for p in group['params']:
        if p.grad is not None:
            p.grad.detach_()
            p.grad.zero_()
十、使用GPU
使用GPU跑代码需要将网络模型、数据、损失函数三者都进行.to(“cuda”)操作
#方式1
device = "cuda" if torch.cuda.is_available() else "cpu"
	xx=xx.to(device)
#方式2
if torch.cuda.is_available():
	xx=xx.to("cuda")


