Tensorflow2 图像分类-Flowers数据深度学习模型保存、读取、参数查看和图像预测
目录
1.原文完整代码
1.1 模型运行参数总结
1.2模型训练效果
编辑2.模型的保存
3.读取模型model
4.使用模型进行图片预测
5.补充 如何查看保存模型参数
5.1 model_weights
5.2 optimizer_weights
使用之前一篇代码:
原文链接:Tensorflow2 图像分类-Flowers数据及分类代码详解
这篇文章中,经常有人问到怎么保存模型?怎么读取和应用模型进行数据预测?这里做一下详细说明。
1.原文完整代码
完整代码如下,做了少量修改:
import matplotlib.pyplot as plt
import numpy as np
import os
import PIL
import tensorflow as tf

from tensorflow import keras
from tensorflow.keras import layers
from tensorflow.keras.models import Sequential

"""flower_photo/
  daisy/
  dandelion/
  roses/
  sunflowers/
  tulips/"""
import pathlib

dataset_url = "https://storage.googleapis.com/download.tensorflow.org/example_images/flower_photos.tgz"
data_dir = tf.keras.utils.get_file('flower_photos', origin=dataset_url, untar=True)
print(data_dir)
print(type(data_dir))
data_dir = pathlib.Path(data_dir)
print(data_dir)
print(type(data_dir))

image_count = len(list(data_dir.glob('*/*.jpg')))
print(image_count)
roses = list(data_dir.glob('roses/*'))
img0 = PIL.Image.open(str(roses[0]))
plt.imshow(img0)
plt.show()

batch_size = 32
img_height = 180
img_width = 180

# It's good practice to use a validation split when developing your model.
# Let's use 80% of the images for training, and 20% for validation.
train_ds = tf.keras.preprocessing.image_dataset_from_directory(
    data_dir,
    validation_split=0.2,
    subset="training",
    seed=123,
    image_size=(img_height, img_width),
    batch_size=batch_size)

val_ds = tf.keras.preprocessing.image_dataset_from_directory(
    data_dir,
    validation_split=0.2,
    subset="validation",
    seed=123,
    image_size=(img_height, img_width),
    batch_size=batch_size)

class_names = train_ds.class_names
print(class_names)

# 图片可视化
plt.figure(figsize=(10, 10))
for images, labels in train_ds.take(1):
    for i in range(30):
        ax = plt.subplot(3, 10, i + 1)
        plt.imshow(images[i].numpy().astype("uint8"))
        plt.title(class_names[labels[i]])
        plt.axis("off")
plt.show()

for image_batch, labels_batch in train_ds:
    print(image_batch.shape)
    print(labels_batch.shape)
    break

AUTOTUNE = tf.data.AUTOTUNE

train_ds = train_ds.cache().shuffle(1000).prefetch(buffer_size=AUTOTUNE)
val_ds = val_ds.cache().prefetch(buffer_size=AUTOTUNE)

normalization_layer = layers.experimental.preprocessing.Rescaling(1. / 255)
normalized_ds = train_ds.map(lambda x, y: (normalization_layer(x), y))
image_batch, labels_batch = next(iter(normalized_ds))
first_image = image_batch[0]
# Notice the pixels values are now in `[0,1]`.
print(np.min(first_image), np.max(first_image))

data_augmentation = keras.Sequential(
    [
        layers.experimental.preprocessing.RandomFlip("horizontal",
                                                     input_shape=(img_height,
                                                                  img_width,
                                                                  3)),
        layers.experimental.preprocessing.RandomRotation(0.1),
        layers.experimental.preprocessing.RandomZoom(0.1),
    ]
)
plt.figure(figsize=(10, 10))
for images, _ in train_ds.take(1):
    for i in range(9):
        augmented_images = data_augmentation(images)
        ax = plt.subplot(3, 3, i + 1)
        plt.imshow(augmented_images[0].numpy().astype("uint8"))
        plt.axis("off")

num_classes = 5
model = Sequential([
    data_augmentation,
    layers.experimental.preprocessing.Rescaling(1. / 255),
    layers.Conv2D(16, 3, padding='same', activation='relu'),
    layers.MaxPooling2D(),
    layers.Conv2D(32, 3, padding='same', activation='relu'),
    layers.MaxPooling2D(),
    layers.Conv2D(64, 3, padding='same', activation='relu'),
    layers.MaxPooling2D(),
    layers.Conv2D(128, 3, padding='same', activation='relu'),
    layers.MaxPooling2D(),
    layers.Dropout(0.15),
    layers.Flatten(),
    layers.Dense(128, activation='relu'),
    layers.Dense(num_classes)
])

model.compile(optimizer='adam',
              loss=tf.keras.losses.SparseCategoricalCrossentropy(from_logits=True),
              metrics=['accuracy'])
model.summary()

epochs = 15
history = model.fit(
    train_ds,
    validation_data=val_ds,
    epochs=epochs
)

model.save("./model/Flowers_1227.h5")   #保存模型

#读取并调用模型
pre_model = tf.keras.models.load_model("./model/Flowers_1227.h5")


acc = history.history['accuracy']
val_acc = history.history['val_accuracy']

loss = history.history['loss']
val_loss = history.history['val_loss']

epochs_range = range(epochs)

plt.figure(figsize=(8, 8))
plt.subplot(1, 2, 1)
plt.plot(epochs_range, acc, label='Training Accuracy')
plt.plot(epochs_range, val_acc, label='Validation Accuracy')
plt.legend(loc='lower right')
plt.title('Training and Validation Accuracy')

plt.subplot(1, 2, 2)
plt.plot(epochs_range, loss, label='Training Loss')
plt.plot(epochs_range, val_loss, label='Validation Loss')
plt.legend(loc='upper right')
plt.title('Training and Validation Loss')
plt.show()

sunflower_url = "https://storage.googleapis.com/download.tensorflow.org/example_images/592px-Red_sunflower.jpg"
sunflower_path = tf.keras.utils.get_file('Red_sunflower', origin=sunflower_url)

img = keras.preprocessing.image.load_img(
    sunflower_path, target_size=(img_height, img_width)
)
img_array = keras.preprocessing.image.img_to_array(img)
img_array = tf.expand_dims(img_array, 0)  # Create a batch

predictions = pre_model.predict(img_array)
score = tf.nn.softmax(predictions[0])

print(
    "This image most likely belongs to {} with a {:.2f} percent confidence."
        .format(class_names[np.argmax(score)], 100 * np.max(score))
)
修改的代码包含:(1)修改了模型,增加了一个卷积层;(2)增加模型保存代码;(3)增加模型读取代码,并使用读取到的模型预测图片
1.1 模型运行参数总结
Model: "sequential_1"
_________________________________________________________________
Layer (type)                 Output Shape              Param #
=================================================================
sequential (Sequential)      (None, 180, 180, 3)       0
_________________________________________________________________
rescaling_1 (Rescaling)      (None, 180, 180, 3)       0
_________________________________________________________________
conv2d (Conv2D)              (None, 180, 180, 16)      448
_________________________________________________________________
max_pooling2d (MaxPooling2D) (None, 90, 90, 16)        0
_________________________________________________________________
conv2d_1 (Conv2D)            (None, 90, 90, 32)        4640
_________________________________________________________________
max_pooling2d_1 (MaxPooling2 (None, 45, 45, 32)        0
_________________________________________________________________
conv2d_2 (Conv2D)            (None, 45, 45, 64)        18496
_________________________________________________________________
max_pooling2d_2 (MaxPooling2 (None, 22, 22, 64)        0
_________________________________________________________________
conv2d_3 (Conv2D)            (None, 22, 22, 128)       73856
_________________________________________________________________
max_pooling2d_3 (MaxPooling2 (None, 11, 11, 128)       0
_________________________________________________________________
dropout (Dropout)            (None, 11, 11, 128)       0
_________________________________________________________________
flatten (Flatten)            (None, 15488)             0
_________________________________________________________________
dense (Dense)                (None, 128)               1982592
_________________________________________________________________
dense_1 (Dense)              (None, 5)                 645
=================================================================
Total params: 2,080,677
Trainable params: 2,080,677
Non-trainable params: 0
1.2模型训练效果
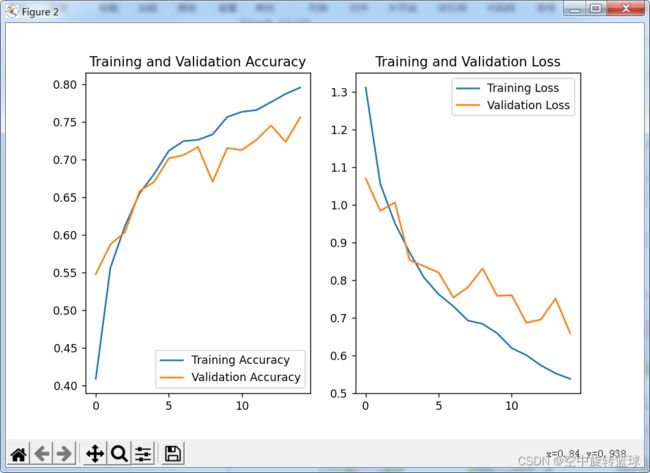
15次epoch有75.61%的精度,增加训练次数应该还有一定提升空间。
Epoch 1/15
92/92 [==============================] - 99s 1s/step - loss: 1.3126 - accuracy: 0.4087 - val_loss: 1.0708 - val_accuracy: 0.5477
Epoch 2/15
92/92 [==============================] - 88s 957ms/step - loss: 1.0561 - accuracy: 0.5562 - val_loss: 0.9844 - val_accuracy: 0.5872
Epoch 3/15
92/92 [==============================] - 89s 966ms/step - loss: 0.9517 - accuracy: 0.6117 - val_loss: 1.0068 - val_accuracy: 0.6035
Epoch 4/15
92/92 [==============================] - 84s 913ms/step - loss: 0.8743 - accuracy: 0.6550 - val_loss: 0.8538 - val_accuracy: 0.6580
Epoch 5/15
92/92 [==============================] - 82s 891ms/step - loss: 0.8065 - accuracy: 0.6809 - val_loss: 0.8371 - val_accuracy: 0.6703
Epoch 6/15
92/92 [==============================] - 82s 892ms/step - loss: 0.7623 - accuracy: 0.7115 - val_loss: 0.8203 - val_accuracy: 0.7016
Epoch 7/15
92/92 [==============================] - 94s 1s/step - loss: 0.7309 - accuracy: 0.7245 - val_loss: 0.7539 - val_accuracy: 0.7057
Epoch 8/15
92/92 [==============================] - 90s 982ms/step - loss: 0.6928 - accuracy: 0.7262 - val_loss: 0.7811 - val_accuracy: 0.7166
Epoch 9/15
92/92 [==============================] - 88s 955ms/step - loss: 0.6840 - accuracy: 0.7333 - val_loss: 0.8314 - val_accuracy: 0.6703
Epoch 10/15
92/92 [==============================] - 81s 877ms/step - loss: 0.6591 - accuracy: 0.7565 - val_loss: 0.7585 - val_accuracy: 0.7153
Epoch 11/15
92/92 [==============================] - 83s 899ms/step - loss: 0.6195 - accuracy: 0.7633 - val_loss: 0.7600 - val_accuracy: 0.7125
Epoch 12/15
92/92 [==============================] - 86s 934ms/step - loss: 0.6006 - accuracy: 0.7657 - val_loss: 0.6871 - val_accuracy: 0.7262
Epoch 13/15
92/92 [==============================] - 86s 934ms/step - loss: 0.5736 - accuracy: 0.7762 - val_loss: 0.6955 - val_accuracy: 0.7452
Epoch 14/15
92/92 [==============================] - 82s 897ms/step - loss: 0.5523 - accuracy: 0.7871 - val_loss: 0.7513 - val_accuracy: 0.7234
Epoch 15/15
92/92 [==============================] - 86s 935ms/step - loss: 0.5379 - accuracy: 0.7956 - val_loss: 0.6591 - val_accuracy: 0.7561 2.模型的保存
训练模型的保存实际上只需一行代码就行,在模型训练完成之后,我们将模型保存到指定的路径并给模型命名。模型保存的格式是.h5后缀的格式,这种文件是hdf5格式的数据,我们可以使用专门的软件打开查看模型相关参数。
在model.fit()训练完模型之后,保存模型到model文件夹下:
model.save("./model/Flowers_1227.h5") #保存模型运行完成之后在项目文件下可以看到model文件夹,文件中可以看到我们保存的模型:
模型大小有45.7M.
3.读取模型model
读取代码也只需要一行,如下:
#读取并调用模型
pre_model = tf.keras.models.load_model("./model/Flowers_1227.h5")
4.使用模型进行图片预测
根据上面读取到的模型直接进行图片预测。
可以省去前面的数据训练部分,直接使用后面的部分代码,读取模型然后进行图片预测。
继续运行上文中的代码后面部分,即最后面的部分是预测一张图片属于什么类型的。
运行结果是:
This image most likely belongs to sunflowers with a 98.13 percent confidence.读取模型进行预测的代码如下:
import matplotlib.pyplot as plt
import numpy as np
import os
import PIL
import tensorflow as tf

from tensorflow import keras
from tensorflow.keras import layers
from tensorflow.keras.models import Sequential

"""flower_photo/
  daisy/
  dandelion/
  roses/
  sunflowers/
  tulips/"""
import pathlib

batch_size = 32
img_height = 180
img_width = 180

dataset_url = "https://storage.googleapis.com/download.tensorflow.org/example_images/flower_photos.tgz"
data_dir = tf.keras.utils.get_file('flower_photos', origin=dataset_url, untar=True)
train_ds = tf.keras.preprocessing.image_dataset_from_directory(
    data_dir,
    validation_split=0.2,
    subset="training",
    seed=123,
    image_size=(img_height, img_width),
    batch_size=batch_size)
class_names = train_ds.class_names
print(class_names)

#读取并调用模型
pre_model = tf.keras.models.load_model("./model/Flowers_1227.h5")

sunflower_url = "https://storage.googleapis.com/download.tensorflow.org/example_images/592px-Red_sunflower.jpg"
sunflower_path = tf.keras.utils.get_file('Red_sunflower', origin=sunflower_url)

img = keras.preprocessing.image.load_img(
    sunflower_path, target_size=(img_height, img_width)
)
img_array = keras.preprocessing.image.img_to_array(img)
img_array = tf.expand_dims(img_array, 0)  # Create a batch

predictions = pre_model.predict(img_array)
score = tf.nn.softmax(predictions[0])
print(score)

print(
    "This image most likely belongs to {} with a {:.2f} percent confidence."
        .format(class_names[np.argmax(score)], 100 * np.max(score))
)
运行结果:
Found 3670 files belonging to 5 classes.
Using 2936 files for training.
2022-12-27 22:34:13.075000: I tensorflow/core/platform/cpu_feature_guard.cc:142] This TensorFlow binary is optimized with oneAPI Deep Neural Network Library (oneDNN) to use the following CPU instructions in performance-critical operations:  AVX AVX2
To enable them in other operations, rebuild TensorFlow with the appropriate compiler flags.
['daisy', 'dandelion', 'roses', 'sunflowers', 'tulips']
2022-12-27 22:34:14.205000: I tensorflow/compiler/mlir/mlir_graph_optimization_pass.cc:176] None of the MLIR Optimization Passes are enabled (registered 2)
tf.Tensor([1.1012822e-04 5.2587932e-04 4.4165729e-03 9.8130155e-01 1.3645952e-02], shape=(5,), dtype=float32)
This image most likely belongs to sunflowers with a 98.13 percent confidence.
我们可以看到预测结果中,score = tf.nn.softmax(predictions[0]),代表的是该图片属于每种类型的概率大小,第四个是最大的,即第四个对应的是sunflowers类别,因此可以认为预测的结果就是sunflowers。
这里预测的图片是使用在线下载的一张图片进行预测的,实际上我们可以读取我们本地路径下的文件进行大批量的预测,并将每张图片预测结果保存到文本文件中用于后续的分析。
5.补充 如何查看保存模型参数
使用HDFView软件查看.H5后缀的文件。下载链接:HDFViiew-2.11.0-win64.exe-桌面系统文档类资源-CSDN下载
网上其他地方也有免费下载的,之前是在国外网站下载的,有时间查找的同学可以花点时间去找一下。
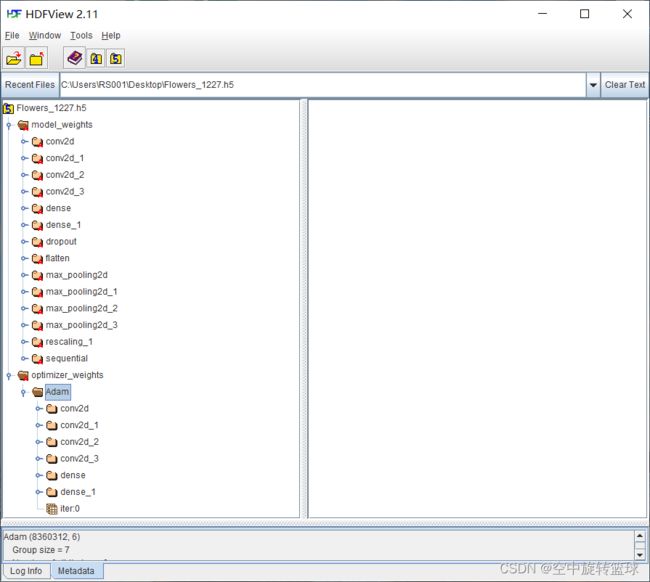
可以看到,该模型主要有两部分,model_weights和optimizer_weights.即模型权重系数和优化器权重系数参数。
我们点击展开这两个文件夹,我们可以看到里面的文件层次和我们的模型层次是一致的。
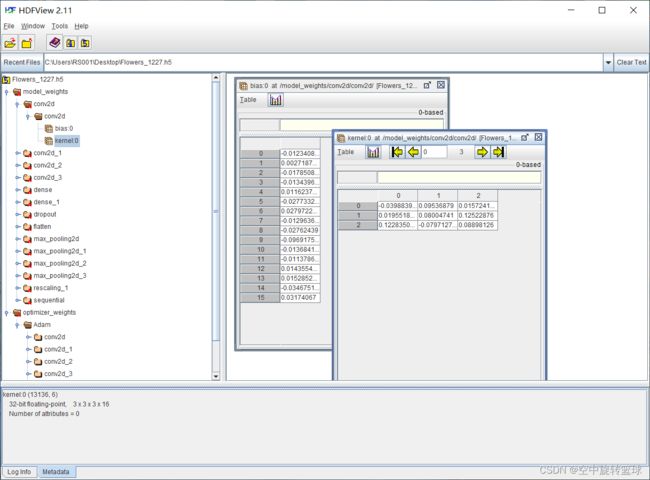
卷积层中的参数可以查看到如下:
5.1 model_weights
model_weigths参数展开如下,从dropout开始是空的。
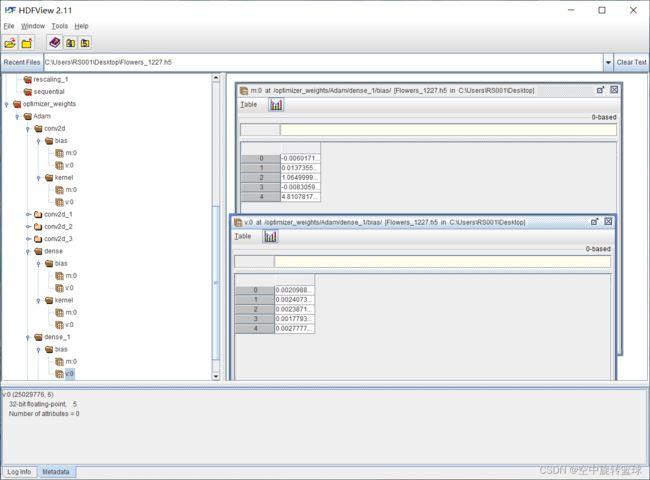
5.2 optimizer_weights
optimizer_weights参数如下:


