登录认证(双因子)-手机令牌设计及实现
什么是双因子验证?
双因子验证(2FA),指互不相关的两个因子来验证用户身份,又被称作两步验证或者双因素验证,是一种安全验证过程。用户通过独有的认证因子做登录校验,通常是密码+令牌的形式。此处讲解令牌流程。
理解令牌认证流程
流程分为令牌绑定和登录验证
- 令牌绑定:绑定就像给用户标记个人认证因素
- 登录验证:其实就是验证秘钥是否正确,它就像盐

案例环境:springboot+swagger+Knife4j
具体实现
这里的pom主要是生成二维码用的
            com.google.zxing
            core
            3.3.3


            com.google.zxing
            javase
            3.3.3


            cn.hutool
            hutool-all
            5.3.5
二维码工具类主要用到的是生成Base64图片方便传输
package com.soul.demo.util;
import cn.hutool.core.codec.Base64;
import cn.hutool.core.util.StrUtil;
import com.google.zxing.BarcodeFormat;
import com.google.zxing.EncodeHintType;
import com.google.zxing.common.BitMatrix;
import com.google.zxing.qrcode.QRCodeWriter;
import com.google.zxing.qrcode.decoder.ErrorCorrectionLevel;

import javax.imageio.ImageIO;
import javax.servlet.ServletOutputStream;
import java.awt.*;
import java.awt.geom.RoundRectangle2D;
import java.awt.image.BufferedImage;
import java.io.ByteArrayOutputStream;
import java.io.IOException;
import java.io.OutputStream;
import java.net.URL;
import java.util.HashMap;

/**
 * QRCodeUtil

 * Description: 二维码工具类

 * Creation Time: 2021/8/8 10:06


 *
 * @author soul
 * @version soul v1.0
 */
public class QRCodeUtil {
    /**
     * 默认宽度
     */
    private static final Integer WIDTH = 140;
    /**
     * 默认高度
     */
    private static final Integer HEIGHT = 140;

    /**
     * LOGO 默认宽度
     */
    private static final Integer LOGO_WIDTH = 22;
    /**
     * LOGO 默认高度
     */
    private static final Integer LOGO_HEIGHT = 22;

    /**
     * 图片格式
     */
    private static final String IMAGE_FORMAT = "png";
    private static final String CHARSET = "utf-8";
    /**
     * 原生转码前面没有 data:image/png;base64 这些字段,返回给前端是无法被解析
     */
    private static final String BASE64_IMAGE = "data:image/png;base64,%s";

    /**
     * 生成二维码,使用默认尺寸
     *
     * @param content 内容
     * @return
     */
    public static String getBase64QRCode(String content) {
        return getBase64Image(content, WIDTH, HEIGHT, null, null, null);
    }

    /**
     * 生成二维码,使用默认尺寸二维码,插入默认尺寸logo
     *
     * @param content 内容
     * @param logoUrl logo地址
     * @return
     */
    public static String getBase64QRCode(String content, String logoUrl) {
        return getBase64Image(content, WIDTH, HEIGHT, logoUrl, LOGO_WIDTH, LOGO_HEIGHT);
    }

    /**
     * 生成二维码
     *
     * @param content    内容
     * @param width      二维码宽度
     * @param height     二维码高度
     * @param logoUrl    logo 在线地址
     * @param logoWidth  logo 宽度
     * @param logoHeight logo 高度
     * @return
     */
    public static String getBase64QRCode(String content, Integer width, Integer height, String logoUrl, Integer logoWidth, Integer logoHeight) {
        return getBase64Image(content, width, height, logoUrl, logoWidth, logoHeight);
    }

    private static String getBase64Image(String content, Integer width, Integer height, String logoUrl, Integer logoWidth, Integer logoHeight) {
        ByteArrayOutputStream os = new ByteArrayOutputStream();
        BufferedImage bufferedImage = crateQRCode(content, width, height, logoUrl, logoWidth, logoHeight);
        try {
            ImageIO.write(bufferedImage, IMAGE_FORMAT, os);
        } catch (IOException e) {
            System.out.println("[生成二维码,错误"+e+"]");
        }
        // 转出即可直接使用
        return String.format(BASE64_IMAGE, Base64.encode(os.toByteArray()));
    }


    /**
     * 生成二维码
     *
     * @param content    内容
     * @param width      二维码宽度
     * @param height     二维码高度
     * @param logoUrl    logo 在线地址
     * @param logoWidth  logo 宽度
     * @param logoHeight logo 高度
     * @return
     */
    private static BufferedImage crateQRCode(String content, Integer width, Integer height, String logoUrl, Integer logoWidth, Integer logoHeight) {
        if (StrUtil.isNotBlank(content)) {
            ServletOutputStream stream = null;
            HashMap<EncodeHintType, Comparable> hints = new HashMap<>(4);
            // 指定字符编码为utf-8
            hints.put(EncodeHintType.CHARACTER_SET, CHARSET);
            // 指定二维码的纠错等级为中级
            hints.put(EncodeHintType.ERROR_CORRECTION, ErrorCorrectionLevel.M);
            // 设置图片的边距
            hints.put(EncodeHintType.MARGIN, 2);
            try {
                QRCodeWriter writer = new QRCodeWriter();
                BitMatrix bitMatrix = writer.encode(content, BarcodeFormat.QR_CODE, width, height, hints);
                BufferedImage bufferedImage = new BufferedImage(width, height, BufferedImage.TYPE_INT_RGB);
                for (int x = 0; x < width; x++) {
                    for (int y = 0; y < height; y++) {
                        bufferedImage.setRGB(x, y, bitMatrix.get(x, y) ? 0xFF000000 : 0xFFFFFFFF);
                    }
                }
                if (StrUtil.isNotBlank(logoUrl)) {
                    insertLogo(bufferedImage, width, height, logoUrl, logoWidth, logoHeight);
                }
                return bufferedImage;
            } catch (Exception e) {
                e.printStackTrace();
            } finally {
                if (stream != null) {
                    try {
                        stream.flush();
                        stream.close();
                    } catch (IOException e) {
                        e.printStackTrace();
                    }
                }
            }
        }
        return null;
    }

    /**
     * 二维码插入logo
     *
     * @param source     二维码
     * @param width      二维码宽度
     * @param height     二维码高度
     * @param logoUrl    logo 在线地址
     * @param logoWidth  logo 宽度
     * @param logoHeight logo 高度
     * @throws Exception
     */
    private static void insertLogo(BufferedImage source, Integer width, Integer height, String logoUrl, Integer logoWidth, Integer logoHeight) throws Exception {
        // logo 源可为 File/InputStream/URL
        Image src = ImageIO.read(new URL(logoUrl));
        // 插入LOGO
        Graphics2D graph = source.createGraphics();
        int x = (width - logoWidth) / 2;
        int y = (height - logoHeight) / 2;
        graph.drawImage(src, x, y, logoWidth, logoHeight, null);
        Shape shape = new RoundRectangle2D.Float(x, y, logoWidth, logoHeight, 6, 6);
        graph.setStroke(new BasicStroke(3f));
        graph.draw(shape);
        graph.dispose();
    }


    /**
     * 获取二维码
     *
     * @param content 内容
     * @param output  输出流
     * @throws IOException
     */
    public static void getQRCode(String content, OutputStream output) throws IOException {
        BufferedImage image = crateQRCode(content, WIDTH, HEIGHT, null, null, null);
        ImageIO.write(image, IMAGE_FORMAT, output);
    }

    /**
     * 获取二维码
     *
     * @param content 内容
     * @param logoUrl logo资源
     * @param output  输出流
     * @throws Exception
     */
    public static void getQRCode(String content, String logoUrl, OutputStream output) throws Exception {
        BufferedImage image = crateQRCode(content, WIDTH, HEIGHT, logoUrl, LOGO_WIDTH, LOGO_HEIGHT);
        ImageIO.write(image, IMAGE_FORMAT, output);
    }

}
多因素身份验证器工具类就两个核心方法,生成秘钥和检验动态口令
package com.soul.demo.util;

import lombok.extern.slf4j.Slf4j;
import org.apache.commons.codec.binary.Base32;
import org.apache.commons.codec.binary.Base64;

import javax.crypto.Mac;
import javax.crypto.spec.SecretKeySpec;
import java.security.InvalidKeyException;
import java.security.NoSuchAlgorithmException;
import java.security.SecureRandom;

/**
 * MultiFactorAuthenticatorUtil

 * Description: 多因素身份验证器工具类

 * Creation Time: 2021/8/8 11:15


 *
 * @author soul
 * @version soul v1.0
 */
@Slf4j
public class MultiFactorAuthenticatorUtil {
    /** 这是发行人,您可以将其更改为您的公司项目名称.*/
    private static final String ISSUER = "Hello";
    /** 您可以将其更改为任何字符串.*/
    private static final String SEED = "thisistestauthenticator";
    /** 取自 Google pam docs - 我们可能不需要弄乱这些.*/
    private static final String RANDOM_NUMBER_ALGORITHM = "SHA1PRNG";
    /** 要生成的种子字节数.*/
    private static final int SECRET_SIZE = 10;
    /** 建议:数值越小越安全。 (从 1 到 17).*/
    private static final int WINDOW_SIZE = 1;

    /**
     * 生成令牌秘钥
     * @return 令牌秘钥
     */
    public static String generateSecretKey() {
        try {
            SecureRandom sr = SecureRandom.getInstance(RANDOM_NUMBER_ALGORITHM);
            sr.setSeed(Base64.decodeBase64(SEED));
            byte[] buffer = sr.generateSeed(SECRET_SIZE);
            Base32 codec = new Base32();
            byte[] bEncodedKey = codec.encode(buffer);
            return new String(bEncodedKey);
        } catch (NoSuchAlgorithmException e) {
            log.error("generate secret exception:{[]}", e);
        }
        return null;
    }

    /**
     * 生成Base64图片
     * @param user 用户名
     * @param secret 令牌秘钥
     * @return Base64图片
     */
    public static String getQRBarcode(String user, String secret) {
        // 固定结构
        String format = "otpauth://totp/%s?secret=%s&issuer=%s";
        String imageContent = String.format(format, user, secret, ISSUER);
        log.info(imageContent);
        return QRCodeUtil.getBase64QRCode(imageContent);
    }

    /**
     * 令牌身份验证
     * @param secret 令牌秘钥
     * @param code 令牌码
     * @param time 当前时间
     * @return 成功/失败
     */
    public static boolean checkCode(String secret, long code, long time) {
        Base32 codec = new Base32();
        byte[] decodedKey = codec.decode(secret);
        // 将 unix 毫秒时间转换为 30 秒的“窗口”
        // 这是根据 TOTP 规范(有关详细信息,请参阅 RFC)
        long t = (time / 1000L) / 30L;
        // Window 用于检查最近生成的代码
        for (int i = -WINDOW_SIZE; i <= WINDOW_SIZE; ++i) {
            long hash;
            try {
                hash = verifyCode(decodedKey, t + i);
            } catch (Exception e) {
                // 是的,这是不好的形式——但是
                // 抛出的异常很少见,并且是静态配置问题
                e.printStackTrace();
                throw new RuntimeException(e.getMessage());
                //return false;
            }
            if (hash == code) {
                return true;
            }
        }
        // 验证码无效
        return false;
    }

    private static int verifyCode(byte[] key, long t) throws NoSuchAlgorithmException, InvalidKeyException {
        byte[] data = new byte[8];
        long value = t;
        for (int i = 8; i-- > 0; value >>>= 8) {
            data[i] = (byte) value;
        }
        SecretKeySpec signKey = new SecretKeySpec(key, "HmacSHA1");
        Mac mac = Mac.getInstance("HmacSHA1");
        mac.init(signKey);
        byte[] hash = mac.doFinal(data);
        int offset = hash[20 - 1] & 0xF;
        // 我们使用 long 因为 Java 没有 unsigned int
        long truncatedHash = 0;
        for (int i = 0; i < 4; ++i) {
            truncatedHash <<= 8;
            // 我们正在处理有符号字节:
            // 我们只保留第一个字节
            truncatedHash |= (hash[offset + i] & 0xFF);
        }
        truncatedHash &= 0x7FFFFFFF;
        truncatedHash %= 1000000;
        return (int) truncatedHash;
    }
}
接口代码
package com.soul.demo.controller;

import com.soul.demo.util.MultiFactorAuthenticatorUtil;
import com.soul.demo.util.ResponseUtil;
import io.swagger.annotations.Api;
import io.swagger.annotations.ApiOperation;
import io.swagger.annotations.ApiParam;
import lombok.extern.slf4j.Slf4j;
import org.springframework.web.bind.annotation.*;

import java.util.HashMap;
import java.util.Map;
import java.util.concurrent.ConcurrentHashMap;

/**
 * SecurityController

 * Description: 登录服务

 * Creation Time: 2021/8/8 14:43


 *
 * @author soul
 * @version soul v1.0
 */
@Slf4j
@RestController
@RequestMapping("/security")
@Api(tags = "登录服务")
public class SecurityController {
    /**
     * We can use a Map to simulate the database.
     */
    protected Map<String, String> userSecret = new ConcurrentHashMap<>();

    /**
     * 令牌绑定接口
     *
     * @param username 用户名
     * @return 二维码
     */
    @ApiOperation(value = "令牌绑定接口", notes = "")
    @GetMapping("/bind")
    public Object bind(@ApiParam(value = "用户名", required = true) @RequestParam String username) {
        HashMap<String, String> json = new HashMap<>(4);
        if (userSecret.containsKey(username)) {
            String secret = userSecret.get(username);
            String qrCode = MultiFactorAuthenticatorUtil.getQRBarcode(username, secret);
            json.put("qrCode", qrCode);
            json.put("user", username);
            json.put("secret", secret);
            log.info(userSecret.toString());
            return ResponseUtil.ok(json);
        }
        String secret = MultiFactorAuthenticatorUtil.generateSecretKey();
        String qrCode = MultiFactorAuthenticatorUtil.getQRBarcode(username, secret);
        json.put("qrCode", qrCode);
        json.put("user", username);
        json.put("secret", secret);
        userSecret.put(username, secret);
        log.info(userSecret.toString());
        return ResponseUtil.ok(json);
    }

    /**
     * 令牌验证接口
     *
     * @param username  用户名称
     * @param codeInput 动态口令
     * @return right or not
     */
    @ApiOperation(value = "令牌验证接口", notes = "")
    @PostMapping("/check")
    public Object check(@ApiParam(value = "用户名称", required = true) @RequestParam String username, @ApiParam(value = "动态口令", required = true) @RequestParam String codeInput) {
        HashMap<String, Object> json = new HashMap<>(2);
        String secret = userSecret.get(username);
        if (null != codeInput && codeInput.length() == 6 && null != secret) {
            long code = Long.parseLong(codeInput);
            boolean result = MultiFactorAuthenticatorUtil.checkCode(secret, code, System.currentTimeMillis());
            json.put("pass", result);
        } else {
            json.put("pass", false);
        }
        log.info(userSecret.toString());
        return ResponseUtil.ok(json);
    }

}
效果展示
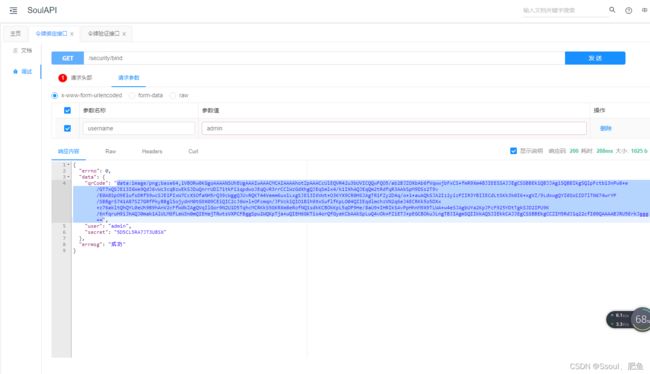
- 启动后端,打开Knife4j集成的API文档接测试页面(没有集成的可以使用postman)

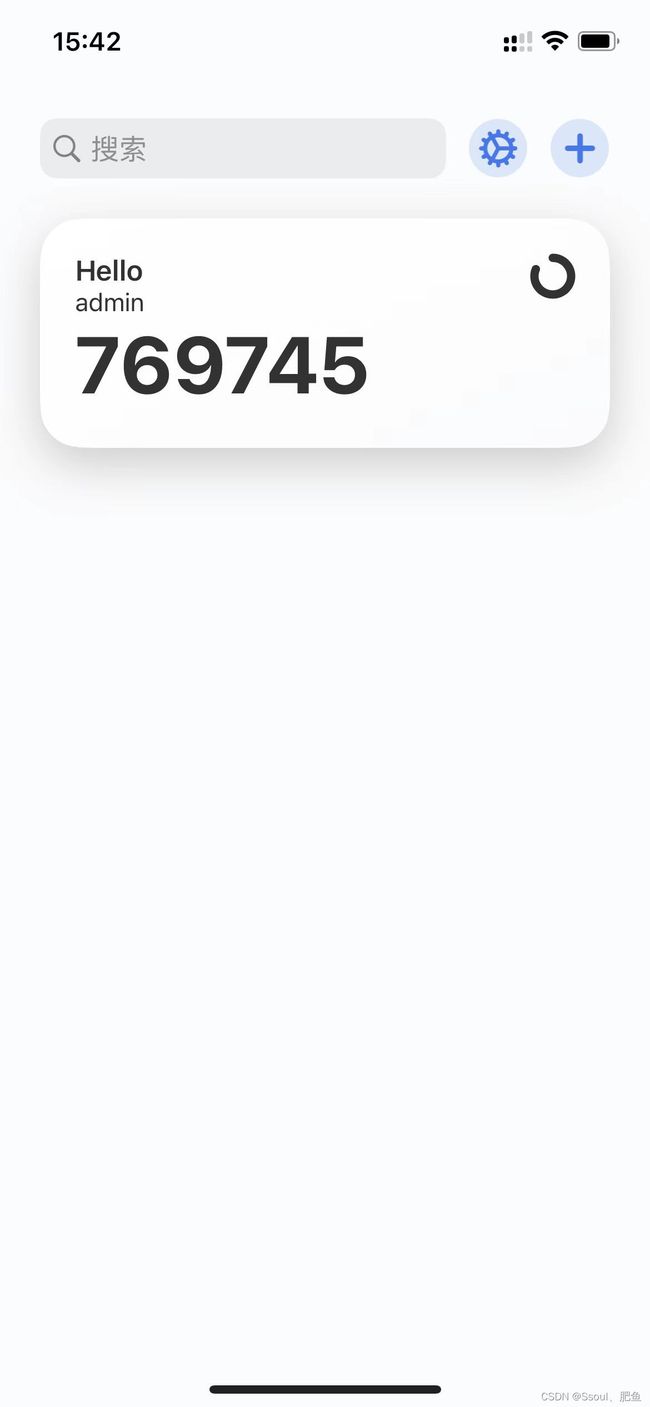
- 将Base64转化成图片,我使用的是Step Two这款app,仅支持苹果,其他机型可以使用Authenticator

- 用app扫过后会出现六位动态口令

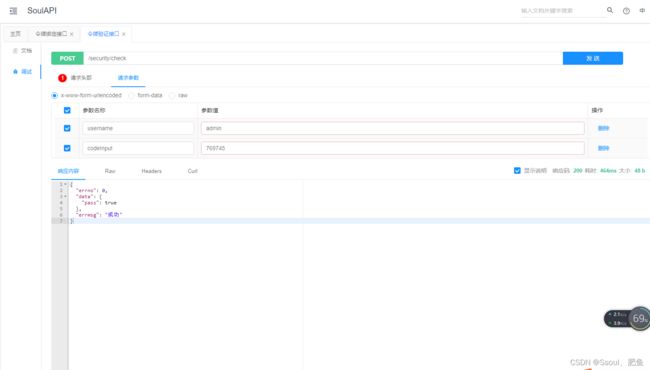
- 登录验证,这里简化了,去掉了密码的校验

注释详尽,在此不赘述…
我们不造轮子,我只是轮子的搬运工
码字不易,点赞收藏不迷路!!