学习记录(3):使用卷积神经网络进行手写数字识别
首先,本人也是刚接触机器学习和深度学习,所以可能代码不会太难。这些学习都是在学习了一些机器学习和深度学习的基础上的延伸,并且也学习了一部分pytorch的基础上,以下为相关链接:
吴恩达机器学习 吴恩达深度学习 莫烦pytorch学习
下面代码均上传到github上,链接如下:deep_learning_cnn_target_detection
此次做的是使用卷积神经网络进行手写数字识别:
1.收集手写数字的数据集
使用的代码是cnn_get_img.py,主要的作用就是识别如下的图片进行手写数字的框选与大小转化和保存,保存路径是img,原图片的路径是img_origin。
数据集链接:
链接:https://pan.baidu.com/s/16fDy6DLTLvtlSJTfsCimKg
提取码:629e
主要作用就是采集数据集,数据集的大小为128*128,得到的结果存入img内,主要修改部分就是ball_color,num和epo,分别为字体颜色,检测的数字,图片的数目,得到结果如下:


最后得到的图像在img内。
2.得到更多的数据
代码在make_more_train_data.py:主要作用就是将原有数据集扩展,得到的数据集将达到更大,采用的运算主要有镜像,旋转,开运算,加噪声等等,可以将数据集扩展为原来的6倍多,最后由上一个函数的图像结到如下效果:
3.训练卷积神经网络并保存
handwrite_num_train_128.py 通过上面得到的数据集,得到图像,采用的是(length, 3, 128, 128)这种输入类型,使用三维的图像输入卷积神经网络,最后通过全连接层,输出的为10层,得到的最大值就是该图像的最接近的标签,最后结果输出为'net_cnn.pkl', 'net_cnn_params.pkl'
下面是超参数的设置:
file_name = 'img'
classes = ['auto_car', '1', '2', '0', '3', '4', '5', '6', '7', '8', '9']
EPOCH = 10               # train the training data n times, to save time, we just train 1 epoch
BATCH_SIZE = 4
LR = 0.0001              # learning rate
下面是将图像转化为3*128*128的pytorch矩阵设置
transf = transforms.ToTensor()这一代码主要就是卷积神经网络的设置。
class CNN(nn.Module):
    def __init__(self):
        super(CNN, self).__init__()
        self.conv1 = nn.Sequential(         # input shape (3, 128, 128)
            nn.Conv2d(
                in_channels=3,              # input height
                out_channels=16,            # n_filters
                kernel_size=3,              # filter size
                stride=1,                   # filter movement/step
                padding=1,                  # if want same width and length of this image after Conv2d, padding=(kernel_size-1)/2 if stride=1
            ),                              # output shape (16, 128, 128)
            nn.ReLU(),                      # activation
            nn.MaxPool2d(kernel_size=2),    # choose max value in 2x2 area, output shape (16, 64, 64)
        )
        self.conv2 = nn.Sequential(         # input shape (16, 64, 64)
            nn.Conv2d(16, 32, 3, 1, 1),     # output shape (32, 64, 64)
            nn.ReLU(),                      # activation
            nn.MaxPool2d(2),                # output shape (32, 32, 32)
        )
        self.conv3 = nn.Sequential(  # input shape (32, 32, 32)
            nn.Conv2d(32, 48, 5, 1, 2),  # output shape (48, 32, 32)
            nn.ReLU(),  # activation
            nn.MaxPool2d(2),  # output shape (48, 16, 16)
        )
        self.conv4 = nn.Sequential(  # input shape (48, 16, 16)
            nn.Conv2d(48, 64, 3, 1, 1),  # output shape (64, 16, 16)
            nn.ReLU(),  # activation
            nn.MaxPool2d(2),  # output shape (64, 8, 8)
        )
        self.hidden = torch.nn.Linear(64 * 8 * 8, 128)  # 隐藏层线性输出
        self.out = nn.Linear(128, 10)   # fully connected layer, output 10 classes

    def forward(self, x):
        x = self.conv1(x)
        x = self.conv2(x)
        x = self.conv3(x)
        x = self.conv4(x)
        x = x.view(x.size(0), -1)       # flatten the output of conv2 to (batch_size, 32 * 7 * 7)
        x = F.relu(self.hidden(x))  # 激励函数(隐藏层的线性值)
        output = self.out(x)
        return output, x    # return x for visualization
下面的主要是获取图像信息,标签等
def get_img2torch(files):
    name_data = os.listdir(files)
    length = len(name_data)
    arr = np.arange(length)
    np.random.shuffle(arr)
    name = []
    for i in range(0, length):
        name.append(name_data[arr[i]])
    label = np.ones((1, length))
    img_data = np.zeros((length, 3, 128, 128))
    for i in range(0, length):
        img = cv2.imread(files + '/' + name[i])
        img = cv2.resize(img, (128, 128))
        img_tensor = transf(img)
        img_data[i] = img_tensor
        label[0][i] = name[i].split('_')[0]
        # label[0][i] = classes.index([''.join(list(g)) for k, g in groupby(name[i], key=lambda x: x.isdigit())][0])
    return img_data, label, length
获取参数信息并将数据集成:
data, y, l = get_img2torch(file_name)
    train_data = torch.tensor(data[0:l - 400], dtype=torch.float32)
    Y_train_tensor = torch.tensor(y[0][0:l - 400], dtype=torch.int64).view(1, -1).squeeze()
    test_x = torch.tensor(data[l - 400:l], dtype=torch.float32).cuda()
    test_y = torch.tensor(y[0][l - 400:l], dtype=torch.int64).view(1, -1).squeeze().cuda()
    torch_dataset = Data.TensorDataset(train_data, Y_train_tensor)
    # 把 dataset 放入 DataLoader
    loader = Data.DataLoader(
        dataset=torch_dataset,  # torch TensorDataset format
        batch_size=BATCH_SIZE,  # mini batch size
        shuffle=True,  # 要不要打乱数据 (打乱比较好)
        num_workers=2,  # 多线程来读数据
    )
网络初始化:
cnn = CNN().cuda()
print(cnn)
cnn.load_state_dict(torch.load('net_cnn_params.pkl'))
optimizer = torch.optim.Adam(cnn.parameters(), lr=LR)  # optimize all cnn parameters
loss_func = nn.CrossEntropyLoss()  # the target label is not one-hotted
训练和输出:
    for epoch in range(EPOCH):
        for step, (x, y) in enumerate(loader):  # gives batch data, normalize x when iterate train_loader
            b_x = x.cuda()  # Tensor on GPU
            b_y = y.cuda()  # Tensor on GPU
            output = cnn(b_x)[0]
            loss = loss_func(output, b_y)
            optimizer.zero_grad()
            loss.backward()
            optimizer.step()

            if step % 200 == 0:
                test_output, last_layer = cnn(test_x)
                pred_y = torch.max(test_output, 1)[1].cuda().data  # move the computation in GPU
                print(pred_y)
                print(test_y)
                accuracy = torch.sum(pred_y == test_y).type(torch.FloatTensor) / test_y.size(0)
                print('Epoch: ', epoch, '| train loss: %.4f' % loss.data.cpu().numpy(),
                      '| test accuracy: %.2f' % accuracy)
    # torch.save(cnn, 'net_cnn.pkl')  # save entire net
    # torch.save(cnn.state_dict(), 'net_cnn_params.pkl')  # save only the parameters
    test_output, last_layer = cnn(test_x)
    pred_y = torch.max(test_output, 1)[1].cuda().data  # move the computation in GPU
    accuracy = torch.sum(pred_y == test_y).type(torch.FloatTensor) / test_y.size(0)
    print(pred_y)
    print(test_y)
    print('test accuracy: %.2f' % accuracy)
4.色域识别和数字识别
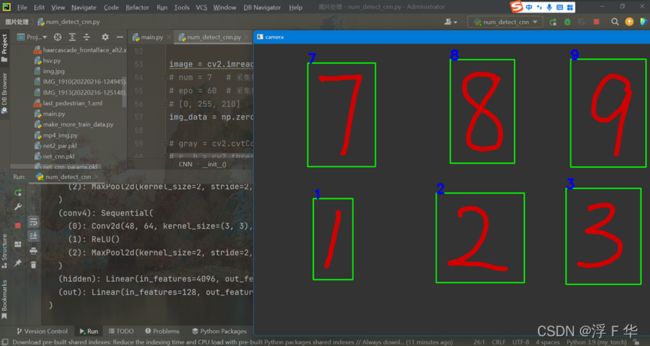
使用的代码是num_detect_cnn.py,通过上一个函数得到的结果对图像进行识别并框识别,得到的结果显示在屏幕,不过需要对颜色首先进行识别,才能完成该区域的目标识别并分类,该代码不支持一张图像随机位置识别,只能先颜色识别可能的区域再检测。
结果如下: