flutter 并不完美的登录完美验证功能
flutter 并不完美的登录完美验证功能
- 前言
- 一、文本输入功能
- 二、验证提示功能
- 三、业务部分
- 总结
前言
在一个APP 中,登录页面做为门户,很多时候,我们都需要写一个完善的登录验证页面,本篇文章将记录如何去封装一个并不算完美的登录验证页面。
一、文本输入功能
本篇文章将使用Form 表单的形式,来完成输入文本的基本布局,关于Form 表单等组件的详细说明,请看分栏中的flutter 入门篇。
本篇文章,其实我只是想用Form 表单的验证功能,但是在实际使用中,我发现Form 表单的验证提示信息部分,并不是特别的灵活,会有一定的限制,so:如果你有想法,可以在后续继续完善,也可以自行替换,我这里只是用于记录。
下面我们先来看写一个文本输入框
Container(
  decoration: BoxDecoration(
    border: Border.all(color: Colors.blue, width: 1),
    borderRadius: BorderRadius.all(Radius.circular(6.r)),
  ),
  child: TextFormField(
    autofocus: model.userNode,
    controller: model.userController,
    onEditingComplete: model.scopeNode.nextFocus,
    decoration: const InputDecoration(
      hintText: "请输入用户名",
      icon: Icon(Icons.person),
      border: InputBorder.none,
    ),
    onChanged: (value){
      model.userValidation(value);
    },
  ),
)
这里我选用自定义样式的方式,进行一个简单的样式定义
二、验证提示功能
文本输入框有了,接下来我们再来写一个错误提示的组件
Offstage(
  offstage: model.userOffstage,
  child: Container(
    padding: const EdgeInsets.only(top: 5),
    alignment: Alignment.centerRight,
    child: const Text(
      "用户名不能为空",
      style: TextStyle(
        color: Colors.red,
      ),
    ),
  ),
),
这里我使用了一个新的组件,Offstage 组件,这个组件主要的作用就是展示和隐藏其它的组件,个人认为,这个组件在一些特定的情况下,还是蛮好用的,有兴趣的可以去了解一下。
其实到这里,我们还需要一个体检login 按钮,就不介绍了,自己根据实际项目需要,去自定义一个就可以了。
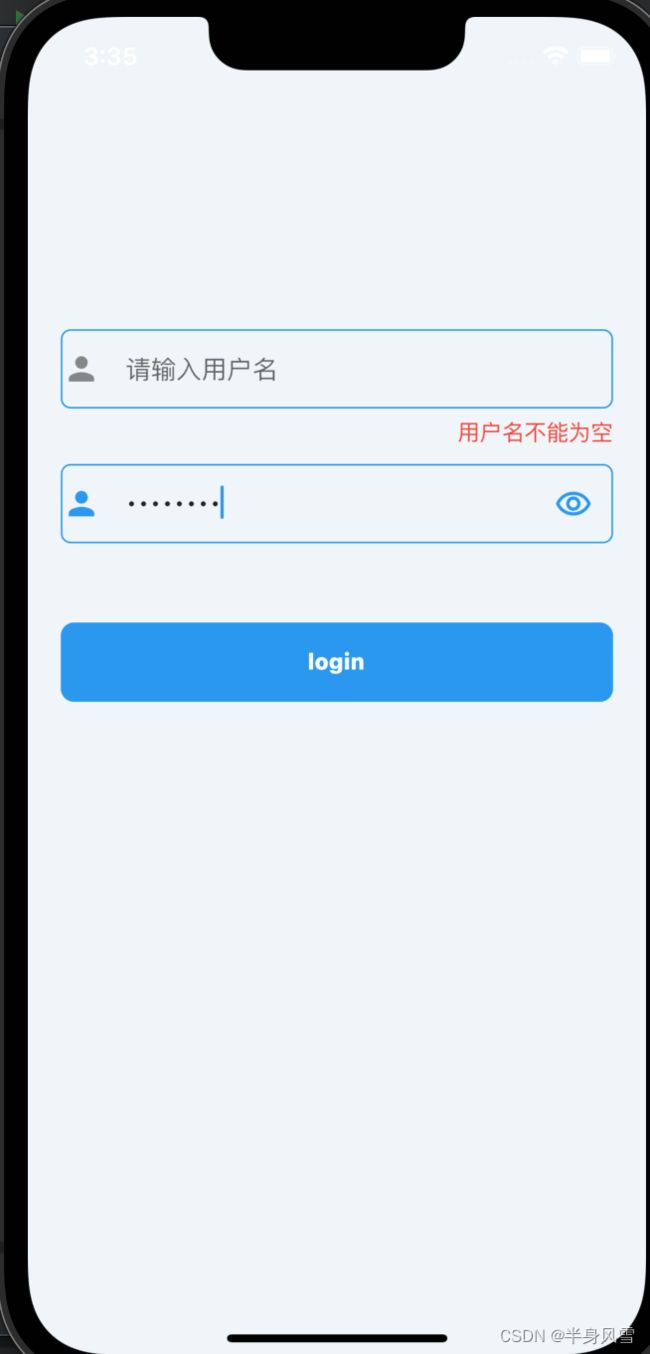
先来看一下实际运行效果图
三、业务部分
个人写项目,比较喜欢前后分离,这样不管在后期的项目维护,版本升级,或者日常开发中,都是比较简单明了的,上面UI 部分已经完成,接下来我们一起来看一下业务逻辑相关部分代码
-
关于文本输入框的焦点部分,我们需要定义所有文本输入框的焦点状态
bool userNode = true; -
密码文本输入框,我们需要有展示和隐藏明文的功能
bool obscureText = true;
- 关于报错信息的展示控制 Offstage 组件的控制,那么我们应该相应的定义一个控制属性
bool userOffstage = true;
- 现在所有的属性都已经定义完成了,现在我们需要对用户输入的信息进行检验
// 验证用户名
userValidation(String input) {
  userOffstage = true;
  if (!TextUtils.validationInput(input)) {
    userOffstage = false;
  }

  notifyListeners();
}
我这里只是一个简单的为空验证检测方法,可根据实际项目需求,来完善自己的验证方法,validationInput 字符检验方法,在flutter 进阶专栏有记录,有兴趣的朋友可以去查看。
文章写到这里,其实我们的整个功能,就已经写完了,内容比较简单,下面来看一下完整的代码
UI 部分
static Widget bodyWidget(LoginViewModel model) {
  return Container(
    padding: EdgeInsets.symmetric(horizontal: 20.w),
    child: Column(
      children: [
        const SizedBox(
          height: 150,
        ),
        textField(model),
        const SizedBox(
          height: 50,
        ),
        submitBtn(model),
      ],
    ),
  );
}

static Widget textField(LoginViewModel model) {
  return Form(
    key: model.formGlobalKey,
    autovalidateMode: AutovalidateMode.onUserInteraction,
    child: FocusScope(
      node: model.scopeNode,
      child: Column(
        crossAxisAlignment: CrossAxisAlignment.start,
        children: [
          Container(
            decoration: BoxDecoration(
              border: Border.all(color: Colors.blue, width: 1),
              borderRadius: BorderRadius.all(Radius.circular(6.r)),
            ),
            child: TextFormField(
              autofocus: model.userNode,
              controller: model.userController,
              onEditingComplete: model.scopeNode.nextFocus,
              decoration: const InputDecoration(
                hintText: "请输入用户名",
                icon: Icon(Icons.person),
                border: InputBorder.none,
              ),
              onChanged: (value){
                model.userValidation(value);
              },
            ),
          ),
          Offstage(
            offstage: model.userOffstage,
            child: Container(
              padding: const EdgeInsets.only(top: 5),
              alignment: Alignment.centerRight,
              child: const Text(
                "用户名不能为空",
                style: TextStyle(
                  color: Colors.red,
                ),
              ),
            ),
          ),
          const SizedBox(
            height: 10,
          ),
          Container(
            decoration: BoxDecoration(
              border: Border.all(color: Colors.blue, width: 1),
              borderRadius: BorderRadius.all(Radius.circular(6.r)),
            ),
            child: TextFormField(
              autofocus: model.passNode,
              controller: model.passController,
              obscureText: model.obscureText,
              onEditingComplete: model.scopeNode.nextFocus,
              decoration: InputDecoration(
                hintText: "请输入用户名",
                icon: const Icon(Icons.person),
                border: InputBorder.none,
                suffixIcon: IconButton(
                  onPressed: () {
                    model.obscureText = !model.obscureText;
                    model.notifyListeners();
                  },
                  icon: Icon(model.obscureText
                      ? Icons.remove_red_eye_outlined
                      : Icons.remove_red_eye),
                ),
              ),
              onChanged: (value){
                model.passValidation(value);
              },
            ),
          ),
          Offstage(
            offstage: model.passOffstage,
            child: Container(
              padding: const EdgeInsets.only(top: 5),
              alignment: Alignment.centerRight,
              child: const Text(
                "密码不能为空",
                style: TextStyle(
                  color: Colors.red,
                ),
              ),
            ),
          ),
        ],
      ),
    ),
  );
}

static Widget submitBtn(LoginViewModel model) {
  return InkWell(
    onTap: () {
      model.login();
    },
    child: Container(
      height: 50,
      alignment: Alignment.center,
      decoration: BoxDecoration(
        color: Colors.blue,
        borderRadius: BorderRadius.all(
          Radius.circular(8.r),
        ),
      ),
      child: const Text(
        "login",
        style: TextStyle(
          color: Colors.white,
          fontWeight: FontWeight.w800,
        ),
      ),
    ),
  );
}
业务逻辑部分
// Form 表单唯一的Key
GlobalKey formGlobalKey = GlobalKey();
TextEditingController userController =
    TextEditingController(text: "13042824000");
TextEditingController passController =
    TextEditingController(text: "12345678");
FocusScopeNode scopeNode = FocusScopeNode();

// 用户名和密码的焦点
bool userNode = true;
bool passNode = false;

// 密码输入框,是否展示明文
bool obscureText = true;

// 显示隐藏报错信息
bool userOffstage = true;
bool passOffstage = true;

// 验证用户名
userValidation(String input) {
  userOffstage = true;
  if (!TextUtils.validationInput(input)) {
    userOffstage = false;
  }

  notifyListeners();
}

// 验证密码
passValidation(String input) {
  passOffstage = true;
  if (!TextUtils.validationInput(input)) {
    passOffstage = false;
  }

  notifyListeners();
}

login() {
  // 获取当前用户名和密码的状态
  if (!userOffstage && !passOffstage) {
    ToastUtils.showError("账号或密码错误");
    return;
  }

  // 用户登录基本信息存储
  PreferencesUtils.setString("user", userController.text);
  PreferencesUtils.setString("pass", passController.text);

  // 登录成功,返回之前页
  back();
}
总结
本篇文章内容较少,代码也比较少,如果对你有帮忙,麻烦点个赞,或者你想看什么,可以在下面留言,感谢你的支持。
最近我在参与博客之星的评选活动,如果我的文章对你有帮助,请点击这里 给予五星支持一下,谢谢。


