部署Yolov5模型到jetson nano上
目录
一、检查是否安装cuda
二、安装好pip3,系统已经自带python3.6.9
三、检测是否安装gpu版本的tensorflow
四、安装pycuda
五、下载tensorrtx源码
六、模型测试
一、检查是否安装cuda
nvcc -Vljx@ljx-desktop:~/pycuda2/tensorrtx-yolov5-v5.0/yolov5$ nvcc -V
nvcc: NVIDIA (R) Cuda compiler driver
Copyright (c) 2005-2021 NVIDIA Corporation
Built on Sun_Feb_28_22:34:44_PST_2021
Cuda compilation tools, release 10.2, V10.2.300
Build cuda_10.2_r440.TC440_70.29663091_0
ljx@ljx-desktop:~/pycuda2/tensorrtx-yolov5-v5.0/yolov5$
cd /usr/src/cudnn_samples_v8/mnistCUDNN
sudo make
sudo chmod a+x mnistCUDNN
./mnistCUDNN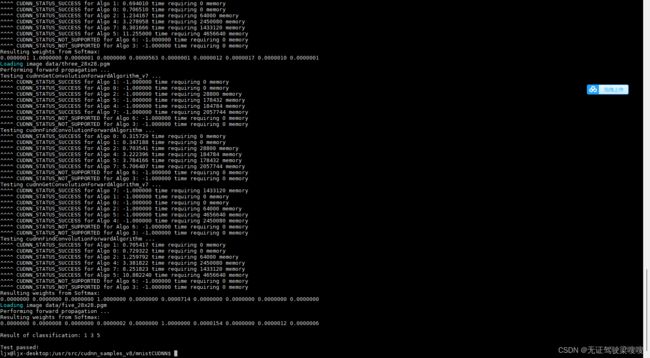
二、安装好pip3,系统已经自带python3.6.9
sudo apt-get install python3-pip python3-dev三、检测是否安装gpu版本的tensorflow
1.安装方法之前的文章有这里举个例子
sudo apt-get install libhdf5-serial-dev hdf5-toolspip3 install --extra-index-url https://developer.download.nvidia.com/compute/redist/jp/v46 tensorflow-gpu==2.6.0+nv19.3 --user2.检测方法举两个例子
ljx@ljx-desktop:~/pycuda2/pycuda-2021.1$ python3
Python 3.6.9 (default, Dec  8 2021, 21:08:43)
[GCC 8.4.0] on linux
Type "help", "copyright", "credits" or "license" for more information.
>>> import torchvision
>>> print(torchvision.__version__)
0.11.1
>>> import tensorflow as tf
>>> a = tf.constant(1.)
2022-02-21 21:25:38.178350: I tensorflow/stream_executor/cuda/cuda_gpu_executor.cc:1017] ARM64 does not support NUMA - returning NUMA node zero
2022-02-21 21:25:38.179671: I tensorflow/stream_executor/cuda/cuda_gpu_executor.cc:1017] ARM64 does not support NUMA - returning NUMA node zero
2022-02-21 21:25:38.180036: I tensorflow/stream_executor/cuda/cuda_gpu_executor.cc:1017] ARM64 does not support NUMA - returning NUMA node zero
2022-02-21 21:25:38.194555: I tensorflow/stream_executor/cuda/cuda_gpu_executor.cc:1017] ARM64 does not support NUMA - returning NUMA node zero
2022-02-21 21:25:38.196004: I tensorflow/stream_executor/cuda/cuda_gpu_executor.cc:1017] ARM64 does not support NUMA - returning NUMA node zero
2022-02-21 21:25:38.197011: I tensorflow/stream_executor/cuda/cuda_gpu_executor.cc:1017] ARM64 does not support NUMA - returning NUMA node zero
2022-02-21 21:26:58.812460: I tensorflow/stream_executor/cuda/cuda_gpu_executor.cc:1017] ARM64 does not support NUMA - returning NUMA node zero
2022-02-21 21:26:58.873885: I tensorflow/stream_executor/cuda/cuda_gpu_executor.cc:1017] ARM64 does not support NUMA - returning NUMA node zero
2022-02-21 21:26:58.909564: I tensorflow/stream_executor/cuda/cuda_gpu_executor.cc:1017] ARM64 does not support NUMA - returning NUMA node zero
2022-02-21 21:26:59.039953: I tensorflow/core/common_runtime/gpu/gpu_device.cc:1510] Created device /job:localhost/replica:0/task:0/device:GPU:0 with 41 MB memory:  -> device: 0, name: NVIDIA Tegra X1, pci                bus id: 0000:00:00.0, compute capability: 5.3
>>> import os
>>> os.environ['TF_CPP_MIN_LOG_LEVEL'] = '2'
>>> a = tf.constant(1.)
>>> b = tf.constant(2.)
>>> print(a+b)
tf.Tensor(3.0, shape=(), dtype=float32)
>>> print('GPU:', tf.test.is_gpu_available())
WARNING:tensorflow:From :1: is_gpu_available (from tensorflow.python.framework.test_util) is deprecated and will be removed in a future version.
Instructions for updating:
Use `tf.config.list_physical_devices('GPU')` instead.
2022-02-21 21:32:15.515633: I tensorflow/stream_executor/cuda/cuda_gpu_executor.cc:1017] ARM64 does not support NUMA - returning NUMA node zero
2022-02-21 21:32:15.517432: I tensorflow/stream_executor/cuda/cuda_gpu_executor.cc:1017] ARM64 does not support NUMA - returning NUMA node zero
2022-02-21 21:32:15.518313: I tensorflow/stream_executor/cuda/cuda_gpu_executor.cc:1017] ARM64 does not support NUMA - returning NUMA node zero
2022-02-21 21:32:15.527565: I tensorflow/stream_executor/cuda/cuda_gpu_executor.cc:1017] ARM64 does not support NUMA - returning NUMA node zero
2022-02-21 21:32:15.528595: I tensorflow/stream_executor/cuda/cuda_gpu_executor.cc:1017] ARM64 does not support NUMA - returning NUMA node zero
2022-02-21 21:32:15.529327: I tensorflow/core/common_runtime/gpu/gpu_device.cc:1510] Created device /device:GPU:0 with 41 MB memory:  -> device: 0, name: NVIDIA Tegra X1, pci bus id: 0000:00:00.0, compute capability: 5.3
GPU: True
>>>
ljx@ljx-desktop:~/pycuda2$ cat demo3.py
import tensorflow as tf
tf.compat.v1.disable_eager_execution()
with tf.device('/cpu:0'):
a = tf.constant([1.0,2.0,3.0],shape=[3],name='a')
b = tf.constant([1.0,2.0,3.0],shape=[3],name='b')
with tf.device('/gpu:1'):
c = a+b
sess = tf.compat.v1.Session(config=tf.compat.v1.ConfigProto(allow_soft_placement=True,log_device_placement=True))
sess.run(tf.compat.v1.global_variables_initializer())
print(sess.run(c))
ljx@ljx-desktop:~/pycuda2$ python3 demo3.py
2022-02-24 13:36:43.842123: I tensorflow/stream_executor/cuda/cuda_gpu_executor.cc:1017] ARM64 does not support NUMA - returning NUMA node zero
2022-02-24 13:36:45.249622: I tensorflow/stream_executor/cuda/cuda_gpu_executor.cc:1017] ARM64 does not support NUMA - returning NUMA node zero
2022-02-24 13:36:45.251626: I tensorflow/stream_executor/cuda/cuda_gpu_executor.cc:1017] ARM64 does not support NUMA - returning NUMA node zero
2022-02-24 13:38:19.897324: I tensorflow/stream_executor/cuda/cuda_gpu_executor.cc:1017] ARM64 does not support NUMA - returning NUMA node zero
2022-02-24 13:38:20.908341: I tensorflow/stream_executor/cuda/cuda_gpu_executor.cc:1017] ARM64 does not support NUMA - returning NUMA node zero
2022-02-24 13:38:20.941767: I tensorflow/stream_executor/cuda/cuda_gpu_executor.cc:1017] ARM64 does not support NUMA - returning NUMA node zero
2022-02-24 13:38:21.589736: I tensorflow/core/common_runtime/gpu/gpu_device.cc:1510] Created device /job:localhost/replica:0/task:0/device:GPU:0 with 39 MB memory: -> device: 0, name: NVIDIA Tegra X1, pci bus id: 0000:00:00.0, compute capability: 5.3
2022-02-24 13:38:22.835843: I tensorflow/core/common_runtime/direct_session.cc:361] Device mapping:
/job:localhost/replica:0/task:0/device:GPU:0 -> device: 0, name: NVIDIA Tegra X1, pci bus id: 0000:00:00.0, compute capability: 5.3
add: (AddV2): /job:localhost/replica:0/task:0/device:GPU:0
2022-02-24 13:38:28.950709: I tensorflow/core/common_runtime/placer.cc:114] add: (AddV2): /job:localhost/replica:0/task:0/device:GPU:0
init: (NoOp): /job:localhost/replica:0/task:0/device:GPU:0
2022-02-24 13:38:28.988627: I tensorflow/core/common_runtime/placer.cc:114] init: (NoOp): /job:localhost/replica:0/task:0/device:GPU:0
a: (Const): /job:localhost/replica:0/task:0/device:CPU:0
2022-02-24 13:38:28.988931: I tensorflow/core/common_runtime/placer.cc:114] a: (Const): /job:localhost/replica:0/task:0/device:CPU:0
b: (Const): /job:localhost/replica:0/task:0/device:CPU:0
2022-02-24 13:38:28.989207: I tensorflow/core/common_runtime/placer.cc:114] b: (Const): /job:localhost/replica:0/task:0/device:CPU:0
[2. 4. 6.]四、安装pycuda
官方解决方案【链接】
不想去看的话,直接下载这个链接的源码,同下步骤进行安装即可
pycuda · PyPI
tar zxvf pycuda-2021.1.tar.gz
cd pycuda-2021.1/
python3 configure.py --cuda-root=/usr/local/cuda-10.2
sudo python3 setup.py install
demo测试
ljx@ljx-desktop:~/pycuda2$ python3 demo2.py
[[ 19.436962    39.908886    20.68723    ...  -8.1019335  -15.546103
  -17.154585  ]
 [-19.714169    -0.6291714    9.462954   ... -15.174974    -4.1439514
   18.460089  ]
 [-17.491064   -34.86578    -12.999788   ... -17.18811     10.867537
    0.05436563]
 ...
 [ 45.716812   -32.27492     -0.5752983  ... -31.032787    -4.8378153
    7.907672  ]
 [  6.989045   -13.123575    -2.8372145  ...  21.856476     5.0534296
  -15.905795  ]
 [ 17.042442     0.354123    -7.9831614  ... -11.882836    20.23512
  -19.761951  ]]
[[ 19.436964    39.908894    20.687223   ...  -8.101934   -15.54609
  -17.154581  ]
 [-19.71417     -0.62916106   9.46296    ... -15.174983    -4.1439533
   18.460089  ]
 [-17.491072   -34.86579    -12.999789   ... -17.188126    10.867537
    0.05437115]
 ...
 [ 45.716824   -32.27491     -0.57529545 ... -31.03278     -4.8378134
    7.907671  ]
 [  6.989043   -13.123584    -2.8372157  ...  21.856468     5.053428
  -15.905798  ]
 [ 17.042446     0.35412684  -7.98316    ... -11.882843    20.23511
  -19.761948  ]]
ljx@ljx-desktop:~/pycuda2$ cat demo2.py
import numpy as np
import pycuda.autoinit
import pycuda.driver as cuda
from pycuda.compiler import SourceModule
mod = SourceModule("""
#define BLOCK_SIZE 16
typedef struct {
int width;
int height;
int stride;
int __padding; //为了和64位的elements指针对齐
float* elements;
} Matrix;
// 读取矩阵元素
__device__ float GetElement(const Matrix A, int row, int col)
{
return A.elements[row * A.stride + col];
}
// 赋值矩阵元素
__device__ void SetElement(Matrix A, int row, int col, float value)
{
A.elements[row * A.stride + col] = value;
}
// 获取 16x16 的子矩阵
__device__ Matrix GetSubMatrix(Matrix A, int row, int col)
{
Matrix Asub;
Asub.width = BLOCK_SIZE;
Asub.height = BLOCK_SIZE;
Asub.stride = A.stride;
Asub.elements = &A.elements[A.stride * BLOCK_SIZE * row + BLOCK_SIZE * col];
return Asub;
}
__global__ void matrix_mul(Matrix *A, Matrix *B, Matrix *C)
{
int blockRow = blockIdx.y;
int blockCol = blockIdx.x;
int row = threadIdx.y;
int col = threadIdx.x;
Matrix Csub = GetSubMatrix(*C, blockRow, blockCol);
// 每个线程通过累加Cvalue计算Csub的一个值
float Cvalue = 0;
// 为了计算Csub遍历所有需要的Asub和Bsub
for (int m = 0; m < (A->width / BLOCK_SIZE); ++m)
{
Matrix Asub = GetSubMatrix(*A, blockRow, m);
Matrix Bsub = GetSubMatrix(*B, m, blockCol);
__shared__ float As[BLOCK_SIZE][BLOCK_SIZE];
__shared__ float Bs[BLOCK_SIZE][BLOCK_SIZE];
As[row][col] = GetElement(Asub, row, col);
Bs[row][col] = GetElement(Bsub, row, col);
__syncthreads();
for (int e = 0; e < BLOCK_SIZE; ++e)
Cvalue += As[row][e] * Bs[e][col];
__syncthreads();
}
SetElement(Csub, row, col, Cvalue);
}
""")
class MatrixStruct(object):
def __init__(self, array):
self._cptr = None
self.shape, self.dtype = array.shape, array.dtype
self.width = np.int32(self.shape[1])
self.height = np.int32(self.shape[0])
self.stride = self.width
self.elements = cuda.to_device(array) # 分配内存并拷贝数组数据至device,返回其地址
def send_to_gpu(self):
self._cptr = cuda.mem_alloc(self.nbytes()) # 分配一个C结构体所占的内存
cuda.memcpy_htod(int(self._cptr), self.width.tobytes()) # 拷贝数据至device,下同
cuda.memcpy_htod(int(self._cptr)+4, self.height.tobytes())
cuda.memcpy_htod(int(self._cptr)+8, self.stride.tobytes())
cuda.memcpy_htod(int(self._cptr)+16, np.intp(int(self.elements)).tobytes())
def get_from_gpu(self):
return cuda.from_device(self.elements, self.shape, self.dtype) # 从device取回数组数据
def nbytes(self):
return self.width.nbytes * 4 + np.intp(0).nbytes
a = np.random.randn(400,400).astype(np.float32)
b = np.random.randn(400,400).astype(np.float32)
c = np.zeros_like(a)
A = MatrixStruct(a)
B = MatrixStruct(b)
C = MatrixStruct(c)
A.send_to_gpu()
B.send_to_gpu()
C.send_to_gpu()
matrix_mul = mod.get_function("matrix_mul")
matrix_mul(A._cptr, B._cptr, C._cptr, block=(16,16,1), grid=(25,25))
result = C.get_from_gpu()
print(np.dot(a,b))
print(result)
五、下载tensorrtx源码
进入tensorrtx的官网,下载你训练时对应的yolov5的版本,点击左上角的master-->tags-->yolov5
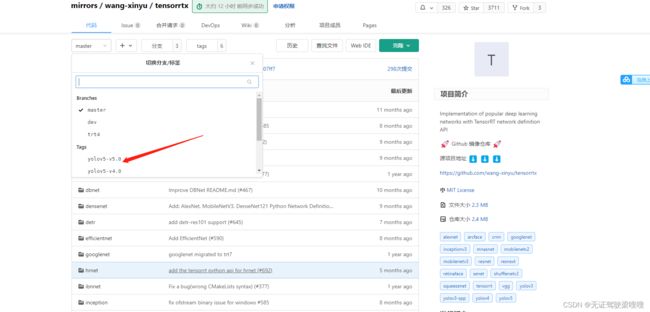

下载完成后,来到下载目录下,输入以下命令解压,我这里是v5.0版本
unzip tensorrtx-yolov5-v5.0.zip把之前训练的模型生成的wts权重文件放到tensorrtx的yolov5文件夹中
没有wts文件只是想体验强大的jetson nano的同学可以先下载一下五类垃圾分类权重文件https://blog.csdn.net/xiaoyuan2157
链接: https://pan.baidu.com/s/1nciB7Xn1vXj9ZfBAoj39Bw 提取码: r74h
来到tensorrtx的yolov5文件夹,打开yololayer.h的代码,修改CLASS_NUM

创建进入文件夹build并cmake ..
mkdir build
cd build
cmake ..
make 生成引擎文件
sudo ./yolov5 -s ../best.wts best.engine s 这一段模型引擎生成的命令解释如下
sudo ./yolov5 -s/ [.wts文件路径] [.engine文件名称] [s/m/l/x/s6/m6/l6/x6 or c/c6 gd gw]
稍作等待后,出现Build engine successfully!表示生成完成,这时build文件夹里面会多出一个best.engine文件
六、模型测试
根据官方的yolov5_trt改的代码来测试一下

ljx@ljx-desktop:~/pycuda2/tensorrtx-yolov5-v5.0/yolov5$ cat yolov5_trt2.py
"""
# Yolov5 基于pytorch,修改起来更加方便快捷;
# yolov5自带anchor生成器,自动为你的数据集生成最优化的anchor;
# yolov5的整体AP比yolov4更高。
"""
import ctypes
import os
import random
import sys
import threading
import time
# 安装串口函数库 sudo pip3 install pyserial
import serial
import serial as se  # 导入串口库,这里是用于串口通信的库,需要在命令行输入
#pip3 install pyserial
import cv2
import numpy as np  # 构造ndarray对象
import pycuda.autoinit
import pycuda.driver as cuda
import tensorrt as trt
from time import sleep


# from jetcam.csi_camera import CSICamera
# import torch
# import torchvision#在nano上安装这两个库是有些麻烦的特别是torchvision。

INPUT_W = 640
INPUT_H = 640
CONF_THRESH = 0.8  # 概率阈值
IOU_THRESHOLD = 0.1


# 定义画框函数
def plot_one_box(x, img, color=None, label=None, line_thickness=None):
    '''
    description: Plots one bounding box on image img,
                 this function comes from YoLov5 project.
    param:
        x:      a box likes [x1,y1,x2,y2]
        img:    a opencv image object

        label:  str
        line_thickness: int
    return:
        no return
    '''

    # img, result_boxes, result_scores, result_classid = yolov5_wrapper.infer(img)
    # img = draw_boxes(img, result_boxes, result_scores, result_classid)
    tl = (
            line_thickness or round(0.002 * (img.shape[0] + img.shape[1]) / 2) + 1
    )  # line/font thickness
    color = color or [random.randint(0, 255) for _ in range(3)]
    c1, c2 = (int(x[0]), int(x[1])), (int(x[2]), int(x[3]))
    cv2.rectangle(img, c1, c2, color, thickness=tl, lineType=cv2.LINE_AA)
    # print("left:(" + str(c1[0]) + "," + str(c1[1]) +")","right:(" + str(c2[0]) + "," + str(c2[1])+ ")")
    a = int(c1[0])
    b = int(c2[0])
    c = int(c1[1])
    d = int(c2[1])
    x1 = (b + a) / 2

    x = int(x1)
    y1 = (d + c) / 2
    y = int(y1)
    r = label[2:6] #rate
    sleep(0.0009)
    c =str(label[0]) #class

    if label:
        tf = max(tl - 1, 1)  # font thickness
        t_size = cv2.getTextSize(label, 0, fontScale=tl / 3, thickness=tf)[0]
        c2 = c1[0] + t_size[0], c1[1] - t_size[1] - 3
        cv2.rectangle(img, c1, c2, color, -1, cv2.LINE_AA)  # filled
        cv2.putText(
            img,
            label,
            (c1[0], c1[1] - 2),
            0,
            tl / 3,
            [225, 255, 255],
            thickness=tf,
            lineType=cv2.LINE_AA,
        )
    return x, y


# 画框函数
def draw_boxes(image_raw, result_boxes, result_scores, result_classid):
    max_scores = -1
    max_index = -1
    max_x,max_y = -1,-1
    for i in range(len(result_boxes)):
        box = result_boxes[i]
        x, y = plot_one_box(
            box,
            image_raw,
            label="{}:{:.2f}".format(
                categories[int(result_classid[i])], result_scores[i]
            )
        )
        # print(result_classid[i])
        # se.write((str(x) + ',' + str(y) + ',' + str(result_classid[i]) + '\r\n').encode())
        # global max_score
        if result_boxes.all() > max_scores:
            max_scores = result_scores[i]
            max_index = i
            max_x, max_y = x, y

    if max_scores != -1:
        c = int(result_classid[max_index])
        output_str = ('[' + str(x) + ',' + str(y) + ',' +str(c) + ']'+'\r\n')
        print(output_str)
        se.write(output_str.encode())
        sleep(0.0009)

    return image_raw


# yolov5模型转到TensorRT中推理
# 定义yolov5转trt的类 start
class YoLov5TRT(object):
    """
    description: A YOLOv5 class that warps TensorRT ops, preprocess and postprocess ops.
    """

    def __init__(self, engine_file_path):
        # Create a Context on this device,
        self.ctx = cuda.Device(0).make_context()
        stream = cuda.Stream()
        TRT_LOGGER = trt.Logger(trt.Logger.INFO)
        runtime = trt.Runtime(TRT_LOGGER)

        # Deserialize the engine from file
        with open(engine_file_path, "rb") as f:
            engine = runtime.deserialize_cuda_engine(f.read())
        context = engine.create_execution_context()

        host_inputs = []
        cuda_inputs = []
        host_outputs = []
        cuda_outputs = []
        bindings = []

        for binding in engine:
            size = trt.volume(engine.get_binding_shape(binding)) * engine.max_batch_size
            dtype = trt.nptype(engine.get_binding_dtype(binding))
            # Allocate host and device buffers
            host_mem = cuda.pagelocked_empty(size, dtype)
            cuda_mem = cuda.mem_alloc(host_mem.nbytes)
            # Append the device buffer to device bindings.
            bindings.append(int(cuda_mem))
            # Append to the appropriate list.
            if engine.binding_is_input(binding):
                host_inputs.append(host_mem)
                cuda_inputs.append(cuda_mem)
            else:
                host_outputs.append(host_mem)
                cuda_outputs.append(cuda_mem)

        # Store
        self.stream = stream
        self.context = context
        self.engine = engine
        self.host_inputs = host_inputs
        self.cuda_inputs = cuda_inputs
        self.host_outputs = host_outputs
        self.cuda_outputs = cuda_outputs
        self.bindings = bindings

    # 释放引擎,释放GPU显存,释放CUDA流
    def __del__(self):
        print("delete object to release memory")

    def infer(self, input_image_path):
        threading.Thread.__init__(self)
        # Make self the active context, pushing it on top of the context stack.
        self.ctx.push()
        # Restore
        stream = self.stream
        context = self.context
        engine = self.engine
        host_inputs = self.host_inputs
        cuda_inputs = self.cuda_inputs
        host_outputs = self.host_outputs
        cuda_outputs = self.cuda_outputs
        bindings = self.bindings
        # Do image preprocess
        input_image, image_raw, origin_h, origin_w = self.preprocess_image(
            input_image_path
        )
        # Copy input image to host buffer
        np.copyto(host_inputs[0], input_image.ravel())
        start = time.time()
        # Transfer input data  to the GPU.
        cuda.memcpy_htod_async(cuda_inputs[0], host_inputs[0], stream)
        # Run inference.
        context.execute_async(bindings=bindings, stream_handle=stream.handle)
        # Transfer predictions back from the GPU.
        cuda.memcpy_dtoh_async(host_outputs[0], cuda_outputs[0], stream)
        # Synchronize the stream
        stream.synchronize()
        end = time.time()
        # Remove any context from the top of the context stack, deactivating it.
        self.ctx.pop()
        # Here we use the first row of output in that batch_size = 1
        output = host_outputs[0]
        # Do postprocess
        result_boxes, result_scores, result_classid = self.post_process(
            output, origin_h, origin_w
        )


        return image_raw, result_boxes, result_scores, result_classid

    def destroy(self):
        # Remove any context from the top of the context stack, deactivating it.
        self.ctx.pop()

    def preprocess_image(self, image_raw):
        """
        description: Read an image from image path, convert it to RGB,
                     resize and pad it to target size, normalize to [0,1],
                     transform to NCHW format.
        param:
            input_image_path: str, image path
        return:
            image:  the processed image
            image_raw: the original image
            h: original height
            w: original width
        """
        h, w, c = image_raw.shape
        image = cv2.cvtColor(image_raw, cv2.COLOR_BGR2RGB)
        # Calculate widht and height and paddings
        r_w = INPUT_W / w
        r_h = INPUT_H / h
        if r_h > r_w:
            tw = INPUT_W
            th = int(r_w * h)
            tx1 = tx2 = 0
            ty1 = int((INPUT_H - th) / 2)
            ty2 = INPUT_H - th - ty1
        else:
            tw = int(r_h * w)
            th = INPUT_H
            tx1 = int((INPUT_W - tw) / 2)
            tx2 = INPUT_W - tw - tx1
            ty1 = ty2 = 0
        # Resize the image with long side while maintaining ratio
        image = cv2.resize(image, (tw, th))
        # Pad the short side with (128,128,128)
        image = cv2.copyMakeBorder(
            image, ty1, ty2, tx1, tx2, cv2.BORDER_CONSTANT, (128, 128, 128)
        )
        image = image.astype(np.float32)
        # Normalize to [0,1]
        image /= 255.0
        # HWC to CHW format:
        image = np.transpose(image, [2, 0, 1])
        # CHW to NCHW format
        image = np.expand_dims(image, axis=0)
        # Convert the image to row-major order, also known as "C order":
        image = np.ascontiguousarray(image)
        return image, image_raw, h, w

    def xywh2xyxy(self, origin_h, origin_w, x):
        """
        description:    Convert nx4 boxes from [x, y, w, h] to [x1, y1, x2, y2] where xy1=top-left, xy2=bottom-right
        param:
            origin_h:   height of original image
            origin_w:   width of original image
            x:          A boxes tensor, each row is a box [center_x, center_y, w, h]
        return:
            y:          A boxes tensor, each row is a box [x1, y1, x2, y2]
        """
        y = np.zeros_like(x)
        # y = torch.zeros_like(x) if isinstance(x, torch.Tensor) else np.zeros_like(x)
        r_w = INPUT_W / origin_w
        r_h = INPUT_H / origin_h
        if r_h > r_w:
            y[:, 0] = x[:, 0] - x[:, 2] / 2
            y[:, 2] = x[:, 0] + x[:, 2] / 2
            y[:, 1] = x[:, 1] - x[:, 3] / 2 - (INPUT_H - r_w * origin_h) / 2
            y[:, 3] = x[:, 1] + x[:, 3] / 2 - (INPUT_H - r_w * origin_h) / 2
            y /= r_w
        else:
            y[:, 0] = x[:, 0] - x[:, 2] / 2 - (INPUT_W - r_h * origin_w) / 2
            y[:, 2] = x[:, 0] + x[:, 2] / 2 - (INPUT_W - r_h * origin_w) / 2
            y[:, 1] = x[:, 1] - x[:, 3] / 2
            y[:, 3] = x[:, 1] + x[:, 3] / 2
            y /= r_h

        return y

    # 往YoLov5TRT这个类中加入一个方法,此处是用numpy的方式实现nms
    def nms(self, boxes, scores, iou_threshold=IOU_THRESHOLD):  # 非极大值抑制,是目标检测框架中的后处理模块
        # 空间距离结合并交比(IOU)完成聚类划分
        x1 = boxes[:, 0]
        y1 = boxes[:, 1]
        x2 = boxes[:, 2]
        y2 = boxes[:, 3]
        areas = (y2 - y1 + 1) * (x2 - x1 + 1)
        scores = scores
        keep = []
        index = scores.argsort()[::-1]
        while index.size > 0:
            i = index[0]  # every time the first is the biggst, and add it directly
            keep.append(i)

            x11 = np.maximum(x1[i], x1[index[1:]])  # calculate the points of overlap
            y11 = np.maximum(y1[i], y1[index[1:]])
            x22 = np.minimum(x2[i], x2[index[1:]])
            y22 = np.minimum(y2[i], y2[index[1:]])

            w = np.maximum(0, x22 - x11 + 1)  # the weights of overlap
            h = np.maximum(0, y22 - y11 + 1)  # the height of overlap

            overlaps = w * h
            ious = overlaps / (areas[i] + areas[index[1:]] - overlaps)

            idx = np.where(ious <= iou_threshold)[0]
            index = index[idx + 1]  # because index start from 1
            # print(overlaps)
            # print(x1)
            # sleep(1)

        return keep

    # 把nms的结果赋值给indices变量,改写post_process函数
    def post_process(self, output, origin_h, origin_w):
        """
        description: postprocess the prediction
        param:
            output:     A tensor likes [num_boxes,cx,cy,w,h,conf,cls_id, cx,cy,w,h,conf,cls_id, ...]
            origin_h:   height of original image
            origin_w:   width of original image
        return:
            result_boxes: finally boxes, a boxes tensor, each row is a box [x1, y1, x2, y2]
            result_scores: finally scores, a tensor, each element is the score correspoing to box
            result_classid: finally classid, a tensor, each element is the classid correspoing to box
        """
        # Get the num of boxes detected
        num = int(output[0])
        # Reshape to a two dimentional ndarray
        pred = np.reshape(output[1:], (-1, 6))[:num, :]
        # to a torch Tensor
        # pred = torch.Tensor(pred).cuda()#去掉这行,用torchvision库中的nms方法来完成非极大值抑制。
        # Get the boxes
        boxes = pred[:, :4]
        # Get the scores
        scores = pred[:, 4]
        # Get the classid
        classid = pred[:, 5]
        # Choose those boxes that score > CONF_THRESH
        si = scores > CONF_THRESH
        boxes = boxes[si, :]
        scores = scores[si]
        classid = classid[si]
        # Trandform bbox from [center_x, center_y, w, h] to [x1, y1, x2, y2]
        boxes = self.xywh2xyxy(origin_h, origin_w, boxes)
        # Do nms
        # 去掉cpu方法,因为ndarray没有这个方法
        # indices = torchvision.ops.nms(boxes, scores, iou_threshold=IOU_THRESHOLD).cpu()
        # result_boxes = boxes[indices, :].cpu()
        # result_scores = scores[indices].cpu()
        # result_classid = classid[indices].cpu()

        indices = self.nms(boxes, scores, IOU_THRESHOLD)
        result_boxes = boxes[indices, :]
        result_scores = scores[indices]
        result_classid = classid[indices]
        # print(result_boxes)
        # print(result_classid)

        return result_boxes, result_scores, result_classid


class myThread(threading.Thread):
    def __init__(self, func, args):
        threading.Thread.__init__(self)
        self.func = func
        self.args = args

    def run(self):
        self.func(*self.args)


# 摄像头检测
def detect_camera(camera, yolov5_wrapper):
    # def detect_camera(x,camera, yolov5_wrapper):
    count = 0

    # 开始循环检测
    while True:
        # img = camera.read()#CSI摄像头
        ret, img = camera.read()  # usb摄像头用这个
        img, result_boxes, result_scores, result_classid = yolov5_wrapper.infer(img)
        img = draw_boxes(img, result_boxes, result_scores, result_classid)

        count = count + 1

        cv2.imshow("result", img)  # 显示结果
        if cv2.waitKey(1) == ord('q'):
            break


# 定义摄像头函数
def main_camera():
    camera = cv2.VideoCapture(0)  # usb摄像头用这个
    # camera = CSICamera(capture_device=0, width=640, height=480)
    # load custom plugins
    camera.set(3, 640)
    camera.set(4, 480)
    PLUGIN_LIBRARY = "build/libmyplugins.so"
    ctypes.CDLL(PLUGIN_LIBRARY)
    engine_file_path = "build/yolov5s.engine"

    # YoLov5TRT instance
    yolov5_wrapper = YoLov5TRT(engine_file_path)
    print("start detection!")
    detect_camera(camera, yolov5_wrapper)
    # camera.release() #  使用cv方法打开摄像头才需要这句
    cv2.destroyAllWindows()
    print("\nfinish!")


if __name__ == "__main__":
    # load custom plugins      修改成你build出来的引擎的相对路径
    PLUGIN_LIBRARY = "build/libmyplugins.so"
    ctypes.CDLL(PLUGIN_LIBRARY)
    engine_file_path = "build/yolov5s.engine"
    se = serial.Serial('/dev/ttyTHS1', 115200, timeout=0.5)  # 设置使用的引脚、波特率和超时时间 8接R,10接T
    # load coco labels

    # categories = ['battery', 'orange', 'bottle', 'paper_cup', 'spitball']  # 垃圾种类
    categories = ['0', '1', '2', '3', '4']  # 垃圾种类


    main_camera()
都是按照大佬们的博客复制学习的,真尴尬哈哈