SpringCloud详解(三):服务容错保护Hystrix
在微服务架构中,存在着很多的服务单元,若一个单元出现故障,就很容易因依赖关系而引发故障的蔓延,最终导致整个系统的瘫痪,为了解决这样的问题,产生了断路器等一系列的服务保护机制
当某个服务单元发生故障之后,通过断路器的故障监控,向调用方返回一个错误响应,而不是长时间的等待。这样就不会使得线程因调用故障服务被长时间占用不释放,避免了故障在分布式系统中的蔓延
SpringCloud Hystrix具备服务降级、服务熔断、线程和信号隔离、请求缓存、请求合并以及服务监控等强大功能
1、快速入门
前两篇关于Eureka和Ribbon的博客,实现了如下图所示的服务调用关系
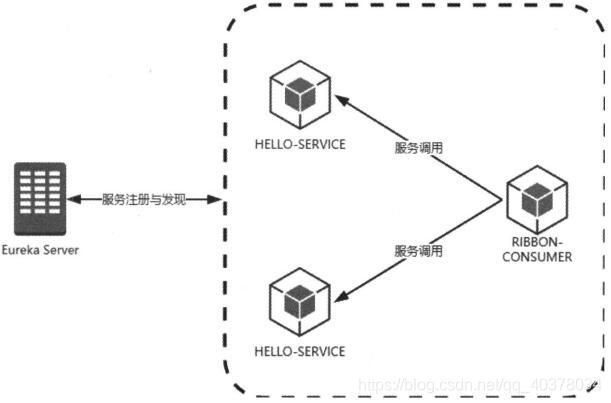
- eureka-server工程:服务注册中心
- service-provider工程:HELLO-SERVICE的服务单元,两个实例启动端口分别为8080和8081
- ribbon-consumer工程:使用Ribbon实现的服务消费者,端口为9000
在ribbon-consumer工程中引入spring-cloud-starter-netflix-hystrix的依赖:
        <dependency>
            <groupId>org.springframework.cloudgroupId>
            <artifactId>spring-cloud-starter-netflix-hystrixartifactId>
        dependency>
在主类上添加@EnableDiscoveryClient注解@EnableCircuitBreaker
@EnableCircuitBreaker
@EnableDiscoveryClient
@SpringBootApplication
public class RibbonConsumerApplication {

    public static void main(String[] args) {
        SpringApplication.run(RibbonConsumerApplication.class, args);
    }

    @Bean
    @LoadBalanced
    RestTemplate restTemplate() {
        return new RestTemplate();
    }

}
还可以使用SpringCloud应用中的@SpringCloudApplication注解来修饰主类,该注解包含了上面所引用的三个注解,这也意味着一个标准的SpringCloud应用包含服务发现以及断路器
@Target(ElementType.TYPE)
@Retention(RetentionPolicy.RUNTIME)
@Documented
@Inherited
@SpringBootApplication
@EnableDiscoveryClient
@EnableCircuitBreaker
public @interface SpringCloudApplication {

}
改造服务消费方式,添加一个ConsumeService类,注入RestTemplate的使用迁移到helloService方法中,最后,在helloService方法上增加@HystrixCommand注解来指定回调方法
@Service
public class HelloService {
    @Autowired
    private RestTemplate restTemplate;

    @HystrixCommand(fallbackMethod = "helloFallbak")
    public String helloService() {
        return restTemplate.getForEntity("http://HELLO-SERVICE/hello?name={1}", String.class, "tom").getBody();
    }

    public String helloFallbak() {
        return "error";
    }
}
来验证一下通过断路器实现的服务回调逻辑,启动服务注册中心、两个HELLO-SERVICE服务以及ribbon-consumer,访问http://localhost:9000/ribbon-consumer可以轮询两个HELLO-SERVICE并返回文字信息。此时断开8081的HELLO-SERVICE,然后访问http://localhost:9000/ribbon-consumer,当轮询到断开的8081服务端时,输出内容为error,Hystrix的服务回调生效
除了断开具体的服务实例来模拟某个节点无法访问的情况之外,还可以模拟一下服务阻塞(长时间未响应)的情况。对HELLO-SERVICE服务的/hello接口做一些修改
    @GetMapping("/hello")
    public String hello(@RequestParam("name") String name) throws InterruptedException {
        int sleepTime = new Random().nextInt(2000);
        log.info("sleepTime:" + sleepTime);
        Thread.sleep(sleepTime);
        return "name:" + name;
    }
由于Hystrix默认超时时间为1000毫秒,所以这里采用了0至2000的随机数以让处理过程有一定概率发生超时来触发断路器
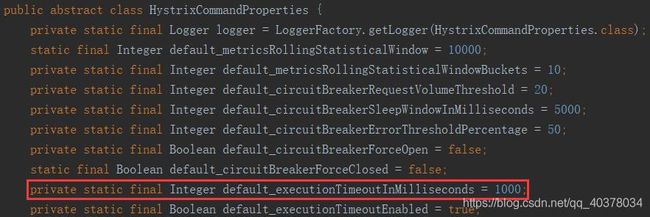
可以通过以下方式修改默认的超时时间
#在调用方配置,被该调用方的所有方法的超时时间,优先级低于下边的指定配置
hystrix.command.default.execution.isolation.thread.timeoutInMilliseconds
#在调用方配置,被该调用方的指定方法(HystrixCommandKey方法名)的超时时间
hystrix.command.HystrixCommandKey.execution.isolation.thread.timeoutInMilliseconds
@HystrixCommand(commandProperties = {@HystrixProperty(name = "execution.isolation.thread.timeoutInMilliseconds", value = "2000")})
连续访问http://localhost:9000/ribbon-consumer,当控制台打印的sleepTime大于1000的时候,就会返回error,即服务消费者因调用的服务超时从而触发熔断请求,并调用回调逻辑返回结果
2、原理分析
Hystrix主要提供4个功能:断路器、隔离机制、请求聚合和请求缓存
- 断路器用于提供熔断降级的功能,控制是否可以发起对依赖服务的请求,并收集当前服务对依赖服务的请求结果,然后做统计和计算
- Hystrix利用线程池或信号量机制提供依赖服务的隔离,每个依赖服务都使用独立的线程池,这样的好处是某一个依赖服务发生故障时,对当前服务的影响会限制在这个线程池内部,不会影响对其他依赖服务的请求,这样的代价是在当前服务中创建了很多线程,需要不小的线程上下文切换的开销,特别是对低延时的调用有比较大的影响。Hystrix使用信号量机制去控制对某个依赖服务的并发访问情况,这样的隔离非常轻量级,不需要显示创建线程池,但是信号量机制无法处理依赖服务的请求响应时间变长的情况
- 请求聚合:使用HystrixCollapser将前端的多个请求聚合成一个请求发送到后端
- 请求缓存:HystrixCommand和HystrixObservableCommand实现了对请求的缓存,假如在某个上下文中有多个同时到达的相同参数的查询,利用请求缓存功能,可以减少对后端系统的压力
Hystrix的工作流程图如下:
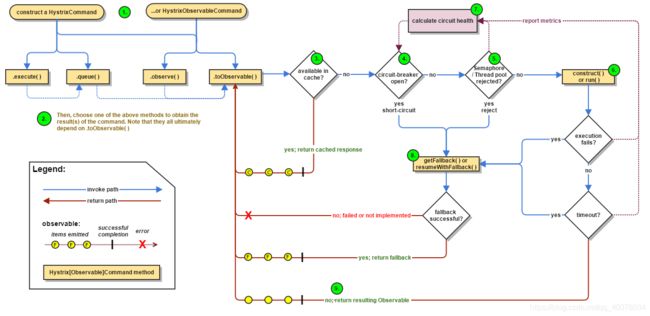
1)构建HystrixCommand或HystrixObservableCommand对象,这两个对象用来表示对依赖服务的请求。如果只需要单个返回值,则构建HystrixCommand对象;如果需要多个返回值,则需要构建HystrixObservableCommand对象
2)有四个方法(execute、queue、observe、toObservable)可以用来执行命令,其中前两个方法只有HystrixCommand提供,HystrixObservableCommand没有这两个方法
3)检查当前请求是否有缓存,如果有,则直接返回缓存的响应值,如果没有,则执行步骤4
4)检查断路器状态,如果断路器打开,则尝试执行fallback逻辑,即步骤8;如果断路器未打开,则执行步骤5
5)检查线程池是否满,或者信号量是否用完,如果用完,则拒绝服务,尝试fallback逻辑,即步骤8;如果线程池或信号量可用,则执行步骤6
6)通过construce()或run()方法发起对依赖服务的调用。如果执行失败或超时,则执行步骤8,如果没有失败,也没有超时,则可以在执行时间内返回结果
7)每次发起对依赖服务的调用,Hystrix都会对执行结果进行收集和统计,用来改变断路器或线程池(信号量)的状态
8)fallback逻辑是我们预先设置好的备用服务或默认值,如果fallback逻辑执行失败,则本次请求失败,否则成功返回结果
3、使用详解
1)、创建请求命令
通过@HystrixCommand注解来实现Hystrix命令
    @HystrixCommand
    public User getUserById(Integer id) {
        return restTemplate.getForEntity("http://HELLO-SERVICE/user/{1}", User.class, id).getBody();
    }
如上定义的getUserById方式只是同步执行的实现,若要实现异步执行则还需另外定义,比如:
    @HystrixCommand
    public Future<User> getUserByIdAsync(Integer id) {
        return new AsyncResult<User>() {
            @Override
            public User invoke() {
                return restTemplate.getForEntity("http://HELLO-SERVICE/user/{1}", User.class, id).getBody();
            }
        };
    }
2)、定义服务降级
fallback是Hystrix命令执行失败时使用的后备方法,用来实现服务的降级处理逻辑
如果要通过注解实现服务降级只需要使用@HystrixCommand中的fallbackMethod参数来指定具体的服务降级实现方法,服务降级实现方法需要与原方法的参数保持一致
    @HystrixCommand(fallbackMethod = "defaultUser")
    public User getUserById(Integer id) {
        return restTemplate.getForEntity("http://HELLO-SERVICE/user/{1}", User.class, id).getBody();
    }

    public User defaultUser(Integer id){
        return new User();
    }
3)、异常处理
在HystrixCommand实现的run()方法中抛出异常时,除了HystrixBadRequestException之外,其他异常均会被Hystrix认为命令执行失败并触发服务降级的处理逻辑
可以通过设置@HystrixCommand注解的ignoreExceptions参数执行忽略异常的类型
    @HystrixCommand(fallbackMethod = "defaultUser", ignoreExceptions = {BadRequestException.class})
    public User getUserById(Integer id) {
        return restTemplate.getForEntity("http://HELLO-SERVICE/user/{1}", User.class, id).getBody();
    }
4)、命令名称、分组以及线程池划分
@HystrixCommand注解的commandKey、groupKey以及threadPoolKey属性分别表示了命令名称、分组以及线程池划分
    @HystrixCommand(commandKey = "getUserById", groupKey = "UserGroup", threadPoolKey = "getUserByIdThread")
    public User getUserById(Integer id) {
        return restTemplate.getForEntity("http://HELLO-SERVICE/user/{1}", User.class, id).getBody();
    }
通过设置命令组,Hystrix会根据组来组织和统计命令的告警、仪表盘等信息。Hystrix命令默认的线程划分是根据命令分组来实现的。默认情况下,Hystrix会让相同组名的命令使用同一个线程池,所以需要在创建Hystrix命令时为其制定命令组名来实现默认的线程池划分
threadPoolKey属性可以指定该Hystrix命令的线程池划分
4、属性详解
Hystrix的属性存在下面4个不同优先级别的配置(优先级由低到高)
- 全局默认值:如果没有设置下面三个级别的属性,那么这个属性就是默认值
- 全局配置默认值:通过在配置文件中定义全局属性值
- 实例默认值:通过代码为实例定义的默认值
- 实例配置属性:通过配置文件来为指定的实例进行属性配置
1)、command属性
1)execution.isolation.strategy:该属性用来设置HystrixCommand.run()执行的隔离策略,有如下两个选项
- THREAD:通过线程池隔离的策略。它在独立的线程上执行,并且它的并发限制受线程池中线程数量的限制(默认值)
- SEMAPHORE:通过信号量隔离的策略。它在调用线程上执行,并且它的并发限制受信号量计数的限制
全局配置属性:hystrix.command.default.execution.isolation.strategy
实例默认值:
@HystrixCommand(commandProperties = {@HystrixProperty(name = "execution.isolation.strategy",value ="SEMAPHORE")})
实例配置属性:hystrix.command.HystrixCommandKey.execution.isolation.strategy
2)execution.isolation.thread.timeoutInMilliseconds:该属性用来配置HystrixCommand执行的超时时间,默认值为1000毫秒。当HystrixCommand执行时间超过该配置值之后,Hystrix会将该执行命令标记为TIMEOUT并进入服务降级处理逻辑
全局配置属性:hystrix.command.default.execution.isolation.thread.timeoutInMilliseconds
实例默认值:
@HystrixCommand(commandProperties = {@HystrixProperty(name = "execution.isolation.thread.timeoutInMilliseconds", value = "2000")})
实例配置属性:hystrix.command.HystrixCommandKey.execution.isolation.thread.timeoutInMilliseconds
3)execution.isolation.semaphore.maxConcurrentRequests:当HystrixCommand的隔离策略使用信号量的时候,该属性用来配置信号量的大小(并发请求数,默认为10)。当最大并发请求数达到该设置值时,后续的请求将会被拒绝
全局配置属性:hystrix.command.default.execution.isolation.semaphore.maxConcurrentRequests
实例默认值:
@HystrixCommand(commandProperties = {@HystrixProperty(name = "execution.isolation.semaphore.maxConcurrentRequests", value = "10")})
实例配置属性:hystrix.command.HystrixCommandKey.execution.isolation.semaphore.maxConcurrentRequests
2)、threadPool属性
1)coreSize:该参数用来设置执行命令线程池的核心线程数,该值也就是命令执行的最大并发量(默认值为10)
全局配置属性:hystrix.threadpool.default.coreSize
实例默认值:
@HystrixCommand(commandKey = "helloKey", threadPoolProperties = {@HystrixProperty(name = "coreSize", value = "10")})
实例配置属性:hystrix.threadpool.HystrixThreadPoolKey.coreSize
2)maxQueueSize:该参数用来设置线程池的最大队列大小。当设置为-1时,线程池将使用SynchronousQueue实现的队列,否则将使用LinkedBlockingQueue实现的队列(默认值为-1)
全局配置属性:hystrix.threadpool.default.maxQueueSize
实例默认值:
@HystrixCommand(commandKey = "helloKey", threadPoolProperties = {@HystrixProperty(name = "maxQueueSize", value = "-1")})
实例配置属性:hystrix.threadpool.HystrixThreadPoolKey.maxQueueSize
5、Hystrix仪表盘
Hystrix Dashboard主要用来实时监控Hystrix的各项指标信息
构建一个Hystrix Dashboard来对ribbon-consumer实现监控,完成后的架构如下图:(其他相关项目的构建青查看SpringCloud的前两篇博客)
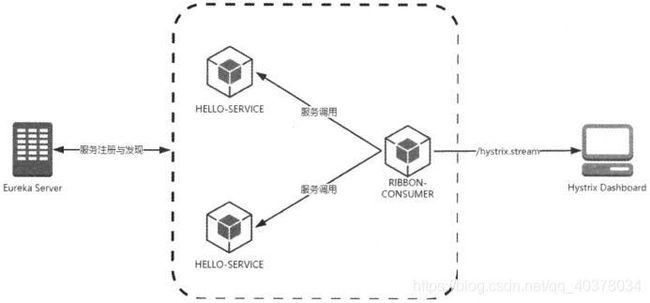
构建一个SpringBoot工程,命名为hystrix-dashboard
添加如下依赖:
        <dependency>
            <groupId>org.springframework.bootgroupId>
            <artifactId>spring-boot-starter-actuatorartifactId>
        dependency>
        <dependency>
            <groupId>org.springframework.cloudgroupId>
            <artifactId>spring-cloud-starter-netflix-hystrixartifactId>
        dependency>
        <dependency>
            <groupId>org.springframework.cloudgroupId>
            <artifactId>spring-cloud-starter-netflix-hystrix-dashboardartifactId>
        dependency>
在主类上添加@EnableHystrixDashboard注解,启用Hystrix Dashboard功能
修改应用端口号:
server.port=2000
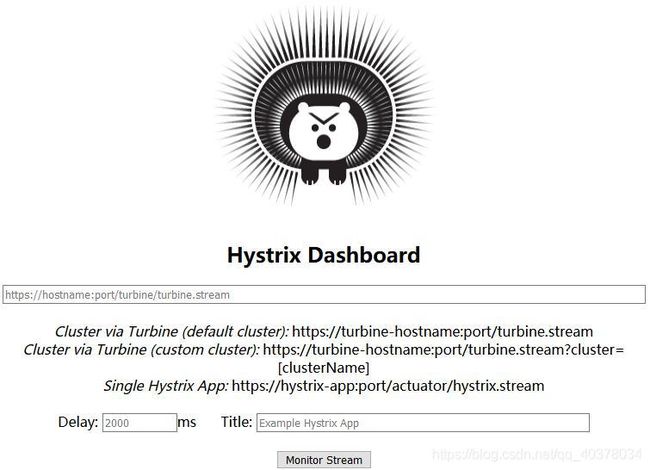
访问http://localhost:2000/hystrix
Hystrix Dashboard的监控首页如下图:
被监控的服务实例中(ribbon-consumer)需要添加如下依赖:
        <dependency>
            <groupId>org.springframework.cloudgroupId>
            <artifactId>spring-cloud-starter-netflix-hystrixartifactId>
        dependency>
        <dependency>
            <groupId>org.springframework.bootgroupId>
            <artifactId>spring-boot-starter-actuatorartifactId>
        dependency>
主类中需要进行如下配置,主要是主类需要添加@EnableCircuitBreaker注解,并对ServletRegistrationBean配置
@EnableCircuitBreaker
@EnableDiscoveryClient
@SpringBootApplication
//@SpringCloudApplication
public class RibbonConsumerApplication {

    public static void main(String[] args) {
        SpringApplication.run(RibbonConsumerApplication.class, args);
    }

    @Bean
    @LoadBalanced
    RestTemplate restTemplate() {
        return new RestTemplate();
    }

    @Bean
    public ServletRegistrationBean getServlet() {
        HystrixMetricsStreamServlet streamServlet = new HystrixMetricsStreamServlet();
        ServletRegistrationBean registrationBean = new ServletRegistrationBean(streamServlet);
        registrationBean.setLoadOnStartup(1);
        registrationBean.addUrlMappings("/hystrix.stream");
        registrationBean.setName("HystrixMetricsStreamServlet");
        return registrationBean;
    }

}
在Hystrix Dashboard的首页输入http://localhost:9000/hystrix.stream,可以看到已启动对ribbon-consumer的监控

首页上另外两个参数:
- Delay:该参数用来控制服务器上轮询监控信息的延迟时间,默认值为2000毫秒
- Title:该参数对应了上图头部标题Hystrix Stream之后的内容,默认会使用具体监控实例的URL
监控页面:
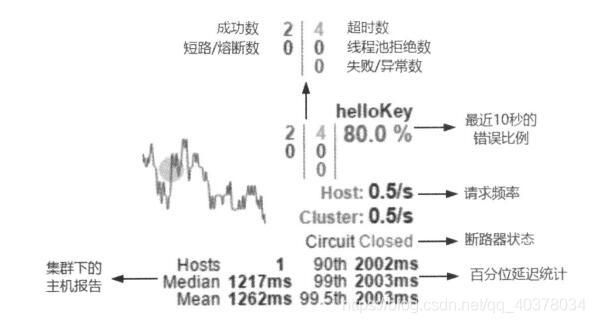
- 实心圆:通过颜色的变化代表了实例的健康程度,从绿色、黄色、橙色、红色递减,实心圆的大小也会根据实例的请求流量发生变化,流量越大该实心圆就越大
- 曲线:用来记录2分钟内流量的相对变化,可以通过它来观察流量的上升和下降趋势
- 其他一些数量指标如下图
当使用Hystrix Dashboard来监控SpringCloud Zuul构建的API网关时,ThreadPool信息会一直处于Loading状态。这是由于Zuul默认会使用信号量实现隔离,只有通过Hystrix配置把隔离机制改为线程池的方式才能够得以展示