pyinstaller打包包含pytorch_geometric的项目遇到的坑和解决办法
目录
1.exe文件占用空间过大 - 新建conda虚拟环境
2.缺失dll依赖 - 找到dll并加入
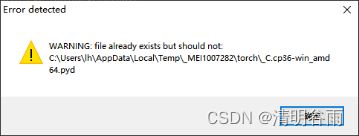
3../torch/_C.cp36-win_amd64.pyd文件重复添加问题 - 解决方法如下
4.due to unhandled exception:’NoneType’ object has no attribute ‘origin’ - 解决方法如下
5.Can't get source for xxx. TorchScript requires source access in order to carry out compilation, make sure original .py file are available - 解决方法如下
6.最后
7.总结
最近在做研究生毕设,需要将python打包成可执行文件,一搜索大家在用的工具,我锁定了pyinstaller
给pyinstaller官网引个流
前提:python脚本已经在pycharm+conda虚拟环境上运行没有任何问题
本来以为很顺利,但是很快遇到了问题 o(╥﹏╥)o
1.exe文件占用空间过大 - 新建conda虚拟环境
首先,先不看打包后的exe能不能运行,就看可执行文件的空间占用大小,也太大了,查阅其他人的博客后,决定新建一个打包的conda虚拟环境。
本来打包后接近3G,后来就1.5G了。
这是因为pyinstaller会将环境中所有库都打包,所以一个干净的专用于打包的库很重要!
列下我新建conda虚拟环境和DL有关的库:
python                    3.6.13
torch                     1.8.1+cu101
torch-cluster             1.5.9
torch-geometric           1.4.2
torch-scatter             2.0.7
torch-sparse              0.6.9
torch-spline-conv         1.2.1
特别注意,在安装torch时下载对应版本的whl使用pip安装,否则很可能因为下了CPU+GPU两个版本的torch为之后挖坑;还有依赖于torch_gemoetric也要根据以下网站安装whl
torch下载指路
torch_geometric依赖的四个库下载指路
2.缺失dll依赖 - 找到dll并加入
这个问题我稀里糊涂解决了,可能是版本冲突问题
可以看https://blog.csdn.net/JohnnyRian/article/details/108450556
安装Dependencies,查看可执行文件的依赖,缺少哪些dll,就在网上搜索下载相应dll
3../torch/_C.cp36-win_amd64.pyd文件重复添加问题 - 解决方法如下
pyinstaller 打包yolov5和deepsort项目打包部,win10平台_Yang_4881002的博客-CSDN博客的5.4
pyinstaller系列之七:打包各种问题汇总_MrWind灬的博客-CSDN博客_pyinstaller 无法打包
分两步处理
1)使用setup重装pyinstaller(注意选择python版本支持的pyinstaller),然后
pyinstaller -Fw -i xx.ico xxx.pyChangelog for PyInstaller — PyInstaller 5.4.1 documentation
Releases · pyinstaller/pyinstaller · GitHub
2)修改spec文件
WARNING: file already exists but should not: C:\Users\workAI\AppData\Local\Temp\_MEI132522\torch\_C_黄小黄i的博客-CSDN博客
pyqt5使用pyinstaller打包项目为exe_huangzyi的博客-CSDN博客
.spec中添加(注意替换成自己的python版本):
for d in a.datas:
 if '_C.cp36-win_amd64.pyd' in d[0]:
  a.datas.remove(d)
  break
cmd中执行命令:
pyinstaller -F --onefile xxx.spec如果不行,继续执行:
pyinstaller -D --onedir xxx.spec4.due to unhandled exception:’NoneType’ object has no attribute ‘origin’ - 解决方法如下
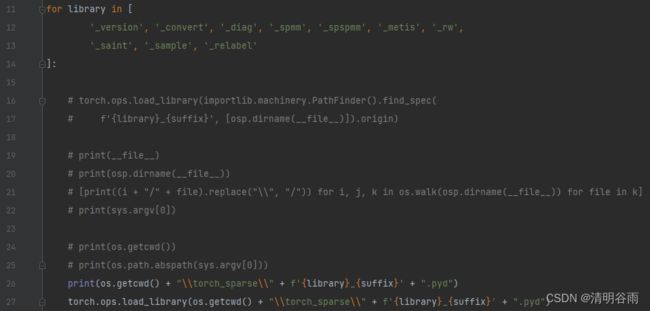
根据错误提示,找到代码中问题所在:
图中代码中find_spec方法返回None导致出错,经过几次打印和打包看出错信息(注意去掉pyinstaller打包命令中的-w,它会不弹出调试窗口;可能在cmd中执行xx.exe也可以看到调试信息)后,发现是找不到图中列出的库(.pyd格式)
猜测pyinstaller在打包时没有将这些pyd格式的文件打包到可执行文件中,导致在执行exe,加载库时找不到这些文件
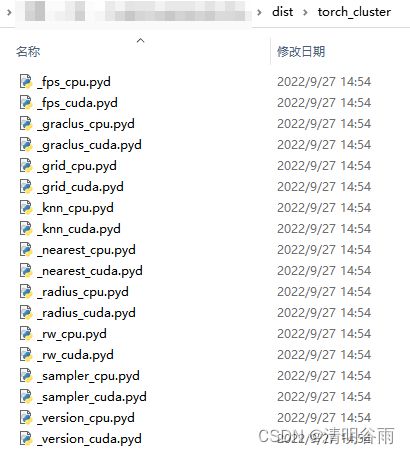
解决方法:在exe所在目录上建个对应库的pyd文件夹
另外库函数中加载部分要修改下路径:
torch.ops.load_library(os.getcwd() + "\\torch_sparse\\" + f'{library}_{suffix}' + ".pyd")代码改成了这样:
文件结构改成了这样(发现torch_geometric依赖的这四个库都有相应问题):
5.Can't get source for xxx. TorchScript requires source access in order to carry out compilation, make sure original .py file are available - 解决方法如下
pyinstaller打包pytorch踩坑与解决记录_溯风百流的博客-CSDN博客_pyinstaller 打包pytorch
坑3的法三可以成功
6.最后
注意打包好之后的exe在dist文件夹里;如果网络有训练好的模型参数 或者 可执行文件需要使用的其他资源(比如图片、音频等),直接复制到dist文件夹里,到时候要运行exe时创建快捷方式到桌面上即可
7.总结
1)目前打包的流程:
pyinstaller -F -i xx.ico xxx.py --hidden-import torch_sparse --hidden-import torch注:如果不想弹出窗口,使用
pyinstaller -Fw -i xx.ico xxx.py --hidden-import torch_sparse --hidden-import torch--hidden-import应该作用不大,可以去掉:
pyinstaller -F -i xx.ico xxx.py2)然后在spec文件中的a和pyz之间增加(注意替换成自己的python版本):
for d in a.datas:
 if '_C.cp36-win_amd64.pyd' in d[0]:
  a.datas.remove(d)
  break
最后:
pyinstaller -F --onefile xx.spec记录备忘
另外本打包的项目还涉及到了GUI,使用的是wxpython


