Python-第三方库管理与虚拟环境
Python的第三方库
Python提供了大量的第三方库来给咱们使用,这也是Python的强大之处
三方库官网链接
可以直接搜索需要的Python三方库来使用
包管理工具pip
pip是Python的包管理工具,可以很方便的安装和管理第三方库(包)。类似于PHP中Composer,或者Nodejs中的npm,以及Linux中的yum
pip简单使用
可以直接使用 pip install 包名来安装指定三方库
例如安装 requests 库:
pip install requests
pip常用命令
帮助文档
可以通过 pip --help或pip -h查看 pip 的帮助文档
>> pip --help
Usage:
pip <command> [options]
Commands:
install Install packages.
download Download packages.
uninstall Uninstall packages.
freeze Output installed packages in requirements format.
list List installed packages.
show Show information about installed packages.
check Verify installed packages have compatible dependencies.
config Manage local and global configuration.
search Search PyPI for packages.
cache Inspect and manage pip's wheel cache.
index Inspect information available from package indexes.
wheel Build wheels from your requirements.
hash Compute hashes of package archives.
completion A helper command used for command completion.
debug Show information useful for debugging.
help Show help for commands.
General Options:
-h, --help Show help.
--debug Let unhandled exceptions propagate outside the
main subroutine, instead of logging them to
stderr.
--isolated Run pip in an isolated mode, ignoring
environment variables and user configuration.
--require-virtualenv Allow pip to only run in a virtual environment;
exit with an error otherwise.
-v, --verbose Give more output. Option is additive, and can be
used up to 3 times.
-V, --version Show version and exit.
-q, --quiet Give less output. Option is additive, and can be
used up to 3 times (corresponding to WARNING,
ERROR, and CRITICAL logging levels).
--log Path to a verbose appending log.
--no-input Disable prompting for input.
--proxy Specify a proxy in the form
[user:passwd@]proxy.server:port.
--retries Maximum number of retries each connection should
attempt (default 5 times).
--timeout Set the socket timeout (default 15 seconds).
--exists-action Default action when a path already exists:
(s)witch, (i)gnore, (w)ipe, (b)ackup, (a)bort.
--trusted-host Mark this host or host:port pair as trusted,
even though it does not have valid or any HTTPS.
--cert Path to PEM-encoded CA certificate bundle. If
provided, overrides the default. See ' SSL
Certificate Verification' in pip documentation
for more information.
--client-cert Path to SSL client certificate, a single file
containing the private key and the certificate
in PEM format.
--cache-dir Store the cache data in .
--no-cache-dir Disable the cache.
--disable-pip-version-check
Don' t periodically check PyPI to determine
whether a new version of pip is available for
download. Implied with --no-index.
--no-color Suppress colored output.
--no-python-version-warning
Silence deprecation warnings for upcoming
unsupported Pythons.
--use-feature <feature> Enable new functionality, that may be backward
incompatible.
--use-deprecated <feature> Enable deprecated functionality, that will be
removed in the future.
升级pip
pip install -U pip
查看已安装的包
pip list
展示已安装包详情
pip show
# 展示包文件所在路径
pip show -f <包名>
安装三方包
五种方式
  pip install [options] <requirement specifier> [package-index-options] ...
  pip install [options] -r <requirements file> [package-index-options] ...
  pip install [options] [-e] <vcs project url> ...
  pip install [options] [-e] <local project path> ...
  pip install [options] <archive url/path> ...
常用方式1:pip install [options] [package-index-options]
# 栗子
pip install requests
常用方式2:过 requirements 文件批量安装软件包
pip install -r requirements.txt
安装指定版本
pip install package              # 最新版本
pip install package==1.0.4       # 指定版本
pip install 'package>=1.0.4'     # 最小版本
生成 requirement.txt文件
# 在当前目录下生成requirements.txt
pip freeze > requirements.txt
更换pip的镜像源
临时使用国内源安装
使用 -i参数即可:
pip install -i https://pypi.douban.com/simple/ <包名>
国内源参考
清华:https://pypi.tuna.tsinghua.edu.cn/simple

阿里云:http://mirrors.aliyun.com/pypi/simple/

中国科技大学 https://pypi.mirrors.ustc.edu.cn/simple/

华中理工大学:http://pypi.hustunique.com/

山东理工大学:http://pypi.sdutlinux.org/

豆瓣(自己常用):http://pypi.douban.com/simple/
永久指定国内源安装
linux
修改 ~/.pip/pip.conf没有就创建一个,内容如下:
[global]
timeout = 6000  #指定超时时间 ms
index-url = https://pypi.tuna.tsinghua.edu.cn/simple  #源地址
trusted-host = pypi.tuna.tsinghua.edu.cn  #信任域名
windows
直接在user目录中创建一个pip目录,如:C:\Users\xx\pip,在pip 目录下新建文件pip.ini,内容如下:
或者按照网友的建议:win+R 打开用户目录%HOMEPATH%,在此目录下创建 pip 文件夹,在 pip 目录下创建 pip.ini 文件, 内容如下:
[global]
timeout = 6000
index-url = https://pypi.tuna.tsinghua.edu.cn/simple
trusted-host = pypi.tuna.tsinghua.edu.cn
下载包但不安装
pip install <包名> -d <目录>
pip install -d <目录> -r requirements.txt
更新包
pip install --upgrade <包名>
pip install -U  <包名>   # --upgrade 可简写为 -U
卸载和批量卸载包
pip uinstall <包名>  #卸载指定包
pip uinstall -r requirement.txt  #卸载requirement内的指定的包
显示可升级的包
pip list --outdated  # 列出所有过期的库
pip list -o  # --outdated的简写,列出所有过期的库
卸载pip
python -m pip uninstall pip
拓展:pip批量更新包
https://www.cnblogs.com/poloyy/p/15170969.html
我们在使用python第三方库的时候,经常是用到什么库就去pip install ,需要哪一个下载哪一个。但是当我们需要更新第三方库的时候,手动的一个个的去更新的话,恐怕是要耗费很多时间,下面就介绍一下怎么批量更新Python的三方包,这里只介绍两种常用(推荐)的方式:
- 使用 pip-review 库
- 使用 pipupgrade
使用 pip-review 库
# 安装pip-review
> pip install pip-review

# 检查是否有需要更新的包
> pip-review
Everything up-to-date

# 自动更新所有包 --auto -a
> pip-review -a

# 手动为每个包选择是否更新 --interactive -i
> pip-review --interactive
matplotlib==3.3.3 is available (you have 3.1.3)
Upgrade now? [Y]es, [N]o, [A]ll, [Q]uit N
numpy==1.19.4 is available (you have 1.18.1)
Upgrade now? [Y]es, [N]o, [A]ll, [Q]uit Y
pandas==1.1.5 is available (you have 1.0.3)
Upgrade now? [Y]es, [N]o, [A]ll, [Q]uit N
...
使用 pipupgrade
# 安装pipupgrade
> pip install pipupgrade

# 批量更新
# -V --verbose:显示详细输出
> pipupgrade -V -l -y

# -s --self:更新 pipupgrade
> pipupgrade --self

# -c --check:检查并打印过时的软件包(不执行升级)
> pipupgrade --check

# -l --latest:升级所有包 ,包括破坏更改的包
> pipupgrade --latest

# -a --all:列出所有包
> pipupgrade --all

# -i --interactive:更新每个包都显示确认框
> pipupgrade --interactive

# -r --requirements:根据 requiremenet.txt 文件升级
> pipupgrade --requirement requirement.txt

# -y、--yes:一次性确认所有包更新的确认框
> pipupgrade -y
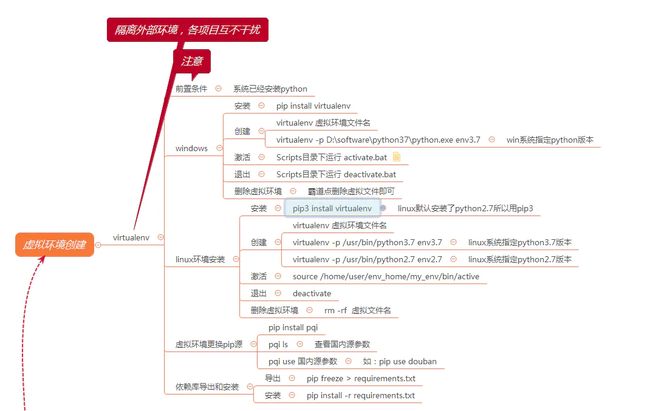
虚拟环境
为什么需要虚拟环境
- 虚拟环境中可以在没有权限的情况下安装新的库(Linux系统中可能会出现的问题)
- 不同的应用可以使用不同的库或不同的版本。
- 虚拟环境中的库升级也不影响其它环境
- 虚拟环境可以作为一个项目的专有环境。在需要部署时,一键导出项目的所需要的包
如果你现在用Django 1.10.x写了个网站,然后你的领导跟你说,之前有一个旧项目是用Django 0.9开发的,让你来维护,但是Django 1.10不再兼容Django 0.9的一些语法了。这时候就会碰到一个问题,我如何在我的电脑中同时拥有Django 1.10和Django 0.9两套环境呢?这时候我们就可以通过虚拟环境来解决这个问题
主要有两种方式创建:
- Pycharm创建
- virtualenv创建
- 两种方式都需要提前安装Python解释器
- 以下图片借鉴大佬整理:
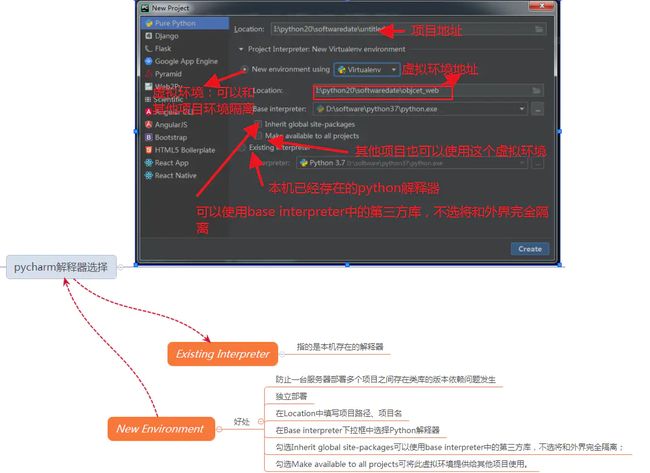
Pycharm中创建虚拟环境
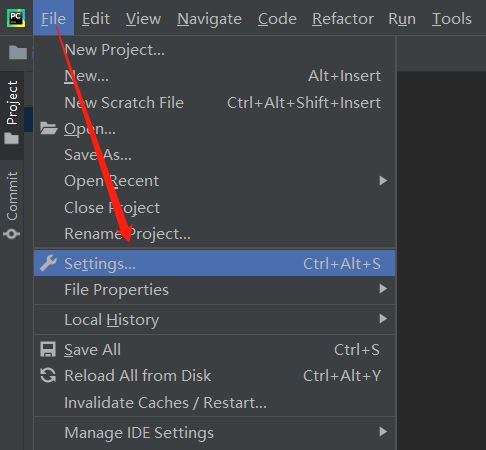
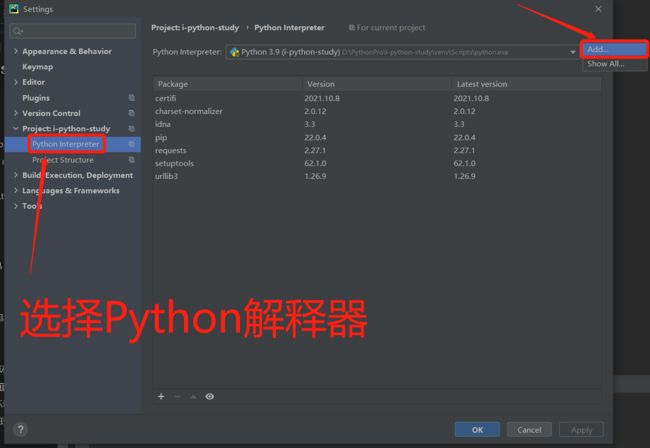
打开解释器配置页面
点击添加解释器
修改选项
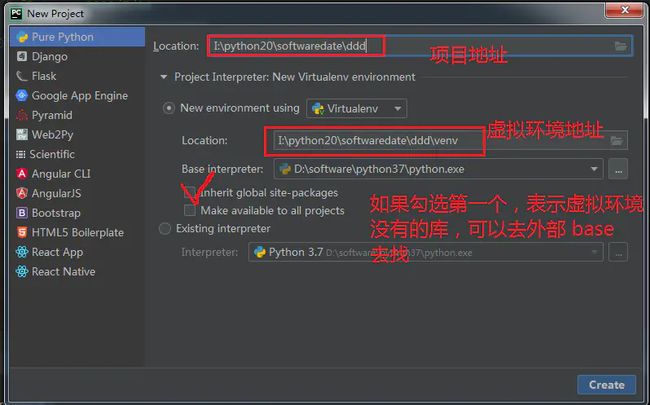
点击创建
会生成一个venv的目录:
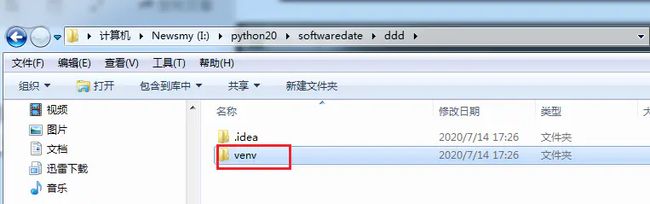
打开venv目录:

特别注意:pycharm新建的虚拟环境需要重启ide才会生效

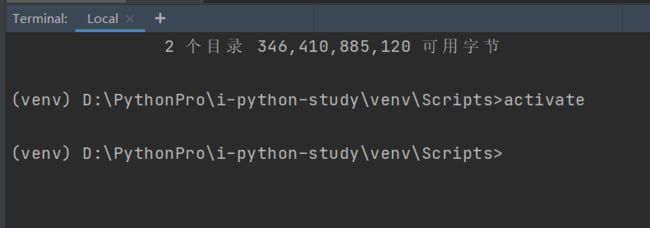
退出/激活虚拟环境
cd 到venv/Scripts 输出:deactivate 退出虚拟环境

activate 重新激活虚拟环境
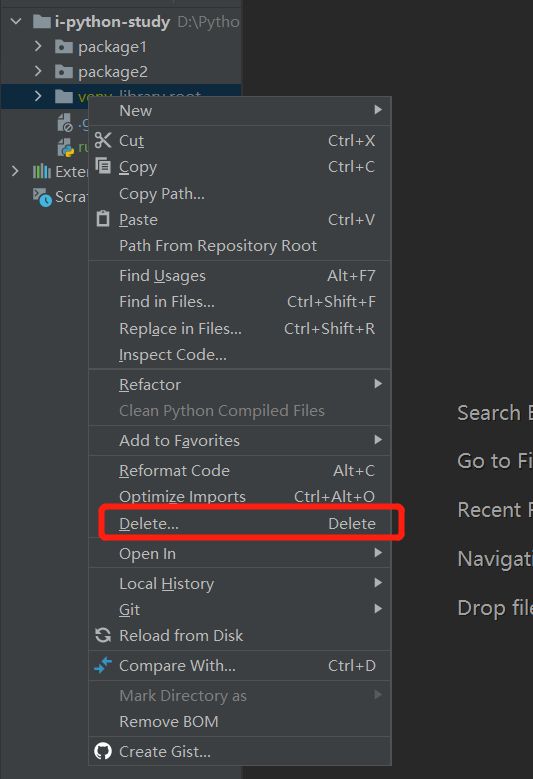
删除虚拟环境
直接删除venv目录即可
virtualenv创建虚拟环境
安装virtualenv
pip install virtualenv
创建虚拟环境
virtualenv <虚拟环境的名字>
激活/退出虚拟环境
虚拟环境创建好了以后,那么可以进入到这个虚拟环境中,然后安装一些第三方包,进入虚拟环境在不同的操作系统中有不同的方式,一般分为两种:Windows和Linux
Windows
# 激活:进入到虚拟环境的Scripts文件夹中,然后执行activate命令
activate

# 退出虚拟环境
deactivate
Linux
# 激活虚拟环境
source /path/to/virtualenv/bin/activate

# 退出虚拟环境
deactivate
要删除虚拟环境,同样删除虚拟环境目录即可
创建虚拟环境的时候指定Python解释器版本
- 在电脑的环境变量中,一般是不会去更改一些环境变量的顺序的。也就是说比如你的Python2/Scripts在Python3/Scripts的前面,那么你不会经常去更改他们的位置
- 但是这时候我确实是想在创建虚拟环境的时候用Python3这个版本,这时候可以通过
-p参数来指定具体的Python解释器
virtualenv -p C:\Python39\python.exe [virutalenv name]
其他三方虚拟环境管理工具
主流的虚拟环境和包管理工具大致如下:
- Poetry
- Virtualenvwrapper
- Conda
- Pipenv
Poetry使用:https://www.yuque.com/li-sheng/study/usg7vh