动手学深度学习笔记第三章(线性回归网络)
3.1 线性网络
- 偏置目的是当所有特征都为0时,预测值应该为多少。线性公式就是一种放射变化,放射变化是通过加权和对特征进行线性变换,而偏置项则是来进行平移。
- 梯度下降小批量样本回归:随机抽样一个小批量的训练样本,然后计算小批量的平均损失关于模型参数的导数(梯度)。
- 复习python面向对象:类有一个名为 init() 的特殊方法(构造方法),类的实例化操作会自动调用 init() 方法。如下实例化类 MyClass,对应的 init() 方法就会被调用:
def __init__(self):
    self.data = []
x = MyClass()#此时自动调用
init() 方法可以有参数,参数通过 init() 传递到类的实例化操作上。例如:
class Complex:
    def __init__(self, realpart, imagpart):
        self.r = realpart
        self.i = imagpart
x = Complex(3.0, -4.5)
print(x.r, x.i)   # 输出结果:3.0 -4.5
self 代表的是类的实例,代表当前对象的地址,而 self.class 则指向类。self 不是 python 关键字,可以换成其他的名字,在类的内部,使用 def 关键字来定义一个方法时的第一个参数必须是 self。
继承也是和C++类似:
#类定义
class people:
    #定义基本属性
    name = ''
    age = 0
    #定义私有属性,私有属性在类外部无法直接进行访问
    __weight = 0
    #定义构造方法
    def __init__(self,n,a,w):
        self.name = n
        self.age = a
        self.__weight = w
    def speak(self):
        print("%s 说: 我 %d 岁。" %(self.name,self.age))

#单继承示例
class student(people):
    grade = ''
    def __init__(self,n,a,w,g):
        #调用父类的构函
        people.__init__(self,n,a,w)
        self.grade = g
    #覆写父类的方法
    def speak(self):
        print("%s 说: 我 %d 岁了,我在读 %d 年级"%(self.name,self.age,self.grade))

#另一个类,多重继承之前的准备
class speaker():
    topic = ''
    name = ''
    def __init__(self,n,t):
        self.name = n
        self.topic = t
    def speak(self):
        print("我叫 %s,我是一个演说家,我演讲的主题是 %s"%(self.name,self.topic))

#多重继承
class sample(speaker,student):
    a =''
    def __init__(self,n,a,w,g,t):
        student.__init__(self,n,a,w,g)
        speaker.__init__(self,n,t)

test = sample("Tim",25,80,4,"Python")
test.speak()   #方法名同,默认调用的是在括号中参数位置排前父类的方法
子类覆写父类方法,调用子类和父类方法的代码:
class Parent:        # 定义父类
   def myMethod(self):
      print ('调用父类方法')

class Child(Parent): # 定义子类
   def myMethod(self):
      print ('调用子类方法')

c = Child()          # 子类实例
c.myMethod()         # 子类调用重写方法
super(Child,c).myMethod() #用子类对象调用父类已被覆盖的方法,super() 函数是用于调用父类(超类)的一个方法。
调用子类方法
调用父类方法
类的私有属性:__private_attrs:两个下划线开头,声明该属性为私有,不能在类的外部被使用或直接访问。在类内部的方法中使用时 self.__private_attrs。
- time包:time.time():返回当前时间戳
- 用重载运算符运算要比for循环一个一个计算要快的多
- python 中yeild用法:相当于带有生成器的return函数,可以用next进行迭代调用,也可以用for进行迭代。
def foo():
    print("starting...")
    while True:
        res = yield 4
        print("res:",res)
g = foo()
print(next(g))
print("*"*20)
print(next(g))
starting...
4  #到yeild这之后就出去了没有执行后面的print
********************
res: None  #next之后并参数没有值,可以用g.send(666)的方式赋值
4
- requires_grad=True的变量必须是浮点数,不能为整数,否则会报错: RuntimeError: Only Tensors of floating point dtype can require gradients
- 使用with torch.no_grad()的目的是减少计算负担(计算梯度消耗内存),所以不能用backward。
- 比较大的网络的代码中可以将函数名换成其他的名字,如下:
lr=0.03
num_epochs=3
net=linreg#这里def linreg名字就变成了def net
loss=squared_loss#这里也一样
10.pytorch广播机制: 满足右对齐(即:234和34的,第二个对齐为13*4的)
a=torch.tensor([1,2])
b=torch.tensor([[4,4]])
c=torch.tensor([[4],[4]])
a-b
a-c
tensor([[-3, -2]])
tensor([[-3, -2],
        [-3, -2]])
- *用在变量前:向函数传递参数的时候*表示解包,也就是将元组拆解,一个一个作为参数传给函数
*用在函数定义时:用来收集参数,将参数捕捉到一个元组中
def fut(*a):
    return a
fut(1,4,5,7,8)
(1, 4, 5, 7, 8)
- torch.utils.data.Dataset.TensorDataset :用于将数据(tensor)包装成Dataset类,方便后续用dataloader提取数据,类似zip,要求传入的数据第一维度必须相等,要不然无法一一配对。
a = torch.tensor([[11, 22, 33], [44, 55, 66], [77, 88, 99], [11, 22, 33], [44, 55, 66], [77, 88, 99], [11, 22, 33], [44, 55, 66], [77, 88, 99], [11, 22, 33], [44, 55, 66], [77, 88, 99]])
b = torch.tensor([0, 1, 2, 0, 1, 2, 0, 1, 2, 0, 1, 2])
train_ids = data.TensorDataset(a, b)
for x_train, y_label in train_ids:
    print(x_train, y_label)
tensor([11, 22, 33]) tensor(0)
tensor([44, 55, 66]) tensor(1)
tensor([77, 88, 99]) tensor(2)
tensor([11, 22, 33]) tensor(0)
tensor([44, 55, 66]) tensor(1)
tensor([77, 88, 99]) tensor(2)
tensor([11, 22, 33]) tensor(0)
tensor([44, 55, 66]) tensor(1)
tensor([77, 88, 99]) tensor(2)
tensor([11, 22, 33]) tensor(0)
tensor([44, 55, 66]) tensor(1)
tensor([77, 88, 99]) tensor(2)
- DataLoader:是PyTorch中读取数据的一个重要接口,将自定义的Dataset根据batch size大小、是否shuffle等选项封装成一个batch size大小的Tensor,然后可以使用迭代器进行访问数据。
def load_array(data_arrays,batch_size,is_train=True):
    dataset=data.TensorDataset(*data_arrays)#这里*用于将一对一对的元组类型的数据集进行解包
    return data.DataLoader(dataset,batch_size,shuffle=is_train)
batch_size=10
data_iter=load_array((features,labels),batch_size)
next(iter(data_iter))#获取的是第一项
[tensor([[ 1.4374, -0.1842],
         [ 1.4026,  0.2906],
         [-0.4039, -0.7695],
         [ 1.3689, -0.5112],
         [ 0.3761, -0.4634],
         [ 0.7622,  0.4490],
         [ 0.6972, -2.1557],
         [-1.0846,  0.4156],
         [-0.4159,  0.1932],
         [ 0.7097,  0.9984]]),
 tensor([[ 7.6939],
         [ 6.0142],
         [ 6.0113],
         [ 8.6953],
         [ 6.5257],
         [ 4.2048],
         [12.9263],
         [ 0.6089],
         [ 2.6933],
         [ 2.2192]])]
- torch模块中nn:nn.Linear():
torch.nn.Linear(in_features, # 输入的神经元个数
           out_features, # 输出神经元个数
           bias=True # 是否包含偏置
           )
给个例子:
X = torch.Tensor([
    [0.1,0.2,0.3,0.3,0.3],
    [0.4,0.5,0.6,0.6,0.6],
    [0.7,0.8,0.9,0.9,0.9],
])
model = nn.Linear(in_features=5, out_features=10, bias=True)
这里的5是因为有5个特征,10则是希望下一层神经元输出个数为10个。
然后是nn.Sequential():Sequential其实就是个有序的容器,神经网络模块将按照在传入构造器的顺序依次被添加到计算图中执行,讲白了就是将多个神经层串联在一起,这样会简化操作,forward就不用一个一个写了,因为Sequential会按照for顺序调用层。
引用个例子:
简化前:
class Net(nn.Module):
    def __init__(self, in_dim, n_hidden_1, n_hidden_2, out_dim):
        super().__init__()

      	self.Linear1 = nn.Linear(in_dim, n_hidden_1),
		self.Linear2=nn.Linear(n_hidden_1, n_hidden_2)
		self.Linear3=nn.Linear(n_hidden_2, out_dim)


  	def forward(self, x):
      	out= self.Linear1(x)
      	out=torch.relu(out)
      	out=self.Linear2(out)
      	out=torch.relu(out)
      	out=self.Linear3(out)
      	return out
简化后:
class Net(nn.Module):
    def __init__(self, in_dim, n_hidden_1, n_hidden_2, out_dim):
        super().__init__()

      	self.layer = nn.Sequential(
            nn.Linear(in_dim, n_hidden_1),
            nn.ReLU(True),
            nn.Linear(n_hidden_1, n_hidden_2),
            nn.ReLU(True),
            # 最后一层不需要添加激活函数
            nn.Linear(n_hidden_2, out_dim)
             )

  	def forward(self, x):
      	x = self.layer(x)
      	return x
- net[0]选择第一图层之后,用net[0].weight.data和net[0].bias.data来访问参数,而normal_(a,b)和fill_(a)则分别是均值为a标准差为b和填充值为a的方法来重写参数值。(用了‘_’的方法)
net[0].weight.data.normal_(0,0.01)
net[0].bias.data.fill_(0)
- loss=nn.MSELoss()这里是将计算均方误差的MSELoss类实例化为loss,跟上面的net一样,后面只要传入两个参数就可以计算均方误差了。
- net.parameters():里面包括了网络层中的参数(weight和bias)
- torch.optim中实现了很多算法的变种,SGD就在其中,可以直接调用。
trainer=torch.optim.SGD(net.parameters(),lr=0.03)
- trainer.step():对模型进行一次更新
- 画图函数中的scale是缩放的尺寸,计算figsize的时候要将行和列都乘上scale之后在相乘。
- enumerate() 函数:用来遍历一个集合对象,它在遍历的同时还可以得到当前元素的索引位置。
names = ["Alice","Bob","Carl"]
for index,value in enumerate(names):
    print(f'{index}: {value}')
0: Alice
1: Bob
2: Carl
- softmax数据集画图代码:
def show_images(imgs,num_rows,num_cols,titles=None,scale=1.5):
    figsize=(num_cols*scale,num_rows*scale)#定义figsize图形尺寸的大小,这里scale缩放了
    _,axes=d2l.plt.subplots(num_rows,num_cols,figsize=figsize)#_代指fig,但是因为后面用不上所以用_表示,这里subplots函数是将画板分成num_rows行num_cols列个画布区域,
    axes=axes.flatten()#将原本代指图片在画板位置中m*n的二维矩阵axes用flatten函数展平成1*mn的一维axes数组,这样后面就可以直接调用axes[i]了
    for i,(ax,img) in enumerate(zip(axes,imgs)):# 这里enumerate函数是方便生成索引,遍历的同时还可以得到当前元素的索引位置。
        if torch.is_tensor(img):#如果图像是tensor类型,就转化成numpy类型
            ax.imshow(img.numpy())#imshow是用来绘制热图信息的,对象可以为PIL图片(Python 平台事实上的图像处理标准库中的图片)或者数组对象。
        else:#如果是PIL图片,则可以用imshow直接绘制
            ax.imshow(img)
        ax.axes.get_xaxis().set_visible(False)#坐标轴上的坐标刻度不可见,但是轴还在
        ax.axes.get_yaxis().set_visible(False)
        if titles:
            ax.set_title(titles[i])#指定图片的名称
    return axes
-
torchvision.transforms.ToTensor()(img):把PIL.Image格式的数据或ndarray格式的数据从 (H x W x C)形状转换为 (C x H x W) 形状的tensor格式。这里H和W就是图中像素大小的行和列,C是channel数。此外如果满足:转换前numpy.ndarray的dtype = np.uint8
或者转换前的PIL.Image是L, LA, P, I, F, RGB, YCbCr, RGBA, CMYK, 1 格式,那么还会将数值从 [0, 255] 归一化到[0,1]。不符合的不会归一化。注意使用格式不一般,后面直接接(img),可能等同于a=orchvision.transforms.ToTensor(),然后a(img)。 -
transforms.Resize(mn)(img):将img图片调整为mn大小的尺寸。引用一下别人的代码例子:
import torchvision.transforms as transform
from PIL import Image
import matplotlib.pyplot as plt
import numpy as np
import torch
img0=Image.open('lin-xiao-xun-000003.jpg')
img1=transform.Resize((128,128))(img0)
img2=transform.Resize((256,256))(img0)
axs = plt.figure().subplots(1, 3)
axs[0].imshow(img0);axs[0].set_title('src');axs[0].axis('off')
axs[1].imshow(img1);axs[1].set_title('128x128');axs[1].axis('off')
axs[2].imshow(img2);axs[2].set_title('256x256');axs[2].axis('off')
plt.show()
- transforms.Compose(trans) :这里的Compose的作用组合几个transforms变换,需要是一个列表,python中,列表的表示形式为[数据1,数据2,…],在compose中数据需要的是transforms类型,所以得到Compose([transforms参数1,transforms参2…])
#传入PIL类型,经过Transforms类型参数1:trans_resize_2,实现缩放,经过Transforms类型参数2:trans_totensor实现将PIL类型转为tensor类型
trans_compose=transforms.Compose([trans_resize_2,trans_totensor])#输入为PIL类型
img_resize_2=trans_compose(img)
- 数据类型转化分析:
argmax(axis=1):当axis=0,是在列中比较,选出最大的行索引,当axis=1,是在行中比较,选出最大的列索引,如果没有axis参数,那么就是将对象展平,比较出最大的那个值的索引。
def accuracy(y_hat,y):
    if len(y_hat.shape)>1 and y_hat.shape[1]>1:
        y_hat=y_hat.argmax(axis=1)
    cmp=y_hat.type(y.dtype)==y#这里是首先将y_hat的数据类型转化成y的类型,然后比较,可以得出bool类型的数组
    return float(cmp.type(y.dtype).sum())#求和之后就是分类正确样本的数量。
- pytorch中的isinstance:用来判断两个类型是否相同的
isinstance(object, classinfo)

# object -- 实例对象。
# classinfo -- 可以是直接或间接类名、基本类型或者由它们组成的元组。
#例子:
for sub_module in alexnet.modules():  # 遍历每一个网络层,有顺序
	if not isinstance(sub_module, nn.Conv2d):  # 如果是卷积层,才继续执行
       continue
- 关于李沐写的accumulator函数的解析
- 关于动画中绘制函数的一点理解:
class Animator:  #@save
    """在动画中绘制数据。"""
    def __init__(self, xlabel=None, ylabel=None, legend=None, xlim=None,
                 ylim=None, xscale='linear', yscale='linear',
                 fmts=('-', 'm--', 'g-.', 'r:'), nrows=1, ncols=1,
                 figsize=(3.5, 2.5)):
        # 增量地绘制多条线
        if legend is None:
            legend = []
        d2l.use_svg_display()
        self.fig, self.axes = d2l.plt.subplots(nrows,
        ncols, figsize=figsize)#绘制subplots子图,数量是nrows*ncols
        if nrows * ncols == 1:#如果只有一个子图,那么进行以下操作
            self.axes = [self.axes, ]#变成一个列表(就是外面在套一个[])
        # 使用lambda函数捕获参数
        self.config_axes = lambda: d2l.set_axes(
            self.axes[0], xlabel, ylabel,
            xlim, ylim, xscale, yscale
            , legend)#lambda替换函数,让self.config_axes等同于lambda后面的函数
        self.X, self.Y, self.fmts = None, None, fmts

    def add(self, x, y):
        # 向图表中添加多个数据点
        if not hasattr(y, "__len__"):#看y是否是数字(数字没有len属性),那么就直接放到列表里面
            y = [y]
        n = len(y)#看有几个函数,一个函数对应一个y值
        if not hasattr(x, "__len__"):
            x = [x] * n#同理,n函数对应n个x值
        if not self.X:
            self.X = [[] for _ in range(n)]#创建n个空列表,都包含在一个大列表里面
        if not self.Y:
            self.Y = [[] for _ in range(n)]
        for i, (a, b) in enumerate(zip(x, y)):
            if a is not None and b is not None:
                self.X[i].append(a)#按照顺序放到列表里面去
                self.Y[i].append(b)
        self.axes[0].cla()#axes[0]画布清零
        for x, y, fmt in zip(self.X, self.Y, self.fmts):
            self.axes[0].plot(x, y, fmt)#进行绘画
        self.config_axes()#调用函数获得参数
        display.display(self.fig)#调用display进行展示
        display.clear_output(wait=True)
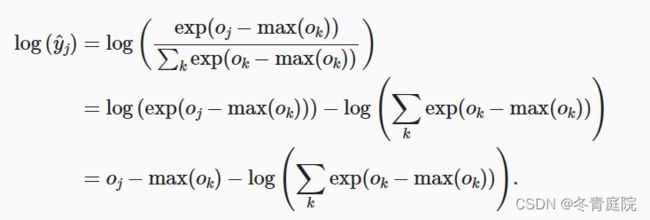
- “LogSumExp”技巧:(1)为了解决exp之后,数据上溢的情况 ,采用所有的值都减去最大的那个值,这样softmax的值还是不变,如下所示:

(2)由于计算交叉熵损失函数会取对数,和softmax的指数刚好可以结合,那么通过将softmax和交叉熵结合在一起,可以避免反向传播过程中可能会困扰我们的数值稳定性问题。避免计算exp(oj-max(ok)),直接计算oj-max(ok)。
所以我们没有将softmax概率传递到损失函数中, 而是在交叉熵损失函数中传递未规范化的预测,并同时计算softmax及其对数。 - pytorch中的CrossEntropyLoss()函数其实就是把输出结果进行sigmoid(将数据设置到0-1之间),随后再放到传统的交叉熵函数中,就会得到结果。所以使用CrossEntropyLoss()就相当于做了两件事(softmax和损失韩函数)
