基于dlib进行人脸识别demo
环境准备:win10,python3.9,cv2,numpy,dlib
项目所要达到的目的:
实现人脸识别(输入几张图片,人脸检测、关键点检测、人脸关键点进行编码存储起来,再传进来一张图片,判断新传来来这张图片属于哪一个人)
如果dlib安装不成功请参考我前面的文章
原理:
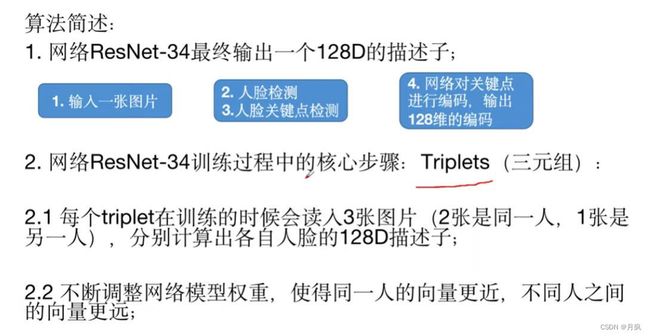
主体采用Resnet生成一个128D的特征向量,resnet是采用34层的(resnet34)。
但由于resnet34最后一层神经网络里实际上有1000个神经元,所以dlib在后面加了Dense(128),所以生成的是128维度的向量
生成128D编码模型:dlib_face_recognition_resnet_model_v1.dat
下载地址:https://github.com/davisking/dlib-models
关键点监测模型:shape_predictor_68_face_landmarks.dat
下载地址:http://dlib.net/files/shape_predictor_68_face_landmarks.dat.bz2
分别准备4张刘亦菲小头像和一张陈乔恩小头像
过程描述:分别获取陈乔恩和刘亦菲的头像128d编码,然后和测试照片刘亦菲计算欧氏距离,欧氏距离越小,意味着图片的相似度就越高,然后拿着刘亦菲图片测试。
基本准本就绪,那就开始吧:
# 1、导入库
import cv2
import dlib
import numpy as np
from PIL import Image, ImageDraw, ImageFont


# 2、定义:关键点编码为128D维度,upsample下采样,jet是拉伸都设置为1
def encoder_face(image, detector, predictor, encoder, upsample=1, jet=1):
    # 检测人脸
    faces = detector(image, upsample)
    # 对每张人脸进行关键点检测,列表推导
    # BGR图片转换为灰度图
    gray = cv2.cvtColor(image, cv2.COLOR_BGR2GRAY)
    face_keypoints = [predictor(image, face) for face in faces]  # 每张脸的关键点
    # 返回每个关键点的128维向量
    return [np.array(encoder.compute_face_descriptor(image, face_keypoint, jet)) for face_keypoint in face_keypoints]


# 3、定义:人脸比较,通过欧氏距离比较
def compare_faces(face_encoding, test_encoding):
    return list(np.linalg.norm(np.array(face_encoding) - np.array(test_encoding), axis=1))  # 计算俩个向量的欧氏距离,1表示按照行向量处理


# 4、定义:比较之后,写出对应图片的名称
def compare_faces_order(face_encoding, test_encoding, names):
    distance = list(np.linalg.norm(np.array(face_encoding) - np.array(test_encoding), axis=1))
    return zip(*sorted(zip(distance, names)))  # 逆序输出
#解决opencv显示中文乱码


def main():
    # 2、读取4张图片
    img1 = cv2.imread("../images/liuyifei1.jpg")
    img2 = cv2.imread("../images/liuyifei2.jpg")
    img3 = cv2.imread("../images/liuyifei3.jpg")
    img4 = cv2.imread("../images/chenqiaoen.jpg")
    test = cv2.imread("../images/liuyifei.jpg")

    # BGR转换成RGB(通道转换)
    # img1 = img1[:, :, ::-1]
    # img2 = img2[:, :, ::-1]
    # img3 = img3[:, :, ::-1]
    # img4 = img4[:, :, ::-1]
    # test = test[:, :, ::-1]

    image_name = ["刘亦菲1", "刘亦菲2", "刘亦菲3", "陈乔恩0"]
    add_name = ["../images/liuyifei1.jpg","../images/liuyifei2.jpg","../images/liuyifei3.jpg","../images/chenqiaoen.jpg"]
    # 3、加载人脸检测器
    detector = dlib.get_frontal_face_detector()

    # 4、加载关键点的检测器
    predictor = dlib.shape_predictor("shape_predictor_68_face_landmarks.dat")

    # 5、加载人脸特征编码模型
    encoder = dlib.face_recognition_model_v1("dlib_face_recognition_resnet_model_v1.dat")

    # 6、调用编码方法:128维特征向量输出,[0]表示只取第一张人脸,可能存在很多张人脸
    # 注意这里一定要传入BGR的图片
    img1_128D = encoder_face(img1, detector, predictor, encoder)[0]
    img2_128D = encoder_face(img2, detector, predictor, encoder)[0]
    img3_128D = encoder_face(img3, detector, predictor, encoder)[0]
    img4_128D = encoder_face(img4, detector, predictor, encoder)[0]
    test_128D = encoder_face(test, detector, predictor, encoder)[0]

    # 四张图片放到一起
    four_images_128D = [img1_128D, img2_128D, img3_128D, img4_128D]
    # 7、调用方法:比较人脸,计算特征项之间的距离,判断是否为同一个人,测试一下
    distance = compare_faces(four_images_128D, test_128D)
    print(distance)

    # 输出对应的名字(返回一个距离对应一个名字)
    distance, name = compare_faces_order(four_images_128D, test_128D, image_name)
    print("\n")
    print("distance:{},\n names:{}".format(distance, name))

    #找出最小值以及最小值对应下表
    min_value = min(distance)
    index_value = distance.index(min_value)
    print(min_value)
    print(index_value)
    value_img=name[index_value]#名字集合对应的名字下
    index_name=image_name.index(value_img)
    add = add_name[index_name] #获取图片的地址

    #加载图片显示图片
    result_face = cv2.imread(add)
    #再次检测人脸
    face = detector(result_face,1)[0]
    cv2.rectangle(result_face,(face.left(),face.top()),(face.right(),face.bottom()),(0,188,0),5)

    gbk_title = value_img.encode("gbk").decode(errors="ignore")
    #绘制半透明的边框
    blk = np.zeros(result_face.shape, np.uint8)
    pis = cv2.rectangle(blk, (40, 40), (300, 400), (255, 0, 0), -1)  # 注意在 blk的基础上进行绘制;
    cv2.putText(pis,"name:liuyifei",(50,80),cv2.FONT_HERSHEY_COMPLEX_SMALL, 1.0,(0,255,0),1)
    cv2.putText(pis,"sex:female",(50,120),cv2.FONT_HERSHEY_COMPLEX_SMALL, 1.0,(0,255,0),1)
    cv2.putText(pis,"age:34",(50,160),cv2.FONT_HERSHEY_COMPLEX_SMALL, 1.0,(0,255,0),1)
    cv2.putText(pis,"love:dance@swim@player",(50,200),cv2.FONT_HERSHEY_COMPLEX_SMALL, 1.0,(0,255,0),1)
    cv2.putText(pis,"healthy:good",(50,240),cv2.FONT_HERSHEY_COMPLEX_SMALL, 1.0,(0,255,0),1)
    cv2.putText(pis,"temperature:36.5",(50,280),cv2.FONT_HERSHEY_COMPLEX_SMALL, 1.0,(0,255,0),1)
    cv2.putText(pis,"presure:124/78",(50,320),cv2.FONT_HERSHEY_COMPLEX_SMALL, 1.0,(0,255,0),1)
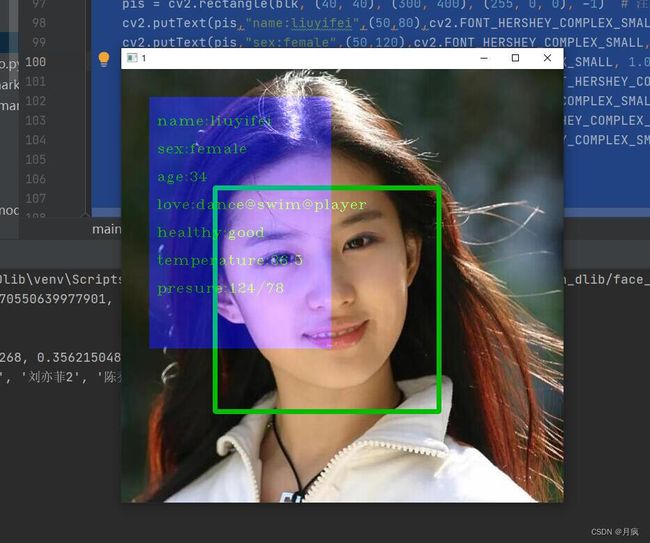
    picture = cv2.addWeighted(result_face, 1.0, blk, 0.5, 1)
    cv2.imshow(gbk_title,picture)

    cv2.waitKey(0)


if __name__ == "__main__":
    main()
数据结果:
F:\开发工具\pythonProject\Dlib\venv\Scripts\python.exe F:/开发工具/pythonProject/Dlib/face_recognition_dlib/face_rg_dlib_show.py
[0.3456185279221268, 0.3770550639977901, 0.3562150489993451, 0.5097962418015457]
distance:(0.3456185279221268, 0.3562150489993451, 0.3770550639977901, 0.5097962418015457),
names:('刘亦菲1', '刘亦菲3', '刘亦菲2', '陈乔恩0')
测试结果:系统准确的识别出来,这张照片是刘亦菲。


