《动手学深度学习》| 2 深度学习基础
目录
- 1 线性回归
-
- 1.1 线性回归的基本要素
- 1.2 线性回归与神经网络的联系
- 1.3 线性回归的矢量表示法
- 1.4 线性回归的从零开始实现
- 1.5 线性回归的简洁实现
- 1.6 Keras线性回归练习
- 2 图像分类数据集(Fashion-MNIST)
-
- 2.1 数据集介绍
- 2.2 数据集获取
- 2.3 读取小批量
- 2.4 小结
- 3 softmax回归
-
- 3.1 softmax回归模型
- 3.2 softmax的矢量计算表达式
- 3.3 交叉熵损失函数
- 3.4 softmax回归的从零开始实现
- 3.5 softmax的简洁实现
- 4 多层感知机
-
- 4.1 多层感知机定义
- 4.2 激活函数
- 4.3 多层感知机的从零开始实现
- 4.4 多层感知机的简洁实现
- 5 模型选择、欠拟合和过拟合
-
- 5.1 训练误差和泛化误差
- 5.2 模型选择
-
- 5.2.1 验证集
- 5.2.2 K折交叉验证
- 5.3 欠拟合与过拟合
- 5.4 应对过拟合的方法:权重衰减
-
- 5.4.1 权重衰减的从零开始实现
- 5.4.2 权重衰减的简洁实现
- 5.5 应对过拟合的方法:丢弃法
-
- 5.5.1 丢弃法的从零开始实现
- 5.5.2 丢弃法的简洁实现
- 6 正向传播与反向传播
-
- 6.1 正向传播
- 6.2 反向传播基础:链式法则
- 6.3 反向传播
- 6.4 正向传播与反向传播相互依赖
- 7 数值稳定性与模型初始化
-
- 7.1 衰减或爆炸
- 7.2 模型参数的初始化
-
- 7.2.1 Tensorflow2.0的默认随机初始化
- 7.2.2 Xavier随机初始化
1 线性回归
1.1 线性回归的基本要素
以预测房价为例,影响指标为面积(平方米)与房龄(年)。
设房屋的面积为x1,房龄为x2,房屋价格为y。
线性回归模型:
y ^ = w 1 x 1 + w 2 x 2 + b \hat y = {w_1}{x_1} + {w_2}{x_2} + b y^=w1x1+w2x2+b
| 名称 | 定义 |
|---|---|
| 样本 | 一栋房屋 |
| 真实售出价格 | 标签 |
| 特征 | x1,x2 |
| 误差损失 | y ^ − y \hat y - y y^−y |
模型训练:通过数据寻找参数值 w1,w2,b ,使得误差尽可能小。
损失函数(这里选取平方损失函数):
l ( i ) ( w 1 , w 2 , b ) = 1 2 ( y ^ ( i ) − y ( i ) ) 2 {l^{(i)}}({w_1},{w_2},b) = \frac{1}{2}{({\hat y^{(i)}} - {y^{(i)}})^2} l(i)(w1,w2,b)=21(y^(i)−y(i))2 l ( w 1 , w 2 , b ) = 1 n ∑ i = 1 n l ( i ) = 1 n ∑ i = 1 n 1 2 ( w 1 x 1 ( i ) + w 2 x 2 ( i ) + b − y ( i ) ) 2 l({w_1},{w_2},b) = \frac{1}{n}\sum\limits_{i = 1}^n {{l^{(i)}}} = \frac{1}{n}\sum\limits_{i = 1}^n {\frac{1}{2}{{({w_1}{x_1}^{(i)} + {w_2}{x_2}^{(i)} + b - {y^{(i)}})}^2}} l(w1,w2,b)=n1i=1∑nl(i)=n1i=1∑n21(w1x1(i)+w2x2(i)+b−y(i))2
目标: w 1 ∗ , w 2 ∗ , b = arg min l ( w 1 , w 2 , b ) w_1^*,w_2^*,b = \arg \min l({w_1},{w_2},b) w1∗,w2∗,b=argminl(w1,w2,b)
误差最小化问题的解:
| 最小损失函数的解 | 含义 |
|---|---|
| 解析解 | 模型和损失函数较为简单,最优解可以用公式写出来 |
| 数值解 | 通过优化算法有限次迭代模型参数来降低损失函数的值 |
常见的优化算法:小批量随机梯度下降
思想:先选取一组模型参数的初始值,接下来对参数进行多次迭代,使每次迭代都可能降低损失函数的值。在每次迭代中,先随机均匀采样一个由固定数目训练数据样本所组成的小批量(mini-batch)B,然后求小批量中数据样本的平均损失有关模型参数的导数(梯度),最后用此结果与预先设定的一个正数的乘积作为模型参数在本次迭代的减小量。
在本节讨论的线性回归模型的过程中,模型的每个参数将作如下迭代:
w 1 ← w 1 − η ∣ B ∣ ∑ i ∈ B ∂ l ( i ) ( w 1 , w 2 , b ) ∂ w 1 {w_1} \leftarrow {w_1} - \frac{\eta }{{\left| B \right|}}\sum\limits_{i \in B} {\frac{{\partial {l^{(i)}}({w_1},{w_2},b)}}{{\partial {w_1}}}} w1←w1−∣B∣ηi∈B∑∂w1∂l(i)(w1,w2,b) w 2 ← w 2 − η ∣ B ∣ ∑ i ∈ B ∂ l ( i ) ( w 1 , w 2 , b ) ∂ w 2 {w_2} \leftarrow {w_2} - \frac{\eta }{{\left| B \right|}}\sum\limits_{i \in B} {\frac{{\partial {l^{(i)}}({w_1},{w_2},b)}}{{\partial {w_2}}}} w2←w2−∣B∣ηi∈B∑∂w2∂l(i)(w1,w2,b) b ← b − η ∣ B ∣ ∑ i ∈ B ∂ l ( i ) ( w 1 , w 2 , b ) ∂ b b \leftarrow b - \frac{\eta }{{\left| B \right|}}\sum\limits_{i \in B} {\frac{{\partial {l^{(i)}}({w_1},{w_2},b)}}{{\partial b}}} b←b−∣B∣ηi∈B∑∂b∂l(i)(w1,w2,b)
其中,B表示小批量样本数(batch size), η {\eta} η为学习率。
1.2 线性回归与神经网络的联系

线性回归是一个单层神经网络。输出层中的神经元和输入层中各个输入完全连接。因此,这里的输出层又叫全连接层(fully-connected layer)或稠密层(dense layer)。
1.3 线性回归的矢量表示法
线性回归的矢量计算表达式:
y ^ = x w + b \hat y = xw + b y^=xw+b 损失函数的矢量表达式为: l ( θ ) = 1 2 n ( y ^ − y ) T ( y ^ − y ) l(\theta ) = \frac{1}{{2n}}{(\hat y - y)^T}(\hat y - y) l(θ)=2n1(y^−y)T(y^−y)小批量随机梯度下降的矢量表达式为: θ ← θ − η ∣ B ∣ ∑ i ∈ B ∇ θ l ( i ) \theta \leftarrow \theta {\rm{ - }}\frac{\eta }{{\left| {\rm{B}} \right|}}\sum\limits_{i \in B} {{\nabla _\theta }{l^{(i)}}} θ←θ−∣B∣ηi∈B∑∇θl(i)
1.4 线性回归的从零开始实现
- 生成数据集
import matplotlib.pyplot as plt
import tensorflow as tf

# 生成数据集
num_inputs = 2
num_examples = 1000
true_w = [2,-3.4]
true_b = 4.2
features = tf.random.normal((num_examples, num_inputs),stddev = 1)
labels = true_w[0] * features[:,0] + true_w[1] * features[:,1] + true_b
labels += tf.random.normal(labels.shape, stddev=0.01)

# 第一个特征和y标签的关系
def set_figsize(figsize=(3.5,2.5)):
    plt.rcParams['figure.figsize'] = figsize

set_figsize()
plt.scatter(features[:,0],labels,1)

# 第二个特征和y标签的关系
plt.scatter(features[:,1],labels,1)
- 读取数据
import random

# 定义数据迭代器
def data_iter(batch_size, features, labels):
    num_examples = len(features)
    indices = list(range(num_examples))
    random.shuffle(indices)
    for i in range(0, num_examples, batch_size):
        j = indices[i:min(i+batch_size, num_examples)]
        yield tf.gather(features, axis=0, indices=j), tf.gather(labels, axis=0, indices=j)

# 打印某小批量样本数据
batch_size = 10
for X,y in data_iter(batch_size, features, labels):
    print(X,y)
    break
- 初始化模型参数
# 初始化模型参数
# 将权重初始化为均值为0,标准差为0.01的正态随机数,偏差初始化为0

w = tf.Variable(tf.random.normal((num_inputs, 1), stddev=0.01))
b = tf.Variable(tf.zeros((1,)))
- 定义模型
# 定义模型-线性回归的矢量表达式
def linreg(X,w,b):
    return tf.matmul(X,w) + b
- 定义损失函数
# 平方损失函数
def squared_loss(y_hat,y):
    return (y_hat - tf.reshape(y, y_hat.shape)) ** 2/2
- 定义优化算法
# sgd函数实现小批量随机梯度下降算法
def sgd(params, lr, batch_size, grads):  #lr是学习率
    for i, param in enumerate(params):
        param.assign_sub(lr * grads[i] / batch_size)
这里自动求梯度模块计算得来的梯度是一个批量样本的梯度和。我们将它除以批量大小来得到平均值。
- 训练模型
在每次迭代中,我们根据当前读取的小批量数据样本(特征X和标签y),通过调用反向函数t.gradients计算小批量随机梯度,并调用优化算法sgd迭代模型参数。
# 训练模型
lr = 0.03
num_epochs = 3
net = linreg
loss = squared_loss

for epoch in range(num_epochs):
    for X,y in data_iter(batch_size, features, labels):
        with tf.GradientTape() as t:
            t.watch([w,b])
            l = tf.reduce_sum(loss(net(X,w,b),y))
        grads = t.gradient(l, [w,b])
        sgd([w,b], lr, batch_size, grads)
    train_l = loss(net(features, w, b),labels)
    print('epoch %d, loss %f' % (epoch+1, tf.reduce_mean(train_l)))
epoch 1, loss 0.000049
epoch 2, loss 0.000049
epoch 3, loss 0.000049
训练完成后,我们可以比较学到的参数和用来生成训练集的真实参数。它们应该很接近。
print(true_w, w)
print(true_b, b)
[2, -3.4]
array([[ 1.9996516],
[-3.4006658]], dtype=float32)>
4.2
1.5 线性回归的简洁实现
tensorflow.data 模块提供了有关数据处理的工具,
tensorflow.keras.layers 模块定义了大量神经网络的层,
tensorflow.initializers 模块定义了各种初始化方法,
tensorflow.optimizers 模块提供了模型的各种优化算法。
import tensorflow as tf
from tensorflow import data as tfdata
from tensorflow import keras
from tensorflow.keras import layers
from tensorflow import initializers as init
from tensorflow import losses

# 生成数据集
num_inputs = 2
num_examples = 1000
true_w = [2,-3.4]
true_b = 4.2
features = tf.random.normal(shape=(num_examples, num_inputs),stddev = 1)
labels = true_w[0] * features[:,0] + true_w[1] * features[:,1] + features[:, 1] + true_b
labels += tf.random.normal(labels.shape, stddev=0.01)

# 读取数据集
batch_size = 10
# 将训练数据的特征和标签组合
dataset = tfdata.Dataset.from_tensor_slices((features,labels))
# 随机读取小批量
dataset = dataset.shuffle(buffer_size = num_examples)
dataset = dataset.batch(batch_size)
data_iter = iter(dataset)

# 遍历数据集
for (batch,(X,y)) in enumerate(dataset):
    print(X,y)
    break

# 定义模型与初始化参数
model = keras.Sequential()
model.add(layers.Dense(1, kernel_initializer = init.RandomNormal(stddev=0.01)))

# 定义损失函数
loss = losses.MeanSquaredError()

# 定义优化算法
trainer = optimizers.SGD(learning_rate=0.03)

# 训练模型
num_epochs = 3
for epoch in range(1, num_epochs + 1):
    for (batch, (X, y)) in enumerate(dataset):
        with tf.GradientTape() as tape:
            l = loss(model(X, training=True), y)

        grads = tape.gradient(l, model.trainable_variables)
        trainer.apply_gradients(zip(grads, model.trainable_variables))

    l = loss(model(features), labels)
    print('epoch %d, loss: %f' % (epoch, l))
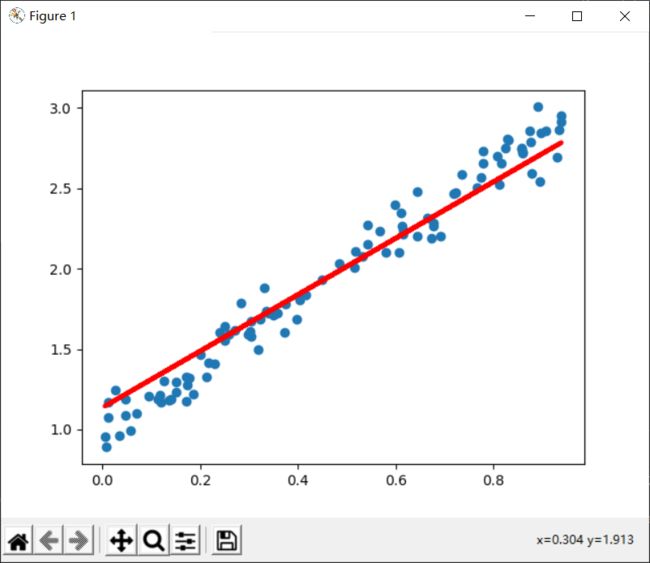
1.6 Keras线性回归练习
import keras
import numpy as np
import matplotlib.pyplot as plt
from keras.models import Sequential   # Sequential是顺序模型
from keras.layers import Dense        # Dense是全连接层

# 生成数据,真实方程为y=2x+1
x_data = np.random.rand(100)
noise = np.random.normal(loc=0, scale=0.1, size=100)
y_data = 2*x_data + 1 + noise

# 可视化数据
plt.scatter(x_data,y_data)
plt.show()

# 构建线性回归模型
model = Sequential()
model.add(Dense(units=1, input_dim=1))
model.compile(optimizer= 'sgd', loss= 'mse')

# 迭代1000次,训练模型
for epoch in range(1,1001):
    loss = model.train_on_batch(x_data,y_data)
    # 每100次迭代打印一次loss值
    if epoch % 100 == 0:
        print("loss:",loss)

# 输出训练好的权重
w,b = model.layers[0].get_weights()
print("w:",w, "b:",b)

# 可视化模型结果
y_pred = model.predict(x_data)

plt.scatter(x_data,y_data)
plt.plot(x_data,y_pred, 'r-', lw=3)
plt.show()
输出:
loss: 0.12541063129901886
loss: 0.07694817334413528
loss: 0.06041103973984718
loss: 0.0480429045855999
loss: 0.038693398237228394
loss: 0.0316251665353775
loss: 0.026281464844942093
loss: 0.0222416203469038
loss: 0.019187498837709427
loss: 0.01687854900956154
w: [[1.7554725]] b: [1.1360984]
2 图像分类数据集(Fashion-MNIST)
在介绍softmax回归的实现前我们先引入一个多类图像分类数据集。它将在后面的章节中被多次使用,以方便我们观察比较算法之间在模型精度和计算效率上的区别。图像分类数据集中最常用的是手写数字识别数据集MNIST [1]。但大部分模型在MNIST上的分类精度都超过了95%。为了更直观地观察算法之间的差异,我们将使用一个图像内容更加复杂的数据集Fashion-MNIST [2]。
2.1 数据集介绍
Fashion-MNIST中一共包括了10个类别,分别为t-shirt(T恤)、trouser(裤子)、pullover(套衫)、dress(连衣裙)、coat(外套)、sandal(凉鞋)、shirt(衬衫)、sneaker(运动鞋)、bag(包)和ankle boot(短靴)。
变量feature对应高和宽均为28像素的图像。每个像素的数值为0到255之间8位无符号整数(uint8)。它使用二维的numpy.ndarray存储。(28x28)
2.2 数据集获取
import tensorflow as tf
from tensorflow import keras
import numpy as np
import time
import sys
import matplotlib.pyplot as plt

# 通过Keras的dataset包下载数据集
from tensorflow.keras.datasets import fashion_mnist
(x_train, y_train), (x_test, y_test) = fashion_mnist.load_data()

# 将数值标签转化为文本标签
def get_fashion_mnist_labels(labels):
    text_labels = ['t-shirt', 'trouser', 'pullover', 'dress', 'coat',
                   'sandal', 'shirt', 'sneaker', 'bag', 'ankle boot']
    return [text_labels[int(i)] for i in labels]


# 可以在一行里画出多张图像和对应标签的函数
def show_fashion_mnist(images, labels):
    _, figs = plt.subplots(1, len(images), figsize=(12, 12))
    for f, img, lbl in zip(figs, images, labels):
        f.imshow(img.reshape((28, 28)))
        f.set_title(lbl)
        f.axes.get_xaxis().set_visible(False)
        f.axes.get_yaxis().set_visible(False)
    plt.show()

# 看一下训练集中前9个样本的图像内容及标签
X, y = [], []
for i in range(10):
    X.append(x_train[i])
    y.append(y_train[i])
show_fashion_mnist(X, get_fashion_mnist_labels(y))
2.3 读取小批量
# 读取小批量
batch_size = 256
if sys.platform.startswith('win'):
    num_workers = 0  # 0表示不用额外的进程来加速读取数据
else:
    num_workers = 4
train_iter = tf.data.Dataset.from_tensor_slices((x_train, y_train)).batch(batch_size)

# 看一遍读取数据所需的时间
start = time.time()
for X,y in train_iter:
    continue
print((time.time()-start))
0.14162111282348633
2.4 小结
- Fashion-MNIST是一个10类服饰分类数据集,之后章节里将使用它来检验不同算法的表现。
- 我们将高和宽分别为 h 和 w 像素的图像的形状记为 h×w 或(h,w)。
3 softmax回归
3.1 softmax回归模型
假设有4个特征,输出为3种类别。所以权重包含12个标量,且对每个输入计算 o 1 {o_1} o1, o 2 {o_2} o2, o 3 {o_3} o3 3个输出。
o 1 = w 11 x 1 + w 21 x 2 + w 31 x 3 + w 41 x 4 + b 1 o 2 = w 12 x 1 + w 22 x 2 + w 32 x 3 + w 42 x 4 + b 2 o 3 = w 13 x 1 + w 23 x 2 + w 33 x 3 + w 43 x 4 + b 3 \begin{array}{l} {o_1} = {w_{11}}{x_1} + {w_{21}}{x_2} + {w_{31}}{x_3} + {w_{41}}{x_4} + {b_1}\\ {o_2} = {w_{12}}{x_1} + {w_{22}}{x_2} + {w_{32}}{x_3} + {w_{42}}{x_4} + {b_2}\\ {o_3} = {w_{13}}{x_1} + {w_{23}}{x_2} + {w_{33}}{x_3} + {w_{43}}{x_4} + {b_3} \end{array} o1=w11x1+w21x2+w31x3+w41x4+b1o2=w12x1+w22x2+w32x3+w42x4+b2o3=w13x1+w23x2+w33x3+w43x4+b3
softmax回归同线性回归一样,也是一个单层神经网络。由于每个输出都要依赖所有的输入,因此输出层也是一个全连接层。
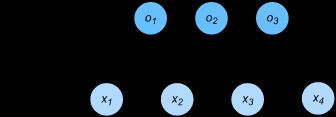
分类问题需要得到离散的预测输出,一种简单的方法是将 o i {o_i} oi 的输出值作为预测类别为 i 的置信度,将最大的 o i {o_i} oi对应的类别作为预测类别。
但这样的做法存在两个问题:
- 输出层的输出值范围不确定,难以直观判断这些值的意义。
- 由于真实标签是离散值,输出值与真实值之间的误差难以衡量。
softmax运算符解决了上述问题,它将输出值转换为和为1的正值。
y ^ 1 , y ^ 2 , y ^ 3 = s o f t max ( o 1 , o 2 , o 3 ) {\hat y_1},{\hat y_2},{\hat y_3} = soft\max ({o_1},{o_2},{o_3}) y^1,y^2,y^3=softmax(o1,o2,o3) 其中,
y ^ 1 = e o 1 ∑ i = 1 3 e o i , y ^ 2 = e o 2 ∑ i = 1 3 e o i , y ^ 3 = e o 3 ∑ i = 1 3 e o i {\hat y_1} = \frac{{{e^{{o_1}}}}}{{\sum\limits_{i = 1}^3 {{e^{{o_i}}}} }},{\hat y_{\rm{2}}} = \frac{{{e^{{o_{\rm{2}}}}}}}{{\sum\limits_{i = 1}^3 {{e^{{o_i}}}} }},{\hat y_{\rm{3}}} = \frac{{{e^{{o_{\rm{3}}}}}}}{{\sum\limits_{i = 1}^3 {{e^{{o_i}}}} }} y^1=i=1∑3eoieo1,y^2=i=1∑3eoieo2,y^3=i=1∑3eoieo3
3.2 softmax的矢量计算表达式
[外链图片转存失败,源站可能有防盗在这里插入!链机制,建描述]议将图片上https://传(imblog.csdnimg.cn/dq7b999fcd408fbb06OWU1e77e8ffde10f.png4636)( https://img-blog.csdnimg.cn/d9c67b999fcd408fbb01e77e8ffde16f.png)]
给定一个小批量样本,批量大小为n,特征数为d,类别数为q,则矢量计算式为:
O = X W + b Y ^ = s o f t max ( O ) \begin{array}{l} O = XW + b\\ \hat Y = soft\max (O) \end{array} O=XW+bY^=softmax(O)
3.3 交叉熵损失函数
softmax运算将输出变换为一个合法的类别预测分布,实际上,真实标签也可以用类别分布表示:
对于样本i,构造向量 y ( i ) ∈ R q {y^{(i)}} \in {R^q} y(i)∈Rq ,使样本i所属的类别对应元素为1,其余均为0.
训练目标:使 y ( i ) {y^{(i)}} y(i) 尽可能接近 y ^ ( i ) {\hat y^{(i)}} y^(i)。
交叉熵比平方损失函数(太严格)更适合衡量两个概率分布的差异。
交叉熵:
H ( y ( i ) , y ^ ( i ) ) = − ∑ j = 1 q y j ( i ) log y ^ j ( i ) H({y^{(i)}},{\hat y^{(i)}}) = - \sum\limits_{j = 1}^q {y_j^{(i)}\log } \hat y_j^{(i)} H(y(i),y^(i))=−j=1∑qyj(i)logy^j(i) 交叉熵损失函数:
l ( θ ) = 1 n ∑ i = 1 n H ( y ( i ) , y ^ ( i ) ) l(\theta ) = \frac{1}{n}\sum\nolimits_{i = 1}^n {H({y^{(i)}},{{\hat y}^{(i)}})} l(θ)=n1∑i=1nH(y(i),y^(i))
最小化交叉熵损失函数等价于最大化训练数据集所有标签类别的联合预测概率。
3.4 softmax回归的从零开始实现
import tensorflow as tf
import numpy as np

# 读取Fashion-MNIST数据集,设置batch_size=256
from tensorflow.keras.datasets import fashion_mnist
from tensorflow.python.ops.script_ops import numpy_function
from tensorflow.python.platform.tf_logging import log

batch_size = 256
(x_train, y_train),(x_test, y_test) = fashion_mnist.load_data()
x_train = tf.cast(x_train, tf.float32) /255
x_test = tf.cast(x_test, tf.float32) /255
train_iter = tf.data.Dataset.from_tensor_slices((x_train,y_train)).batch(batch_size)
test_iter = tf.data.Dataset.from_tensor_slices((x_test,y_test)).batch(batch_size)

# 初始化模型参数
num_inputs = 28*28
num_outputs = 10
W = tf.Variable(tf.random.normal(shape=(num_inputs, num_outputs),
                mean=0, stddev=0.01, dtype=tf.float32))
b = tf.Variable(tf.zeros(num_outputs, dtype=tf.float32))

# 实现softmax运算
def softmax(logits, axis=1):
    return tf.exp(logits)/tf.reduce_sum(tf.exp(logits), axis, keepdims=True)

# 定义模型
def net(X):
    logits = tf.matmul(tf.reshape(X, shape=(-1, W.shape[0])),W) + b
    return softmax(logits)

# 定义损失函数(交叉熵损失函数)
def cross_entropy(y_hat, y):
    y = tf.cast(tf.reshape(y, shape=[-1, 1]),dtype=tf.int32)
    y = tf.one_hot(y, depth=y_hat.shape[-1])
    y = tf.cast(tf.reshape(y, shape=[-1, y_hat.shape[-1]]),dtype=tf.int32)
    return -tf.math.log(tf.boolean_mask(y_hat, y)+1e-8)

# 计算准确率
def accuracy(y_hat, y):
    return np.mean((tf.argmax(y_hat, axis=1)==y))

def evaluate_accuracy(data_iter, net):
    acc_sum, n = 0.0, 0
    for _, (X, y) in enumerate(data_iter):
        y = tf.cast(y,dtype=tf.int64)
        acc_sum += np.sum(tf.cast(tf.argmax(net(X), axis=1), dtype=tf.int64) == y)
        n += y.shape[0]
    return acc_sum / n

# 训练模型
num_epochs, lr = 5, 0.1

def train_ch3(net, train_iter, test_iter, loss, num_epochs, batch_size, params=None, lr=None, trainer=None):
    for epoch in range(num_epochs):
        train_l_sum, train_acc_sum, n = 0.0, 0.0, 0
        for X, y in train_iter:
            with tf.GradientTape() as tape:
                y_hat = net(X)
                l = tf.reduce_sum(loss(y_hat, y))
            grads = tape.gradient(l, params)
            if trainer is None:
                # 如果没有传入优化器,则使用原先编写的小批量随机梯度下降
                for i, param in enumerate(params):
                    param.assign_sub(lr * grads[i] / batch_size)
            else:
                # tf.keras.optimizers.SGD 直接使用是随机梯度下降 theta(t+1) = theta(t) - learning_rate * gradient
                # 这里使用批量梯度下降,需要对梯度除以 batch_size, 对应原书代码的 trainer.step(batch_size)
                trainer.apply_gradients(zip([grad / batch_size for grad in grads], params))

            y = tf.cast(y, dtype=tf.float32)
            train_l_sum += l.numpy()
            train_acc_sum += tf.reduce_sum(tf.cast(tf.argmax(y_hat, axis=1) == tf.cast(y, dtype=tf.int64), dtype=tf.int64)).numpy()
            n += y.shape[0]
        test_acc = evaluate_accuracy(test_iter, net)
        print('epoch %d, loss %.4f, train acc %.3f, test acc %.3f'% (epoch + 1, train_l_sum / n, train_acc_sum / n, test_acc))

trainer = tf.keras.optimizers.SGD(lr)
train_ch3(net, train_iter, test_iter, cross_entropy, num_epochs, batch_size, [W, b], lr)

# 预测
import matplotlib.pyplot as plt
X, y = iter(test_iter).next()

def get_fashion_mnist_labels(labels):
    text_labels = ['t-shirt', 'trouser', 'pullover', 'dress', 'coat', 'sandal', 'shirt', 'sneaker', 'bag', 'ankle boot']
    return [text_labels[int(i)] for i in labels]

def show_fashion_mnist(images, labels):
    # 这⾥的_表示我们忽略(不使⽤)的变量
    _, figs = plt.subplots(1, len(images), figsize=(12, 12)) # 这里注意subplot 和subplots 的区别
    for f, img, lbl in zip(figs, images, labels):
        f.imshow(tf.reshape(img, shape=(28, 28)).numpy())
        f.set_title(lbl)
        f.axes.get_xaxis().set_visible(False)
        f.axes.get_yaxis().set_visible(False)
    plt.show()

true_labels = get_fashion_mnist_labels(y.numpy())
pred_labels = get_fashion_mnist_labels(tf.argmax(net(X), axis=1).numpy())
titles = [true + '\n' + pred for true, pred in zip(true_labels, pred_labels)]

show_fashion_mnist(X[0:9], titles[0:9])
epoch 1, loss 0.7841, train acc 0.749, test acc 0.795
epoch 2, loss 0.5705, train acc 0.813, test acc 0.812
epoch 3, loss 0.5255, train acc 0.825, test acc 0.819
epoch 4, loss 0.5014, train acc 0.831, test acc 0.825
epoch 5, loss 0.4856, train acc 0.836, test acc 0.828
3.5 softmax的简洁实现
import tensorflow as tf
from tensorflow import keras

# 读取数据
fashion_mnist = keras.datasets.fashion_mnist
(x_train,y_train),(x_test,y_test) = fashion_mnist.load_data()
# 对数据进行归一化处理
x_train = x_train /255
y_train = y_train /255

# 定义和初始化模型
model = keras.Sequential([
    keras.layers.Flatten(input_shape=(28,28)),
    keras.layers.Dense(10, activation=tf.nn.softmax)
])

# 定义损失函数
loss = 'sparse_categorical_crossentropy'

# 定义优化算法
optimizer = tf.keras.optimizers.SGD(0.1)

# 训练模型
model.compile(optimizer = optimizer,
              loss = loss,
              metrics = ['categorical_accuracy'])

model.fit(x_train, y_train, epochs=5, batch_size=256)

# 模型在测试集上的表现
test_loss, test_acc = model.evaluate(x_test, y_test)
print('Test ACC:',test_acc)
Test ACC: 1.0
4 多层感知机
4.1 多层感知机定义
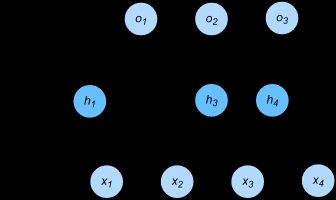
多层感知机是含有至少一个隐藏层的多层神经网络,并且输入层和隐藏层都是全连接层。
每个隐藏层的输出通过激活函数进行变换,多层感知机的层数和各隐藏层中隐藏单元个数都是超参数。
矢量表达式:
H = ϕ ( X W h + b h ) O = H W o + b o \begin{array}{l} H = \phi (X{W_h} + {b_h})\\ O = H{W_o} + {b_o} \end{array} H=ϕ(XWh+bh)O=HWo+bo 神经网络图示:

如果将两个式子联立起来,等价于单层神经网络。
4.2 激活函数
在多层感知机中,隐藏层的输出应通过激活函数变换,常见的激活函数有ReLU函数、sigmoid函数和tanh函数。
-
ReLU函数
R e L U ( x ) = max ( x , 0 ) {\mathop{\rm Re}\nolimits} LU(x) = \max (x,0) ReLU(x)=max(x,0) 作用:只保留正数,将负数转换为0。
函数图像: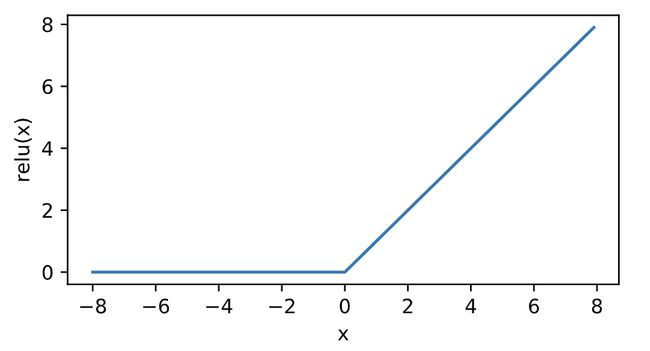
-
sigmoid函数
s i g m o i d ( x ) = 1 1 + exp ( − x ) sigmoid(x) = \frac{1}{{1 + \exp ( - x)}} sigmoid(x)=1+exp(−x)1 作用:将元素值变换到0-1之间。
函数图像: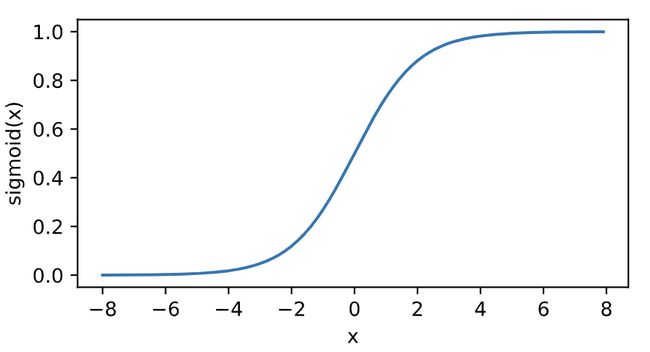
-
tanh函数
tanh ( x ) = 1 − exp ( − 2 x ) 1 + exp ( − 2 x ) \tanh (x) = \frac{{1 - \exp ( - 2x)}}{{1 + \exp ( - 2x)}} tanh(x)=1+exp(−2x)1−exp(−2x) 作用:tanh(双曲正切)函数可以将元素值变换到-1到1之间。
函数图像: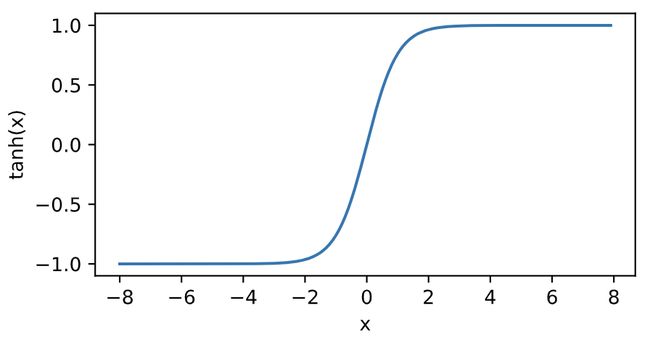
4.3 多层感知机的从零开始实现
import tensorflow as tf
import numpy as np
import sys
sys.path.append("..") # 为了导入上层目录的d2lzh_tensorflow
import d2lzh_tensorflow2 as d2l


# 读取数据
from tensorflow.keras.datasets import fashion_mnist
(x_train,y_train),(x_test,y_test) = fashion_mnist.load_data()
batch_size = 256
x_train = tf.cast(x_train, tf.float32) /255
x_test = tf.cast(x_test, tf.float32) /255
train_iter = tf.data.Dataset.from_tensor_slices((x_train,y_train)).batch(batch_size)
test_iter = tf.data.Dataset.from_tensor_slices((x_test,y_test)).batch(batch_size)

# 定义模型参数
num_inputs, num_outputs, num_hiddens = 784, 10, 256
W1 = tf.Variable(tf.random.normal(shape=(num_inputs, num_hiddens),mean=0, stddev=0.01, dtype=tf.float32))
b1 = tf.Variable(tf.zeros(num_hiddens, dtype=tf.float32))
W2 = tf.Variable(tf.random.normal(shape=(num_hiddens, num_outputs),mean=0, stddev=0.01, dtype=tf.float32))
b2 = tf.Variable(tf.random.normal([num_outputs], stddev=0.1))

# 定义激活函数
def relu(x):
    return tf.math.maximum(x,0)

# 定义模型
def net(X):
    X = tf.reshape(X, shape=[-1, num_inputs])
    h = relu(tf.matmul(X, W1) + b1)
    return tf.math.softmax(tf.matmul(h, W2) + b2)

# 定义损失函数
def loss(y_hat, y_true):
    return tf.losses.sparse_categorical_crossentropy(y_true, y_hat)

# 训练模型
num_epochs, lr = 5, 0.5
params = [W1,b1,W2,b2]
d2l.train_ch3(net, train_iter=train_iter, test_iter=test_iter, loss=loss, num_epochs=5, batch_size=256, params=params, lr=0.5)
epoch 1, loss 0.8106, train acc 0.698, test acc 0.798
epoch 2, loss 0.4887, train acc 0.817, test acc 0.832
epoch 3, loss 0.4205, train acc 0.843, test acc 0.850
epoch 4, loss 0.3877, train acc 0.855, test acc 0.856
epoch 5, loss 0.3637, train acc 0.866, test acc 0.864
4.4 多层感知机的简洁实现
import tensorflow as tf
from tensorflow import keras

# 定义模型
model = tf.keras.models.Sequential([
    tf.keras.layers.Flatten(input_shape=(28,28)),
    tf.keras.layers.Dense(256, activation='relu'),
    tf.keras.layers.Dense(10, activation='softmax')
])

# 读取数据并训练模型
fashion_mnist = keras.datasets.fashion_mnist
(x_train,y_train), (x_test,y_test) = fashion_mnist.load_data()
x_train = x_train /255
x_test = x_test /255

model.compile(optimizer = tf.keras.optimizers.SGD(lr=0.5),
              loss = 'sparse_categorical_crossentropy',
              metrics = ['accuracy'])
model.fit(x_train, y_train, epochs=5,
         batch_size = 256,
         validation_data = (x_test,y_test),
         validation_freq = 1)
epoch 1, loss 0.8106, train acc 0.698, test acc 0.8039
epoch 2, loss 0.4887, train acc 0.817, test acc 0.8282
epoch 3, loss 0.4205, train acc 0.843, test acc 0.8365
epoch 4, loss 0.3877, train acc 0.855, test acc 0.8226
epoch 5, loss 0.3637, train acc 0.866, test acc 0.8548
5 模型选择、欠拟合和过拟合
5.1 训练误差和泛化误差
训练误差:模型在训练集上表现出的误差。
泛化误差:模型在测试集上表现出的误差。
5.2 模型选择
5.2.1 验证集
测试集:在模型参数确定之后进行的唯一测试。
验证集:在建立模型前,预留一部分在训练集和测试集之外的数据作验证集。
实际中,训练集和测试集之间的界限比较模糊。(本书所使用的测试集,严格意义上讲应称为验证集)
5.2.2 K折交叉验证
目的:由于验证集不参与模型训练,当训练数据不够用时,预留大量的验证数据显得太奢侈,因此出现了K折交叉验证。
方法:将原始数据集分为K份,做K次模型训练与验证,每次使用一个子数据集验证,其余K-1个子数据集训练。最终,我们对这k次训练误差和验证误差求平均。
5.3 欠拟合与过拟合
有很多因素可以导致欠拟合和过拟合,这里重点讨论两个因素:模型复杂度、训练集大小。
模型复杂度:

训练集大小:当训练集样本数过小时,容易发生过拟合,因此我们应该选择足够数目的训练集。
多项式函数拟合实验:
真实分布:
y = 1.2 x − 3.4 x 2 + 5.6 x 3 + 5 + ε y = 1.2x - 3.4{x^2} + 5.6{x^3} + 5 + \varepsilon y=1.2x−3.4x2+5.6x3+5+ε其中噪声项ϵ服从均值为0、标准差为0.1的正态分布。训练数据集和测试数据集的样本数都设为100。
import tensorflow as tf
import numpy as np
import matplotlib.pyplot as plt

# 生成数据集
n_train, n_test, true_w, true_b = 100, 100, [1.2,-3.4,5.6], 5
features = tf.random.normal(shape=(200,1))
poly_features = tf.concat([features, tf.pow(features,2), tf.pow(features,3)],1)
labels = (true_w[0] * poly_features[:,0] + true_w[1] * poly_features[:,2] + true_b)
labels += tf.random.normal(labels.shape,0,0.1)

# 画图函数
from IPython import display
def use_svg_display():
    """Use svg format to display plot in jupyter"""
    display.set_matplotlib_formats('svg')

def set_figsize(figsize=(3.5, 2.5)):
    """Set matplotlib figure size."""
    use_svg_display()
    plt.rcParams['figure.figsize'] = figsize
def semilogy(x_vals, y_vals, x_label, y_label, x2_vals=None, y2_vals=None,
             legend=None, figsize=(3.5, 2.5)):
    set_figsize(figsize)
    plt.xlabel(x_label)
    plt.ylabel(y_label)
    plt.semilogy(x_vals, y_vals)
    if x2_vals and y2_vals:
        plt.semilogy(x2_vals, y2_vals, linestyle=':')
        plt.legend(legend)
    plt.show()


# 定义与训练模型
num_epochs = 100
loss = tf.losses.MeanSquaredError()

def fit_and_plot(train_features, test_features, train_labels, test_labels):
    net = tf.keras.Sequential()
    net.add(tf.keras.layers.Dense(1))
    batch_size = min(10, train_labels.shape[0])
    train_iter = tf.data.Dataset.from_tensor_slices(
        (train_features, train_labels)).batch(batch_size)
    test_iter = tf.data.Dataset.from_tensor_slices(
        (test_features, test_labels)).batch(batch_size)
    optimizer = tf.keras.optimizers.SGD(learning_rate=0.01)
    train_ls, test_ls = [], []
    for _ in range(num_epochs):
        for X, y in train_iter:
            with tf.GradientTape() as tape:
                l = loss(y, net(X))

            grads = tape.gradient(l, net.trainable_variables)
            optimizer.apply_gradients(zip(grads, net.trainable_variables))

        train_ls.append(loss(train_labels, net(train_features)).numpy().mean())
        test_ls.append(loss(test_labels, net(test_features)).numpy().mean())
    print('final epoch: train loss', train_ls[-1], 'test loss', test_ls[-1])
    semilogy(range(1, num_epochs + 1), train_ls, 'epochs', 'loss',
             range(1, num_epochs + 1), test_ls, ['train', 'test'])
    print('weight:', net.get_weights()[0],
          '\nbias:', net.get_weights()[1])


# 三阶多项式拟合(正常)
fit_and_plot(poly_features[:n_train, :], poly_features[n_train:, :],
             labels[:n_train], labels[n_train:])

# 线性函数拟合(欠拟合)
fit_and_plot(features[:n_train, :], features[n_train:, :], labels[:n_train],
             labels[n_train:])

# 训练样本不足(过拟合)
fit_and_plot(poly_features[0:2, :], poly_features[n_train:, :], labels[0:2],
             labels[n_train:])
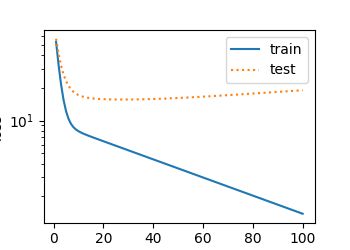
final epoch: train loss 0.010118032 test loss 0.011717844
weight: [[ 1.1717690e+00]
[ 3.2052724e-03]
[-3.4006360e+00]]
bias: [4.980329]
final epoch: train loss 48.82444 test loss 35.068447
weight: [[-7.768481]]
bias: [4.972491]
final epoch: train loss 1.3818874 test loss 19.003952
weight: [[-1.1968768]
[ 1.8191712]
[-1.8213197]]
bias: [3.1863894]
5.4 应对过拟合的方法:权重衰减
正则化: 通过为模型损失函数添加惩罚项,限制模型参数较小。
L2范数正则化又称为权重衰减,其惩罚项是:模型权重^2 * 常数
以线性回归为例: l o s s = l ( w 1 , w 2 , b ) + λ 2 n ∣ ∣ w ∣ ∣ 2 loss = l({w_1},{w_2},b) + \frac{\lambda }{{2n}}||w|{|^2} loss=l(w1,w2,b)+2nλ∣∣w∣∣2 迭代方式更改为: w 1 ← ( 1 − η λ ∣ B ∣ ) w 1 − η ∣ B ∣ ∑ i ∈ B x 1 ( i ) ( x 1 ( i ) w 1 + x 2 ( i ) w 2 + b − y ( i ) ) {w_1} \leftarrow (1 - \frac{{\eta \lambda }}{{\left| B \right|}}){w_1} - \frac{\eta }{{\left| B \right|}}\sum\limits_{i \in B} {x_1^{(i)}(x_1^{(i)}{w_1} + x_2^{(i)}{w_2} + b - {y^{(i)}})} w1←(1−∣B∣ηλ)w1−∣B∣ηi∈B∑x1(i)(x1(i)w1+x2(i)w2+b−y(i)) w 2 ← ( 1 − η λ ∣ B ∣ ) w 2 − η ∣ B ∣ ∑ i ∈ B x 2 ( i ) ( x 1 ( i ) w 1 + x 2 ( i ) w 2 + b − y ( i ) ) {w_2} \leftarrow (1 - \frac{{\eta \lambda }}{{\left| B \right|}}){w_2} - \frac{\eta }{{\left| B \right|}}\sum\limits_{i \in B} {x_2^{(i)}(x_1^{(i)}{w_1} + x_2^{(i)}{w_2} + b - {y^{(i)}})} w2←(1−∣B∣ηλ)w2−∣B∣ηi∈B∑x2(i)(x1(i)w1+x2(i)w2+b−y(i)) 即:L2正则化先让权重乘小于1的数,再减梯度,因此又叫做权重衰减。
5.4.1 权重衰减的从零开始实现
下面,我们以高维线性回归为例来引入一个过拟合问题,并使用权重衰减来应对过拟合。设数据样本特征的维度为p,对于训练数据集和测试数据集中特征为x1,x2,…,xp的任一样本,我们使用如下的线性函数来生成该样本的标签:
y = 0.05 + ∑ i = 1 p 0.01 x i + ε y = 0.05 + \sum\nolimits_{i = 1}^p {0.01{x_i} + \varepsilon } y=0.05+∑i=1p0.01xi+ε 为了较容易地观察过拟合,我们考虑高维线性回归问题,如设维度p=200p=200;同时,我们特意把训练数据集的样本数设低,如20。
import tensorflow as tf
from tensorflow.keras import layers,models,initializers,optimizers,regularizers
import numpy as np
import matplotlib.pyplot as plt
import d2lzh_tensorflow2 as d2l

# 生成数据集
n_train, n_test, num_inputs = 20,100,200
true_w, ture_b = tf.ones((num_inputs,1)) *0.01, 0.05
features = tf.random.normal(shape=(120,200))
labels = tf.keras.backend.dot(features, true_w) + ture_b
labels += tf.random.normal(mean=0.01, shape=labels.shape)
train_features, test_features = features[:n_train, :], features[n_train: ,:]
train_labels, test_labels = labels[:n_train], labels[n_train:]

# 初始化模型参数
def init_params():
    w = tf.Variable(tf.random.normal(mean=1, shape=(num_inputs, 1)))
    b = tf.Variable(tf.zeros(shape=(1,)))
    return [w,b]

# 定义L2范数惩罚项
def l2_penalty(w):
    return tf.reduce_sum((w**2)) /2

# 训练和测试
batch_size, num_epochs, lr = 1, 100, 0.003
net, loss = d2l.linreg, d2l.squared_loss
optimizer = tf.keras.optimizers.SGD()
train_iter = tf.data.Dataset.from_tensor_slices(
    (train_features, train_labels)).batch(batch_size).shuffle(batch_size)

def fit_and_plot(lambd):
    w, b = init_params()
    train_ls, test_ls = [], []
    for _ in range(num_epochs):
        for X, y in train_iter:
            with tf.GradientTape(persistent=True) as tape:
                # 添加了L2范数惩罚项
                l = loss(net(X, w, b), y) + lambd * l2_penalty(w)
            grads = tape.gradient(l, [w, b])
            d2l.sgd([w, b], lr, batch_size, grads)
        train_ls.append(tf.reduce_mean(loss(net(train_features, w, b),
                             train_labels)).numpy())
        test_ls.append(tf.reduce_mean(loss(net(test_features, w, b),
                            test_labels)).numpy())
    d2l.semilogy(range(1, num_epochs + 1), train_ls, 'epochs', 'loss',
                 range(1, num_epochs + 1), test_ls, ['train', 'test'])
    print('L2 norm of w:', tf.norm(w).numpy())

# 观察过拟合
fit_and_plot(lambd=0)

# 使用权重衰减
fit_and_plot(lambd=3)

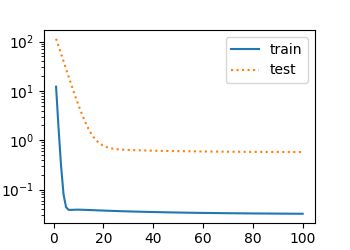
L2 norm of w: 19.351995
L2 norm of w: 0.32339257
5.4.2 权重衰减的简洁实现
在 TensorFlow2.0 中,我们可以对Dense层传入 kernel_regularizer 参数进行权重衰减。
def fit_and_plot_tf2(wd, lr=1e-3):
    model = tf.keras.models.Sequential()
    model.add(tf.keras.layers.Dense(1,
                                 kernel_regularizer=regularizers.l2(wd),
                                    bias_regularizer=None))
    model.compile(optimizer=tf.keras.optimizers.SGD(lr=lr),
                 loss=tf.keras.losses.MeanSquaredError())
    history = model.fit(train_features, train_labels, epochs=100, batch_size=1,
              validation_data=(test_features, test_labels),
             validation_freq=1,verbose=0)
    train_ls = history.history['loss']
    test_ls = history.history['val_loss']
    d2l.semilogy(range(1, num_epochs + 1), train_ls, 'epochs', 'loss',
                     range(1, num_epochs + 1), test_ls, ['train', 'test'])
    print('L2 norm of w:', tf.norm(model.get_weights()[0]).numpy())
5.5 应对过拟合的方法:丢弃法
丢弃法有一些不同的变体,本节中提到的为倒置丢弃法。
在多层神经网络中,若对隐藏层使用丢弃法,该层的隐藏单元将有一定概率被丢弃。
设丢弃概率为p,那么有p的概率 h i {h_i} hi会被清零,有1-p的概率 h i / ( 1 − p ) {h_i}/(1 - p) hi/(1−p)做拉伸,p为超参数。设随机变量 ξ i {\xi _i} ξi为0和1的概率为p和1-p。
h i ′ = ξ i 1 − p h i {h_i}^\prime = \frac{{{\xi _i}}}{{1 - p}}{h_i} hi′=1−pξihi 由于 E ( ξ i ) = 1 − p E({\xi _i}) = 1 - p E(ξi)=1−p,因此
E ( h i ′ ) = E ( ξ i ) 1 − p h i = h i E({h_i}^\prime ) = \frac{{E({\xi _i})}}{{1 - p}}{h_i} = {h_i} E(hi′)=1−pE(ξi)hi=hi故丢弃法不改变输入的期望值。
由于在训练中隐藏层神经元的丢弃是随机的,输出层无法过度依赖 h 1 , h 2 . . . h 5 {h_1},{h_2}...{h_5} h1,h2...h5的任一个,从而在训练模型时起到正则化的作用。
5.5.1 丢弃法的从零开始实现
import tensorflow as tf
import numpy as np
from tensorflow import keras, nn, losses
from tensorflow.keras.layers import Dropout, Flatten, Dense

# 定义丢弃法函数
def dropout(X, drop_prob):
    assert 0 <= drop_prob <= 1
    keep_prob = 1 - drop_prob
    # 这种情况下把全部元素都丢弃
    if keep_prob == 0:
        return tf.zeros_like(X)
    #初始mask为一个bool型数组,故需要强制类型转换
    mask = tf.random.uniform(shape=X.shape, minval=0, maxval=1) < keep_prob
    return tf.cast(mask, dtype=tf.float32) * tf.cast(X, dtype=tf.float32) / keep_prob


# 定义模型参数
num_inputs, num_outputs, num_hiddens1, num_hiddens2 = 784, 10, 256, 256

W1 = tf.Variable(tf.random.normal(stddev=0.01, shape=(num_inputs, num_hiddens1)))
b1 = tf.Variable(tf.zeros(num_hiddens1))
W2 = tf.Variable(tf.random.normal(stddev=0.1, shape=(num_hiddens1, num_hiddens2)))
b2 = tf.Variable(tf.zeros(num_hiddens2))
W3 = tf.Variable(tf.random.truncated_normal(stddev=0.01, shape=(num_hiddens2, num_outputs)))
b3 = tf.Variable(tf.zeros(num_outputs))

params = [W1, b1, W2, b2, W3, b3]

# 定义模型
drop_prob1, drop_prob2 = 0.2, 0.5

def net(X, is_training=False):
    X = tf.reshape(X, shape=(-1,num_inputs))
    H1 = tf.nn.relu(tf.matmul(X, W1) + b1)
    if is_training:# 只在训练模型时使用丢弃法
      H1 = dropout(H1, drop_prob1)  # 在第一层全连接后添加丢弃层
    H2 = nn.relu(tf.matmul(H1, W2) + b2)
    if is_training:
      H2 = dropout(H2, drop_prob2)  # 在第二层全连接后添加丢弃层
    return tf.math.softmax(tf.matmul(H2, W3) + b3)


# 训练和测试模型
from tensorflow.keras.datasets import fashion_mnist

def evaluate_accuracy(data_iter, net):
    acc_sum, n = 0.0, 0
    for _, (X, y) in enumerate(data_iter):
        y = tf.cast(y,dtype=tf.int64)
        acc_sum += np.sum(tf.cast(tf.argmax(net(X), axis=1), dtype=tf.int64) == y)
        n += y.shape[0]
    return acc_sum / n

def train_ch3(net, train_iter, test_iter, loss, num_epochs, batch_size,
              params=None, lr=None, trainer=None):
    global sample_grads
    for epoch in range(num_epochs):
        train_l_sum, train_acc_sum, n = 0.0, 0.0, 0
        for X, y in train_iter:
            with tf.GradientTape() as tape:
                y_hat = net(X, is_training=True)
                l = loss(y_hat, tf.one_hot(y, depth=10, axis=-1, dtype=tf.float32))

            grads = tape.gradient(l, params)
            if trainer is None:

                sample_grads = grads
                params[0].assign_sub(grads[0] * lr)
                params[1].assign_sub(grads[1] * lr)
            else:
                trainer.apply_gradients(zip(grads, params))  # “softmax回归的简洁实现”一节将用到

            y = tf.cast(y, dtype=tf.float32)
            train_l_sum += l.numpy()
            train_acc_sum += tf.reduce_sum(tf.cast(tf.argmax(y_hat, axis=1) == tf.cast(y, dtype=tf.int64), dtype=tf.int64)).numpy()
            n += y.shape[0]
        test_acc = evaluate_accuracy(test_iter, net)
        print('epoch %d, loss %.4f, train acc %.3f, test acc %.3f'
              % (epoch + 1, train_l_sum / n, train_acc_sum / n, test_acc))


loss = tf.losses.CategoricalCrossentropy()
num_epochs, lr, batch_size = 5, 0.5, 256
(x_train, y_train), (x_test, y_test) = fashion_mnist.load_data()
x_train = tf.cast(x_train, tf.float32) / 255 #在进行矩阵相乘时需要float型,故强制类型转换为float型
x_test = tf.cast(x_test,tf.float32) / 255 #在进行矩阵相乘时需要float型,故强制类型转换为float型
train_iter = tf.data.Dataset.from_tensor_slices((x_train, y_train)).batch(batch_size)
test_iter = tf.data.Dataset.from_tensor_slices((x_test, y_test)).batch(batch_size)
train_ch3(net, train_iter, test_iter, loss, num_epochs, batch_size,
              params, lr)
epoch 1, loss 0.0361, train acc 0.537, test acc 0.670
epoch 2, loss 0.0256, train acc 0.659, test acc 0.701
epoch 3, loss 0.0229, train acc 0.697, test acc 0.732
epoch 4, loss 0.0213, train acc 0.718, test acc 0.748
epoch 5, loss 0.0202, train acc 0.729, test acc 0.754
5.5.2 丢弃法的简洁实现
import tensorflow as tf
import numpy as np
from tensorflow import keras, nn, losses
from tensorflow.keras.layers import Dropout, Flatten, Dense

# 导入数据
from tensorflow.keras.datasets import fashion_mnist

loss = tf.losses.CategoricalCrossentropy()
num_epochs, lr, batch_size = 5, 0.5, 256
(x_train, y_train), (x_test, y_test) = fashion_mnist.load_data()
x_train = tf.cast(x_train, tf.float32) / 255 #在进行矩阵相乘时需要float型,故强制类型转换为float型
x_test = tf.cast(x_test,tf.float32) / 255 #在进行矩阵相乘时需要float型,故强制类型转换为float型
train_iter = tf.data.Dataset.from_tensor_slices((x_train, y_train)).batch(batch_size)
test_iter = tf.data.Dataset.from_tensor_slices((x_test, y_test)).batch(batch_size)

# 建立模型
model = keras.Sequential([
    keras.layers.Flatten(input_shape=(28,28)),
    keras.layers.Dense(256, activation='relu'),
    Dropout(0.2),
    keras.layers.Dense(256, activation='relu'),
    Dropout(0.5),
    keras.layers.Dense(10, activation=tf.nn.softmax)
])

model.compile(optimizer = tf.keras.optimizers.Adam(),
              loss = 'sparse_categorical_crossentropy',
              metrics = ['accuracy'])
model.fit(x_train, y_train, epochs=5, batch_size=256, validation_data=(x_test,y_test),
          validation_freq=1)
6 正向传播与反向传播
6.1 正向传播
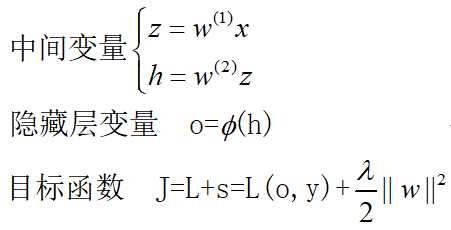
定义:沿着神经网络从输入层→隐藏层→输出层顺序,依次计算并存储模型的中间变量。
假设不考虑偏差项,

假设损失函数为L,正则化项为L2范数正则化:

J J J为目标函数。
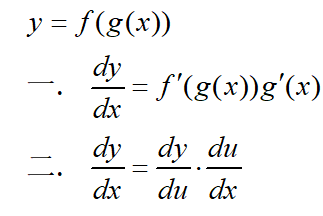
6.2 反向传播基础:链式法则
6.3 反向传播
定义:利用微积分中的链式法则,沿着从输出层→输入层的顺序,依次计算神经网络参数梯度的方法。
∂ z ∂ x = p r o d ( ∂ z ∂ y , ∂ y ∂ x ) \frac{{\partial z}}{{\partial x}} = prod(\frac{{\partial z}}{{\partial y}},\frac{{\partial y}}{{\partial x}}) ∂x∂z=prod(∂y∂z,∂x∂y) p r o d prod prod运算符是乘法运算符。
反向传播的目标: ∂ J ∂ W ( 1 ) \frac{{\partial J}}{{\partial {W^{(1)}}}} ∂W(1)∂J, ∂ J ∂ W ( 2 ) \frac{{\partial J}}{{\partial {W^{(2)}}}} ∂W(2)∂J
- 首先计算目标函数 J = L + s J = L + s J=L+s有关损失项 L L L和正则项 s s s的梯度:
∂ J ∂ L = 1 , ∂ J ∂ s = 1 \frac{{\partial J}}{{\partial L}} = 1,\frac{{\partial J}}{{\partial s}} = 1 ∂L∂J=1,∂s∂J=1 - 计算目标函数有关输出层变量的梯度:
∂ J ∂ o = p r o d ( ∂ J ∂ L , ∂ L ∂ o ) = ∂ L ∂ o \frac{{\partial J}}{{\partial o}} = prod(\frac{{\partial J}}{{\partial L}},\frac{{\partial L}}{{\partial o}}) = \frac{{\partial L}}{{\partial o}} ∂o∂J=prod(∂L∂J,∂o∂L)=∂o∂L - 计算正则化 s s s关于两个参数的梯度:
∂ s ∂ w ( 1 ) = λ w ( 1 ) , ∂ s ∂ w ( 2 ) = λ w ( 2 ) \frac{{\partial s}}{{\partial {w^{(1)}}}} = \lambda {w^{(1)}},\frac{{\partial s}}{{\partial {w^{(2)}}}} = \lambda {w^{(2)}} ∂w(1)∂s=λw(1),∂w(2)∂s=λw(2) - 计算 J J J关于 w ( 2 ) {w^{(2)}} w(2)的梯度:
∂ J ∂ w ( 2 ) = p r o d ( ∂ J ∂ o , ∂ o ∂ w ( 2 ) ) + p r o d ( ∂ J ∂ s , ∂ s ∂ w ( 2 ) ) = ∂ J ∂ o h + λ w ( 2 ) \frac{{\partial J}}{{\partial {w^{(2)}}}} = prod(\frac{{\partial J}}{{\partial o}},\frac{{\partial o}}{{\partial {w^{(2)}}}}) + prod(\frac{{\partial J}}{{\partial s}},\frac{{\partial s}}{{\partial {w^{(2)}}}}) = \frac{{\partial J}}{{\partial o}}h + \lambda {w^{(2)}} ∂w(2)∂J=prod(∂o∂J,∂w(2)∂o)+prod(∂s∂J,∂w(2)∂s)=∂o∂Jh+λw(2) - 隐藏层梯度计算:
∂ J ∂ h = p r o d ( ∂ J ∂ o , ∂ o ∂ h ) = ∂ J ∂ o w ( 2 ) \frac{{\partial J}}{{\partial h}} = prod(\frac{{\partial J}}{{\partial o}},\frac{{\partial o}}{{\partial h}}) = \frac{{\partial J}}{{\partial o}}{w^{(2)}} ∂h∂J=prod(∂o∂J,∂h∂o)=∂o∂Jw(2) - 中间变量 z z z的梯度:
∂ J ∂ z = p r o d ( ∂ J ∂ h , ∂ h ∂ z ) = ∂ J ∂ h ϕ ′ ( z ) \frac{{\partial J}}{{\partial z}} = prod(\frac{{\partial J}}{{\partial h}},\frac{{\partial h}}{{\partial z}}) = \frac{{\partial J}}{{\partial h}}\phi '(z) ∂z∂J=prod(∂h∂J,∂z∂h)=∂h∂Jϕ′(z) - 计算 J J J关于 w ( 1 ) w^{{(1)}} w(1)的梯度:
∂ J ∂ w ( 1 ) = p r o d ( ∂ J ∂ z , ∂ z ∂ w ( 1 ) ) + p r o d ( ∂ J ∂ s , ∂ s ∂ w ( 1 ) ) = ∂ J ∂ z x + λ w ( 1 ) \frac{{\partial J}}{{\partial {w^{(1)}}}} = prod(\frac{{\partial J}}{{\partial z}},\frac{{\partial z}}{{\partial {w^{(1)}}}}) + prod(\frac{{\partial J}}{{\partial s}},\frac{{\partial s}}{{\partial {w^{(1)}}}}) = \frac{{\partial J}}{{\partial z}}x + \lambda {w^{(1)}} ∂w(1)∂J=prod(∂z∂J,∂w(1)∂z)+prod(∂s∂J,∂w(1)∂s)=∂z∂Jx+λw(1)
6.4 正向传播与反向传播相互依赖
在训练深度学习模型时,正向传播和反向传播之间相互依赖。
- 一方面,正向传播的计算可能依赖于模型参数的当前值,而这些模型参数是在反向传播的梯度计算后通过优化算法迭代的。
- 另一方面,反向传播的梯度计算可能依赖于各变量的当前值,而这些变量的当前值是通过正向传播计算得到的。
7 数值稳定性与模型初始化
现在我们讨论以下两个问题:
- 深度学习模型的数值稳定性:衰减、爆炸
- 深度学习模型参数的初始化
7.1 衰减或爆炸
设有一多层感知机:
第 l l l层的权重系数: w ( l ) w^{{(l)}} w(l);输出层 H ( l ) H^{{(l)}} H(l)权重系数: w ( L ) w^{{(L)}} w(L);激活函数 ϕ ( x ) = x \phi (x) = x ϕ(x)=x
则输入 x x x时,第 l l l层的输出为: H ( l ) = w ( 1 ) w ( 2 ) . . . w ( l ) x {H^{(l)}} = {w^{(1)}}{w^{(2)}}...{w^{(l)}}x H(l)=w(1)w(2)...w(l)x
若 l l l过大时,则 H ( l ) {H^{(l)}} H(l)可能会发生衰减/爆炸。例如, 0. 2 30 0.2^{{30}} 0.230 和 5 30 5^{{30}} 530
7.2 模型参数的初始化
在进行基于梯度的优化算法迭代之前,通常将神经网络的模型参数,特别是权重参数,进行随机初始化。
7.2.1 Tensorflow2.0的默认随机初始化
Tensorflow 2.0中initializers模块参数都采取了较为合理的初始化策略,一般不用我们考虑。
7.2.2 Xavier随机初始化
还有一种比较常用的随机初始化方法叫作Xavier随机初始化。
假设某全连接层的输入个数为a,输出个数为b,Xavier随机初始化将使该层中权重参数的每个元素都随机采样于均匀分布:
U ( − 6 a + b , 6 a + b ) U( - \sqrt {\frac{6}{{a + b}}} ,\sqrt {\frac{6}{{a + b}}} ) U(−a+b6,a+b6)它的设计主要考虑到,模型参数初始化后,每层输出的方差不该受该层输入个数影响,且每层梯度的方差也不该受该层输出个数影响。

