Android Studio arctic Fox(北极狐)导入openCV
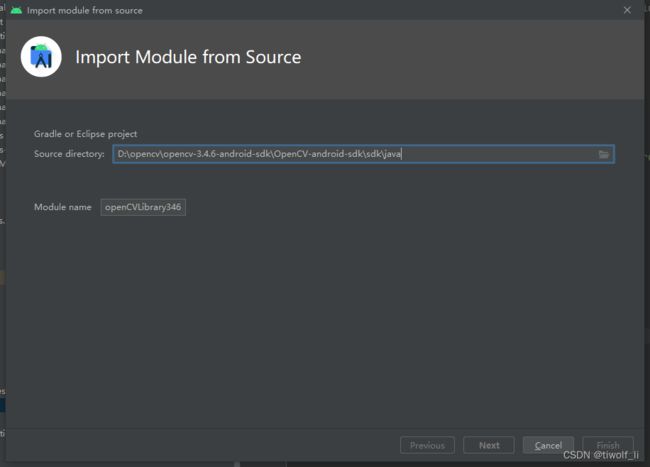
Android studio arctic Fox在引入opencv的时候按照正常的File->New->Import Module操作时,出现无法点击“Next”和“Finish”的情况。如下图
所以我们使用另外的方法进行引入。
准备工作:
1,Android Studio
2,下载opencv,我这下载的是opencv3.4.6。https://udomain.dl.sourceforge.net/project/opencvlibrary/3.4.6/opencv-3.4.6-android-sdk.zip
开始导入:
1,创建一个新的工程,随便命名
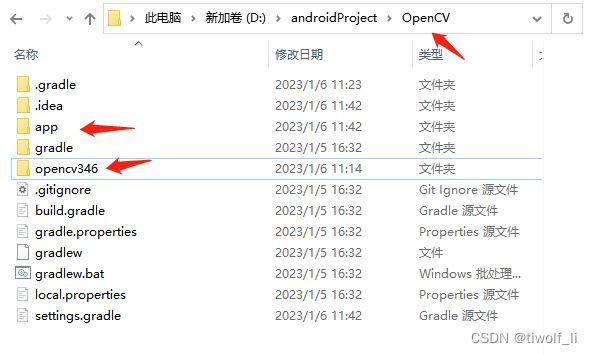
2,将opencv-3.4.6-android-sdk.zip下载下来之后,进行解压。然后将解压出来的java包全部复制到工程目录下。并且重命名opencv346.下图为复制的文件目录。
下图为在Andrid studio里面的目录

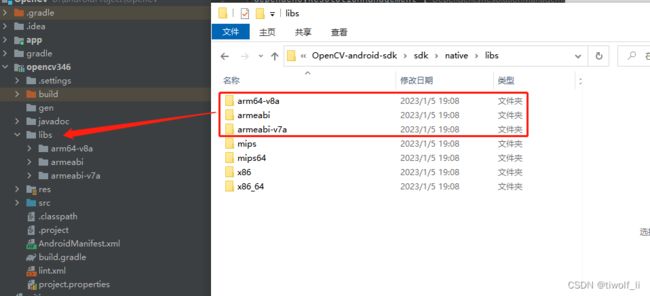
3,将 opencv-3.4.6-android-sdk包里面的sdk/native/libs目录下的so文件复制到opencv346的libs目录下。我这里主要复制arm64-v8a,armeabi,armeabi-v7a这几个主流架构的。如下图
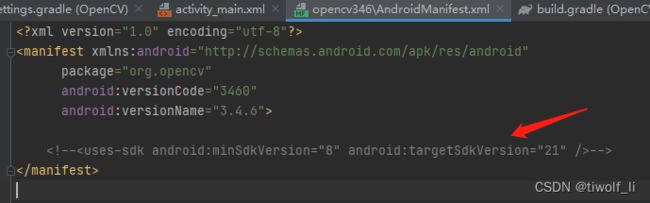
3,修改AndroidManifest.xml;将里面的
注释掉。如下图:
4,将opencv-3.4.6-android-sdk包里面的sdk目录下的build.gradle复制到opencv346包下,得到如下图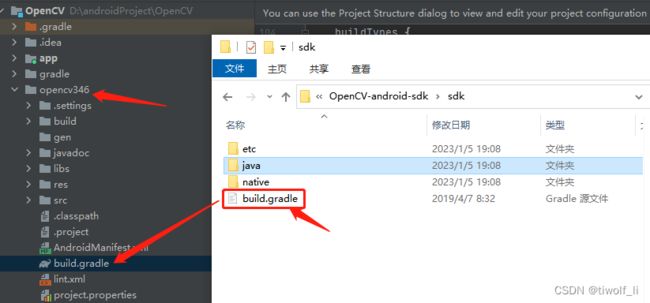
设置build.gradle ,修改android的version部分,javeVersion部分,还有sourceSets部分。不然有可能找不到资源路径。我这设置如下代码
// This file is part of OpenCV project.
// It is subject to the license terms in the LICENSE file found in the top-level directory
// of this distribution and at http://opencv.org/license.html.

//
// Notes about integration OpenCV into existed Android Studio application project are below (application 'app' module should exist).
//
// This file is located in /sdk directory (near 'etc', 'java', 'native' subdirectories)
//
// Add module into Android Studio application project:
//
// - Android Studio way:
//   (will copy almost all OpenCV Android SDK into your project, ~200Mb)
//
//   Import module: Menu -> "File" -> "New" -> "Module" -> "Import Gradle project":
//   Source directory: select this "sdk" directory
//   Module name: ":opencv"
//
// - or attach library module from OpenCV Android SDK
//   (without copying into application project directory, allow to share the same module between projects)
//
//   Edit "settings.gradle" and add these lines:
//
//   def opencvsdk=''
//   // You can put declaration above into gradle.properties file instead (including file in HOME directory),
//   // but without 'def' and apostrophe symbols ('): opencvsdk=
//   include ':opencv'
//   project(':opencv').projectDir = new File(opencvsdk + '/sdk')
//
//
//
// Add dependency into application module:
//
// - Android Studio way:
//   "Open Module Settings" (F4) -> "Dependencies" tab
//
// - or add "project(':opencv')" dependency into app/build.gradle:
//
//   dependencies {
//       implementation fileTree(dir: 'libs', include: ['*.jar'])
//       ...
//       implementation project(':opencv')
//   }
//
//
//
// Load OpenCV native library before using:
//
// - avoid using of "OpenCVLoader.initAsync()" approach - it is deprecated
//   It may load library with different version (from OpenCV Android Manager, which is installed separatelly on device)
//
// - use "System.loadLibrary("opencv_java3")" or "OpenCVLoader.initDebug()"
//   TODO: Add accurate API to load OpenCV native library
//
//
//
// Native C++ support (necessary to use OpenCV in native code of application only):
//
// - Use find_package() in app/CMakeLists.txt:
//
//   find_package(OpenCV 3.4 REQUIRED java)
//   ...
//   target_link_libraries(native-lib ${OpenCV_LIBRARIES})
//
// - Add "OpenCV_DIR" and enable C++ exceptions/RTTI support via app/build.gradle
//   Documentation about CMake options: https://developer.android.com/ndk/guides/cmake.html
//
//   defaultConfig {
//       ...
//       externalNativeBuild {
//           cmake {
//               cppFlags "-std=c++11 -frtti -fexceptions"
//               arguments "-DOpenCV_DIR=" + opencvsdk + "/sdk/native/jni" // , "-DANDROID_ARM_NEON=TRUE"
//           }
//       }
//   }
//
// - (optional) Limit/filter ABIs to build ('android' scope of 'app/build.gradle'):
//   Useful information: https://developer.android.com/studio/build/gradle-tips.html (Configure separate APKs per ABI)
//
//   splits {
//       abi {
//           enable true
//           reset()
//           include 'armeabi-v7a' // , 'x86', 'x86_64', 'arm64-v8a'
//           universalApk false
//       }
//   }
//

apply plugin: 'com.android.library'

println "OpenCV: " + project.buildscript.sourceFile

android {
    compileSdkVersion 29
    //buildToolsVersion "27.0.3" // not needed since com.android.tools.build:gradle:3.0.0

    defaultConfig {
        minSdkVersion 21
        targetSdkVersion 29
    }

    buildTypes {
        release {
            minifyEnabled false
            proguardFiles getDefaultProguardFile('proguard-android.txt'), 'proguard-rules.txt'
        }
    }
    compileOptions {
        sourceCompatibility JavaVersion.VERSION_1_8
        targetCompatibility JavaVersion.VERSION_1_8
    }

    sourceSets {
        main {
            jniLibs.srcDirs = ['libs']
            java.srcDirs = ['src']
            aidl.srcDirs = ['src']
            res.srcDirs = ['res']
            manifest.srcFile 'AndroidManifest.xml'
        }
    }
}

dependencies {
}
5,设置settings.gradle。添加include ':opencv346'
如此,opencv346已经可以作为一个依赖库使用了。
验证:
1,在app中build.gradle的dependecies下面输入
implementation project(':opencv346')
引入opencv。然后输入对应代码验证
if (OpenCVLoader.initDebug()){
     Log.e(TAG, "onCreate: load Opencv library cuccess!" );
}else{
     Log.e(TAG, "onCreate: can't load Opencv library" );
}
出现日志为
onCreate: load Opencv library cuccess!
即可说明opencv已经加载成功,可以正常使用了