图像数据增强及其对应的标签扩充
先安装imgaug库,命令为:
pip install imgaug以下代码用到的标签数据类型为yolo格式(即.txt),如果你的是voc格式(即.xml),可参考:
VOC格式标签与yolo格式标签互相转换代码_m0_48987347的博客-CSDN博客
进行格式转换。
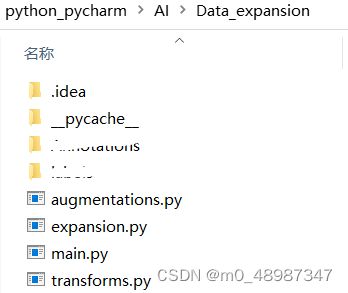
然后按下图所示结构创建数据扩增项目。注意:图片和标签放于同一文件夹内,路径不含中文。
其中, transforms.py是对标签坐标进行转换及执行扩充操作。
import torch
import torch.nn.functional as F
import numpy as np

import imgaug.augmenters as iaa
from imgaug.augmentables.bbs import BoundingBox, BoundingBoxesOnImage

import torchvision.transforms as transforms

# 对标签坐标进行转换及执行扩充操作

# function: 将中心坐标(x,y),宽高(w, h)转为左上角坐标和右下角坐标的形式(x1, y1, x2, y2)
def xywh2xyxy_np(x):
    y = np.zeros_like(x)
    y[..., 0] = x[..., 0] - x[..., 2] / 2
    y[..., 1] = x[..., 1] - x[..., 3] / 2
    y[..., 2] = x[..., 0] + x[..., 2] / 2
    y[..., 3] = x[..., 1] + x[..., 3] / 2
    return y


class ImgAug(object):
    def __init__(self, augmentations=[]):
        self.augmentations = augmentations

    def __call__(self, data):
        img, boxes = data

        # convert xywh to xyxy
        boxes = np.array(boxes)
        boxes[:, 1:] = xywh2xyxy_np(boxes[:, 1:])

        # convert bounding boxes to imgaug
        bounding_boxes = BoundingBoxesOnImage(
            [BoundingBox(*box[1:], label=box[0]) for box in boxes],
            shape=img.shape
        )

        # apply augmentations
        img, bounding_boxes = self.augmentations(
            image=img,
            bounding_boxes=bounding_boxes
        )

        bounding_boxes = bounding_boxes.clip_out_of_image()

        # convert bounding boxes back to numpy
        boxes = np.zeros((len(bounding_boxes), 5))
        for box_idx, box in enumerate(bounding_boxes):
            x1 = box.x1
            y1 = box.y1
            x2 = box.x2
            y2 = box.y2

            # returns (x, y, w, h)
            boxes[box_idx, 0] = box.label
            boxes[box_idx, 1] = ((x1 + x2) / 2)
            boxes[box_idx, 2] = ((y1 + y2) / 2)
            boxes[box_idx, 3] = (x2 - x1)
            boxes[box_idx, 4] = (y2 - y1)

        return img, boxes


class RelativeLabels(object):
    def __init__(self, ):
        pass

    def __call__(self, data):
        img, boxes = data
        # w, h, _ = img.shape
        h = img.shape[0]
        w = img.shape[1]
        boxes[:, [1, 3]] /= w
        boxes[:, [2, 4]] /= h
        return img, boxes


class AbsoluteLabels(object):
    def __init__(self, ):
        pass

    def __call__(self, data):
        img, boxes = data
        # w, h, _ = img.data
        h = img.shape[0]
        w = img.shape[1]

        # boxes[:, [1, 3]]*=h
        # print(boxes[:, [1, 3]])
        boxes[:, 1] = boxes[:, 1] * w
        boxes[:, 3] = boxes[:, 3] * w
        # boxes[:, [2, 4]]*=w
        boxes[:, 2] = boxes[:, 2] * h
        boxes[:, 4] = boxes[:, 4] * h
        return img, boxes


class PadSquare(ImgAug):
    def __init__(self, ):
        self.augmentations = iaa.Sequential([
            iaa.PadToAspectRatio(1.0, position="center-center").to_deterministic()
        ])


class ToTensor(object):
    def __init__(self, ):
        pass

    def __call__(self, data):
        img, boxes = data
        # extract image as pytorch tensor
        img = transforms.ToTensor()(img)

        bb_targets = torch.zeros((len(boxes), 6))
        bb_targets[:, 1:] = transforms.ToTensor()(boxes)

        return img, bb_targets


class Resize(object):
    def __init__(self, size):
        self.size = size

    def __call__(self, data):
        img, boxes = data
        img = F.interpolate(img.unsqueeze(0), size=self.size, mode="nearest").squeeze(0)
        return img, boxes


DEFAULT_TRANSFORMS = transforms.Compose([
    AbsoluteLabels(),
    PadSquare(),
    RelativeLabels()
])
augmentations.py是进行图像数据扩充。
import imgaug.augmenters as iaa
from transforms import *   # 这里的transforms是上面的transforms.py文件,如果修改了文件名,这里对应修改即可
# imgaug是一个用于机器学习实验中图像增强的python库

class DefaultAug(ImgAug):
    def __init__(self, ):
        self.augmentations = iaa.Sequential([  # 定义变换序列, 可根据需要自行增减或修改参数
            iaa.Dropout([0.0, 0.01]),          # 随机去掉一些像素点,即把这些像素点变成0
            iaa.Sharpen((0.0, 0.2)),           # 锐化处理
            iaa.Affine(rotate=(-20, 20), translate_percent=(-0.2,0.2)),  #仿射变换, rotate by -45 to 45 degrees (affects segmaps)
            iaa.AddToBrightness((-30, 30)),    # 改变亮度
            iaa.AddToHue((-20, 20)),           # 色调随机
            # iaa.Sometimes(0.5, iaa.Fliplr(1)),  0.5概率翻转
            iaa.Fliplr(0.5),                   # 翻转图片,水平翻转图像(左右)
        ], random_order=True)
AUGMENTATION_TRANSFORMS = transforms.Compose([
        AbsoluteLabels(),       # 绝对标签
        DefaultAug(),           # 一些基本的数据增强
        RelativeLabels(),       # 相对标签
    ])
expansion.py函数入口:注意修改default和copy_num的值
import numpy as np
import os
import cv2
from tqdm import tqdm
import argparse
from PIL import Image
from augmentations import *  # 这里的augmentations就是上面的augmentations.py文件


# 获取文件下属性为imgProperty的所有文件
def GetImgNameByEveryDir(file_dir, imgProperty):
    FileName = []
    for root, dirs, files in os.walk(file_dir):
        for file in files:
            if os.path.splitext(file)[1] in imgProperty:
                FileName.append(file)  # 保存图片名称
    return FileName


def readBoxes(txt_path):
    boxes = []
    with open(txt_path) as file:
        txt_lines = file.readlines()
        for txt_line in txt_lines:
            box = txt_line.rstrip().split(" ")
            boxes.append([int(box[0]), float(box[1]), float(box[2]), float(box[3]), float(box[4])])

    return boxes


# 程序入口
# --img_path为需要扩增的图像数据
# note:图像和标签文件存在同一个文件夹
# 标签坐标:中心点坐标和宽高(cX, cY, W, H)

if __name__ == '__main__':
    parser = argparse.ArgumentParser()
    # default指定存放图像和标签的路径
    parser.add_argument('--img_path', type=str, default='JPEGImages',
                        help='image path')
    opt = parser.parse_args()

    img_list = GetImgNameByEveryDir(opt.img_path, ['.jpg', '.jpeg'])
    for img_name in tqdm(img_list):
        img_is_ok = 1
        boxes = []
        img_path = opt.img_path + '\\' + img_name
        try:
            img = np.array(Image.open(img_path).convert('RGB'), dtype=np.uint8)
            img1 = cv2.imread(img_path)
        except Exception as e:
            print(f"could not read image '{img_path}'. ")
            img_is_ok = 0
        if img_is_ok:  # 如果图像存在,读取对应的标签文件
            txt_path = img_path[:-3] + 'txt'
            boxes = readBoxes(txt_path)
            print(boxes)
        transform = AUGMENTATION_TRANSFORMS
        boxes = np.array(boxes)
        temp_boxes = np.zeros_like(boxes)
        temp_boxes[:, :] = boxes[:, :]
        #
        # copy_num为对同一张图片扩充的张数
        copy_num = 5
        for i in np.arange(copy_num):
            new_img, bb_target = transform((img1, boxes))
            save_name = img_name[:-4] + "_" + str(i)
            cv2.imwrite(save_name + '.jpg', new_img)
            txt_file = open(save_name + '.txt', 'w')
            for line in bb_target:
                bb = str(int(line[0])) + ' ' + str(line[1]) + ' ' + str(line[2]) + ' ' + str(line[3]) + ' ' + str(
                    line[4]) + '\n'
                txt_file.write(bb)
            txt_file.close()
            boxes[:, :] = temp_boxes[:, :]
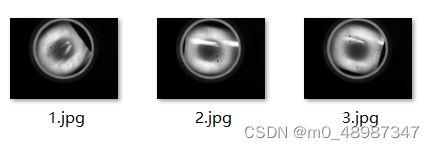
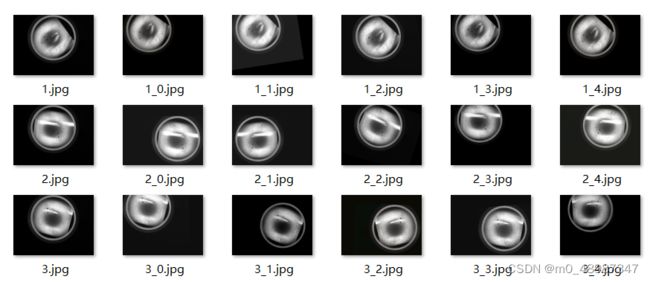
扩充前后的数据效果对比:
输出结果:
参考:深度学习之数据扩充,对应生成扩充的标签文件_HowHardYouAre的博客-CSDN博客_深度学习数据扩充


