虎虎生威—新年版本(鼠标超人、烟花、浮动会闪的星星以及闪避值拉满的老虎)
文章目录
- 前言
- 一、独立版本
- 二、集成版本
- 1. 新增功能说明
- 2. 代码
- 总结以及下载链接
前言
虎虎生威-冬季版本1.3
这是冬季版本的最新版本,前些版本请看
版本1. (169条消息) 忙活半天只为了看雪--送给大家的冬至礼物_A Lucky Boy的博客-CSDN博客![]() https://blog.csdn.net/qq_54554848/article/details/121873955?spm=1001.2014.3001.5501
https://blog.csdn.net/qq_54554848/article/details/121873955?spm=1001.2014.3001.5501
版本2. (169条消息) 用Python画圣诞树 ‘‘遇见’’ 圣诞老人_A Lucky Boy的博客-CSDN博客![]() https://blog.csdn.net/qq_54554848/article/details/122233767?spm=1001.2014.3001.5501
https://blog.csdn.net/qq_54554848/article/details/122233767?spm=1001.2014.3001.5501
版本2是基于版本1的文章,但是此文章为了让新人朋友更快看到标题,我已经把它独立出来了
下述目录分为两块:首先是独立出来的标题所描述的版本
其次是基于版本2的集成版本的改动
一、独立版本
首先我必须告诉你全面安装包在最下面第一个(包括源代码文件、背景音乐、背景图片……),安装包还提供了卸载程序。
先上效果演示:
大致就这样,简单来说就是用鼠标控制飞人飞向老虎,随机次数后,次数不会太多(这得看老虎心情,随机触发),就会触发放烟花的倒计时,当然了,两侧也会根据你的选择是否要有图片显示(比如新年鞭炮),是否两侧有图片;是否有背景图片,什么样的背景图片等等等
上代码:
烟花程序--fireworks.py:
实现原理已经注明了,主要解释一下主函数的四个参数screen、file、font、choose作用
screen:呈现的屏幕名称
file:背景图片
font:字幕的字型和大小---例: pygame.font.Font('STXINGKA.TTF', 48)
choose:是否选择显示背景图片,当然了这里是不显示,但在调用时,是根据初始化文件决定,下面会讲
import sys
import pygame
import math
import random

width, height = 1920, 1080

# 定义时间、显示、频率
t1 = 0.18

show_n = 0

# 烟花绽放频率,数值越大频率越高
show_frequency = 0.001

# 烟花列表
color_list = []
for i in range(50):
    color_list.append([random.randint(0, 256), random.randint(0, 256), random.randint(0, 256)])
# print(color_list)

# 游戏初始化
pygame.init()


# 烟花
class Fireworks:
    is_show = False
    x, y = 0, 0
    vy = 0
    p_list = []
    color = [0, 0, 0]
    v = 0

    def __init__(self, x, y, vy, n=300, color=(0, 255, 0), v=10):
        self.x = x
        self.y = y
        self.vy = vy
        self.color = color
        self.v = v
        for e in range(n):
            self.p_list.append([random.random() * 2 * math.pi, 0, v * math.pow(random.random(), 1 / 3)])

    def again(self):
        self.is_show = True
        self.x = random.randint(width // 2 - 350, width // 2 + 350)
        self.y = random.randint(int(height / 2), int(height * 3 / 5))
        self.vy = -40 * (random.random() * 0.4 + 0.8) - self.vy * 0.2
        self.color = color_list[random.randint(0, len(color_list) - 1)].copy()
        n = len(self.p_list)
        self.p_list = []
        for l in range(n):
            self.p_list.append([random.random() * 2 * math.pi, 0, self.v * math.pow(random.random(), 1 / 3)])

    def run(self):
        global show_n
        for p in self.p_list:
            p[1] = p[1] + (random.random() * 0.6 + 0.7) * p[2]
            p[2] = p[2] * 0.97
            if p[2] < 1.2:
                self.color[0] *= 0.9999
                self.color[1] *= 0.9999
                self.color[2] *= 0.9999

            if max(self.color) < 10 or self.y > height+p[1]:
                show_n -= 1
                self.is_show = False
                break
        self.vy += 10 * t1
        self.y += self.vy * t1

# 烟花列表
fk_list = [Fireworks(300, 300, -20, n=100, color=[0, 255, 0], v=10),Fireworks(300, 300, -20, n=200, color=[0, 0, 255], v=11),Fireworks(300, 300, -20, n=200, color=[0, 0, 255], v=12),Fireworks(300, 300, -20, n=500, color=[0, 0, 255], v=12),Fireworks(300, 300, -20, n=600, color=[0, 0, 255], v=13),Fireworks(300, 300, -20, n=700, color=[255, 0, 0], v=15),Fireworks(300, 300, -20, n=800, color=[255, 255, 0], v=18)]

# 游戏主循环
def let_it_go(screen, file, font, choose=False):
    """这里的choose表示是否选择背景图片"""
    if not choose:
        show_n = 0
        for event in pygame.event.get():
            # pygame这个不能少,否则退出还在循环
            if event.type == pygame.KEYDOWN:
                if event.key == pygame.K_q:
                    sys.exit()

        screen.fill((0, 0, 0))
        screen.blit(file, (0, 0))
        font_text = font.render("新年快乐!!!", True, (255, 215, 0))
        screen.blit(font_text, (0.234 * width, 0.416 * height))
        font_text1 = font.render("祝你——", True, (255, 215, 0))
        screen.blit(font_text1, (0.156 * width, 0.2777 * height))
        # 放烟花
        for d, fk in enumerate(fk_list):
            if not fk.is_show:
                fk.is_show = False
                if random.random() < show_frequency * (len(fk_list) - show_n):
                    show_n += 1
                    fk.again()
                continue
            fk.run()
            for p in fk.p_list:
                x, y = fk.x + p[1] * math.cos(p[0]), fk.y + p[1] * math.sin(p[0])
                if random.random() < 0.055:
                    screen.set_at((int(x), int(y)), (255, 255, 255))
                else:
                    screen.set_at((int(x), int(y)), (int(fk.color[0]), int(fk.color[1]), int(fk.color[2])))
    else:
        show_n = 0
        for event in pygame.event.get():
            if event.type == pygame.KEYDOWN:
                if event.key == pygame.K_q:
                    sys.exit()

        font_text = font.render("新年快乐!!!", True, (255, 215, 0))
        screen.blit(font_text, (0.234 * width, 0.416 * height))
        font_text1 = font.render("祝你——", True, (255, 215, 0))
        screen.blit(font_text1, (0.156 * width, 0.2777 * height))
        # 放烟花
        for d, fk in enumerate(fk_list):
            if not fk.is_show:
                fk.is_show = False
                if random.random() < show_frequency * (len(fk_list) - show_n):
                    show_n += 1
                    fk.again()
                continue
            fk.run()
            for p in fk.p_list:
                x, y = fk.x + p[1] * math.cos(p[0]), fk.y + p[1] * math.sin(p[0])
                if random.random() < 0.055:
                    screen.set_at((int(x), int(y)), (255, 255, 255))
                else:
                    screen.set_at((int(x), int(y)), (int(fk.color[0]), int(fk.color[1]), int(fk.color[2])))
主程序--效果实现--虎虎生威.py:
这里根据一个初始化文件来决定显示效果(下面细讲这个初始化文件),这个文件主要实现了不断变化的字幕,旋转行星以及它的轨道,用的是math模块里的三角函数和pygame画圆函数实现;这里我把鼠标用图片代替了,每次鼠标图片靠近小老虎,都会触发鼠标位置检测,到了范围老虎就会‘躲闪’,随即次数后结束(使用了random随机数),5~15次即可,这时候会倒计时触发烟花,根据初始化文件,我还是没有让两侧图片和背景图片显示,当然了,我在下面的整体安装包(包括源代码、图片、背景音乐……)里面带了,你可以下载自行设置。
import sys
import pygame
from fireworks import let_it_go
import random
import math
from configobj import ConfigObj

init_con = ConfigObj('init.ini', encoding='utf-8')
init_con_values = list(init_con.values())

# print(init_con)
pygame.init()
pygame.font.init()
size = width, height = 1800, 900
screen = pygame.display.set_mode(size, pygame.NOFRAME)
myfont = pygame.font.Font('STXINGKA.TTF', 72)
file = pygame.image.load(init_con_values[0])
clock = pygame.time.Clock()
pygame.mixer.init()
music = pygame.mixer.Sound(init_con_values[2])
music.play(-1)
# begin_location--depending on nums
nums = 500
begin_x_list, begin_y_list = [], []
for x in range(500):
    begin_x = random.choice(list(range(width * 10)))  # 实现星星从屏幕外飘过来的特效
    begin_x_list.append(begin_x)

for y in range(500):
    begin_y = random.choice(list(range(int(math.ceil(height * 0.45)))))
    begin_y_list.append(begin_y)

# different speeds
speed_final = []
speed_list = [0.1, 0.1, 0.1, 0.1, 0.1, 0.1, 0.1, 0.1, 0.1, 0.1, 0.1, 0.1, 0.1, 0.1, 0.1,
              0.2, 0.2, 0.2, 0.2, 0.2, 0.2, 0.2, 0.2, 0.2, 0.2, 0.2, 0.2, 0.2, 0.2, 0.2,
              0.3, 0.3, 0.3, 0.3, 0.3, 0.3, 0.3, 0.3, 0.3, 0.4, 0.4, 0.4, 0.4, 0.4, 0.4,
              0.5, 0.5, 0.5, 0.5, 0.5]
for k in range(10):
    speed_final.extend(speed_list)

# different radius
r = [1, 2, 3, 4]

# 旋转星河
roll_e, roll_m = 0, 0
pos_e, pos_mm = [], []
GREEN = (0, 255, 0)

moods = ['这一年','就这么快过去了', '我知道很多事', '让人久久不能释怀', '也有很多', '令你骄傲的时光', '新的一年即将到来',
         '祝你', '新的一年', '新的成就', '怀揣憧憬之心',  '在这里', '还是想在对你说一句', '新年快乐——']
mod_x = -100
mood = []
font = pygame.font.Font('STXINGKA.TTF', 48)
for i in moods:
    font_text = font.render(i, True, (255, 0, 0))
    mood.append(font_text)

DJS = ['5', '4', '3', '2', '1']
djs = []
font_ = pygame.font.Font('swissek.ttf', 108*2)
for j in DJS:
    f_t = font_.render(j, True, (255, 0, 0))
    djs.append(f_t)

# 晃动图片
mouse_cursor = pygame.image.load(init_con_values[3]).convert_alpha()
rect_width = mouse_cursor.get_width()
rect_height = mouse_cursor.get_height()
# print(rect_width, rect_height)

# 老虎图片
tiger = pygame.image.load('tiger.png').convert_alpha()
target_width, target_height = tiger.get_width(), tiger.get_height()
positions = [random.randint(1500, 1800 - target_width),random.randint(0, 900 - target_height)]

sen = pygame.image.load('sentence/1643082607697-ckt-抠图.png').convert_alpha()
sen_w, sen_h = sen.get_width(), sen.get_height()
local_run = 0
local_speed = 2

# 老虎心情
# 触碰老虎次数决定放烟花的时刻
mood_tiger = random.randint(5, 16)
print(mood_tiger)
all_time = []

while True:

    import os.path as path
    for event in pygame.event.get():
        if event.type == pygame.QUIT:
            sys.exit()
        if event.type == pygame.KEYDOWN:
            # 按q键退出
            if event.key == event.key == pygame.K_q:
                sys.exit()
            # 按s键截图
            if event.key == pygame.K_s:
                list_file = []
                list_ooo = list(range(1000))
                for num_in in list_ooo:
                    if path.isfile('picture/picture' + str(num_in) + '.jpg'):
                        continue
                    else:
                        list_file.append(num_in)
                pygame.image.save(screen, 'picture/picture' + str(list_file[0]) + '.jpg')
    screen.fill((0, 0, 0))
    # 星星漫步
    for l in range(nums):
        y1 = begin_y_list[l]
        begin_x_list[l] -= speed_final[l]
        pygame.draw.circle(screen, (
            random.choice(list(range(256))), random.choice(list(range(256))), random.choice(list(range(256))))
                           , (begin_x_list[l], y1), random.choice(r), 0)

    # 旋转行星
    roll_e += 0.01  # 假设每帧公转0.01pi
    pos_e_x = int(size[0] // 2 + size[0] // 6 * math.sin(roll_e))
    pos_e_y = int(size[1] // 2 + size[1] // 6 * math.cos(roll_e))
    pos_e1 = pos_e_x - 500
    pos_e2 = pos_e_y - 250
    pygame.draw.circle(screen, (0, 0, 255), (pos_e1, pos_e2), 15, 0)

    # 行星轨迹
    pos_e.append((pos_e1, pos_e2))
    if len(pos_e) > 150:
        pos_e.pop(0)
    for i in range(len(pos_e)):
        # 轨迹线为绿色=green=0,255,0
        pygame.draw.circle(screen, GREEN, pos_e[i], 1, 0)

    # 行星的卫星
    roll_m += 0.1  # 假设每帧公转0.1pi
    pos_m_x = int(pos_e1 + size[0] // 20 * math.sin(roll_m))
    pos_m_y = int(pos_e2 + size[1] // 20 * math.cos(roll_m))
    pygame.draw.circle(screen, (230, 230, 230), (pos_m_x, pos_m_y), 5, 0)

    # 卫星轨迹
    pos_mm.append((pos_m_x, pos_m_y))
    if len(pos_mm) > 100:
        pos_mm.pop(0)
    for i in range(len(pos_mm)):
        # 轨迹线为绿色=green=0,255,0
        pygame.draw.circle(screen, GREEN, pos_mm[i], 1, 0)
    # 鼠标的x,y坐标
    x, y = pygame.mouse.get_pos()

    # 变换字幕
    mod_x += 2
    if mod_x < 0:
        pass
    elif mod_x < 200:
        screen.blit(mood[0], (1400, 300))
        screen.blit(mood[1], (1300, 450))
    elif mod_x < 400:
        screen.blit(mood[2], (1400, 300))
    elif mod_x < 600:
        screen.blit(mood[3], (1400, 300))
    elif mod_x < 800:
        screen.blit(mood[4], (1400, 300))
    elif mod_x < 1000:
        screen.blit(mood[5], (1400, 300))
    elif mod_x < 1200:
        screen.blit(mood[6], (1400, 300))
    elif mod_x < 1400:
        screen.blit(mood[7], (1400, 300))
        screen.blit(mood[8], (1350, 450))
        screen.blit(mood[9], (1300, 600))
    elif mod_x < 1600:
        screen.blit(mood[10], (1400, 300))
    elif mod_x < 1800:
        screen.blit(mood[11], (1400, 300))
        screen.blit(mood[12], (1300, 450))
    elif mod_x < 2000:
        screen.blit(mood[13], (1400, 300))
    elif mod_x >= 2200:
        pass

    # 隐藏鼠标
    pygame.mouse.set_visible(False)
    x -= mouse_cursor.get_width() / 2
    y -= mouse_cursor.get_height() / 2
    # 用其他图形代替鼠标
    screen.blit(mouse_cursor, (x, y))

    # 人物点燃烟花-> 放烟花
    screen.blit(tiger, positions)

    if positions[0]-target_width <= x <= positions[0]+target_width and positions[1]-target_height <= y <= positions[1]+target_height:
        all_time.append(1)
        print(len(all_time))
        if len(all_time) <= mood_tiger:
            positions = [random.randint(target_width,1800-target_width), random.randint(target_height,900-target_width)]
        else:
            positions = [-800, -800]
            # 这里开始做老虎说的话->‘我让你看烟花了’->然后切换屏幕放烟花
    if positions == [-800, -800]:
        local_run += local_speed
        if 0 <= local_run <= 200:
            screen.blit(sen, [width / 2 - sen_w / 2, height / 2 - sen_h / 2])
            screen.blit(sen, positions)
        elif 200 <= local_run <= 300:
            screen.blit(djs[0], [width / 2, height / 2])
        elif 300 <= local_run <= 400:
            screen.blit(djs[1], [width / 2, height / 2])
        elif 400 <= local_run <= 500:
            screen.blit(djs[2], [width / 2, height / 2])
        elif 500 <= local_run <= 600:
            screen.blit(djs[3], [width / 2, height / 2])
        elif 600 <= local_run <= 700:
            screen.blit(djs[4], [width / 2, height / 2])
        elif local_run >= 700:
            if eval(init_con_values[6]):
                let_it_go(screen=screen, file=file, font=myfont, choose=eval(init_con_values[1]))
                screen.blit(pygame.image.load(init_con_values[4]).convert_alpha(), [-0.5 * pygame.image.load(init_con_values[4]).convert_alpha().get_width(), 0])
                screen.blit(pygame.image.load(init_con_values[5]).convert_alpha(),
                        [width-0.5 * pygame.image.load(init_con_values[5]).convert_alpha().get_width(), height-pygame.image.load(init_con_values[5]).convert_alpha().get_height()])
            else:
                let_it_go(screen=screen, file=file, font=myfont, choose=eval(init_con_values[1]))
    pygame.display.update()
    clock.tick(50)
初始化文件--init.ini:
这是一个对我很友好的文件,为什么呢,因为我不想多写更多代码来实现控制图片显示不显示,换个背景音乐啥的(因为我懒>_<……)
分别作用是:主屏幕背景图片、不选择显示主屏幕背景图片、背景音乐、鼠标控制的图片、
左侧图片(这里是鞭炮)、右侧图片(这里是鞭炮)、是否展示图片(默认不展示)
注意:修改参数时,True和False项要首字母大写,路径项要使用绝对路径。如果文件在本目录下,也可以使用相对路径;修改错误时,可使用副本里的值替代回默认值
bg_img = bfe05ea9ly1fxhbfcdkduj21hc0u011u.jpg
not_open_bg_img = True
bg_music= ggyjn.mp3
mouse_move = fly.png
left = 1643084927594-ckt-抠图.png
right = 1643084927594-ckt-抠图.png
show_left_and_right = False
二、集成版本
开门见山:全面安装包在最下面的第二个
1.新增功能说明
首先就是上面独立版本的加入——我把它放在菜单里面操作,可以打开独立版本的目录
其次是一些bug的修复,author.txt文件有更仔细说明
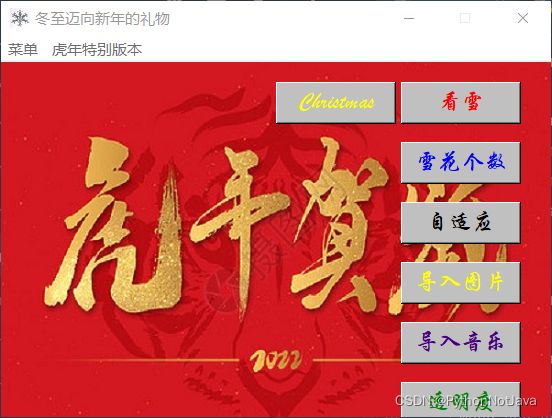
最后提供了一个新的初始化文件--可以让用户修改用户界面的图片,但是建议图片是600x380的像素
这里我就说一下这个cover.ini,将图片路径作为值修改就行
cover = cover.jpg2.代码
新增文件-on_it.py
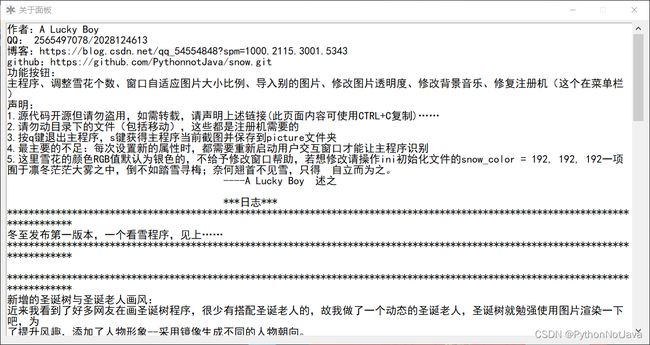
这个是针对用户界面菜单栏里的关于选项的使用,由于author.txt算是一个日志文件,我使用了一个新的用户界面——一个可下拉文本框来进行呈现
def show_on():
    import tkinter
    from tkinter.scrolledtext import ScrolledText

    win = tkinter.Tk()
    win.geometry('1200x600')
    win.title('关于面板')
    win.resizable(False, False)
    win.iconbitmap('favicon.ico')
    # read a Text
    text = open('author.txt', 'r', encoding='utf-8')
    text = text.read()
    # 把文本放在框内
    # font = fontOperation()
    view_text = ScrolledText(win, font=('黑体', 12), fg='black', bg='white')
    view_text.insert('0.0', text)
    view_text.place(x=10, y=5, height=600 - 20, width=1200-20)


win.mainloop()其次是主程序--main.py的修改
这次关于主程序修改的部分如下,
创建用户界面部分:添加了名应用称、应用图标
根据初始化文件读取用户界面图片
添加了菜单栏选项和关于功能的修复
# 用户窗口
import os
from configobj import ConfigObj
import tkinter
from PIL import ImageTk,Image
import snow_draw
import commands
import drawtree
import on_it
from tkinter.messagebox import showinfo

root = tkinter.Tk()
size = 500, 400
root.title('冬至迈向新年的礼物')
root.iconbitmap('favicon.ico')
root.geometry(f'{size[0]}x{size[1]}')
root.resizable(False, False)
# root.config(bg='silver')

# 我们将定义如下功能:开始、调整雪花个数、窗口自适应图片大小比例、导入别的图片、修改图片透明度、修改背景音乐、修复注册机
# 如上功能由按钮事件触发的,将会随着窗口变化而改变按钮自适应(由于源代码开源,使用者可能考虑修改用户界面的大小,这里我因此灵活点)

# 封面初始化
init_value_cover = list(ConfigObj('cover.ini').values())[0]

# 先导入界面背景图片
image = Image.open(init_value_cover)
bg_image = ImageTk.PhotoImage(image)
width = bg_image.width()
height = bg_image.height()
root.geometry('%dx%d+0+0' % (width, height))
background_label = tkinter.Label(root, image=bg_image)
background_label.place(x=0, y=0, relwidth=1, relheight=1)

# 开始按钮
button10 = tkinter.Button(root, text='看雪', font=('华文行楷', 14),
                         bg='silver', fg='red', width=int(float(size[0] * 0.02)), height=int(float(0.0025 * size[1])),
                          command=snow_draw.main)
# 圣诞节版本
button100 = tkinter.Button(root, text='Christmas', font=('华文行楷', 14),
                         bg='silver', fg='yellow', width=int(float(size[0] * 0.02)), height=int(float(0.0025 * size[1])),
                          command=drawtree.main)

button10.place(x=int(float(size[0] * 0.8)), y=int(float(0.05 * size[1])))
button100.place(x=int(float(size[0] * 0.55)), y=int(float(0.05 * size[1])))


# 调整雪花个数按钮
button11 = tkinter.Button(root, text='雪花个数', font=('华文行楷', 14),
                         bg='silver', fg='blue', width=int(float(size[0] * 0.02)), height=int(float(0.0025 * size[1])),
                          command=commands.snow_num)

button11.place(x=int(float(size[0] * 0.8)), y=int(float(0.20 * size[1])))


# 雪花窗口图片自适应图片按钮
button12 = tkinter.Button(root, text='自适应', font=('华文行楷', 14),
                         bg='silver', fg='black', width=int(float(size[0] * 0.02)), height=int(float(0.0025 * size[1])),
                          command=commands.fit)
button12.place(x=int(float(size[0] * 0.8)), y=int(float(0.35 * size[1])))

# 导入别的图片
button13 = tkinter.Button(root, text='导入图片', font=('华文行楷', 14),
                         bg='silver', fg='yellow', width=int(float(size[0] * 0.02)), height=int(float(0.0025 * size[1])),
                          command=commands.import_image)
button13.place(x=int(float(size[0] * 0.8)), y=int(float(0.5 * size[1])))

# 导入别的背景音乐
button14 = tkinter.Button(root, text='导入音乐', font=('华文行楷', 14),
                         bg='silver', fg='indigo', width=int(float(size[0] * 0.02)), height=int(float(0.0025 * size[1])),
                          command=commands.music)
button14.place(x=int(float(size[0] * 0.8)), y=int(float(0.65 * size[1])))

# 修改图片透明度
button15 = tkinter.Button(root, text='透明度', font=('华文行楷', 14),
                         bg='silver', fg='green', width=int(float(size[0] * 0.02)), height=int(float(0.0025 * size[1])),
                          command=commands.alpha)
button15.place(x=int(float(size[0] * 0.8)), y=int(float(0.8 * size[1])))

# 菜单
menu = tkinter.Menu(root)
root['menu'] = menu
f1 = tkinter.Menu(menu, tearoff=False)
f1.add_command(label='重置注册机', command=commands.reg)
f1.add_command(label='关于', command=on_it.show_on)
menu.add_cascade(label='菜单', menu=f1)

def hu():
    os.startfile('new_year')

f2 = tkinter.Menu(menu, tearoff=False)
f2.add_cascade(label='虎年特别版本', command=hu)
menu.add_cascade(label='虎年特别版本', menu=f2, command=hu)

root.mainloop()
最后看一下效果:
关于处的功能效果:
总结以及下载链接:
欧克,到这里详解就差不多了(当然了,这里我没有提供相关的素材),如果你在你的环境中运行不成功,你可以通过我在下方提供的链接进行下载,如需转载,请备上转载地址哦。如果你还有什么疑问,请在下方留言哦,请多多指教。
最后在这里预祝大家新年快乐

print('年年有余')

console.log("万事如意");

printf("大吉大利");

fmt.Println("事业有成")
下载链接(下载完后内部都有说明文档):
阿里云盘:虎虎生威-开源版本
阿里云盘:冬至迈向新年的礼物
Github:冬至迈向新年的礼物

