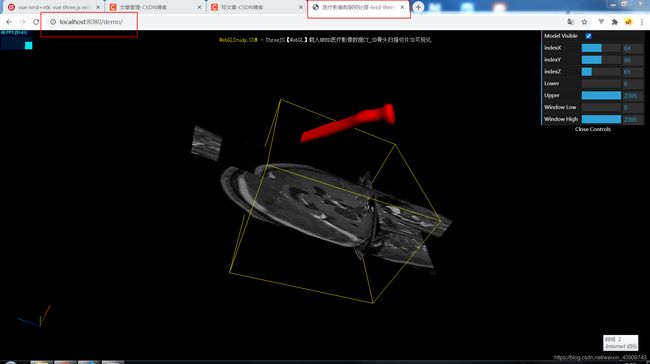
vue+three.js展示nrrd+vtk3D模型-html展示(上)
nrrd3D模型文件、vtk3D模型文件静态html页面显示浏览器端展示
<html lang="en">
	<head>
		<title>医疗影像数据预处理-nrrd-three.js webgl - loaders - NRRD loadertitle>
		<meta charset="utf-8">
		<meta name="viewport" content="width=device-width, user-scalable=no, minimum-scale=1.0, maximum-scale=1.0">
		<link type="text/css" rel="stylesheet" href="main.css">
		<style>
			#inset {
				width: 150px;
				height: 150px;
				background-color: transparent; /* or transparent; will show through only if renderer alpha: true */
				border: none; /* or none; */
				margin: 0;
				padding: 0px;
				position: absolute;
				left: 20px;
				bottom: 20px;
				z-index: 100;
			}
		style>
	head>

	<body>
		<div id="info">
			<a href="https://WebGLStudy.COM" target="_blank" rel="noopener">WebGLStudy.COMa> -
			ThreeJS【WebGL】载入NRRD医疗影像数据CT_3D骨头扫描切片3D可视化
		div>
		<div id="inset">div>

		<script type="module">

			import * as THREE from '../build/three.module.js';

			import Stats from './jsm/libs/stats.module.js';

			import { GUI } from './jsm/libs/dat.gui.module.js';
			import { TrackballControls } from './jsm/controls/TrackballControls.js';
			import { NRRDLoader } from './jsm/loaders/NRRDLoader.js';
			import { VTKLoader } from './jsm/loaders/VTKLoader.js';

			var container, // dom 标签容器
				stats, // 帧率检测
				camera,// 相机
				controls, // 相机控件
				scene, // 场景
				renderer, // 渲染器
				container2,// dom 标签容器
				renderer2, // 渲染器二
				camera2, // 相机二
				axes2, // 坐标系
				scene2; // 场景二

			init(); // 初始化
			animate(); // 运动

			function init() {
				// 透视投影相机:THREE.PerspectiveCamera(fov, aspect, near, far),遵循近大远小的空间规则
				camera = new THREE.PerspectiveCamera( 60, window.innerWidth / window.innerHeight, 0.01, 1e10 );
				/*
					fov: 垂直方向夹角
					aspect:可视区域长宽比 width/height
					near:渲染区域离摄像机最近的距离
					far:渲染区域离摄像机最远的距离,3仅在距离摄像机near和far间的区域会被渲染到 canvas中
				*/
				camera.position.z = 300; // camera.position:控制相机在整个3D环境中的位置(取值为3维坐标对象-THREE.Vector3(x,y,z))

				scene = new THREE.Scene(); // 场景(Scene)

				scene.add( camera ); // 在场景中添加相机

				// light 光

				var dirLight = new THREE.DirectionalLight( 0xffffff ); // 平行光 所有被照射的区域亮度是一致的
				dirLight.position.set( 200, 200, 1000 ).normalize(); // 设置平行光方向

				camera.add( dirLight );
				camera.add( dirLight.target );

				var loader = new NRRDLoader(); // 加载模型文件
				console.log(loader)
				loader.load( "./1.nrrd", function ( volume ) {
					console.log(volume)
					var geometry,
						material,
						sliceZ,
						sliceY,
						sliceX;

					//box helper to see the extend of the volume
					var geometry = new THREE.BoxBufferGeometry( volume.xLength, volume.yLength, volume.zLength ); // 长方体
					var material = new THREE.MeshBasicMaterial( { color: 0x00ff00 } ); // 材质
					var cube = new THREE.Mesh( geometry, material );
					cube.visible = false;
					var box = new THREE.BoxHelper( cube ); // 给立方体设置边框
					scene.add( box );
					box.applyMatrix4( volume.matrix ); // 立方体最大位置
					scene.add( cube );

					//z plane ??
					sliceZ = volume.extractSlice( 'z', Math.floor( volume.RASDimensions[ 2 ] / 4 ) );
					scene.add( sliceZ.mesh );

					//y plane
					sliceY = volume.extractSlice( 'y', Math.floor( volume.RASDimensions[ 1 ] / 2 ) );
					scene.add( sliceY.mesh );

					//x plane
					sliceX = volume.extractSlice( 'x', Math.floor( volume.RASDimensions[ 0 ] / 2 ) );
					scene.add( sliceX.mesh );

					gui.add( sliceX, "index", 0, volume.RASDimensions[ 0 ], 1 ).name( "indexX" ).onChange( function () {

						sliceX.repaint.call( sliceX );

					} );
					gui.add( sliceY, "index", 0, volume.RASDimensions[ 1 ], 1 ).name( "indexY" ).onChange( function () {

						sliceY.repaint.call( sliceY );

					} );
					gui.add( sliceZ, "index", 0, volume.RASDimensions[ 2 ], 1 ).name( "indexZ" ).onChange( function () {

						sliceZ.repaint.call( sliceZ );

					} );

					gui.add( volume, "lowerThreshold", volume.min, volume.max, 1 ).name( "Lower Threshold" ).onChange( function () {

						volume.repaintAllSlices();

					} );
					gui.add( volume, "upperThreshold", volume.min, volume.max, 1 ).name( "Upper Threshold" ).onChange( function () {

						volume.repaintAllSlices();

					} );
					gui.add( volume, "windowLow", volume.min, volume.max, 1 ).name( "Window Low" ).onChange( function () {

						volume.repaintAllSlices();

					} );
					gui.add( volume, "windowHigh", volume.min, volume.max, 1 ).name( "Window High" ).onChange( function () {

						volume.repaintAllSlices();

					} );

				} );

				var vtkmaterial = new THREE.MeshLambertMaterial( { wireframe: false, morphTargets: false, side: THREE.DoubleSide, color: 0xff0000 } );

				var vtkloader = new VTKLoader();
				vtkloader.load( "./bone_1.vtk", function ( geometry ) {

					geometry.computeVertexNormals();

					var mesh = new THREE.Mesh( geometry, vtkmaterial ); // mesh 物体对象
					scene.add( mesh );
					var visibilityControl = {
						visible: true
					};
					gui.add( visibilityControl, "visible" ).name( "Model Visible" ).onChange( function () {

						mesh.visible = visibilityControl.visible;
						renderer.render( scene, camera );

					} );

				} );
				// renderer

				renderer = new THREE.WebGLRenderer( { alpha: true } );
				renderer.setPixelRatio( window.devicePixelRatio ); //设置canvas的像素比为当前设备的屏幕像素比,避免高分屏下模糊
				renderer.setSize( window.innerWidth, window.innerHeight );//设置渲染器大小,即canvas画布的大小

				container = document.createElement( 'div' );
				document.body.appendChild( container );
				container.appendChild( renderer.domElement ); //在页面容器中添加canvas

				controls = new TrackballControls( camera, renderer.domElement ); // 轨迹球控制器,通过键盘和鼠标控制前后左右平移和缩放场景
				controls.rotateSpeed = 5.0;
				controls.zoomSpeed = 5;
				controls.panSpeed = 2;
				controls.staticMoving = true;

				stats = new Stats(); // 帧率监测器
				container.appendChild( stats.dom );

				var gui = new GUI(); //

				setupInset();

				window.addEventListener( 'resize', onWindowResize, false ); // 实时监听·

			}

			function onWindowResize() {

				camera.aspect = window.innerWidth / window.innerHeight;
				camera.updateProjectionMatrix();

				renderer.setSize( window.innerWidth, window.innerHeight );

				controls.handleResize();

			}

			function animate() {

				requestAnimationFrame( animate );

				controls.update();

				//copy position of the camera into inset
				camera2.position.copy( camera.position );
				camera2.position.sub( controls.target );
				camera2.position.setLength( 300 );
				camera2.lookAt( scene2.position );

				renderer.render( scene, camera );
				renderer2.render( scene2, camera2 );

				stats.update();

			}

			function setupInset() {

				var insetWidth = 150,
					insetHeight = 150;
				container2 = document.getElementById( 'inset' );
				container2.width = insetWidth;
				container2.height = insetHeight;

				// renderer
				renderer2 = new THREE.WebGLRenderer( { alpha: true } );
				renderer2.setClearColor( 0x000000, 0 );
				renderer2.setSize( insetWidth, insetHeight );
				container2.appendChild( renderer2.domElement );

				// scene
				scene2 = new THREE.Scene();

				// camera
				camera2 = new THREE.PerspectiveCamera( 50, insetWidth / insetHeight, 1, 1000 );
				camera2.up = camera.up; // important!

				// axes
				axes2 = new THREE.AxesHelper( 100 );
				scene2.add( axes2 );

			}

		script>

	body>
html>
解释:
如果您只是想展示的话,那么直接把
> loader.load("./1.nrrd", function(volume)中的nrrd文件和
> vtkloader.load( "./bone_1.vtk", function ( geometry ) 中的vtk文件改成自己的就ok
如果你想修改参数的设置话,建议您学习一遍three.js的初级基础教程,
这个链接我就不发了,网上有教程,在哔哔哩哩上也有免费的教程,5天肯定能学完基础的
除html外,还需要three.js包文件
直接去我的码云上有这个案例,可以整体copy下来直接运行。
git地址–https://gitee.com/geyixia/html–threejs–nrrd-vtk
还可以在这里点击下载,支持一下博主
项目源代码
html运行3d文件需要启动本地服务–运行解释(小白注意哈)
请注意:
代码copy下来之后
肯定不能直接打开html页面,浏览器端无法解析3d模型文件,
我刚开始学的时候浏览器不能打开3d文件,各种百度,
遇到说改浏览器后缀名的,改设置的,emmm····没啥用。
其实你只需要开启本地服务器就可以了
步骤截图
输入cmd回车

输入:http-server

在浏览器输入:http://localhost:8080/ 即可(浏览器端显示进去后点击demo文件夹,点击index.html即可)
希望多多支持,我会在下一篇写vue框架如何进行集成这个页面
