深度学习基础——week1
更好的阅读体验
PyTorch
什么是PyTorch(来自官方文档)
PyTorch 是基于以下两个目的而打造的python科学计算框架:
-
无缝替换NumPy,并且通过利用GPU的算力来实现神经网络的加速。
-
通过自动微分机制,来让神经网络的实现变得更加容易。
Tensor(张量)
张量如同数组和矩阵一样, 是一种特殊的数据结构。在PyTorch中, 神经网络的输入、输出以及网络的参数等数据, 都是使用张量来进行描述。
张量初始化
import torch
import numpy as np

#由List直接生成张量, 张量类型由原始数据类型决定。
data = [[1, 2], [3, 4]]
x_data = torch.tensor(data)
print(f"{x_data}\n")


#通过Numpy数组来生成张量
np_array = np.array(data)
x_np = torch.from_numpy(np_array)
print(f"{x_np}\n")


#通过已有的张量来生成新的张量
x_ones = torch.ones_like(x_data)   # 保留 x_data 的属性()
print(f"Ones Tensor: \n {x_ones} \n")
x_rand = torch.rand_like(x_data, dtype=torch.float)   # 重写 x_data 的数据类型
                                                      #int -> float
print(f"Random Tensor: \n {x_rand} \n")


#创建Tensor有多种方法,包括:ones, zeros, eye, arange, linspace, rand, randn, normal, uniform, randperm
y_rand = torch.rand(5,3)
print(f"{y_rand}\n")
x = torch.arange(12)
print(f"{x}\n")
tensor([[1, 2],
        [3, 4]])

tensor([[1, 2],
        [3, 4]])

Ones Tensor:
 tensor([[1, 1],
        [1, 1]])

Random Tensor:
 tensor([[0.6913, 0.0076],
        [0.0978, 0.3915]])

tensor([[0.3311, 0.6230, 0.4556],
        [0.4508, 0.9119, 0.1254],
        [0.3226, 0.4033, 0.5625],
        [0.1423, 0.4016, 0.3720],
        [0.6552, 0.2447, 0.0731]])

tensor([ 0,  1,  2,  3,  4,  5,  6,  7,  8,  9, 10, 11])
张量属性
从张量属性我们可以得到张量的维数、数据类型以及它们所存储的设备(CPU或GPU)。
tensor = torch.rand(3,4)

print(f"Shape of tensor: {tensor.shape}")
print(f"Datatype of tensor: {tensor.dtype}")
print(f"Device tensor is stored on: {tensor.device}")
Shape of tensor: torch.Size([3, 4])
Datatype of tensor: torch.float32
Device tensor is stored on: cpu
张量运算
运算例如转置、索引、切片、数学运算、线性代数、随机采样等,下面是一些常见的张量运算,其他有需要的话再查阅官方文档即可
运算符
x = torch.tensor([1.0, 2, 4, 8])
y = torch.tensor([2, 2, 2, 2])
x + y, x - y, x * y, x / y, x ** y,torch.exp(x)  # **运算符是求幂运算
(tensor([ 3.,  4.,  6., 10.]),
 tensor([-1.,  0.,  2.,  6.]),
 tensor([ 2.,  4.,  8., 16.]),
 tensor([0.5000, 1.0000, 2.0000, 4.0000]),
 tensor([ 1.,  4., 16., 64.])
 tensor([2.7183e+00, 7.3891e+00, 5.4598e+01, 2.9810e+03]))
拼接
通过torch.cat方法将一组张量按照指定的维度进行拼接
X = torch.arange(12, dtype=torch.float32).reshape((3,4))
Y = torch.tensor([[2.0, 1, 4, 3], [1, 2, 3, 4], [4, 3, 2, 1]])
torch.cat((X, Y), dim=0), torch.cat((X, Y), dim=1)
(tensor([[ 0.,  1.,  2.,  3.],
         [ 4.,  5.,  6.,  7.],
         [ 8.,  9., 10., 11.],
         [ 2.,  1.,  4.,  3.],
         [ 1.,  2.,  3.,  4.],
         [ 4.,  3.,  2.,  1.]]),
 tensor([[ 0.,  1.,  2.,  3.,  2.,  1.,  4.,  3.],
         [ 4.,  5.,  6.,  7.,  1.,  2.,  3.,  4.],
         [ 8.,  9., 10., 11.,  4.,  3.,  2.,  1.]]))
索引和切片
和Python数组一样,张量的元素支持索引,切片
print(X)
print(X[-1])
print(X[1:3])
print(X[0][0:2])
tensor([[ 0.,  1.,  2.,  3.],
        [ 4.,  5.,  6.,  7.],
        [ 8.,  9., 10., 11.]])
tensor([ 8.,  9., 10., 11.])
tensor([[ 4.,  5.,  6.,  7.],
        [ 8.,  9., 10., 11.]])
tensor([0., 1.])
数学基础
线性代数
基本概念:
-
标量 (scalar) :标量由只有一个元素的张量表示
-
向量 (vector) :将标量从零阶推广到一阶 x ∈ R n \mathbf{x}\in\mathbb{R}^n x∈Rn
-
矩阵 (matrix) :矩阵将向量从一阶推广到二阶, A ∈ R m × n \mathbf{A} \in \mathbb{R}^{m \times n} A∈Rm×n
-
矩阵的转置(transpose),对称矩阵(symmetric matrix),正交矩阵(Orthogonal Matrix),矩阵乘法
-
范数 (norm) : L 1 L_1 L1范数: ∥ x ∥ 1 = ∑ i = 1 n ∣ x i ∣ . \|\mathbf{x}\|_1 = \sum_{i=1}^n \left|x_i \right|. ∥x∥1=i=1∑n∣xi∣.
L 2 L_2 L2范数: ∥ x ∥ 2 = ∑ i = 1 n x i 2 , \|\mathbf{x}\|_2 = \sqrt{\sum_{i=1}^n x_i^2}, ∥x∥2=i=1∑nxi2,
F − F- F−范数(矩阵): ∥ X ∥ F = ∑ i = 1 m ∑ j = 1 n x i j 2 . \|\mathbf{X}\|_F = \sqrt{\sum_{i=1}^m \sum_{j=1}^n x_{ij}^2}. ∥X∥F=i=1∑mj=1∑nxij2.
-
…
微积分
矩阵求导:
矩阵求导的本质与分子布局、分母布局的本质
矩阵求导公式的数学推导
矩阵求导公式的数学推导
概率
基本概念:
- 样本空间(sample space)事件(event)互斥(mutually exclusive)
- 随机变量(random variable)离散(discrete)连续(continuous)
- 条件概率(conditional probability)Bayes定理(Bayes’ theorem)
- 联合分布(joint distribution)边缘分布(marginal distribution)。
- 期望(expectation)标准差(standard deviation)
- 马尔可夫链
- …
线性神经网络
虽然线性神经网络的功能很有限,但它是一切的基础。
线性回归及其实现
基本元素
在机器学习的术语中,该数据集称为训练数据集(training data set) 或训练集(training set)。 每行数据样本(sample), 也可以称为数据点(data point)或数据样本(data instance)。 我们把试图预测的目标称为标签(label)或目标(target)。 预测所依据的自变量称为特征(feature)或协变量(covariate)。
通常,我们使用 n n n来表示数据集中的样本数。对索引为 i i i的样本,其输入表示为 x ( i ) = [ x 1 ( i ) , x 2 ( i ) ] ⊤ \mathbf{x}^{(i)} = [x_1^{(i)}, x_2^{(i)}]^\top x(i)=[x1(i),x2(i)]⊤,其对应的标签是 y ( i ) y^{(i)} y(i)。
线性模型
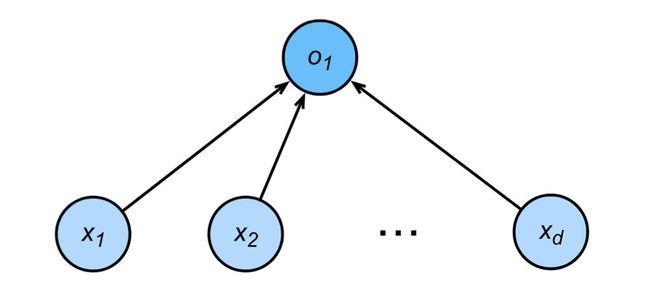
当我们的输入包含 d d d个特征时,我们将预测结果 y ^ \hat{y} y^(通常使用“尖角”符号表示 y y y的估计值)表示为:
y ^ = w 1 x 1 + . . . + w d x d + b . \hat{y} = w_1 x_1 + ... + w_d x_d + b. y^=w1x1+...+wdxd+b.
将所有特征放到向量 x ∈ R d \mathbf{x} \in \mathbb{R}^d x∈Rd中,并将所有权重放到向量 w ∈ R d \mathbf{w} \in \mathbb{R}^d w∈Rd中,我们可以用点积形式来简洁地表达模型:
y ^ = w ⊤ x + b . \hat{y} = \mathbf{w}^\top \mathbf{x} + b. y^=w⊤x+b.
损失函数(loss function)
平方损失函数,一般这样定义: l ( i ) ( w , b ) = 1 2 ( y ^ ( i ) − y ( i ) ) 2 . l^{(i)}(\mathbf{w}, b) = \frac{1}{2} \left(\hat{y}^{(i)} - y^{(i)}\right)^2. l(i)(w,b)=21(y^(i)−y(i))2.]
其实平方损失函数就是对参数的极大似然估计通俗讲解平方损失函数平方形式的数学解释?
小批量随机梯度下降(minibatch stochastic gradient descent)
梯度下降(gradient descent):通过不断地在损失函数递减的方向上更新参数来降低误差。但实际中的执行可能会非常慢:因为在每一次更新参数之前,我们必须遍历整个数据集。 因此,我们通常会在每次需要计算更新的时候随机抽取一小批样本, 这种变体叫做小批量随机梯度下降(minibatch stochastic gradient descent)。
在每次迭代中,我们首先随机抽样一个小批量 B \mathcal{B} B, 然后,我们计算小批量的平均损失关于模型参数的导数(梯度)。 最后,我们将梯度乘以一个预先确定的正数(学习率),并从当前参数的值中减掉。
( w , b ) ← ( w , b ) − η ∣ B ∣ ∑ i ∈ B ∂ ( w , b ) l ( i ) ( w , b ) (\mathbf{w},b) \leftarrow (\mathbf{w},b) - \frac{\eta}{|\mathcal{B}|} \sum_{i \in \mathcal{B}} \partial_{(\mathbf{w},b)} l^{(i)}(\mathbf{w},b) (w,b)←(w,b)−∣B∣ηi∈B∑∂(w,b)l(i)(w,b)
代码实现 参考网站
参数 w = [ 2 , − 3.4 ] ⊤ \mathbf{w} = [2, -3.4]^\top w=[2,−3.4]⊤、 b = 4.2 b = 4.2 b=4.2, y = w ⊤ x + b . y = \mathbf{w}^\top \mathbf{x} + b. y=w⊤x+b.生成1000组数据。
生成数据集
import numpy as np
import torch
from torch.utils import data
from d2l import torch as d2l

def synthetic_data(w, b, num_examples):  #    """生成y=Xw+b+噪声"""
    X = torch.normal(0, 1, (num_examples, len(w)))
    y = torch.matmul(X, w) + b
    y += torch.normal(0, 0.01, y.shape)
    return X, y.reshape((-1, 1))


true_w = torch.tensor([2, -3.4])
true_b = 4.2
features, labels = synthetic_data(true_w, true_b, 1000)
#features:输入的特征矩阵  labels:试图预测的目标
读取数据集
使用iter构造Python迭代器
def load_array(data_arrays, batch_size, is_train=True):
    """构造一个PyTorch数据迭代器"""
    dataset = data.TensorDataset(*data_arrays)
    return data.DataLoader(dataset, batch_size, shuffle=is_train)

batch_size = 10  #上面介绍的小批量随机梯度下降,每个批量的大小
data_iter = load_array((features, labels), batch_size)
定义模型
这里插播一件有趣的事情,为什么神经网络在考虑梯度下降的时候,网络参数的初始值不能设定为全0,而是要采用随机初始化?
在知乎上看到一个非常形象的 答案:
设想你在爬山,但身处直线形的山谷中,两边是对称的山峰。
由于对称性,你所在之处的梯度只能沿着山谷的方向,不会指向山峰;你走了一步之后,情况依然不变。
结果就是你只能收敛到山谷中的一个极大值,而走不到山峰上去。
# nn是神经网络的缩写
from torch import nn
#第一个指定输入特征形状,即2,第二个指定输出特征形状,输出特征形状为单个标量,因此为1。
net = nn.Sequential(nn.Linear(2, 1))


# 随机初始化参数
net[0].weight.data.normal_(0, 0.01)
net[0].bias.data.fill_(0)

#定义损失函数(平方 2 范数)
loss = nn.MSELoss()

#小批量随机梯度下降算法SGD,学习率0.03
trainer = torch.optim.SGD(net.parameters(), lr=0.03)
训练
num_epochs = 3      #总共遍历3次样本
for epoch in range(num_epochs):
    for X, y in data_iter:   #遍历迭代器中元素
        l = loss(net(X) ,y)
        trainer.zero_grad()  #记得清空梯度
        l.backward()         #求导
        trainer.step()
    l = loss(net(features), labels)
    print(f'epoch {epoch + 1}, loss {l:f}')


#最后比较生成数据集的真实参数和通过有限数据训练获得的模型参数
w = net[0].weight.data
print('w的估计误差:', true_w - w.reshape(true_w.shape))
b = net[0].bias.data
print('b的估计误差:', true_b - b)
结果:
epoch 1, loss 0.000174
epoch 2, loss 0.000104
epoch 3, loss 0.000103

w的估计误差: tensor([0.0010, 0.0006])
b的估计误差: tensor([0.0003])
softmax回归及其实现
softmax回归用于分类
回归是估计一个连续的值
- 自然区间R
- 与真实值的区别作为损失
分类是预测一个离散的类别
- 通常多个输出
- 输出的
i是预测第i类的置信度
注:如果觉得softmax回归难以理解,可以先看Logistic回归(softmax的二分类退化版)
网络架构
[外链图片转存失败,源站可能有防盗链机制,建议将图片保存下来直接上传(img-Vs9FMOk7-1655473193629)(http://d2l.ai/_images/softmaxreg.svg)]
o 1 = x 1 w 11 + x 2 w 12 + x 3 w 13 + x 4 w 14 + b 1 o 2 = x 1 w 21 + x 2 w 22 + x 3 w 23 + x 4 w 24 + b 2 o 3 = x 1 w 31 + x 2 w 32 + x 3 w 33 + x 4 w 34 + b 3 \begin{aligned} &o_{1}=x_{1} w_{11}+x_{2} w_{12}+x_{3} w_{13}+x_{4} w_{14}+b_{1} \\ &o_{2}=x_{1} w_{21}+x_{2} w_{22}+x_{3} w_{23}+x_{4} w_{24}+b_{2} \\ &o_{3}=x_{1} w_{31}+x_{2} w_{32}+x_{3} w_{33}+x_{4} w_{34}+b_{3} \end{aligned} o1=x1w11+x2w12+x3w13+x4w14+b1o2=x1w21+x2w22+x3w23+x4w24+b2o3=x1w31+x2w32+x3w33+x4w34+b3
softmax运算
softmax函数将未规范化的预测变换为非负并且总和为1,同时要求模型保持可导。 首先对每个未规范化的预测求幂,这样可以确保输出非负。 为了确保最终输出的总和为1,我们再对每个求幂后的结果除以它们的总和。
y ^ = s o f t m a x ( o ) 其中 y ^ j = exp ( o j ) ∑ k exp ( o k ) \hat{\mathbf{y}} = \mathrm{softmax}(\mathbf{o})\quad \text{其中}\quad \hat{y}_j = \frac{\exp(o_j)}{\sum_k \exp(o_k)} y^=softmax(o)其中y^j=∑kexp(ok)exp(oj)
对于所有的 j j j总有 0 ≤ y ^ j ≤ 1 0 \leq \hat{y}_j \leq 1 0≤y^j≤1。因此, y ^ \hat{\mathbf{y}} y^可以视为一个正确的概率分布。
损失函数
交叉熵损失函数: l ( y , y ^ ) = − ∑ j = 1 q y j log y ^ j . l(\mathbf{y}, \hat{\mathbf{y}}) = - \sum_{j=1}^q y_j \log \hat{y}_j. l(y,y^)=−j=1∑qyjlogy^j.(好像下学期信息论也会讲这个东西??)
代码实现参考网站
对Fashion-MNIST数据集的图形进行分类
初始化模型参数
import torch
from torch import nn
from d2l import torch as d2l

batch_size = 256
train_iter, test_iter = d2l.load_data_fashion_mnist(batch_size)


# PyTorch不会隐式地调整输入的形状。因此,
# 我们在线性层前定义了展平层(flatten)意思是把矩阵铺平,来调整网络输入的形状
net = nn.Sequential(nn.Flatten(), nn.Linear(784, 10))       #10个类别

def init_weights(m):
    if type(m) == nn.Linear:
        nn.init.normal_(m.weight, std=0.01)

net.apply(init_weights);
使用现成的softmax
loss = nn.CrossEntropyLoss(reduction='none')
优化算法
#学习率为0.1的小批量随机梯度下降作为优化算法
trainer = torch.optim.SGD(net.parameters(), lr=0.1)
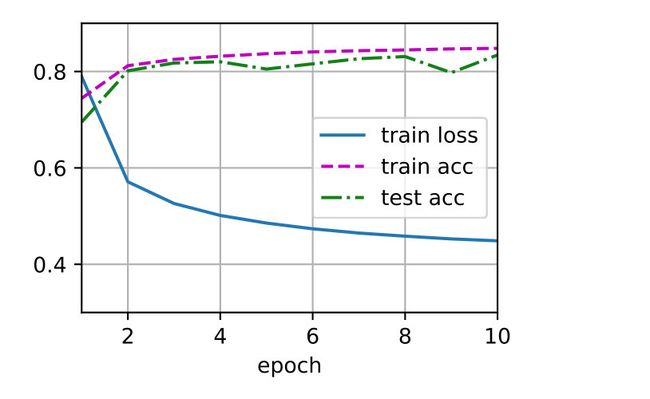
调用现成的接口训练模型,查看效果
num_epochs = 10
d2l.train_ch3(net, train_iter, test_iter, loss, num_epochs, trainer)
最简单的DNN——多层感知机
感知机
给定输入 x \mathbf{x} x, 权重 w \mathbf{w} w, 和偏移 b b b, 感知机输出:
o = σ ( ⟨ w , x ⟩ + b ) σ ( x ) = { 1 if x > 0 0 otherwise o=\sigma(\langle\mathbf{w}, \mathbf{x}\rangle+b) \quad \sigma(x)= \begin{cases}1 & \text { if } x>0 \\ 0 & \text { otherwise }\end{cases} o=σ(⟨w,x⟩+b)σ(x)={10 if x>0 otherwise
- 感知机是一个二分类模型, 是最早的AI模型之一
- 它的求解算法等价于使用批量大小为 1 的梯度下降
- 它不能拟合 XOR 函数, 导致的第一次 AI 寒冬
多层感知机(MLP)
我们可以通过在网络中加入一个或多个隐藏层来克服线性模型的限制,使其能处理更普遍的函数关系类型。
[外链图片转存失败,源站可能有防盗链机制,建议将图片保存下来直接上传(img-8B7e6dnF-1655473193629)(http://d2l.ai/_images/mlp.svg)]
如上图,如果按如下方式计算单隐藏层多层感知机的输出
$$
\begin{aligned}
\mathbf{H} & = \mathbf{X} \mathbf{W}^{(1)} + \mathbf{b}^{(1)}, \
\mathbf{O} & = \mathbf{H}\mathbf{W}^{(2)} + \mathbf{b}^{(2)}.
\end{aligned}
$$
但这其实没起任何作用!证明如下:
令 W = W ( 1 ) W ( 2 ) \mathbf{W} = \mathbf{W}^{(1)}\mathbf{W}^{(2)} W=W(1)W(2) b = b ( 1 ) W ( 2 ) + b ( 2 ) \mathbf{b} = \mathbf{b}^{(1)} \mathbf{W}^{(2)} + \mathbf{b}^{(2)} b=b(1)W(2)+b(2)
O = ( X W ( 1 ) + b ( 1 ) ) W ( 2 ) + b ( 2 ) = X W ( 1 ) W ( 2 ) + b ( 1 ) W ( 2 ) + b ( 2 ) = X W + b . \mathbf{O} = (\mathbf{X} \mathbf{W}^{(1)} + \mathbf{b}^{(1)})\mathbf{W}^{(2)} + \mathbf{b}^{(2)} = \mathbf{X} \mathbf{W}^{(1)}\mathbf{W}^{(2)} + \mathbf{b}^{(1)} \mathbf{W}^{(2)} + \mathbf{b}^{(2)} = \mathbf{X} \mathbf{W} + \mathbf{b}. O=(XW(1)+b(1))W(2)+b(2)=XW(1)W(2)+b(1)W(2)+b(2)=XW+b.
本质上还是一个线性变换,无法拟合异或函数。那么怎么办呢?
激活函数
我们引入非线性函数:激活函数(activation function) σ \sigma σ
$$
\begin{aligned}
\mathbf{H} & = \sigma(\mathbf{X} \mathbf{W}^{(1)} + \mathbf{b}^{(1)}), \
\mathbf{O} & = \mathbf{H}\mathbf{W}^{(2)} + \mathbf{b}^{(2)}.\
\end{aligned}
$$
激活函数就像是将整个空间进行扭曲、拉伸了一样。一般来说,有了激活函数,就不可能再将我们的多层感知机退化成线性模型。
下面介绍几种激活函数:
ReLU函数
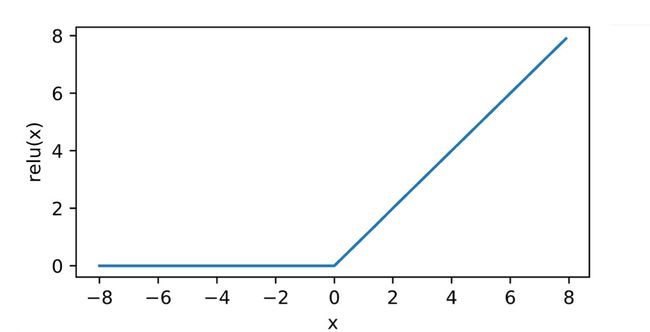
ReLU(Rectified linear unit) 是最常用的激活函数,名字花里胡哨,定义十分简单
ReLU ( x ) = max ( x , 0 ) \operatorname{ReLU}(x) = \max(x, 0) ReLU(x)=max(x,0)

sigmoid函数
sigmoid ( x ) = 1 1 + exp ( − x ) \operatorname{sigmoid}(x) = \frac{1}{1 + \exp(-x)} sigmoid(x)=1+exp(−x)1
tanh函数
tanh ( x ) = 1 − exp ( − 2 x ) 1 + exp ( − 2 x ) \operatorname{tanh}(x) = \frac{1 - \exp(-2x)}{1 + \exp(-2x)} tanh(x)=1+exp(−2x)1−exp(−2x)
学到这里,我们大概有了1990年左右深度学习从业者的知识水平,那就赶快开始实战吧~~
实战:spiral classification问题
总结
看了老师给的视频,学到了好多东西,虽然大概明白了『是什么』,但并不是很清楚『为什么』。于是自己在网上找了一些学习资料,希望打好DL的基础。一些数学的推导很难,但也很有意思,收获满满,希望能够坚持吧~


