chainer-图像分类-MobilenetV1【附源码】
文章目录
- 前言
- 一、MobileNetV1网络结构
- 二、代码实现
-
- 1.引入必须要的库库
- 2.模型构建
-
- 1.一些标准的模块进行设置
- 2.MobilenetV1网络结构的构建
- 3.结合之前构建的分类框架调用
- 三、训练效果展示
-
- 1.mobilenetv1_1.0训练结果展示
- 总结
前言
在文章与之前编写的图像分类框架构建组合使用,这里只讲述基于chainer的模型构建,本次讲解如何使用chainer构建MobileNetV1网络结构,以及对应的mobilenetv1_0.25,mobilenetv1_0.5,mobilenetv1_0.75,mobilenetv1_1.0等结构
主题框架链接,需要配合使用:主题框架博客介绍
一、MobileNetV1网络结构
这里直接上VGG论文中的一张图:
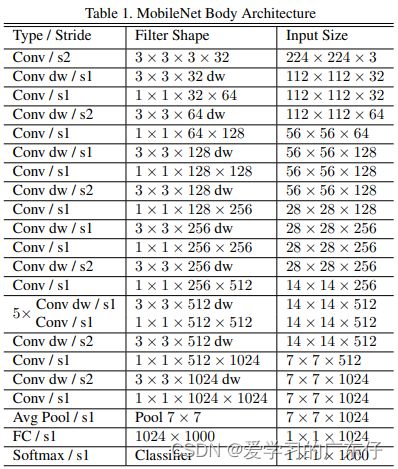
本次也是模块化构建网络结构,因此33深度可分离卷积和11普通卷积做一个模块。具体的看下边的模型构建
二、代码实现
1.引入必须要的库库
import chainer
import numpy as np
import chainer.links as L
import chainer.functions as F
2.模型构建
1.一些标准的模块进行设置
# 卷积+激活函数模块
class ConvBlock(chainer.Chain):
    def __init__(self, in_channels, out_channels, ksize, stride=1, nobias=True, initialW=chainer.initializers.Normal(), initial_bias=None):
        super(ConvBlock, self).__init__()

        self.activation_fn = F.relu6
        self.ksize = ksize
        self.stride = stride

        with self.init_scope():
            self.conv = L.Convolution2D(in_channels, out_channels, ksize, stride, 1, nobias, initialW, initial_bias)
            self.bn = L.BatchNormalization(out_channels, decay=0.9997, eps=0.001)

    def forward(self, x):
        # 巻积+标准化+激活函数
        h = self.conv(h)
        h = self.bn(h)
        h = self.activation_fn(h)
        return h
# 深度可分离巻积
class DWSeparableConvBlock(chainer.Chain):
    def __init__(self, in_channels, out_channels, ksize, stride=1, nobias=True, initialW=chainer.initializers.Normal(), initial_bias=None):
        self.activation_fn = F.relu6
        self.ksize = ksize
        self.stride = stride

        super(DWSeparableConvBlock, self).__init__()
        with self.init_scope():
            self.dw = L.DepthwiseConvolution2D(in_channels, 1, ksize, stride, 1, nobias, initialW, initial_bias)
            self.dw_bn = L.BatchNormalization(in_channels, decay=0.9997, eps=0.001)
            self.pw = L.Convolution2D(in_channels, out_channels, 1, 1, 0, nobias, initialW, initial_bias)
            self.pw_bn = L.BatchNormalization(out_channels, decay=0.9997, eps=0.001)

    def forward(self, x):
        # 3*3 巻积特征提取
        h = self.dw(h)
        h = self.dw_bn(h)
        h = self.activation_fn(h)

        # 1*1 普通巻积 对通道数进行调整
        h = self.pw(h)
        h = self.pw_bn(h)
        h = self.activation_fn(h)

        return h
class LogitsBlock(chainer.Chain):
    def __init__(self, in_channels, num_classes, dropout_keep_prob):
        super(LogitsBlock, self).__init__()
        self.dropout_keep_prob = dropout_keep_prob
        with self.init_scope():
            self.conv = L.Convolution2D(in_channels, num_classes, 1, nobias=False,initialW=chainer.initializers.Normal())

    def forward(self, x):
        # 全局平均池化  : 7*7*1024  ->  1*1*1024
        h = F.average_pooling_2d(x, x.shape[2:4], 1, 0)
        h = F.dropout(h, self.dropout_keep_prob)
        # 通道书调整为num_classes   1*1*1024->  1*1*num_classes
        h = self.conv(h)
        return h
2.MobilenetV1网络结构的构建
这里构建的时候根据参数depth_multiplier决定网络的选择,代码如下:
class MobilenetV1(chainer.Chain):
    def __init__(self, num_classes=1001, dropout_keep_prob=0.999, min_depth=8,
                 depth_multiplier=1.0):
        ch = np.array([32, 64, 128, 256, 512, 1024])
        ch = ch * depth_multiplier
        ch = np.maximum(ch, min_depth)
        ch = ch.astype(np.int32)

        super(MobilenetV1, self).__init__()
        with self.init_scope():
            # 224*224*3 -> 112*112*32
            self.conv2d_0_0 = ConvBlock(3, ch[0], 3, stride=2)
            # 112*112*32 -> 112*112*64
            self.conv2d_0_1 = DWSeparableConvBlock(ch[0], ch[1], 3)
            # 112*112*64 -> 56*56*128
            self.conv2d_1_0 = DWSeparableConvBlock(ch[1], ch[2], 3, stride=2)
            # 56*56*128 -> 56*56*128
            self.conv2d_1_1 = DWSeparableConvBlock(ch[2], ch[2], 3)
            # 56*56*128 -> 28*28*256
            self.conv2d_2_0 = DWSeparableConvBlock(ch[2], ch[3], 3, stride=2)
            # 28*28*256 -> 28*28*256
            self.conv2d_2_1 = DWSeparableConvBlock(ch[3], ch[3], 3)
            # 28*28*256 -> 14*14*512
            self.conv2d_3_0 = DWSeparableConvBlock(ch[3], ch[4], 3, stride=2)
            # 14*14*512 -> 14*14*512
            self.conv2d_3_1 = DWSeparableConvBlock(ch[4], ch[4], 3)
            # 14*14*512 -> 14*14*512
            self.conv2d_3_2 = DWSeparableConvBlock(ch[4], ch[4], 3)
            # 14*14*512 -> 14*14*512
            self.conv2d_3_3 = DWSeparableConvBlock(ch[4], ch[4], 3)
            # 14*14*512 -> 14*14*512
            self.conv2d_3_4 = DWSeparableConvBlock(ch[4], ch[4], 3)
            # 14*14*512 -> 14*14*512
            self.conv2d_3_5 = DWSeparableConvBlock(ch[4], ch[4], 3)
            # 14*14*512 -> 7*7*1024
            self.conv2d_4_0 = DWSeparableConvBlock(ch[4], ch[5], 3, stride=2)
            # 7*7*1024 -> 7*7*1024
            self.conv2d_4_1 = DWSeparableConvBlock(ch[5], ch[5], 3)
            # 7*7*1024 -> 1*1*1024 -> 1*1*num_classes
            self.conv2d_fc = LogitsBlock(ch[5], num_classes, dropout_keep_prob)
            # 转换为概率
            self.prob = lambda x: F.softmax(x.reshape(x.shape[0:2]))

    def forward(self, x):
        x = self.conv2d_0_0(x)
        x = self.conv2d_0_1(x)
        x = self.conv2d_1_0(x)
        x = self.conv2d_1_1(x)
        x = self.conv2d_2_0(x)
        x = self.conv2d_2_1(x)
        x = self.conv2d_3_0(x)
        x = self.conv2d_3_1(x)
        x = self.conv2d_3_2(x)
        x = self.conv2d_3_3(x)
        x = self.conv2d_3_4(x)
        x = self.conv2d_3_5(x)
        x = self.conv2d_4_0(x)
        x = self.conv2d_4_1(x)
        x = self.conv2d_fc(x)
        x = self.prob(x)
        return x
这里的参数需要解释一下:
n_class:类别个数
dropout_keep_prob:做droupout操作的参数
min_depth:最小深度
depth_multiplier:mobilenetv1其他变种
3.结合之前构建的分类框架调用
self.extractor = Mobilenet(num_classes=14, depth_multiplier=1.0)
self.model = Classifier(self.extractor)
if self.gpu_devices >= 0:
    self.model.to_gpu()
mobilenetv1网络结构图:
三、训练效果展示
1.mobilenetv1_1.0训练结果展示
模型正在训练中,未上传
总结
本次使用MobilenetV1网络结构以及对应他的一些不同深度的结构进行测试,效果对比,调用只需要在图像分类框架篇中替换model即可。
源码:chainer源码-mobilenetv1
源码:chainer源码-mobilenetv2