pytorch 提取权重_利用Pytorch的C++前端(libtorch)读取预训练权重并进行预测

前言
距离发布Pytorch-1.0-Preview版的发布已经有两个多月,Pytorch-1.0最瞩目的功能就是生产的大力支持,推出了C++版本的生态端(FB之前已经在Detectron进行了实验),包括C++前端和C++模型编译工具。
对于我们来说,之后如果想要部署深度学习应用的时候,只需要在Python端利用Pytorch进行训练,然后使用torch.jit导出我们训练好的模型,再利用C++端的Pytorch读取进行预测即可,当然C++端的Pytorch也是可以进行训练的。
因为我们使用的C++版的Pytorch实际上为编译好的动态链接库和头文件,官方提供已经编译好的下载包:

通过这个小教程我们可以了解到这个库的基本用法。
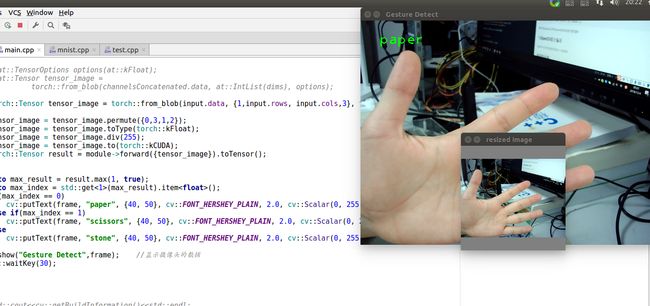
下图是利用Libtorch + OpenCV-4.0.0在GPU端进行的预测(简单识别手势),所使用的语言为C++,相较python版本的预测速度提升10%。
好了,废话不多少,接下来聊聊如何使用它吧~
正式开始
Pytorch-1.0已经发布两个月了,为什么今天才进行尝试呢——原因很简单,个人比较担心其接口的不稳定性,故稍微多等乐些时间再进行尝试。虽然多等了,但是资料依然很是匮乏,官方的相关教程少之可怜,唯一参考信息的获取只有少数的博客和github上的issue了。
但是有一点好消息,相比于之前,现在尝试libtorch已经几乎没什么问题了,各方面都已经完善,如果大家对libtorch感兴趣,那么这篇文章就比较适合你啦~
另外还有个消息,Pytorch-1.0的稳定版将在这个星期五发布,也就是明天:

这样下来,libtorch的接口已经基本稳定,剩下的就让我们感觉尝尝鲜吧。
获取libtorch
获取libtorch的方式有两种:
我这里推荐第二种,因为官方编译好的版本为了兼容性,选择了旧式的C++-ABI(相关链接:https://github.com/pytorch/pytorch/issues/13541 ; https://discuss.pytorch.org/t/issues-linking-with-libtorch-c-11-abi/29510),如果你使用的gcc版本>5,那么如果你将libtorch与其他编译好的库(使用gcc-5以及以上)进行联合编译,很有可能出现冲突,为了避免环境上面的问题,建议自己对源码进行编译。当然大家也可以测试下官方的
当然还有一点需要说明,如果你仅仅只单独使用libtorch库(从官方下载,并没有链接其他库,例如opencv),那么你这样编译那么是没有任何问题的。大家可以直接下载官方编译好的包进行快速尝试。
源码编译
安装好所有的依赖件后,我们下载好官方的源码,然后进入Pytorch源码目录环境执行:
git submodule update --init --recursive # 执行更新第三方库,确保安装成功
mkdir build
cd build
python ../tools/build_libtorch.py
有个ISSUE提到必须将源码目录中tools/build_pytorch_libs.sh第127行左右添加一句(-D_GLIBCXX_USE_CXX11_ABI=1)再进行编译:
THIRD_PARTY_DIR="$BASE_DIR/third_party"
C_FLAGS="" # 添加上 -D_GLIBCXX_USE_CXX11_ABI=1.
# Workaround OpenMPI build failure
# ImportError: /build/pytorch-0.2.0/.pybuild/pythonX.Y_3.6/build/torch/_C.cpython-36m-x86_64-linux-gnu.so: undefined symbol: _ZN3MPI8Datatype4FreeEv
# https://bugs.debian.org/cgi-bin/bugreport.cgi?bug=686926
C_FLAGS="${C_FLAGS} -DOMPI_SKIP_MPICXX=1"
LDFLAGS=""
这个其实并不需要,我们直接编译即可。
这一部其实类似于Pytorch的源码编译,至于其中的细节(cuda、cudnn版本)这里不进行赘述了,大家可以查阅本站相关内页或者根据网上教程来进行安装:
如果编译无错之后我们会看到输出信息:
-- Install configuration: "Release"
-- Set runtime path of "/home/prototype/Downloads/pytorch/torch/lib/tmp_install/lib/libmkldnn.so.0.14.0" to "$ORIGIN:/home/prototype/anaconda3/envs/fastai/lib"
-- Set runtime path of "/home/prototype/Downloads/pytorch/torch/lib/tmp_install/lib/libc10.so" to "$ORIGIN"
-- Set runtime path of "/home/prototype/Downloads/pytorch/torch/lib/tmp_install/lib/libc10_cuda.so" to "$ORIGIN"
-- Set runtime path of "/home/prototype/Downloads/pytorch/torch/lib/tmp_install/lib/libcaffe2.so" to "$ORIGIN:/usr/lib/openmpi/lib:/usr/local/cuda/lib64:/home/prototype/anaconda3/envs/fastai/lib"
-- Set runtime path of "/home/prototype/Downloads/pytorch/torch/lib/tmp_install/lib/libcaffe2_gpu.so" to "$ORIGIN:/usr/local/cuda/lib64:/home/prototype/anaconda3/envs/fastai/lib:/usr/lib/openmpi/lib"
-- Set runtime path of "/home/prototype/Downloads/pytorch/torch/lib/tmp_install/lib/libtorch.so.1" to "$ORIGIN:/usr/local/cuda/lib64:/home/prototype/anaconda3/envs/fastai/lib"
-- Set runtime path of "/home/prototype/Downloads/pytorch/torch/lib/tmp_install/lib/libcaffe2_module_test_dynamic.so" to "$ORIGIN:/home/prototype/anaconda3/envs/fastai/lib"
编译好之后的libtorch在path/to/pytorch/torch/lib/中,但要注意,实际我们在cmake中添加查找lib位置的路径为/pytorch/torch/share/cmake。
我们之后在cmake时需要添加-DCMAKE_PREFIX_PATH=/path/to/pytorch/torch/lib/tmp_install引入libtorch路径。
注意:在最新版的Pytorch-1.0.1中(经测试也适合1.0-1.3),默认libtorch编译好的文件路径有所改变,我们应该这样添加 -DCMAKE_PREFIX_PATH=path/to/pytorch/torch/share/cmake
简单测试libtorch是否正常工作
这里进行一个简单的测试,测试我们导出的模型在python端和C++端是否一致,其中model的输入为(n,3,224,224)的tensor,输出为(3)的tensor,预测三个类别,首先我们在python端导出这个模型权重:
import torch
from Models.MobileNetv2 import mobilenetv2
model = mobildnetv2(pretrained)
example = torch.rand(1, 3, 224, 224).cuda() # 注意,我这里导出的是CUDA版的模型,因为我的模型是在GPU中进行训练的
model = model.eval()
traced_script_module = torch.jit.trace(model, example)
output = traced_script_module(torch.ones(1,3,224,224).cuda())
traced_script_module.save('mobilenetv2-trace.pt')
print(output)
此时打印出输出结果:
tensor([[ -1.2374, -96.6268, 19.2590]], device='cuda:0',
grad_fn=)
然后,我们下载官方或者自己编译好libtorch,并且知道其所在的地址:path/to/libtorch(这只是例子,具体地址每个人不同)。然后编写我们的CmakeLists文件,其中find_package作用为根据我们提供的地址,去寻找libtorch的TorchConfig.cmake从而将整个libtorch库添加到我们的整体文件中:
cmake_minimum_required(VERSION 3.0.0 FATAL_ERROR)
project(simnet)
find_package(Torch REQUIRED)
message(STATUS "Pytorch status:")
message(STATUS " libraries: ${TORCH_LIBRARIES}")
add_executable(simnet test.cpp)
target_link_libraries(simnet ${TORCH_LIBRARIES})
set_property(TARGET simnet PROPERTY CXX_STANDARD 11)
然后编写我们的C++端的Pytorch,简单读取权重信息然后创建一个tensor输入权重模型再打印出结果:
#include "torch/script.h"
#include "torch/torch.h"
#include
#include
using namespace std;
int main(int argc, const char* argv[])
{
if (argc != 2) {
std::cerr << "usage: example-app \n";
return -1;
}
// 读取我们的权重信息
// 如果是1.1版本及以下: std::shared_ptr<:jit::script::module> module = torch::jit::load(argv[1]);
// 如果是1.2版本及以上:
torch::jit::script::Module module;
try {
module = torch::jit::load(argv[1]);
}
catch (const c10::Error& e) {
std::cerr << "error loading the model\n";
return -1;
}
module->to(at::kCUDA);
assert(module != nullptr);
std::cout << "ok\n";
// 建立一个输入,维度为(1,3,224,224),并移动至cuda
std::vector<:jit::ivalue> inputs;
inputs.push_back(torch::ones({1, 3, 224, 224}).to(at::kCUDA));
// Execute the model and turn its output into a tensor.
at::Tensor output = module->forward(inputs).toTensor();
std::cout << output.slice(/*dim=*/1, /*start=*/0, /*end=*/5) << '\n';
}
我们编译此代码然后读取之前导出的模型,可以发现此时输出:
ok
-1.2374 -96.6271 19.2592
[ Variable[CUDAFloatType]{1,3} ]
通过与之前tensor([[ -1.2374, -96.6268, 19.2590]], device='cuda:0',grad_fn=)进行对比,发现在小数点第三位出略有差别,但总体来说差别不是很大。
注意,两次读取都是在GPU中进行的,我们需要注意下,利用CPU和利用GPU训练的模型是不同的,如果导出使用GPU训练的模型(利用model.cpu()将模型移动到CPU中导出)然后使用CPU去读取,结果并不正确,必须保证导出和读取的设备一致。
如果使用的libtorch和导出的模型版本不匹配(这个错误经常出现于我们编译libtorch的版本和导出模型的Pytorch版本不同)则会出现这个错误(这个问题可能会在API稳定后解决):
(simnet:7105): GStreamer-CRITICAL **: gst_element_get_state: assertion 'GST_IS_ELEMENT (element)' failed
terminate called after throwing an instance of 'c10::Error'
what(): memcmp("PYTORCH1", buf, kMagicValueLength) != 0 ASSERT FAILED at /home/prototype/Downloads/pytorch/caffe2/serialize/inline_container.cc:75, please report a bug to PyTorch. File is an unsupported archive format from the preview release. (PyTorchStreamReader at /home/prototype/Downloads/pytorch/caffe2/serialize/inline_container.cc:75)
frame #0: c10::Error::Error(c10::SourceLocation, std::__cxx11::basic_string, std::allocator > const&) + 0x6c (0x7f92b7e7cf1c in /home/prototype/Downloads/pytorch/torch/lib/tmp_install/lib/libc10.so)
frame #1: torch::jit::PyTorchStreamReader::PyTorchStreamReader(std::__cxx11::basic_string, std::allocator >, std::istream*) + 0x6fc (0x7f92ca49a88c in /home/prototype/Downloads/pytorch/torch/lib/tmp_install/lib/libcaffe2.so)
frame #2: torch::jit::load(std::istream&) + 0x2c5 (0x7f92cd9619f5 in /home/prototype/Downloads/pytorch/torch/lib/tmp_install/lib/libtorch.so.1)
frame #3: torch::jit::load(std::__cxx11::basic_string, std::allocator > const&) + 0x55 (0x7f92cd961c15 in /home/prototype/Downloads/pytorch/torch/lib/tmp_install/lib/libtorch.so.1)
frame #4: /home/prototype/CLionProjects/simnet/cmake-build-release/simnet() [0x404f60]
frame #5: __libc_start_main + 0xf0 (0x7f92b4701830 in /lib/x86_64-linux-gnu/libc.so.6)
frame #6: /home/prototype/CLionProjects/simnet/cmake-build-release/simnet() [0x407739]
利用OpenCV读取图像传递给libtorch进行预测
这样,我们已经初步使用了libtorch进行了测试,但是实际上我们需要图像库来读取图像或者视频,然后将其转化为Tensor再输入模型进行预测,这时我们就需要将libtorch与其他的库进行联合编译。
这里我们将OpenCV和libtorch一起编译,实现通过OpenCV开启摄像头将帧转化为tensor进行实时的预测,并判断当前的手势。
编译OpenCV
这里我们仍然推荐在当前的环境下(cmake、make、gcc版本确定情况下)编译自己的OpenCV,如果自己之前已经编译好可以跳过这一步。
与OpenCV联合编译
自己环境中存在OpenCV的前提下,同样使用Cmake的find_package命令可以找到,为此,我们修改CmakeLists文件为:
cmake_minimum_required(VERSION 3.12 FATAL_ERROR)
project(simnet)
find_package(Torch REQUIRED) # 查找libtorch
find_package(OpenCV REQUIRED) # 查找OpenCV
if(NOT Torch_FOUND)
message(FATAL_ERROR "Pytorch Not Found!")
endif(NOT Torch_FOUND)
message(STATUS "Pytorch status:")
message(STATUS " libraries: ${TORCH_LIBRARIES}")
message(STATUS "OpenCV library status:")
message(STATUS " version: ${OpenCV_VERSION}")
message(STATUS " libraries: ${OpenCV_LIBS}")
message(STATUS " include path: ${OpenCV_INCLUDE_DIRS}")
add_executable(simnet test.cpp)
target_link_libraries(simnet ${TORCH_LIBRARIES} ${OpenCV_LIBS})
set_property(TARGET simnet PROPERTY CXX_STANDARD 11)
在Cmake配置后如果正确找到后会显示以下的信息:
-- Caffe2: CUDA detected: 9.2
-- Caffe2: CUDA nvcc is: /usr/local/cuda/bin/nvcc
-- Caffe2: CUDA toolkit directory: /usr/local/cuda
-- Caffe2: Header version is: 9.2
-- Found cuDNN: v7.4.1 (include: /usr/local/cuda/include, library: /usr/local/cuda/lib64/libcudnn.so)
-- Autodetected CUDA architecture(s): 6.1;6.1
-- Added CUDA NVCC flags for: -gencode;arch=compute_61,code=sm_61
-- Pytorch status:
-- libraries: torch;caffe2_library;caffe2_gpu_library;/usr/lib/x86_64-linux-gnu/libcuda.so;/usr/local/cuda/lib64/libnvrtc.so;/usr/local/cuda/lib64/libnvToolsExt.so;/usr/local/cuda/lib64/libcudart_static.a;-lpthread;dl;/usr/lib/x86_64-linux-gnu/librt.so
-- OpenCV library status:
-- version: 4.0.0
-- libraries: opencv_calib3d;opencv_core;opencv_dnn;opencv_features2d;opencv_flann;opencv_gapi;opencv_highgui;opencv_imgcodecs;opencv_imgproc;opencv_ml;opencv_objdetect;opencv_photo;opencv_stitching;opencv_video;opencv_videoio
-- include path: /usr/local/include/opencv4
-- Configuring done
-- Generating done
-- Build files have been written to: /home/prototype/CLionProjects/simnet/cmake-build-release
然后我们的C++代码为:
#include
#include "torch/script.h"
#include "torch/torch.h"
#include
#include
using namespace std;
// resize并保持图像比例不变
cv::Mat resize_with_ratio(cv::Mat& img)
{
cv::Mat temImage;
int w = img.cols;
int h = img.rows;
float t = 1.;
float len = t * std::max(w, h);
int dst_w = 224, dst_h = 224;
cv::Mat image = cv::Mat(cv::Size(dst_w, dst_h), CV_8UC3, cv::Scalar(128,128,128));
cv::Mat imageROI;
if(len==w)
{
float ratio = (float)h/(float)w;
cv::resize(img,temImage,cv::Size(224,224*ratio),0,0,cv::INTER_LINEAR);
imageROI = image(cv::Rect(0, ((dst_h-224*ratio)/2), temImage.cols, temImage.rows));
temImage.copyTo(imageROI);
}
else
{
float ratio = (float)w/(float)h;
cv::resize(img,temImage,cv::Size(224*ratio,224),0,0,cv::INTER_LINEAR);
imageROI = image(cv::Rect(((dst_w-224*ratio)/2), 0, temImage.cols, temImage.rows));
temImage.copyTo(imageROI);
}
return image;
}
int main(int argc, const char* argv[])
{
if (argc != 2) {
std::cerr << "usage: example-app \n";
return -1;
}
cv::VideoCapture stream(0);
cv::namedWindow("Gesture Detect", cv::WINDOW_AUTOSIZE);
std::shared_ptr<:jit::script::module> module = torch::jit::load(argv[1]);
module->to(at::kCUDA);
cv::Mat frame;
cv::Mat image;
cv::Mat input;
while(1)
{
stream>>frame;
image = resize_with_ratio(frame);
imshow("resized image",image); //显示摄像头的数据
cv::cvtColor(image, input, cv::COLOR_BGR2RGB);
// 下方的代码即将图像转化为Tensor,随后导入模型进行预测
torch::Tensor tensor_image = torch::from_blob(input.data, {1,input.rows, input.cols,3}, torch::kByte);
tensor_image = tensor_image.permute({0,3,1,2});
tensor_image = tensor_image.toType(torch::kFloat);
tensor_image = tensor_image.div(255);
tensor_image = tensor_image.to(torch::kCUDA);
torch::Tensor result = module->forward({tensor_image}).toTensor();
auto max_result = result.max(1, true);
auto max_index = std::get<1>(max_result).item();
if(max_index == 0)
cv::putText(frame, "paper", {40, 50}, cv::FONT_HERSHEY_PLAIN, 2.0, cv::Scalar(0, 255, 0), 2);
else if(max_index == 1)
cv::putText(frame, "scissors", {40, 50}, cv::FONT_HERSHEY_PLAIN, 2.0, cv::Scalar(0, 255, 0), 2);
else
cv::putText(frame, "stone", {40, 50}, cv::FONT_HERSHEY_PLAIN, 2.0, cv::Scalar(0, 255, 0), 2);
imshow("Gesture Detect",frame); //显示摄像头的数据
cv::waitKey(30);
}
然后在cmake时添加-DCMAKE_PREFIX_PATH=/path/to/pytorch/torch/lib/tmp_install引入libtorch路径。
这样我们的程序就可以运行了~
关于这个libtorch-C++的API的具体讲解,因为篇幅原因没有详细写出来,会在之后的文章中进行说明。
遇到的问题
上述的编译中可能会出现这个问题,或者其他出现一大堆命名定义但显示未定义的函数:
error: undefined reference to `cv::imread(std::string const&, int)'
如果你的OpenCV在单独编译使用时没有错误,但是一块编译就出现问题,那么这代表我们的libtorch库和OpenCV库冲突了,冲突原因可能是OpenCV编译OpenCV的C++-ABI版本和libtorch中的不同,所以建议OpenCV最好和libtorch在同样的环境下编译。
