Transformer详解
简介:
本文在论文的基础上结合代码来对Transformer进行详细的解释,根据Transformer的流程顺序对其中涉及的技术原理结合代码进行详细地阐述。同时,尽可能地去解释这些功能产生了什么作用。
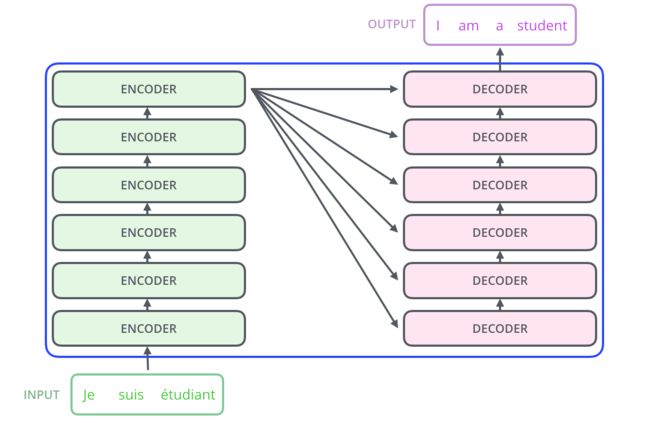
Transformer的运行流程如上图所示,输入一串字符通过encoder层得到一个结果,将这个结果送到每一层的DECODER中,最后通过DECODER输出目标结果。
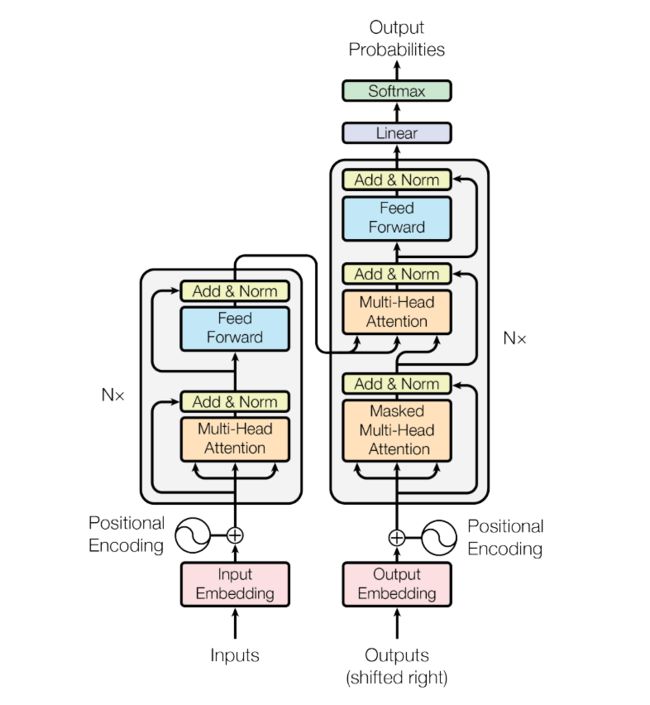
上图是论文《attention is all you need》中所展示的transformer结构图,本文以从左往右、从下往上的顺序进行分析。
Encoder:
class Encoder(nn.Module):
    def __init__(self,
                 input_dim,hid_dim,n_layers, n_heads,pf_dim,dropout, device,
                 max_length = 100):
        super().__init__()

        self.device = device

        self.tok_embedding = nn.Embedding(input_dim, hid_dim)
        self.pos_embedding = nn.Embedding(max_length, hid_dim)

        self.layers = nn.ModuleList([EncoderLayer(hid_dim, n_heads,pf_dim,
                                                  dropout,device)
                                     for _ in range(n_layers)])

        self.dropout = nn.Dropout(dropout)

        self.scale = torch.sqrt(torch.FloatTensor([hid_dim])).to(device)

    def forward(self, src, src_mask):

        #src = [batch size, src len]
        #src_mask = [batch size, src len]

        batch_size = src.shape[0]
        src_len = src.shape[1]

        pos = torch.arange(0, src_len).unsqueeze(0).repeat(batch_size, 1).to(self.device)

        #pos = [batch size, src len]

        src = self.dropout((self.tok_embedding(src) * self.scale) + self.pos_embedding(pos))

        #src = [batch size, src len, hid dim]

        for layer in self.layers:
            src = layer(src, src_mask)

        #src = [batch size, src len, hid dim]

        return src
输入字符串首先被向量化乘上 d m o d e l \sqrt{d_{model}} dmodel(维度),这一步骤应该是用来降低position encoding对原有向量的影响。另外,trg(Decoder的输入)和src(Encoder的输入)共享embedding层的权重,这样做可以减少运算所需要的内存。
由于德语和英语同属日耳曼语言,有很多相同的subword有着相似的含义。如果两种语言没有多少共同的subword(比如中英),使用共享词表也并不会有什么性能损失(由于词表变大,速度上可能有微小的损失),因为对于encoder和decoder而言都只有对应的语言的embedding会被激活. [1]
然后利用positional encodings给输入向量加上位置信息(代码中参考了Bert,直接加上pos_embedding),这是因为self-attention无法像RNN和CNN一样可以直接利用sequence的顺序,所以需要对向量进行一个处理,即,词向量与对应的位置向量相加,让transformer也可以利用sequence的顺序信息。在加上位置信息后dropout,dropout在transformer中多次出现,它可以抑制模型过拟合。
dropout根据一定的概率 p p p 临时隐藏一些神经网络节点(输入输出节点除外),这些被隐藏的网络节不参与这一批样本的训练,未被隐藏的节点正常更新参数。在训练结束后,重新随机隐藏部分节点。dropout通过隐藏部分节点形成一个“新”的神经网络,整个过程相当于对很多个不同的神经网络取平均。 而不同的网络产生不同的过拟合,一些互为“反向”的拟合相互抵消就可以达到整体上减少过拟合。同时,dropout程序导致两个神经元不一定每次都在一个dropout网络中出现。(这样权值的更新不再依赖于有固定关系的隐含节点的共同作用,阻止了某些特征仅仅在其它特定特征下才有效果的情况)。 迫使网络去学习更加鲁棒的特征 (这些特征在其它的神经元的随机子集中也存在)[2]。
PositionalEncoding
这一部分的代码来源于 The Annotated Transformer
class PositionalEncoding(nn.Module):
    "Implement the PE function."
    def __init__(self, d_model, dropout, max_len=5000):
        super(PositionalEncoding, self).__init__()
        self.dropout = nn.Dropout(p=dropout)

        # Compute the positional encodings once in log space.
        pe = torch.zeros(max_len, d_model)
        position = torch.arange(0, max_len).unsqueeze(1)
        div_term = torch.exp(torch.arange(0, d_model, 2) *
                             -(math.log(10000.0) / d_model))
        pe[:, 0::2] = torch.sin(position * div_term)
        pe[:, 1::2] = torch.cos(position * div_term)
        pe = pe.unsqueeze(0)
        self.register_buffer('pe', pe)

    def forward(self, x):
        x = x + Variable(self.pe[:, :x.size(1)],
                         requires_grad=False)
        return self.dropout(x)
从代码中可以看到位置矩阵在偶数位置使用了正弦函数,奇数位置使用了余弦函数
P E ( p o s , 2 i ) = sin ( p o s / 1000 0 2 i / d model ) P E ( p o s , 2 i + 1 ) = cos ( p o s / 1000 0 2 i / d model ) P E_{(p o s, 2 i)} =\sin \left(p o s / 10000^{2 i / d_{\text {model }}}\right) \\ P E_{(p o s, 2 i+1)} =\cos \left(p o s / 10000^{2 i / d_{\text {model }}}\right) PE(pos,2i)=sin(pos/100002i/dmodel )PE(pos,2i+1)=cos(pos/100002i/dmodel )
其中, α = 1 1000 0 2 i / d m o d e l \alpha=\frac{1}{10000^{2 i / d_{model}}} α=100002i/dmodel1代表了编码函数的波长, α \alpha α比较大时,波长比较长,相邻字的位置编码之间的差异比较小。如果 α \alpha α比较小,在长文本中还是可能会有一些不同位置的字符的编码一样。同时 s i n / c o s sin/cos sin/cos的使用只是为了使编码更丰富,在哪些维度上使用不是很重要,都是模型可以调整适应的。
这里的三角函数形式的位置编码没有太大意义。因为至少现在看来:1. 这个函数形式很可能是基于经验得到的,并且应该有不少可以替代的方法;2. 谷歌后期的作品BERT已经换用位置嵌入(positional embedding)了,这可能说明编码的方案有一定的问题(猜测)[3]。
Mutli Head Attention Layer
class MultiHeadAttentionLayer(nn.Module):
    def __init__(self, hid_dim, n_heads, dropout, device):
        super().__init__()

        assert hid_dim % n_heads == 0

        self.hid_dim = hid_dim
        self.n_heads = n_heads
        self.head_dim = hid_dim // n_heads

        self.fc_q = nn.Linear(hid_dim, hid_dim)
        self.fc_k = nn.Linear(hid_dim, hid_dim)
        self.fc_v = nn.Linear(hid_dim, hid_dim)

        self.fc_o = nn.Linear(hid_dim, hid_dim)

        self.dropout = nn.Dropout(dropout)

        self.scale = torch.sqrt(torch.FloatTensor([self.head_dim])).to(device)

    def forward(self, query, key, value, mask = None):

        batch_size = query.shape[0]

        #query = [batch size, query len, hid dim]
        #key = [batch size, key len, hid dim]
        #value = [batch size, value len, hid dim]

        Q = self.fc_q(query)
        K = self.fc_k(key)
        V = self.fc_v(value)

        #Q = [batch size, query len, hid dim]
        #K = [batch size, key len, hid dim]
        #V = [batch size, value len, hid dim]

        Q = Q.view(batch_size, -1, self.n_heads, self.head_dim).permute(0, 2, 1, 3)
        K = K.view(batch_size, -1, self.n_heads, self.head_dim).permute(0, 2, 1, 3)
        V = V.view(batch_size, -1, self.n_heads, self.head_dim).permute(0, 2, 1, 3)

        #Q = [batch size, n heads, query len, head dim]
        #K = [batch size, n heads, key len, head dim]
        #V = [batch size, n heads, value len, head dim]

        energy = torch.matmul(Q, K.permute(0, 1, 3, 2)) / self.scale

        #energy = [batch size, n heads, query len, key len]

        if mask is not None:
            energy = energy.masked_fill(mask == 0, -1e10)

        attention = torch.softmax(energy, dim = -1)

        #attention = [batch size, n heads, query len, key len]

        x = torch.matmul(self.dropout(attention), V)

        #x = [batch size, n heads, query len, head dim]

        x = x.permute(0, 2, 1, 3).contiguous()

        #x = [batch size, query len, n heads, head dim]

        x = x.view(batch_size, -1, self.hid_dim)

        #x = [batch size, query len, hid dim]

        x = self.fc_o(x)

        #x = [batch size, query len, hid dim]

        return x, attention
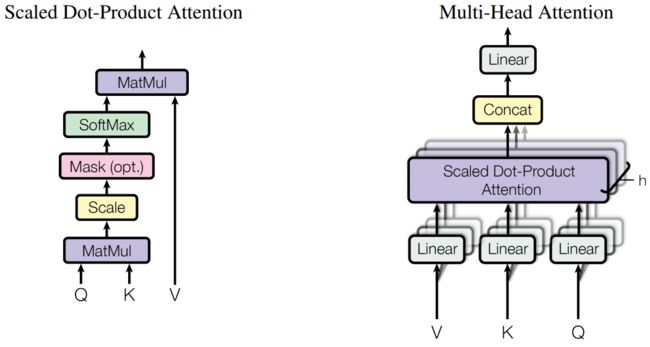
从图中和代码中都可以看到输入进attention中的并不是一个矩阵,而是 Q , V , K Q,V,K Q,V,K三个矩阵(需要注意的其中hid_dim表示的是模型的维度, Q , V , K Q,V,K Q,V,K的维度为head dim,为保证输入输出的维度的统一,所以head dim等于hiddim / n_heads)。在attention中 Q × V Q \times V Q×V,则是将query、key的向量两两做内积,然后做一个mask的操作,将值为 0 0 0的地方设置为 − 1 0 10 - 10^{10} −1010(softmax后近似0),这里的mask与decoder中的不同,这里仅仅是用来mask掉
它描述的就是query和key之间任意两个元素的关联强度。 最后再与 V V V相乘,相当于按照这个关联强度将V的各个向量加权求和,最终输出一个向量序列。目前最常用的Attention方式当数Self Attention,即Q,K,V都是同一个向量序列经过线性变换而来的,而Transformer则是Self Attention跟Position-Wise全连接层(相当于kernel size为1的一维卷积)的组合。所以,Transformer就是基于Attention的向量序列到向量序列的变换[4]。
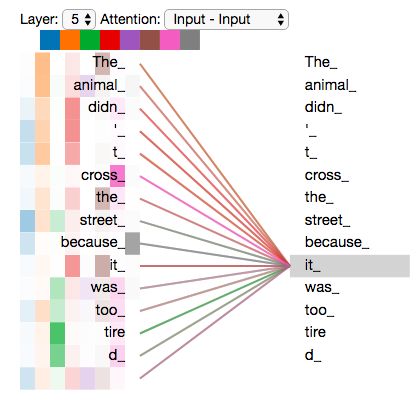
每一个head可以提取到不同的特征信息,这有利于句子通过不同的关键信息预测出"it"的具体含义。
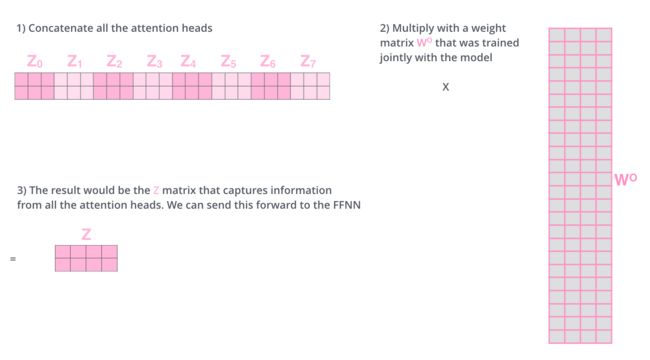
然后将多个scaled dot-product attention的结果进行拼接,通过一个两层的全连接层将所有提取到的特征片段进行一个拼接。
EncoderLayer 代码如下:
class EncoderLayer(nn.Module):
    def __init__(self,
                 hid_dim,
                 n_heads,
                 pf_dim,
                 dropout,
                 device):
        super().__init__()

        self.self_attn_layer_norm = nn.LayerNorm(hid_dim)
        self.ff_layer_norm = nn.LayerNorm(hid_dim)
        self.self_attention = MultiHeadAttentionLayer(hid_dim, n_heads, dropout, device)
        self.positionwise_feedforward = PositionwiseFeedforwardLayer(hid_dim,
                                                                     pf_dim,
                                                                     dropout)
        self.dropout = nn.Dropout(dropout)

    def forward(self, src, src_mask):

        #src = [batch size, src len, hid dim]
        #src_mask = [batch size, src len]

        #self attention
        _src, _ = self.self_attention(src, src, src, src_mask)

        #dropout, residual connection and layer norm
        src = self.self_attn_layer_norm(src + self.dropout(_src))

        #src = [batch size, src len, hid dim]

        #positionwise feedforward
        _src = self.positionwise_feedforward(src)

        #dropout, residual and layer norm
        src = self.ff_layer_norm(src + self.dropout(_src))

        #src = [batch size, src len, hid dim]

        return src
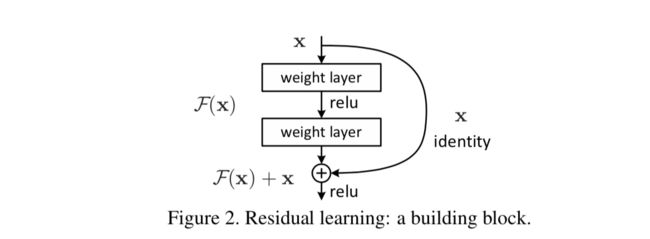
从代码中我们还可以看到,EncodeLayer中每个subLayer种都会使用一次残差连接和layer normalization。layer normalization可以将数据分布拉到激活函数的非饱和区,具有权重/数据伸缩不变性的特点。起到缓解梯度消失/爆炸、加速训练、正则化的效果。残差连接则可以解决网络的退化问题
residual connection:
        #self attention
        _src, _ = self.self_attention(src, src, src, src_mask)
        #dropout, residual connection and layer norm
        src = self.self_attn_layer_norm(src + self.dropout(_src))
结合图片和代码可以知道,残差连接是一个非常简单的操作,通过跳层的方式将输入直接与目标输出相加。
layer normalization:
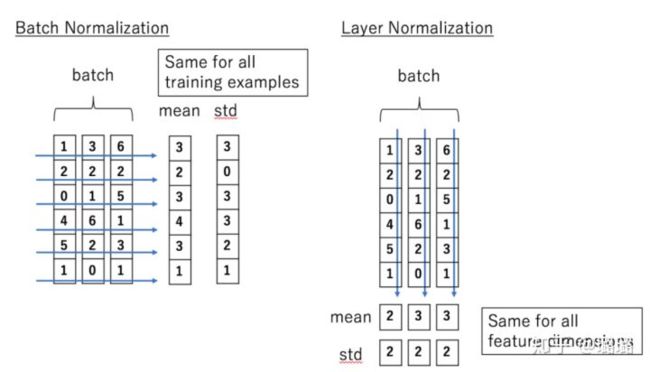
Batch Normalization 的处理对象是对一批样本, Layer Normalization 的处理对象是单个样本。Batch Normalization 是对这批样本的同一维度特征做归一化, Layer Normalization 是对这单个样本的所有维度特征做归一化[5]。
用文本的形式解释:
今天天气很好。
我们出去玩吧。
我要好好学习。
上面三句话作为一个batch,LN是对每一句话进行归一化处理,而BN则是沿着batch_size的方向,对“今我我”,“天们我”,…,进行归一化处理。
Decoder

从结构图中可以看到,Decoder比Encoder多了一个Encoder-Decoder Attention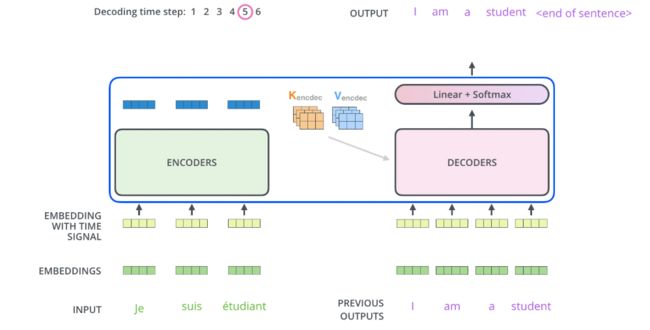
将Encoders训练出来的结果转换成 K , V K,V K,V传入Encoder-Decoder Attention层,Encoder层中的输入转换成矩阵 Q Q Q,进行attention的操作。
mask:
    def make_src_mask(self, src):

        #src = [batch size, src len]

        src_mask = (src != self.src_pad_idx).unsqueeze(1).unsqueeze(2)

        #src_mask = [batch size, 1, 1, src len]

        return src_mask

    def make_trg_mask(self, trg):

        #trg = [batch size, trg len]

        trg_pad_mask = (trg != self.trg_pad_idx).unsqueeze(1).unsqueeze(2)

        #trg_pad_mask = [batch size, 1, 1, trg len]

        trg_len = trg.shape[1]

        trg_sub_mask = torch.tril(torch.ones((trg_len, trg_len), device = self.device)).bool()

        #trg_sub_mask = [trg len, trg len]

        trg_mask = trg_pad_mask & trg_sub_mask

        #trg_mask = [batch size, 1, trg len, trg len]

        return trg_mask
从代码中我们发现,Encode的中mask操作仅仅只是对
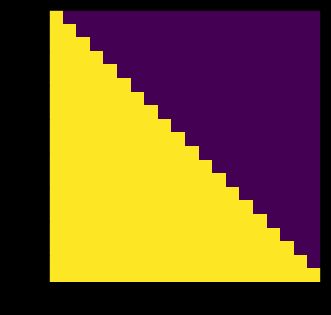
《从语言模型到Seq2Seq:Transformer如戏,全靠Mask 》中的例子来解释Sequence mask
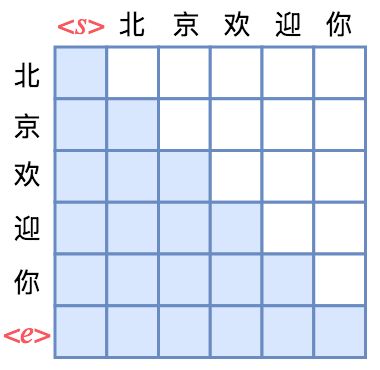
attention矩阵中每一行代表着输出,而每一列代表着输入,而Attention矩阵就表示输出和输入的关联。假定白色方格都代表0,那么第1行表示“北”只能跟起始标记相关了,而第2行就表示“京”只能跟起始标记<\s>和“北”相关了,依此类推。
The Final Linear and Softmax Layer
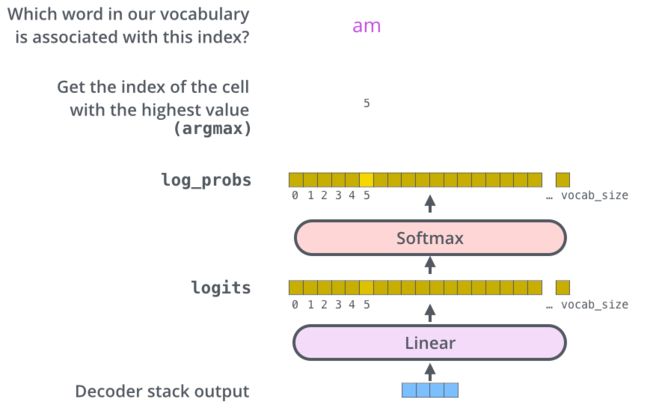
Decoder的输出通过最后的一个全连接层和softmax层,获得的向量长度为词表的长度,每个位置都代表结果是某个词的概率。
参考文章:
[1] https://www.zhihu.com/question/333419099
[2] https://zhuanlan.zhihu.com/p/23178423
[3] https://www.zhihu.com/question/347678607
[4] https://spaces.ac.cn/archives/6933
[5] https://zhuanlan.zhihu.com/p/113233908
[6] https://jalammar.github.io/illustrated-transformer/
参考代码:
http://nlp.seas.harvard.edu/2018/04/03/attention.html#attention
https://github.com/bentrevett/pytorch-seq2seq
