MMdetection记录
MMdetection官方文档:
https://mmdetection.readthedocs.io/zh_CN/latest/article.html
官方有原文https://zhuanlan.zhihu.com/p/337375549
我只提取我在意的
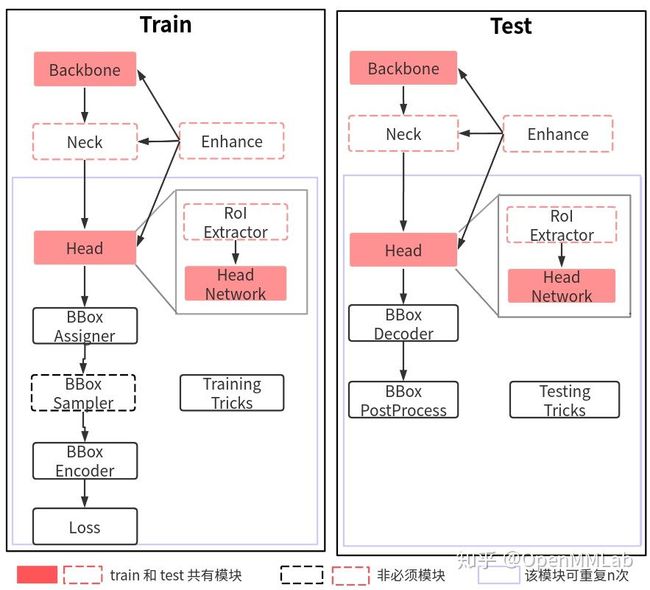
模块详解
- 一个batch进来之后到backbone,例如ResNet
- 输出的单尺度或者多尺度特征图然后到neck进行特征融合或增强,例如FPN
- 上述多尺度特征最终输入到 head 部分,一般都会包括分类和回归分支输出
- 在整个网络构建阶段都可以引入一些即插即用增强算子来增加提取提取能力,典型的例如 SPP、DCN 等等
- 目标检测 head 输出一般是特征图,对于分类任务存在严重的正负样本不平衡,可以通过正负样本属性分配和采样控制
- 为了方便收敛和平衡多分支,一般都会对 gt bbox 进行编码
- 最后一步是计算分类和回归 loss,进行训练
- 在训练过程中也包括非常多的 trick,例如优化器选择等,参数调节也非常关键
backbone
源码在mmdet/models/backbones
如果要自己新建backbone,使用mmcv/utils/registry.py的注册机制,在class前加@BACKBONES.register_module(),然后再init文件中导入并加入__all__的声明。
和detectron2相似。
通过 dict 形式的配置来实例化任何已经注册的类,detectron2是通过yaml配置文件的方式
pretrained='torchvision://resnet50',
backbone=dict(
    type='ResNet', # 骨架类名,后面的参数都是该类的初始化参数
    depth=50,
    num_stages=4,
    out_indices=(0, 1, 2, 3),
    frozen_stages=1,
    norm_cfg=dict(type='BN', requires_grad=True),
    norm_eval=True,
    style='pytorch'),
neck
mmdet/models/necks对backbone之后的特征进行加工
init文件中可以看到,常用的FPN
__all__ = [
    'FPN', 'BFP', 'ChannelMapper', 'HRFPN', 'NASFPN', 'FPN_CARAFE', 'PAFPN',
    'NASFCOS_FPN', 'RFP', 'YOLOV3Neck', 'FPG', 'DilatedEncoder',
    'CTResNetNeck', 'SSDNeck', 'YOLOXPAFPN', 'DyHead'
]
Head
目标检测的head,输出一般是分类和回归,所有的 one-stage 算法的 head 模块都在mmdet/models/dense_heads中,mmdet的好处在于每个算法都是独立的head。
two-stage 算法还包括额外的mmdet/models/roi_heads
mmdet/models/roi_heads/roi_extractors :two-stage 或者 mutli-stage 算法,会额外包括一个区域提取器 roi extractor,用于将不同大小的 RoI 特征图统一成相同大小。
mmdet/models/roi_heads/mask_heads 存放maskhead
由于正负样本属性定义、正负样本采样和 bbox 编解码模块都在 head 模块中进行组合调用,故 MMDetection 中最复杂的模块就是 head。
enhance
enhance 是即插即用、能够对特征进行增强的模块,其具体代码可以通过 dict 形式注册到 backbone、neck 和 head 中。常用的 enhance 模块是 SPP、ASPP、RFB、Dropout、Dropblock、DCN 和各种注意力模块 SeNet、Non_Local、CBA 等
目前mmdet/models/plugins中只有 ‘DropBlock’, ‘PixelDecoder’, ‘TransformerEncoderPixelDecoder’,
‘MSDeformAttnPixelDecoder’
BBox Assigner
mmdet/core/bbox/assigners 分配正负样本的策略。

__all__ = [
    'BaseAssigner', 'MaxIoUAssigner', 'ApproxMaxIoUAssigner', 'AssignResult',
    'PointAssigner', 'ATSSAssigner', 'CenterRegionAssigner', 'GridAssigner',
    'HungarianAssigner', 'RegionAssigner', 'UniformAssigner', 'SimOTAAssigner',
    'TaskAlignedAssigner', 'MaskHungarianAssigner'
]
BBox Sampler
mmdet/core/bbox/samplers
本模块作用是对前面定义的正负样本不平衡进行采样
BBox Encoder
mmdet/core/bbox/coder
Loss
__all__ = [
    'accuracy', 'Accuracy', 'cross_entropy', 'binary_cross_entropy',
    'mask_cross_entropy', 'CrossEntropyLoss', 'sigmoid_focal_loss',
    'FocalLoss', 'smooth_l1_loss', 'SmoothL1Loss', 'balanced_l1_loss',
    'BalancedL1Loss', 'mse_loss', 'MSELoss', 'iou_loss', 'bounded_iou_loss',
    'IoULoss', 'BoundedIoULoss', 'GIoULoss', 'DIoULoss', 'CIoULoss', 'GHMC',
    'GHMR', 'reduce_loss', 'weight_reduce_loss', 'weighted_loss', 'L1Loss',
    'l1_loss', 'isr_p', 'carl_loss', 'AssociativeEmbeddingLoss',
    'GaussianFocalLoss', 'QualityFocalLoss', 'DistributionFocalLoss',
    'VarifocalLoss', 'KnowledgeDistillationKLDivLoss', 'SeesawLoss', 'DiceLoss'
]
trick
测试中的 BBox Decoder
训练时候进行了编码,那么对应的测试环节需要进行解码。根据编码的不同,解码也是不同的。举个简单例子:假设训练时候对宽高是直接除以图片宽高进行归一化的,那么解码过程也仅仅需要乘以图片宽高即可。其代码和 bbox encoder 放在一起,在mmdet/core/bbox/coder中。
BBox PostProcess
后处理
mmdet/core/post_processing
训练测试算法流程
mmdet/models/detectors/single_stage.py和mmdet/models/detectors/two_stage.py是构建单阶段和两件段检测的核心,是每个detector的父类
class SingleStageDetector(BaseDetector):

   def __init__(...):
        # 构建骨架、neck和head
        self.backbone = build_backbone(backbone)
        if neck is not None:
            self.neck = build_neck(neck)
        self.bbox_head = build_head(bbox_head)

  def forward_train(---):
        # 先运行backbone+neck进行特征提取
        x = self.extract_feat(img)
        # 对head进行forward train,输出loss
        losses = self.bbox_head.forward_train(x, img_metas, gt_bboxes,
                                              gt_labels, gt_bboxes_ignore)
        return losses

  def simple_test(---):
        # 先运行backbone+neck进行特征提取
        x = self.extract_feat(img)
        # head输出预测特征图
        outs = self.bbox_head(x)
        # bbox解码和还原
        bbox_list = self.bbox_head.get_bboxes(
            *outs, img_metas, rescale=rescale)
        # 重组结果返回
        bbox_results = [
            bbox2result(det_bboxes, det_labels, self.bbox_head.num_classes)
            for det_bboxes, det_labels in bbox_list
        ]
        return bbox_results
可以发现训练部分最核心的就是bbox_head.forward_train,测试部分最核心的是bbox_head.get_bboxes
其他文件
要理解MMDetection的算法实现流程,必须要吃透Config、Registry、Runner和Hook这四个类。
configs/中base是基本模型的配置文件,
configs/_base_/datasets是数据集设置
configs/_base_/models基本模型的构建
configs/_base_/schedules是训练策略,optimizer和lr
mmdet/apis中train.py是训练的核心代码,一般不会改,除非有自定义需求,在def train_detector中,重点是build_runner和register_training_hooks
mmdet/core中bbox中比较重要,上面提到的关于bbox的代码都在这里
mmdet/datasets数据集的构建和读取
训练和测试流程
https://zhuanlan.zhihu.com/p/341954021

- 首先需要构建 Dataset 类,用于迭代输出数据
- 在迭代输出数据的时候需要通过数据 Pipeline 对数据进行各种处理,数据增强,预处理等
- 通过 Sampler 采样器可以控制 Dataset 输出的数据顺序,最常用的是随机采样器 RandomSampler;分组采样器 GroupSampler 和 DistributedGroupSampler,相当于在 RandomSampler 基础上额外新增了根据图片宽高比进行 group 功能
- 将 Sampler 和 Dataset 都输入给 DataLoader,然后通过 DataLoader 输出已组成 batch 的数据,作为 Model 的输入
- 单机版本 MMDataParallel、分布式(单机多卡或多机多卡)版本 MMDistributedDataParallel
- 训练model时输出loss等,logger 进行保存
pipeline
mmdet/datasets/pipelines
mmdet/datasets/pipelines/loading.py图片和标签加载
mmdet/datasets/pipelines/transforms.py有resize,flip等操作
config文件
lr 设置
# optimizer
optimizer = dict(type='SGD', lr=0.02, momentum=0.9, weight_decay=0.0001)
optimizer_config = dict(grad_clip=None)
# learning policy
lr_config = dict(
    policy='step',
    warmup='linear',
    warmup_iters=500,
    warmup_ratio=0.01,
    step=[8, 11])
runner = dict(type='EpochBasedRunner', max_epochs=12)
optimizer 的 lr = 0.00125*batch_size
8 gpus、imgs_per_gpu = 2:lr = 0.02;
2 gpus、imgs_per_gpu = 2 或 4 gpus、imgs_per_gpu = 1:lr = 0.005;
4 gpus、imgs_per_gpu = 2:lr = 0.01
lr_config指的是学习率变化策略,图片中给出的是线性增加策略,准确来说,初始学习率为warmup_ratio的值0.001,在前500个iters线性增加学习率,之后的iter保持optimizer设置的0.02不变,直到第8个epoch开始学习率降低。
如果使用Adam是自适应初始化lr
batchsize设置
data = dict(
    samples_per_gpu=2,
    #每张gpu训练多少张图片  batch_size = 训练使用gpu数量 * imgs_per_gpu
    workers_per_gpu=2,
    train=dict(
        type=dataset_type,
        ann_file=data_root + 'annotations/instances_train2017.json',
        img_prefix=data_root + 'train2017/',
        pipeline=train_pipeline),
    val=dict(
        type=dataset_type,
        ann_file=data_root + 'annotations/instances_val2017.json',
        img_prefix=data_root + 'val2017/',
        pipeline=test_pipeline),
    test=dict(
        type=dataset_type,
        ann_file=data_root + 'annotations/instances_val2017.json',
        img_prefix=data_root + 'val2017/',
        pipeline=test_pipeline))
自定义数据集
在mmdet/datasets中注册自己的数据集,可以辅助coco.py,然后修改里面的CLASSES和PALETTE
如果只有一个CLASSES,要加上一个逗号,否则将会报错。
(‘person’,)
然后在configs/_base_/datasets中设置数据集配置文件
训练时候显存持续增加
https://www.csdn.net/tags/NtTaggysOTE1ODctYmxvZwO0O0OO0O0O.html
解决思路2:每次训练完清空cuda的缓存
在环境中mmcv 的 runner中epoch_based_runner.py

train bug
RuntimeError: Expected to have finished reduction in the prior iteration before starting a new one. This error indicates that your module has parameters that were not used in producing loss. You can enable unused parameter detection by (1) passing the keyword argument find_unused_parameters=True to torch.nn.parallel.DistributedDataParallel; (2) making sure all forward function outputs participate in calculating loss. If you already have done the above two steps, then the distributed data parallel module wasn’t able to locate the output tensors in the return value of your module’s forward function. Please include the loss function and the structure of the return value of forward of your module when reporting this issue (e.g. list, dict, iterable).
解决方案:https://github.com/open-mmlab/mmaction/issues/150
在mmdet/apis/train.py
find_unused_parameters = cfg.get('find_unused_parameters', False)
False 变True
使用技巧
https://blog.csdn.net/weixin_41693877/article/details/116134263
其中模型瘦身技巧
mmdetection在保存模型时,除了保存权重,还保存了原始数据和优化参数。但是,模型在测试时,有些参数是没有用的,怎样去掉这些无用的参数使模型减小(大约减小50%)呢?见下面的代码:
import torch

model_path = "epoch_30.pth"
checkpoint = torch.load(model_path)
checkpoint['meta'] = None
checkpoint['optimizer'] = None

weights = checkpoint['state_dict']

state_dict = {"state_dict":weights}

torch.save(state_dict,  './epoch_30_new.pth')
to be continue
后续在使用中的学到的tips会记录


