使用Silverlight Toolkit TreeView树形控件
尽管在Silverlight Toolkit中有相关的DEMO来演示如何使用TreeView控件,但其还是有一些功能没
被演示出来。因为在我们平时开发过程中,数据是被动态查询获取的(不是DEMO中的静态文件方式)。
因此今天就演示一下如何使用WCF来获取相应数据并使用TreeView来动态加载相应结点信息。
首先,我们要创建一个WCF服务来获取相应的树形节点数据信息,如下:
从代码中可看出,ForumInfo是使用ParendID来记录父结点信息并以此来创建一个树形结构的,而方法:
GetForumData()即是演示了我们平时查询数据的过程。我们在Silverlight中添加对该服务的引用即可。
我们在Silverlight中添加对Silverlight Toolkit相关DLL引用,然后向XAML文件上拖入一个TREEVIEW
控件。并将其命名为“TreeOfLife”,最后我们再放几个TextBlock来显示树形结点被点击后显示的相应的
ForumInfo信息。最后XAML中的内容如下所示:
下面是相应的XAML.CS文件中的内容,主要是使用递归方式遍历数据列表并创建相关的结点信息:
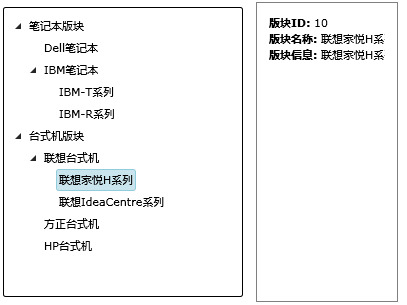
下面演示一下效果,如下图所示:

当前TreeView控件还支持样式定义,比如可以给每个树形结点前添加CheckBox和一个小图标,这里我们使用下
面样式:
然后在cs文件中使用下面语句将该样式绑定到TreeView上:
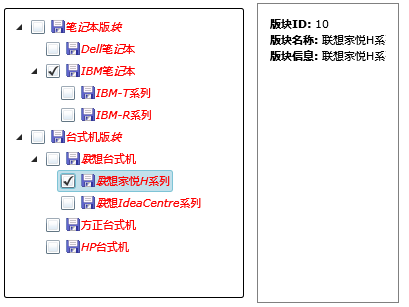
下面就是应用了该样式的运行效果:

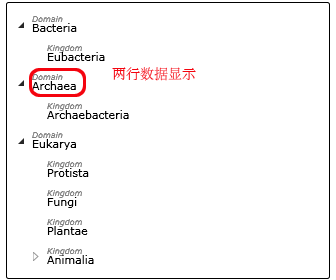
运行该样式的效果如下图所示:

好了,今天的内容就先到这里了。
DEMO下载,请 点击这里:)
原文链接: http://www.cnblogs.com/daizhj/archive/2009/01/08/1372088.html
作者: daizhj, 代震军
Tags: silverlight,treeview,树形,控件
网址: http://daizhj.cnblogs.com/
被演示出来。因为在我们平时开发过程中,数据是被动态查询获取的(不是DEMO中的静态文件方式)。
因此今天就演示一下如何使用WCF来获取相应数据并使用TreeView来动态加载相应结点信息。
首先,我们要创建一个WCF服务来获取相应的树形节点数据信息,如下:
public
class
ForumInfo
{
public int ForumID { get ; set ; }
public int ParendID { get ; set ; }
public string ForumName { get ; set ; }
}
[ServiceContract(Namespace = "" )]
[AspNetCompatibilityRequirements(RequirementsMode = AspNetCompatibilityRequirementsMode.Allowed)]
public class DateService
{
[OperationContract]
public List < ForumInfo > GetForumData()
{
List < ForumInfo > forumList = new List < ForumInfo > ();
forumList.Add( new ForumInfo() { ForumID = 1 , ParendID = 0 , ForumName = " 笔记本版块 " });
forumList.Add( new ForumInfo() { ForumID = 2 , ParendID = 0 , ForumName = " 台式机版块 " });
forumList.Add( new ForumInfo() { ForumID = 3 , ParendID = 1 , ForumName = " Dell笔记本 " });
forumList.Add( new ForumInfo() { ForumID = 4 , ParendID = 1 , ForumName = " IBM笔记本 " });
forumList.Add( new ForumInfo() { ForumID = 5 , ParendID = 4 , ForumName = " IBM-T系列 " });
forumList.Add( new ForumInfo() { ForumID = 6 , ParendID = 4 , ForumName = " IBM-R系列 " });
forumList.Add( new ForumInfo() { ForumID = 7 , ParendID = 2 , ForumName = " 联想台式机 " });
forumList.Add( new ForumInfo() { ForumID = 8 , ParendID = 2 , ForumName = " 方正台式机 " });
forumList.Add( new ForumInfo() { ForumID = 9 , ParendID = 2 , ForumName = " HP台式机 " });
forumList.Add( new ForumInfo() { ForumID = 10 , ParendID = 7 , ForumName = " 联想家悦H系列 " });
forumList.Add( new ForumInfo() { ForumID = 11 , ParendID = 7 , ForumName = " 联想IdeaCentre系列 " });
return forumList;
}
}
{
public int ForumID { get ; set ; }
public int ParendID { get ; set ; }
public string ForumName { get ; set ; }
}
[ServiceContract(Namespace = "" )]
[AspNetCompatibilityRequirements(RequirementsMode = AspNetCompatibilityRequirementsMode.Allowed)]
public class DateService
{
[OperationContract]
public List < ForumInfo > GetForumData()
{
List < ForumInfo > forumList = new List < ForumInfo > ();
forumList.Add( new ForumInfo() { ForumID = 1 , ParendID = 0 , ForumName = " 笔记本版块 " });
forumList.Add( new ForumInfo() { ForumID = 2 , ParendID = 0 , ForumName = " 台式机版块 " });
forumList.Add( new ForumInfo() { ForumID = 3 , ParendID = 1 , ForumName = " Dell笔记本 " });
forumList.Add( new ForumInfo() { ForumID = 4 , ParendID = 1 , ForumName = " IBM笔记本 " });
forumList.Add( new ForumInfo() { ForumID = 5 , ParendID = 4 , ForumName = " IBM-T系列 " });
forumList.Add( new ForumInfo() { ForumID = 6 , ParendID = 4 , ForumName = " IBM-R系列 " });
forumList.Add( new ForumInfo() { ForumID = 7 , ParendID = 2 , ForumName = " 联想台式机 " });
forumList.Add( new ForumInfo() { ForumID = 8 , ParendID = 2 , ForumName = " 方正台式机 " });
forumList.Add( new ForumInfo() { ForumID = 9 , ParendID = 2 , ForumName = " HP台式机 " });
forumList.Add( new ForumInfo() { ForumID = 10 , ParendID = 7 , ForumName = " 联想家悦H系列 " });
forumList.Add( new ForumInfo() { ForumID = 11 , ParendID = 7 , ForumName = " 联想IdeaCentre系列 " });
return forumList;
}
}
从代码中可看出,ForumInfo是使用ParendID来记录父结点信息并以此来创建一个树形结构的,而方法:
GetForumData()即是演示了我们平时查询数据的过程。我们在Silverlight中添加对该服务的引用即可。
我们在Silverlight中添加对Silverlight Toolkit相关DLL引用,然后向XAML文件上拖入一个TREEVIEW
控件。并将其命名为“TreeOfLife”,最后我们再放几个TextBlock来显示树形结点被点击后显示的相应的
ForumInfo信息。最后XAML中的内容如下所示:
<
controls:TreeView
x:Name
="TreeOfLife"
Margin
="5"
Grid.Column
="0"
Grid.Row
="1"
SelectedItemChanged ="TreeOfLife_SelectedItemChanged" />
< Border BorderBrush ="Gray" BorderThickness ="1" Padding ="8" Margin ="8,0,0,0" Grid.Row ="1" Grid.Column ="1" >
< StackPanel x:Name ="DetailsPanel" Margin ="4" >
< StackPanel Orientation ="Horizontal" >
< TextBlock Text ="版块ID: " FontWeight ="Bold" />
< TextBlock Text =" {Binding ForumID} " />
</ StackPanel >
< StackPanel Orientation ="Horizontal" >
< TextBlock Text ="版块名称: " FontWeight ="Bold" />
< TextBlock Text =" {Binding ForumName} " />
</ StackPanel >
< StackPanel Orientation ="Horizontal" >
< TextBlock Text ="版块信息: " FontWeight ="Bold" />
< TextBlock x:Name ="DetailText" TextWrapping ="Wrap" Text =" {Binding ForumName} " />
</ StackPanel >
</ StackPanel >
</ Border >
下面是相应的XAML.CS文件中的内容,主要是使用递归方式遍历数据列表并创建相关的结点信息:
public
partial
class
Page : UserControl
{
DateServiceClient dataServiceClient = new DateServiceClient();
ObservableCollection < ForumInfo > forumList = new ObservableCollection < ForumInfo > ();
public Page()
{
InitializeComponent();
// 此样式只添加在根结点上
// TreeOfLife.ItemContainerStyle = this.Resources["RedItemStyle"] as Style;
dataServiceClient.GetForumDataCompleted += new EventHandler < GetForumDataCompletedEventArgs > (dataServiceClient_GetForumDataCompleted);
dataServiceClient.GetForumDataAsync();
}
void dataServiceClient_GetForumDataCompleted( object sender, GetForumDataCompletedEventArgs e)
{
try
{
forumList = e.Result;
AddTreeNode( 0 , null );
}
catch
{
throw new NotImplementedException();
}
}
private void AddTreeNode( int parentID, TreeViewItem treeViewItem)
{
List < ForumInfo > result = (from forumInfo in forumList
where forumInfo.ParendID == parentID
select forumInfo).ToList < ForumInfo > ();
if (result.Count > 0 )
{
foreach (ForumInfo foruminfo in result)
{
TreeViewItem objTreeNode = new TreeViewItem();
objTreeNode.Header = foruminfo.ForumName;
objTreeNode.DataContext = foruminfo;
// 此样式将会添加的所有叶子结点上
// objTreeNode.ItemContainerStyle = this.Resources["RedItemStyle"] as Style;
// 添加根节点
if (treeViewItem == null )
{
TreeOfLife.Items.Add(objTreeNode);
}
else
{
treeViewItem.Items.Add(objTreeNode);
}
AddTreeNode(foruminfo.ForumID, objTreeNode);
}
}
}
private void TreeOfLife_SelectedItemChanged( object sender, RoutedPropertyChangedEventArgs < object > e)
{
TreeViewItem item = e.NewValue as TreeViewItem;
ForumInfo fi = item.DataContext as ForumInfo;
DetailsPanel.DataContext = fi;
}
}
{
DateServiceClient dataServiceClient = new DateServiceClient();
ObservableCollection < ForumInfo > forumList = new ObservableCollection < ForumInfo > ();
public Page()
{
InitializeComponent();
// 此样式只添加在根结点上
// TreeOfLife.ItemContainerStyle = this.Resources["RedItemStyle"] as Style;
dataServiceClient.GetForumDataCompleted += new EventHandler < GetForumDataCompletedEventArgs > (dataServiceClient_GetForumDataCompleted);
dataServiceClient.GetForumDataAsync();
}
void dataServiceClient_GetForumDataCompleted( object sender, GetForumDataCompletedEventArgs e)
{
try
{
forumList = e.Result;
AddTreeNode( 0 , null );
}
catch
{
throw new NotImplementedException();
}
}
private void AddTreeNode( int parentID, TreeViewItem treeViewItem)
{
List < ForumInfo > result = (from forumInfo in forumList
where forumInfo.ParendID == parentID
select forumInfo).ToList < ForumInfo > ();
if (result.Count > 0 )
{
foreach (ForumInfo foruminfo in result)
{
TreeViewItem objTreeNode = new TreeViewItem();
objTreeNode.Header = foruminfo.ForumName;
objTreeNode.DataContext = foruminfo;
// 此样式将会添加的所有叶子结点上
// objTreeNode.ItemContainerStyle = this.Resources["RedItemStyle"] as Style;
// 添加根节点
if (treeViewItem == null )
{
TreeOfLife.Items.Add(objTreeNode);
}
else
{
treeViewItem.Items.Add(objTreeNode);
}
AddTreeNode(foruminfo.ForumID, objTreeNode);
}
}
}
private void TreeOfLife_SelectedItemChanged( object sender, RoutedPropertyChangedEventArgs < object > e)
{
TreeViewItem item = e.NewValue as TreeViewItem;
ForumInfo fi = item.DataContext as ForumInfo;
DetailsPanel.DataContext = fi;
}
}
下面演示一下效果,如下图所示:

当前TreeView控件还支持样式定义,比如可以给每个树形结点前添加CheckBox和一个小图标,这里我们使用下
面样式:
<
UserControl.Resources
>
< Style x:Key ="RedItemStyle" TargetType ="controls:TreeViewItem" >
< Setter Property ="HeaderTemplate" >
< Setter.Value >
< DataTemplate >
< StackPanel Orientation ="Horizontal" >
< CheckBox />
< Image Source ="image/default.png" />
< TextBlock Text =" {Binding} " Foreground ="Red" FontStyle ="Italic" />
</ StackPanel >
</ DataTemplate >
</ Setter.Value >
</ Setter >
< Setter Property ="IsExpanded" Value ="True" />
</ Style >
</ UserControl.Resources >
然后在cs文件中使用下面语句将该样式绑定到TreeView上:
TreeOfLife.ItemContainerStyle
=
this
.Resources[
"
RedItemStyle
"
]
as
Style;
下面就是应用了该样式的运行效果:

当前TreeView中定义样式模版还可以使用ItemTemplate,下面是一段样式代码:
<
controls:TreeView.ItemTemplate
>
< controls:HierarchicalDataTemplate ItemsSource =" {Binding Subclasses} "
ItemContainerStyle =" {StaticResource ExpandedItemStyle} " >
< StackPanel >
< TextBlock Text =" {Binding Rank} " FontSize ="8" FontStyle ="Italic" Foreground ="Gray" Margin ="0 0 0 -5" />
< TextBlock Text =" {Binding Classification} " />
</ StackPanel >
</ controls:HierarchicalDataTemplate >
</ controls:TreeView.ItemTemplate >
运行该样式的效果如下图所示:

好了,今天的内容就先到这里了。
DEMO下载,请 点击这里:)
原文链接: http://www.cnblogs.com/daizhj/archive/2009/01/08/1372088.html
作者: daizhj, 代震军
Tags: silverlight,treeview,树形,控件
网址: http://daizhj.cnblogs.com/