微服务架构:基于nacos配置中心的Sentinel配置保存技术实现
在上一篇博客《微服务架构:基于sentinel的限流、降级、监控》中,博主已经提到每次重启Sentinel之后,配置规则都会被清空,所以需要我们解决如何保存配置规则的问题。这个问题的解决方案通常有两种:
- 修改Sentinel dashboard源码,集成nacos[1-3];
- Sentinel集成Nacos实现动态流控规则[4-6]。
博主对这两种方案都进行了尝试,方案一要改动Sentinel dashboard的大量代码,后期升级Sentinel时,又得重新改一遍,代价有点高,所以没有采用该方案。对于方案二,博主基于 sentinel1.8.2版本,一直没有尝试成功,不知道哪里出了问题,而且规则下发自己无法把控。因此,博主决定自己手撸基于nacos配置中心的Sentinel配置保存技术方案。技术实现思路大致如下:
1)实现nacos配置中心,在nacos后台配置sentinel规则;
2)主动拉取规则:启动服务器时,主动来取一次nacos后台配置规则;
3)实时接收规则:开启nacos配置实时监听,接收最新的nacos后台配置规则;
4)解析并加载规则:通过FlowRuleManager、DegradeRuleManager提供的API重新加载配置规则。
本文的提纲如下:
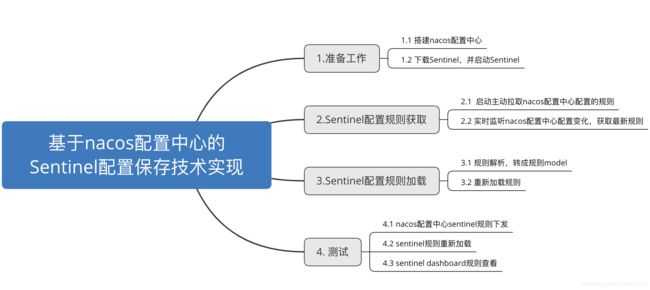 图1 博客提纲
一.准备工作
2.1 搭建配置中心
首先,我们要搭建nacos配置中心。如果小伙伴还不了解nacos配置中心,请先阅读博主的文章《微服务架构: nacos配置中心的实现》,这里就不讲述nacos配置中心的搭建了。下面讲解配置中心重要部分的内容。
1)在nacos创建sentinel规则文件。
 图1.1 创建sentinel规则文件
bootstrap.yml中对应的配置如下:
  cloud:
    nacos:
      config: # nacos 配置中心
        server-addr: localhost:8848
        file-extension: yaml # 配置文件格式是yml
        prefix: sentinel # 配置文件前缀
        group: DEFAULT_GROUP # group是默认的话,可以不写
        # dataID不用配置:,只需要在nacos后台将dataId命名为: ${prefix}-${spring.profile.active}.${file-extension}
        #;例如:sentinel-dev.yaml
      discovery: # 注册到nacos
        server-addr: localhost:8848

  profiles:
    active: dev
sentinel-dev.yml的详情:
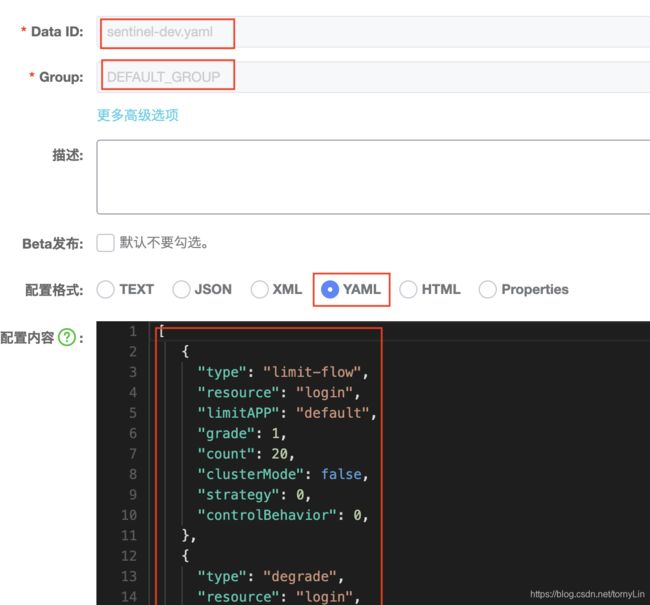 图1.2 sentinel-dev.yaml详情
1.2 启动sentinel
1.2.1 下载sentinel-dashboard.jar
请到git下载sentinel-dashboard.jar最新版本:jar包下载地址。博主用的是sentinel-dashboard-1.8.2.jar版本。
 图1.3 下载sentinel-dashboard.jar
1.2.2 启动sentinel
在终端输入:
java -Dserver.port=8080 -Dcsp.sentinel.dashboard.server=localhost:8080 -Dproject.name=sentinel-dashboard -jar sentinel-dashboard-1.8.2.jar
其中: -Dserver.port=8080 用于指定 Sentinel 控制台端口为 8080。
二.Sentinel配置规则获取
2.1 启动主动拉取nacos配置中心配置的规则
在服务器启动的时候,我们主动拉取一次nacos的配置。我们定义一个Component,在Component中通过NacosFactory提供的API主动拉取配置。代码如下:
@Component
class NacosListener {
    @Bean
    public static void  lisenNacosChanged() throws NacosException, InterruptedException {
        String serverAddr = "127.0.0.1:8848";
        String dataId = "sentinel-dev.yaml";
        String group = "DEFAULT_GROUP";
        Properties properties = new Properties();
        properties.put(PropertyKeyConst.SERVER_ADDR, serverAddr);
        ConfigService configService = NacosFactory.createConfigService(properties);

        String content = configService.getConfig(dataId, group, 3000);
        System.out.println("从nacos拉取到的配置:" + content);
   }
}
2.2 实时监听nacos配置中心配置变化,获取最新规则
NacosFactory提供API 可以实时监听nacos配置中心内容的变化。代码如下:
@Component
class NacosListener {
    @Bean
    public static void  lisenNacosChanged() throws NacosException, InterruptedException {
        String serverAddr = "127.0.0.1:8848";
        String dataId = "sentinel-dev.yaml";
        String group = "DEFAULT_GROUP";
        Properties properties = new Properties();
        properties.put(PropertyKeyConst.SERVER_ADDR, serverAddr);
        ConfigService configService = NacosFactory.createConfigService(properties);

        // 注册监听
        configService.addListener(dataId, group, new Listener() {
            @Override
            public void receiveConfigInfo(String configInfo) {
                 System.out.println("实时接收到的nacos配置信息:" + configInfo);
            }

            @Override
            public Executor getExecutor() {
                return null;
            }
        });
   }
}
完整的代码如下:
package com.rzl.spring.sentinel.nacos;


import com.alibaba.nacos.api.NacosFactory;
import com.alibaba.nacos.api.PropertyKeyConst;
import com.alibaba.nacos.api.config.ConfigService;
import com.alibaba.nacos.api.config.listener.Listener;
import com.alibaba.nacos.api.exception.NacosException;
import org.greenrobot.eventbus.EventBus;
import org.springframework.context.annotation.Bean;
import org.springframework.stereotype.Component;

import java.util.Properties;
import java.util.concurrent.Executor;

@Component
class NacosListener {
    @Bean
    public static void  lisenNacosChanged() throws NacosException {
        String serverAddr = "127.0.0.1:8848";
        String dataId = "sentinel-dev.yaml";
        String group = "DEFAULT_GROUP";
        Properties properties = new Properties();
        properties.put(PropertyKeyConst.SERVER_ADDR, serverAddr);

        // 主动拉取nacos配置中心的内容
        ConfigService configService = NacosFactory.createConfigService(properties);
        String content = configService.getConfig(dataId, group, 3000);
        EventBus.getDefault().post(new NacosConfigEvent(content)); // 通过EventBus发送配置内容给订阅者

        // 注册监听nacos配置中心内容的变化
        configService.addListener(dataId, group, new Listener() {
            @Override
            public void receiveConfigInfo(String configInfo) {
                EventBus.getDefault().post(new NacosConfigEvent(configInfo)); // 通过EventBus发送配置内容给订阅者
            }

            @Override
            public Executor getExecutor() {
                return null;
            }
        });
    }
}
三.Sentinel配置规则加载
3.1 规则解析,转成规则model
在NacosListener中,我们实现了主动拉取和实时接收nacos配置中心的内容。为了解耦代码,我们引入了EventBus,在NacosListener中将nacos配置内容发送给订阅者:DymaticSentinelRuleser。EventBus的依赖如下:
implementation 'org.greenrobot:eventbus:3.2.0'
1)事件发送逻辑:
 // 通过EventBus发送配置内容给订阅者
EventBus.getDefault().post(new NacosConfigEvent(content));
NacosConfigEvent的实现:
package com.rzl.spring.sentinel.nacos;

public class NacosConfigEvent {
    public String content;
    public NacosConfigEvent(String content) {
        this.content = content;
    }
}
2)事件订阅
注册EventBus 、反注册EventBus(防止内存泄漏)、事件订阅逻辑:
@Component
public class DymaticSentinelRuleser {
    /**
     * 注册EventBus监听发送的规则事件
     */
    public DymaticSentinelRuleser() {
        EventBus.getDefault().register(this);
    }

    /**
     * EventBus反注册
     *
     * @throws Throwable
     */
    @Override
    protected void finalize() throws Throwable {
        super.finalize();
        EventBus.getDefault().unregister(this);
    }

    /**
     * 订阅
     *
     * @param eventnt
     */
    @Subscribe
    public void onReceive(NacosConfigEventnt eventnt) {
        String content = eventnt.content;
        parseRules(content);
    }
}
3.2 规则加载
接收到规则之后,首先进行规则解析并转换为rule model。我们来看一下nacos配置中心配置的sentinel规则,博主配置了login、logout的限流、降级各一条规则:
 [
    {
      "type": "limit-flow",
      "resource": "login",
      "limitAPP": "default",
      "grade": 1,
      "count": 20,
      "clusterMode": false,
      "strategy": 0,
      "controlBehavior": 0,
    },
    {
      "type": "degrade",
      "resource": "login",
      "grade": 2,
      "count": 20,
      "slowRatioThreshold": 0.5,
      "timeWindow": 1000,
      "minRequestAmount": 50,
      "statIntervalMs": 1000,
    },
    {
      "type": "limit-flow",
      "resource": "logout",
      "limitAPP": "default",
      "grade": 1,
      "count": 20,
      "clusterMode": false,
      "strategy": 0,
      "controlBehavior": 0,
    },
    {
      "type": "degrade",
      "resource": "logout",
      "grade": 2,
      "count": 20,
      "slowRatioThreshold": 0.5,
      "timeWindow": 1000,
      "minRequestAmount": 500,
      "statIntervalMs": 1000,
    },
]1)String转成JSONArray。发送过来的内容是String格式的,我们先转成JSONArray。
JSONArray array = null; // 配置的内容格式为JSONArray
try {
    array = JSON.parseArray(content);
} catch (Exception e) {
    e.printStackTrace();
}
2)JSONArray转成rule model。为了方便将JSONObject序列化成对象, 博主引入了Gson库。Gson库的依赖如下:
implementation 'com.google.code.gson:gson:2.8.7'
        List flowRules = new ArrayList();
        List degradeRules = new ArrayList();

        for (int i = 0; i < array.size(); i++) {
            JSONObject object = array.getJSONObject(i);
            switch (object.getString("type")) {
                case "limit-flow": { // 解析限流规则
                    FlowRule limitFlowRule = new Gson().fromJson(object.toString(), FlowRule.class);
                    flowRules.add(limitFlowRule);
                    break;
                }

                case "degrade": {  // 解析降级规则
                    DegradeRule degrateRule = new Gson().fromJson(object.toString(), DegradeRule.class);
                    degradeRules.add(degrateRule);
                    break;
                }

                default:
                    break;
            }
} 3)规则加载。FlowRuleManager、DegradeRuleManager的loadRules方法帮我们实现了规则的加载。查看该API的源码,支持规则的更新。因此,我们直接调用该API就行了,不用自己处理规则更新的逻辑。
if (!flowRules.isEmpty()) { // 重新加载限流规则,会update原来的规则
   FlowRuleManager.loadRules(flowRules);
}

if (!degradeRules.isEmpty()) { // 重新加载降级规则,会update原来的规则
   DegradeRuleManager.loadRules(degradeRules);
}
四.测试
4.1 nacos配置中心sentinel规则下发
1)主动拉取规则:服务器启动时,主动拉取nacos配置中心规则,内容如下:
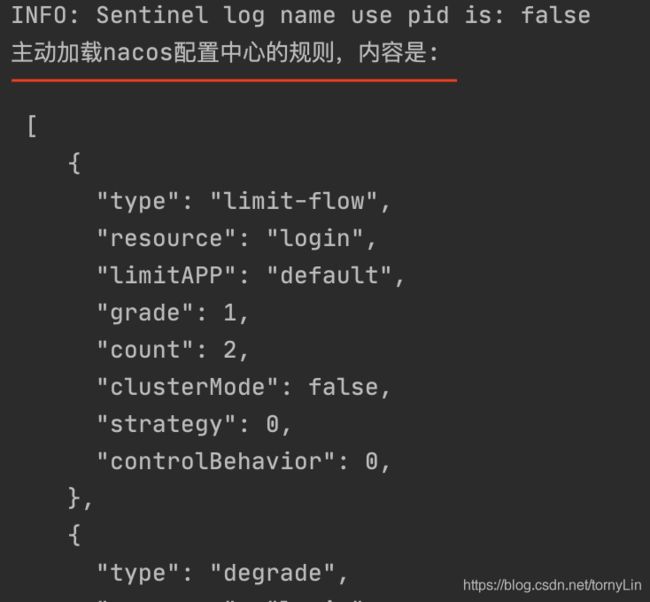 图4.1 主动拉取nacos配置中心的内容
2) 实时监听nacos配置
从nacos后台将第一个限流规则的count由2改为3,点击发布按钮,实时监听到配置下发的最新内容。
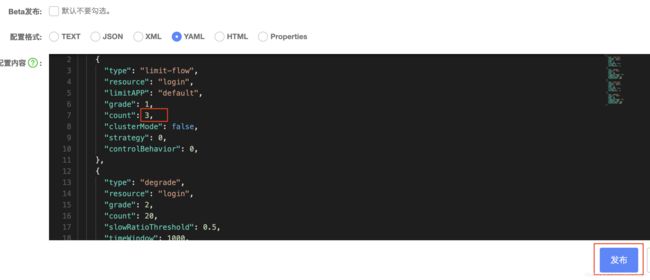 图4.2 修改nacos配置中心内容图
从输出的log可以看到实时收到了最新的内容,如下图所示。
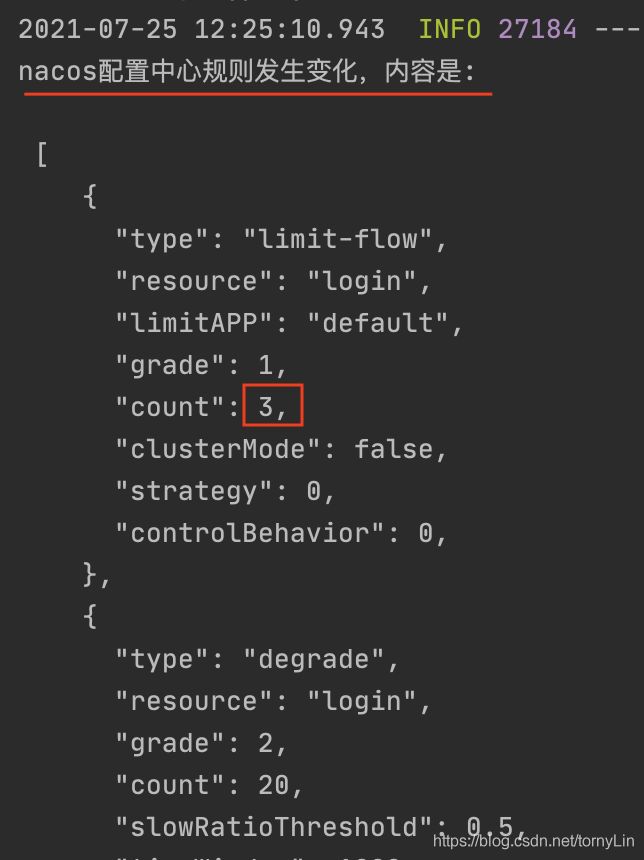 图4.3 实时接收nacos的最新内容
4.2 sentinel规则重新加载
为了测试sentinel限流或降级规则,博主写了一个测试Controller(demo代码)。在浏览器输入:http://localhost:8081/sentinel-rule/login?userName=rzl&password=123。只要QPS <= 3 时,服务正常返回响应。
 图4.4 正常访问页面
狂刷页面,QPS 超过3 时,限流规则被执行,服务器返回异常。过一会再刷新,恢复正常。
 图4.5 限流规则执行
4.3 sentinel dashboard规则查看
- 重启sentinel前,观察sentinel dashboard限流和降级的规则
服务器正常运行情况下,重启sentinel前,看看限流和降级的规则情况。该规则和nacos配置中心的是一致的。
 图4.6 重启前sentinel dashboard规则
- 重启sentinel,观察sentinel dashboard限流和降级的规则
重启sentinel,登录sentinel dashboard后台,看到限流和降级的规则没有被清空。规则和nacos配置中心保持一致。
- 重启服务器,刷新sentinel dashboard,观察限流和降级的规则
停止服务器,刷新sentinel dashboard的规则,几秒钟之后看到限流和降级的规则被被清空。重启服务器,从浏览器刷login接口,再刷新sentinel dashboard,规则显示出来了,和nacos配置中心保持一致。
- 修改 nacos配置中心规则,刷新sentinel dashboard,观察限流和降级的规则
修改nacos配置中心规则,每个规则的cout改为2,刷新sentinel dashboard,观察限流和降级的规则已发生了变化,和nacos配置中心保持一致。
 图4.7 修改nacos配置中心,sentinel dashboard更新了规则
五.Demo代码
本博客的 demo代码已经上传git,需要的读者请自行下载,代码下载地址。
六.参考链接
1.Sentinel 控制台集成 nacos
2. DevilMayFree/sentinel-dashboard-nacos
3.Sentinel Dashboard(基于1.8.1)流控规则持久化到Nacos——涉及部分Sentinel Dashboard源码改造
4.Sentinel集成Nacos实现动态流控规则
5.Sentinel实现接口限流并用Nacos存储规则
6.sentinel 规则持久化到nacos

