引言
如标题所说,属于个人虚拟机安装Ubuntu的笔记记录。
VM安装
网络上有很多教程,这里就直接省略了。
下载Ubuntu 22.04.1-server
进入Ubuntu的中文网站:Ubuntu系统下载 | Ubuntu
根据最新的版本下载即可。本次使用使用USB或者DVD的物理镜像安装。
VM安装Ubuntu
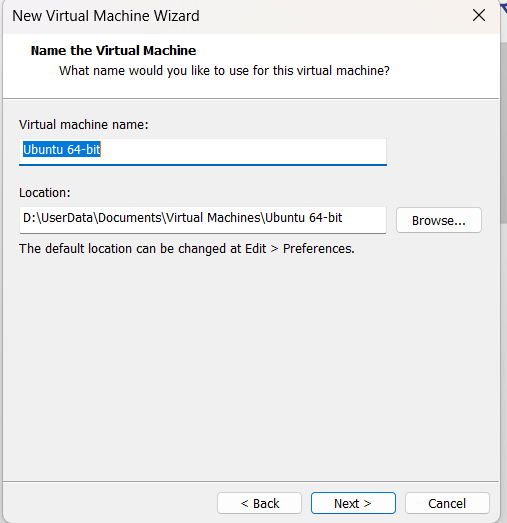
Vm安装完成之后,我们直接去官方网站下载Ubuntu 22.04.1 的Sever版本,在VM当中我们选择直接创建的新的镜像。
在磁盘中选择下载下来的ISO镜像文件。
选择直接下一步
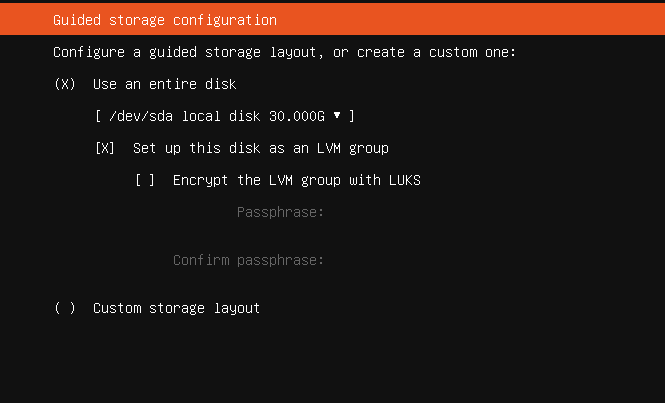
选择磁盘大小,这里个人磁盘空间比较充足,选择了30GB。
选择语言
这里建议使用英文语言:
选择键盘
下面是选择键盘的方式,默认下一步即可:
配置网络
注意:如果这里配置网络一会安装系统速度可能会较慢,因为ubuntu会从网络上下载更新。
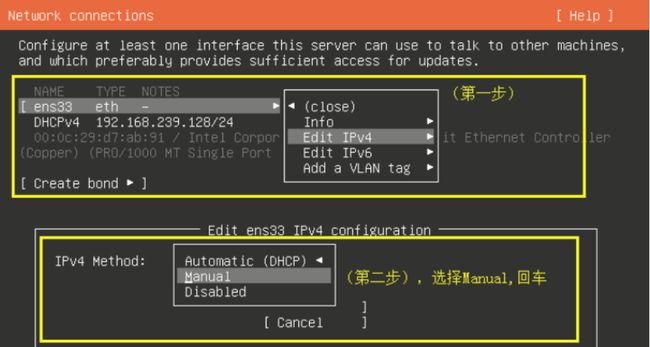
可以选择DHCP获取 IP,有利于新手快速学习,如果读者有IP知识也可以按tab键配置IP相关 地址,如上图中标记。
比如可以参考下面的方式配置网络IP
配置的固定IP地址如上图所示,地址段根据vm默认即可,DNS为公共可用DNS。
选择代理
选择代理,这里直接使用默认的设置即可。
选择软件源
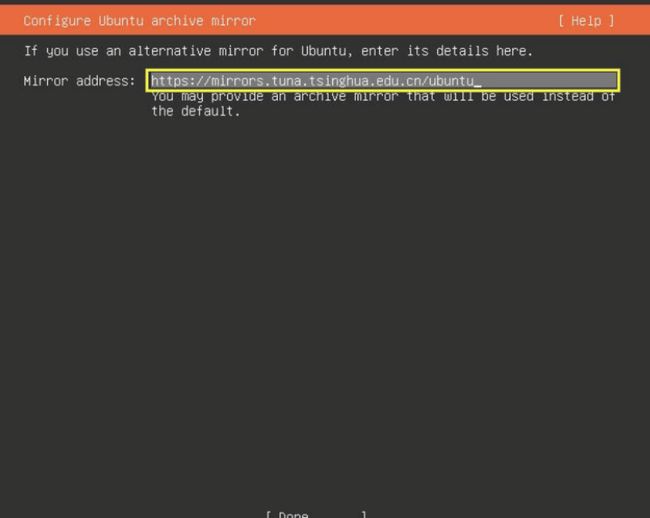
如果开启联网,ubuntu 默认会选择根据软件源进行下载。如果需要联网更新这里可以配置清华源的地址:
https://mirrors.tuna.tsinghua.edu.cn/ubuntu
注意:可以选择VM外的粘贴功能粘贴进去,清华源有ubuntu20,有的源没有,此处也可安装完毕配置。
磁盘分区
新手建议直接使用官方给的默认分区配置。这里就选择默认的使用整块磁盘自动分区。
磁盘分区信息预览
最后是分区的信息预览,这里直接Done即可。
提示:确认是否继续,继续后会对磁盘进行格式化会破坏磁盘数据,如果是宿主机系统重装建议提前备份。
配置系统信息
配置系统主机名、登录用户和密码。
OpenSSL安装
这里需要手动勾选一下,按空格键勾选图中的小方框内为小叉子,然后按tab键选择Done继续。
可选安装
Ubuntu提供一些流行的常见运维工具提供默认安装,比如云服务器的构建,K8S,Docker的软件。
这里个人勾选了docker和powershell。
最后等待安装即可。
注意安装过程中可能出现报错,此处为卸载光驱失败了,因为是虚拟机安装,可不用理会,按回车重启即可。
当安装完成之后,最下方的界面会提示重启或者查看全部日志。我们选择重启然后等待Ubuntu做最后的初始化操作即可。
重启完成之后使用上面系统信息配置的用户登陆即可。注意这个用户不是ROOT,但是具备和ROOT相同的权限。
Root用户配置
Ubuntu 在第一次登陆之后需要设置ROOT用户的密码,切换Root和重新设置密码的命令如下:
修改root密码
sudo passwd root切换root账户
sudo su注意默认情况下无法用Root远程登陆。
Root 远程登陆
默认Ubuntu不允许root远程登录,后期如果想通过root登陆系统则必须修改SSH配置文件中的相关参数 才行。
sudo vim /etc/ssh/sshd_config PermitRootLogin yes修改之后需要重启SSHD后台进程:
sudo systemctl restart sshdXshell 远程连接
检查设置
如果在之前的安装步骤中没有安装OpenSSL,可以使用下面的命令安装:
sudo apt-get install openssh-server在连接之前,需要保证 xshell 所在主机 和 ubuntu( 虚拟机 ) 相互能平通,因为ssh远程连接是通过网络连接的,如果网络不通,就无法连接。
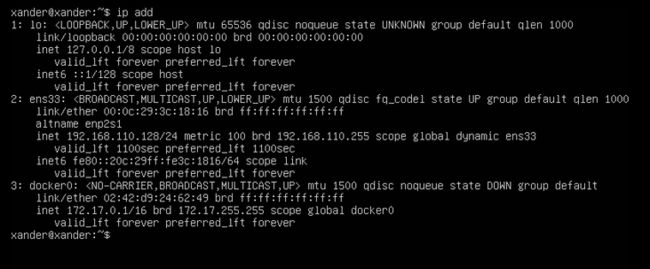
Ubuntu 系统使用ip addr命令查看网络IP,Windows主机使用ipconfig查看网络IP:
ip addrWindow主机地址如下:
双方向主机Ping一下,如果都能联通,可以进行下一步,否则需要检查网卡配置是否正确。
Xshell连接配置
个人使用的版本为Xshell7教育版,在下面的界面中新建一个SSH远程连接,配置如下:
第一次连接Xshell会警告安全性,直接同意即可,接着是提示输入用户名和密码。注意在默认情况下Ubuntu是不能用Root登陆的。
Connecting to 192.168.110.128:22...
Connection established.
To escape to local shell, press 'Ctrl+Alt+]'.

Welcome to Ubuntu 22.04.1 LTS (GNU/Linux 5.15.0-57-generic x86_64)

 * Documentation:  https://help.ubuntu.com
 * Management:     https://landscape.canonical.com
 * Support:        https://ubuntu.com/advantage

  System information as of Sun Jan  8 06:45:58 AM UTC 2023

  System load:  0.0078125          Processes:                226
  Usage of /:   41.8% of 13.67GB   Users logged in:          1
  Memory usage: 12%                IPv4 address for docker0: 172.17.0.1
  Swap usage:   0%                 IPv4 address for ens33:   192.168.110.128


60 updates can be applied immediately.
To see these additional updates run: apt list --upgradable


Last login: Sun Jan  8 03:46:40 2023 from 192.168.110.1
xander@xander:~$
配置apt源
Ubuntu 使用的是apt命令进行安装的,如果之前未进行软件源,会使用Ubuntu的官网镜像默认的地址,基本等于说是在国外,如果要替换,可以使用下面的方案。
清华大学的镜像站的配置网站如下:
ubuntu | 镜像站使用帮助 | 清华大学开源软件镜像站 | Tsinghua Open Source Mirror
清华大学开源软件源配置方式
下面直接拷贝网站的内容。
本镜像仅包含 32/64 位 x86 架构处理器的软件包,在 ARM(arm64, armhf)、PowerPC(ppc64el)、RISC-V(riscv64) 和 S390x 等架构的设备上(对应官方源为ports.ubuntu.com)请使用 ubuntu-ports 镜像。
手动替换
Ubuntu 的软件源配置文件是 /etc/apt/sources.list。
xander@xander:~$ sudo vim /etc/apt/sources.list
# See http://help.ubuntu.com/community/UpgradeNotes for how to upgrade to
# newer versions of the distribution.
deb https://mirrors.tuna.tsinghua.edu.cn/ubuntu jammy main restricted
# deb-src https://mirrors.tuna.tsinghua.edu.cn/ubuntu jammy main restricted

## Major bug fix updates produced after the final release of the
## distribution.
deb https://mirrors.tuna.tsinghua.edu.cn/ubuntu jammy-updates main restricted
# deb-src https://mirrors.tuna.tsinghua.edu.cn/ubuntu jammy-updates main restricted

## N.B. software from this repository is ENTIRELY UNSUPPORTED by the Ubuntu
## team. Also, please note that software in universe WILL NOT receive any
## review or updates from the Ubuntu security team.
deb https://mirrors.tuna.tsinghua.edu.cn/ubuntu jammy universe
# deb-src https://mirrors.tuna.tsinghua.edu.cn/ubuntu jammy universe
deb https://mirrors.tuna.tsinghua.edu.cn/ubuntu jammy-updates universe
# deb-src https://mirrors.tuna.tsinghua.edu.cn/ubuntu jammy-updates universe

## N.B. software from this repository is ENTIRELY UNSUPPORTED by the Ubuntu
## team, and may not be under a free licence. Please satisfy yourself as to
## your rights to use the software. Also, please note that software in
## multiverse WILL NOT receive any review or updates from the Ubuntu
## security team.
deb https://mirrors.tuna.tsinghua.edu.cn/ubuntu jammy multiverse
# deb-src https://mirrors.tuna.tsinghua.edu.cn/ubuntu jammy multiverse
deb https://mirrors.tuna.tsinghua.edu.cn/ubuntu jammy-updates multiverse
# deb-src https://mirrors.tuna.tsinghua.edu.cn/ubuntu jammy-updates multiverse

## N.B. software from this repository may not have been tested as
## extensively as that contained in the main release, although it includes
## newer versions of some applications which may provide useful features.
## Also, please note that software in backports WILL NOT receive any review
## or updates from the Ubuntu security team.
deb https://mirrors.tuna.tsinghua.edu.cn/ubuntu jammy-backports main restricted universe multiverse
# deb-src https://mirrors.tuna.tsinghua.edu.cn/ubuntu jammy-backports main restricted universe multiverse

deb https://mirrors.tuna.tsinghua.edu.cn/ubuntu jammy-security main restricted
# deb-src https://mirrors.tuna.tsinghua.edu.cn/ubuntu jammy-security main restricted
deb https://mirrors.tuna.tsinghua.edu.cn/ubuntu jammy-security universe
# deb-src https://mirrors.tuna.tsinghua.edu.cn/ubuntu jammy-security universe
deb https://mirrors.tuna.tsinghua.edu.cn/ubuntu jammy-security multiverse
# deb-src https://mirrors.tuna.tsinghua.edu.cn/ubuntu jammy-security multiverse
手动替换的方式可以参考网站,因为不同的版本替换方式不太一样,这里为22.04LTS的版本。
# 默认注释了源码镜像以提高 apt update 速度,如有需要可自行取消注释
deb https://mirrors.tuna.tsinghua.edu.cn/ubuntu/ jammy main restricted universe multiverse
# deb-src https://mirrors.tuna.tsinghua.edu.cn/ubuntu/ jammy main restricted universe multiverse
deb https://mirrors.tuna.tsinghua.edu.cn/ubuntu/ jammy-updates main restricted universe multiverse
# deb-src https://mirrors.tuna.tsinghua.edu.cn/ubuntu/ jammy-updates main restricted universe multiverse
deb https://mirrors.tuna.tsinghua.edu.cn/ubuntu/ jammy-backports main restricted universe multiverse
# deb-src https://mirrors.tuna.tsinghua.edu.cn/ubuntu/ jammy-backports main restricted universe multiverse
deb https://mirrors.tuna.tsinghua.edu.cn/ubuntu/ jammy-security main restricted universe multiverse
# deb-src https://mirrors.tuna.tsinghua.edu.cn/ubuntu/ jammy-security main restricted universe multiverse

# 预发布软件源,不建议启用
# deb https://mirrors.tuna.tsinghua.edu.cn/ubuntu/ jammy-proposed main restricted universe multiverse
# deb-src https://mirrors.tuna.tsinghua.edu.cn/ubuntu/ jammy-proposed main restricted universe multiverse
命令替换
命令替换的方式使用下面的命令即可。
sudo sed -i "s@http://.*archive.ubuntu.com@https://mirrors.tuna.tsinghua.edu.cn@g" /etc/apt/sources.list
sudo sed -i "s@http://.*security.ubuntu.com@https://mirrors.tuna.tsinghua.edu.cn@g" /etc/apt/sources.list
apt简介
- apt等同于Centos7的yum命令
- apt-get是第一代的包管理工具,最稳定
- apt是改进的包管理工具,比apt-get要先进,官方推荐使用apt来管理软件
apt和CenterOs系统的区别如下:
| 操作内容 | Centos6/7 | Debian/Ubuntu |
|---|---|---|
| 1.软件包后缀 | *.rpm | *.deb |
| 2.软件源配置文件 | /etc/yum.conf | /etc/apt/sources.list |
| 3.更新软件包列表 | yum makecache fast | apt update |
| 4.从软件仓库安装软件 | yum install package | apt install package |
| 5.安装本地软件包 | rpm -i pkg.rpm | dpkg -i pkg.deb |
| 6.删除软件包 | yum remove package | apt remove package |
| 7.获取某软件包的信息 | yum search package | apt search package |


