无人驾驶虚拟仿真(十二)--图像处理之红绿灯识别
简介:在交通地图中有红绿灯组件,一般放置在T形或者十字路口处,车辆行驶过程中,需要检测红绿灯信号来控制车辆启停,以符合基本的交通规则。红绿灯识别基本分为图像截取、斑点检测、颜色识别三步来实现。
1、新建地图
为了完成红绿灯检测,我们需要创建一个有红绿灯的仿真环境,地图文件如下:
注:地图文件保存路径请参考第一章说明,同时修改duckiebot_node配置文件内的map-name配置
tiles:
- [floor  , floor       , floor     , floor      , floor         , floor         , floor         , floor  ]
- [floor  , curve_left/W, straight/W, 3way_left/W, straight/W    , straight/W    , curve_left/N  , floor  ]
- [floor  , straight/S  , floor     , straight/N , floor         , floor         , straight/N    , floor  ]
- [floor  , 3way_left/S , straight/W, 4way       , straight/E    , straight/E    , 3way_left/N   , floor  ]
- [floor  , straight/S  , floor     , straight/S , floor         , floor         , straight/N    , floor  ]
- [floor  , straight/S  , floor     , straight/S , floor         , curve_right/N , curve_left/E  , floor  ]
- [floor  , curve_left/S, straight/E, 3way_left/E, straight/E    , curve_left/E  , floor         , floor  ]
- [floor  , floor       , floor     , floor      , floor         , floor         , floor         , floor  ]

objects:
  trafficlight1:
    kind: trafficlight
    place:
      tile: [3,4]
      relative:
        ~SE2Transform:
          p: [-0.18,-0.18]
          theta_deg: 135
    height: 0.3
    optional: true
  trafficlight2:
    kind: trafficlight
    place:
      tile: [6,4]
      relative:
        ~SE2Transform:
          p: [-0.18,-0.18]
          theta_deg: 135
    height: 0.3
    optional: true
  trafficlight3:
    kind: trafficlight
    place:
      tile: [1,4]
      relative:
        ~SE2Transform:
          p: [-0.18,-0.18]
          theta_deg: 135
    height: 0.3
    optional: true
  trafficlight4:
    kind: trafficlight
    place:
      tile: [3,6]
      relative:
        ~SE2Transform:
          p: [-0.18,-0.18]
          theta_deg: 135
    height: 0.3
    optional: true
  trafficlight5:
    kind: trafficlight
    place:
      tile: [3,1]
      relative:
        ~SE2Transform:
          p: [-0.18,-0.18]
          theta_deg: 135
    height: 0.3
    optional: true

tile_size: 0.585
地图是一个8*8的地图,周围一圈空地,实际面积是6*6的,有4个丁字路口,一个十字路口,每个路口预设一个红绿灯,并有一个连续弯道:
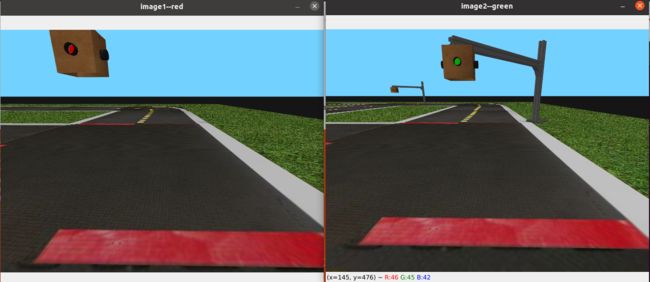
参考前面章节,截两张红绿灯的图片:
2、图片截取
当车辆运行到红绿灯附近时,红绿灯在车辆视野中的位置基本都是偏上偏左,所以截取左上区域的图片进行处理,以减少计算量:
h, w, n = image.shape #获取原始图片尺寸
crop_norm = [[0.0, 0.2], [0.0, 0.6]] #设定截取比例,上下:0~20%,左右0~60%
h_start = int(np.floor(h * crop_norm[0][0]))
h_end = int(np.ceil(h * crop_norm[0][1]))
w_start = int(np.floor(w * crop_norm[1][0]))
w_end = int(np.ceil(w * crop_norm[1][1]))
img_tl = image[h_start:h_end, w_start:w_end, :] #获得交通灯所在区域图像
3、斑点检测
斑点检测采用霍夫圆检测的方法
HoughCircles(gray,cv2.HOUGH_GRADIENT,5,15,param1,param2,minRadius,maxRadius)
gray:对一幅彩色图片进行处理之后的单通道灰度图片
HOUGH_GRADIENT:是使用霍夫梯度法检测圆
5:这个参数是double类型的dp,用来检测圆心的累加器图像的分辨率于输入图像之比的倒数,且此参数允许创建一个比输入图像分辨率低的累加器。上述文字不好理解的话,来看例子吧。例如,如果dp= 1时,累加器和输入图像具有相同的分辨率。如果dp=2,累加器便有输入图像一半那么大的宽度和高度
15:被检测到的圆心的最小距离. 如果该参数很小, 除了一个正确的圆之外, 该圆的邻居也可能被错误地检测出来. 如果该参数很大,一些圆将可能被错过
param1:此参数是对应Canny边缘检测的最大阈值,最小阈值是此参数的一半 也就是说像素的值大于param1是会检测为边缘
param2:它表示在检测阶段圆心的累加器阈值。它越小的话,就可以检测到更多根本不存在的圆,而它越大的话,能通过检测的圆就更加接近完美的圆形了
minRadius:表示能够检测的最小圆的半径
maxRadius:表示能够检测的最大圆的半径
#霍夫圆检测需要用灰度图
gray = cv2.cvtColor(img_tl, cv2.COLOR_BGR2GRAY)
#霍夫圆检测:
circles = cv2.HoughCircles(gray,cv2.HOUGH_GRADIENT,5,15,param1=120,param2=40,minRadius=3,maxRadius=15)
3、感兴趣区域截取:根据检测到的圆的圆心坐标和半径,截取红绿灯图片
if circles1 is not None:
    circles1 = np.uint16(np.around(circles1)) #数据转化为整数
    for circle in circles1[0,:]: #圆心靠近边界防止坐标成为负数,适当扩大范围
        if circle[0] < circle[2]:
            circle[0] = circle[2]
        if circle[1] < circle[2]:
            circle[1] = circle[2]
        #截取红绿灯图片
        roi = image1[(circle[1]-circle[2]):(circle[1]+circle[2]),(circle[0]-circle[2]):(circle[0]+circle[2])]
        #检测颜色
        r = detectColor(roi)
4、检测颜色
在截取到的红绿灯图片中通过处理计算红色点与绿色点的数量,数量大的颜色且数量超过60,认定为该颜色。
def detectColor(image):
    #转化为HSV颜色格式
    hsv_img = cv2.cvtColor(image,cv2.COLOR_BGR2HSV)
    #设定颜色检测范围
    red_min = np.array([0,43,46])
    red_max = np.array([10,255,255])
    red_min2 = np.array([156,43,46])
    red_max2 = np.array([180,255,255])
    green_min = np.array([35,43,46])
    green_max = np.array([77,255,255])
    #利用cv2.inRange函数设阈值,去除背景部分
    red_thresh = cv2.inRange(hsv_img,red_min,red_max)+cv2.inRange(hsv_img,red_min2,red_max2)
    green_thresh = cv2.inRange(hsv_img,green_min,green_max)
    # 进行中值滤波
    red_blur = cv2.medianBlur(red_thresh,5)
    green_blur = cv2.medianBlur(green_thresh,5)
    #计算红色和绿色的点的数量
    red = cv2.countNonZero(red_blur)
    green = cv2.countNonZero(green_blur)
    #取较大值
    lightColor = max(red,green)
    if lightColor > 60: #有效点数量大于60认为检测到红绿灯
        if lightColor == red: #红色返回1
            return 1
        elif lightColor == green: #绿色返回-1
            return -1
    else: #否则认定为误检测,返回0
        return 0
5、统计结果
同一张图片中可能存在误检测出来的圆,统计所有圆颜色检测结果,结果求和,和大于0认定检测到红灯,小于0检测到绿灯:
image1 = cv2.imread("images/red.png")
image2 = cv2.imread("images/green.png")
circles1 = detectState(image1)
circles2 = detectState(image2)
result1 = 0
result2 = 0
if circles1 is not None:
    circles1 = np.uint16(np.around(circles1))
    for circle in circles1[0,:]:
        if circle[0] < circle[2]:
            circle[0] = circle[2]
        if circle[1] < circle[2]:
            circle[1] = circle[2]
        roi = image1[(circle[1]-circle[2]):(circle[1]+circle[2]),(circle[0]-circle[2]):(circle[0]+circle[2])]
        r = detectColor(roi)
        result1 += r
if result1>0:
    cv2.imshow("image1--red", image1)
elif result1<0:
    cv2.imshow("image1--green", image1)

if circles2 is not None:
    circles2 = np.uint16(np.around(circles2))
    for circle in circles2[0,:]:
        if circle[0] < circle[2]:
            circle[0] = circle[2]
        if circle[1] < circle[2]:
            circle[1] = circle[2]
        roi = image2[(circle[1]-circle[2]):(circle[1]+circle[2]),(circle[0]-circle[2]):(circle[0]+circle[2])]
        r = detectColor(roi)
        result2 += r
if result2>0:
    cv2.imshow("image2--red", image2)
6、功能移植到ROS平台
进入工作空间目录:
$ cd ~/myros/catkin_ws/src
创建新功能包:
$ catkin_create_pkg traffic_light rospy duckietown_msgs std_msgs
创建配置文件:
$ mkdir -p traffic_light/config/traffic_light_node
$ touch traffic_light/config/traffic_light_node/default.yaml
新建启动脚本:
$ mkdir -p traffic_light/launch
$ touch traffic_light/launch/start.launch
新建源码文件
$ touch traffic_light/src/traffic_light_node.py
修改编译配置文件
$ gedit traffic_light/CMakeLists.txt
修改为:
编辑配置文件:
$ gedit traffic_light/config/traffic_light_node/default.yaml
min_point_count: 60
crop_norm: [[0.0, 0.2], [0.0, 0.6]]
dp: 5
minDist: 15
param1: 120
param2: 40
minRadius: 3
maxRadius: 15
编辑源码文件:
$ gedit traffic_light/src/traffic_light_node.py
#!/usr/lib/env python3

import rospy
import cv2
import numpy as np
import math
from cv_bridge import CvBridge

from std_msgs.msg import Bool
from sensor_msgs.msg import Image,CompressedImage

class TrafficLightNode():
    def __init__(self):
        rospy.init_node("traffic_light_node", anonymous=False)
        self.bridge = CvBridge()
        #红线检测标志
        self.stop_line_flag = False
        #有效点数量
        self.min_point_count = rospy.get_param('~min_point_count', default=60)
        #红绿灯截取参数
        self.crop_norm = rospy.get_param('~crop_norm', default=[[0.0, 0.2], [0.0, 0.6]])
        #霍夫圆检测参数设置
        self.dp = rospy.get_param('~dp', default=5)
        self.minDist = rospy.get_param('~minDist', default=15)
        self.param1 = rospy.get_param('~param1', default=120)
        self.param2 = rospy.get_param('~param2', default=40)
        self.minRadius = rospy.get_param('~minRadius', default=3)
        self.maxRadius = rospy.get_param('~maxRadius', default=15)
        #订阅图像话题
        rospy.Subscriber("~image/compressed", CompressedImage, self.cb_image)
        #订阅红线检测话题,检测到红线时才进行红绿灯识别,减少计算量
        rospy.Subscriber("~detected", Bool, self.cb_stop_line)
        self.pub_tl_info = rospy.Publisher("~tlState", Bool, queue_size=10)

    def cb_image(self, msg):
        if self.stop_line_flag: #红线检测结果
            image = self.bridge.compressed_imgmsg_to_cv2(msg)
            result = self.detect(image)
            if result>0:
                self.pub_tl_info.publish(Bool(data=True))
            elif result<0:
                self.pub_tl_info.publish(Bool(data=False))

    def cb_stop_line(self, msg):
        self.stop_line_flag = msg.data

    def detect(self, image):
        h, w, n = image.shape
        h_start = int(np.floor(h * self.crop_norm[0][0]))
        h_end = int(np.ceil(h * self.crop_norm[0][1]))
        w_start = int(np.floor(w * self.crop_norm[1][0]))
        w_end = int(np.ceil(w * self.crop_norm[1][1]))
        img_tl = image[h_start:h_end, w_start:w_end, :]
        gray = cv2.cvtColor(img_tl, cv2.COLOR_BGR2GRAY)
        circles = cv2.HoughCircles(gray,cv2.HOUGH_GRADIENT,self.dp,self.minDist,param1=self.param1,param2=self.param2,minRadius=self.minRadius,maxRadius=self.maxRadius)
        result = []
        if circles is not None:
            circles = np.uint16(np.around(circles))
            for circle in circles[0,:]:
                if circle[0] < circle[2]:
                    circle[0] = circle[2]
                if circle[1] < circle[2]:
                    circle[1] = circle[2]
                roi = image[(circle[1]-circle[2]):(circle[1]+circle[2]),(circle[0]-circle[2]):(circle[0]+circle[2])]
                color = self.detectColor(roi)
                result.append(color)
            return np.sum(result)
        else:
            return 0

    def detectColor(self, image):
        hsv_img = cv2.cvtColor(image,cv2.COLOR_BGR2HSV)
        red_min = np.array([0,43,46])
        red_max = np.array([10,255,255])
        red_min2 = np.array([156,43,46])
        red_max2 = np.array([180,255,255])
        green_min = np.array([35,43,46])
        green_max = np.array([77,255,255])
        red_thresh = cv2.inRange(hsv_img,red_min,red_max)+cv2.inRange(hsv_img,red_min2,red_max2)
        green_thresh = cv2.inRange(hsv_img,green_min,green_max)
        # 进行中值滤波
        red_blur = cv2.medianBlur(red_thresh,5)
        green_blur = cv2.medianBlur(green_thresh,5)
        red = cv2.countNonZero(red_blur)
        green = cv2.countNonZero(green_blur)
        lightColor = max(red,green)
        if lightColor > self.min_point_count:
            if lightColor == red:
                return 1
            elif lightColor == green:
                return -1
        else:
            return 0

if __name__=='__main__':
    node = TrafficLightNode()
    rospy.spin()
编辑启动脚本:
$ gedit traffic_light/launch/start.launch
编译:
$ cd ~/myros/catkin_ws
$ catkin_make
编辑多节点启动文件
$ gedit start.launch
启动程序:
$ source devel/setup.bash
$ roslaunch start.launch
启动程序,经过测试,发现红线检测范围过小,会因为延迟导致不停车,修改红线检测配置文件,
alarm_dist: 0.12修改后重新运行,可正常停车。


