深度学习案例1:验证码识别
运行配置:
tensorflow: 2.1.0
keras:2.2.4-tf
cpu训练
1 验证码数据集
数据集来自于Kaggle,可以点击captcha_images_v2进行下载,将文件解压到指定项目中备用。
数据集格式:文件,文件名就是标签
首先从文件名提取对于标签,并从标签中找到所有字符集。
# 数据集的路径
data_dir = Path("myworkspace/captcha/captcha_images_v2/")

# 获取所有的图片
images = sorted(list(map(str, list(data_dir.glob("*.png")))))

# 从文件名中提取标签
labels = [img.split(os.path.sep)[-1].split(".png")[0] for img in images]

# 从标签中提取所有的字符
characters = set(char for label in labels for char in label)
将标签转成dict,char_to_num方便我们将标签转成one hot整型数字用于训练模型,通过num_to_char 从预测结果中获得相应字符。
# 将字符串映射整型
char_to_num = dict((c, i) for c, i in enumerate(characters))
print(char_to_num)

# 通过整型获取对应的字符
num_to_char = dict((i, c) for c, i in enumerate(characters))
将验证码数据集分成测试集和验证集
# 将数据集分为测试集和验证集
def split_data(images, labels, train_size=0.9, shuffle=True):
    # 1. 获得总共数据集的大小
 	size = len(images)
    # 2. 打乱数组的索引
 	indices = np.arange(size)
    if shuffle:
        np.random.shuffle(indices)
    # 3. 获取训练集的大小
 	train_samples = int(size * train_size)
    # 4. 将数据集分为测试集和验证集
 	x_train, y_train = images[indices[:train_samples]], labels[indices[:train_samples]]
    x_valid, y_valid = images[indices[train_samples:]], labels[indices[train_samples:]]
    return x_train, x_valid, y_train, y_valid
将上一步得到的文件路径转成图片数据
# 将训练集和验证集中的路径转成图片数组以及将标签转成字符数组
def encode_single_sample(img_path, label):
    # 1. 读图片文件
 	img = tf.io.read_file(img_path)
    # 2. 编码并转成灰阶
 	img = tf.io.decode_png(img, channels=1)
    # 3. 正则化在[0-1]之间
 	img = tf.image.convert_image_dtype(img, tf.float32)
    # 4. 转成我们想要的图片尺寸。
 	img = tf.image.resize(img, [img_height, img_width])
    # 5. 将字符转成整型数组
 	label = [num_to_char[i] for i in label]
    return img, label
转成模型想要的数据格式[samples,images,labels]
# 获取训练集
def get_train_dataset(dataset_size):
    data_x = []
    data_y = []
    for index in range(dataset_size):
        x, y = encode_single_sample(x_train[index], y_train[index])
        data_x.append(x)
        data_y.append(y)

    data_x = numpy.asarray(data_x)
	# 转成one hot编码
    data_y = to_categorical(data_y)
    data_x = data_x.reshape(-1, img_height, img_width, 1)  # normalize
 	return data_x, data_y
2 网络结构
代码实现如下:
model = Sequential()
model.add(layers.Conv2D(input_shape=(img_height, img_width, 1),
                        filters=32,
                        kernel_size=(3, 3),
                        activation=tf.keras.activations.elu))
model.add(layers.MaxPooling2D(pool_size=(2, 2)))

model.add(layers.Conv2D(
    filters=64,
    kernel_size=(3, 3),
    activation=tf.keras.activations.tanh))
model.add(layers.MaxPooling2D(pool_size=(2, 2)))

model.add(layers.Flatten())
model.add(layers.Dense(1000, activation=tf.keras.activations.tanh))
model.add(layers.Dense(180, activation=tf.keras.activations.tanh))
model.add(layers.Dense(5 * 19, activation='softmax'))
model.add(layers.Reshape([5, 19]))

model.compile(optimizer=tf.keras.optimizers.Adam(),
              loss=tf.keras.losses.CategoricalCrossentropy(),
              metrics=['accuracy'])
print(model.summary())

history = model.fit(data_x, data_y, batch_size=50, epochs=100, verbose=2)
3 编译
优化器采用的adam,损失函数采用的CategoricalCrossentropy。
model.compile(optimizer=tf.keras.optimizers.Adam(),
              loss=tf.keras.losses.CategoricalCrossentropy(),
              metrics=['accuracy', 'loss'])
4 训练
batch_size=50,epochs=100,训练的效果已经很不错了,当我设置batch_size=1时,无法收敛,可能是数据量和epoch设置的不够。
# 训练
history = model.fit(data_x, data_y, batch_size=50, epochs=100, verbose=2)
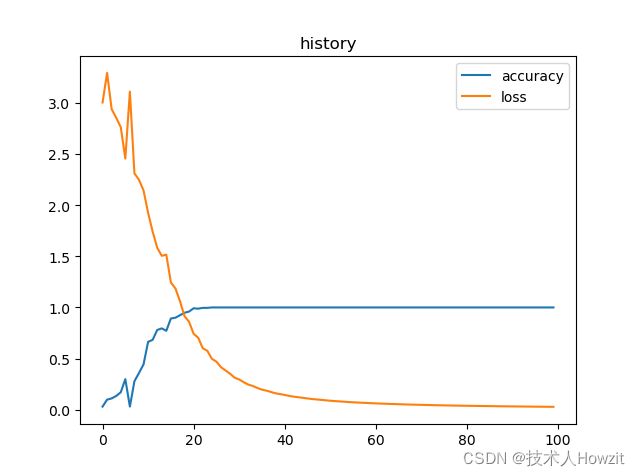
从上面结果可以看出,虽然只用了50数据集,epoch=100,但是准确率还是提高的。
50/50 - 0s - loss: 0.0283 - accuracy: 1.0000
Epoch 96/100
50/50 - 0s - loss: 0.0280 - accuracy: 1.0000
Epoch 97/100
50/50 - 0s - loss: 0.0276 - accuracy: 1.0000
Epoch 98/100
50/50 - 0s - loss: 0.0273 - accuracy: 1.0000
Epoch 99/100
50/50 - 0s - loss: 0.0270 - accuracy: 1.0000
Epoch 100/100
50/50 - 0s - loss: 0.0267 - accuracy: 1.0000
绘制训练历史记录
plt.plot(history.history["accuracy"], label='accuracy')
plt.plot(history.history['loss'], label='loss')
plt.legend()
plt.title('history')
plt.show()
5 结果
附件完整代码
为了方便你验证和学习,提供了完整代码。
import os
from pathlib import Path

import matplotlib.pyplot as plt
import numpy
import numpy as np
import tensorflow as tf
from tensorflow.keras import layers
from tensorflow.keras.models import Sequential
from tensorflow.keras.utils import to_categorical

# 数据集的路径
data_dir = Path("myworkspace/captcha/captcha_images_v2/")

# 获取所有的图片
images = sorted(list(map(str, list(data_dir.glob("*.png")))))
# 从文件名中提取标签
labels = [img.split(os.path.sep)[-1].split(".png")[0] for img in images]
# 从标签中提取所有的字符
characters = set(char for label in labels for char in label)

print("Number of images found: ", len(images))
print("Number of labels found: ", len(labels))
print("Number of unique characters: ", len(characters))
print("Characters present: ", characters)

# Desired image dimensions
img_width = 200
img_height = 50

"""
## Preprocessing
"""

# Mapping characters to integers
char_to_num = dict((c, i) for c, i in enumerate(characters))
print(char_to_num)

# Mapping integers back to original characters
num_to_char = dict((i, c) for c, i in enumerate(characters))


# 将数据集分为测试集和验证集
def split_data(images, labels, train_size=0.9, shuffle=True):
    # 1. 获得总共数据集的大小
 	size = len(images)
    # 2. 打乱数组的索引
 	indices = np.arange(size)
    if shuffle:
        np.random.shuffle(indices)
    # 3. 获取训练集的大小
 	train_samples = int(size * train_size)
    # 4. 将数据集分为测试集和验证集
 	x_train, y_train = images[indices[:train_samples]], labels[indices[:train_samples]]
    x_valid, y_valid = images[indices[train_samples:]], labels[indices[train_samples:]]
    return x_train, x_valid, y_train, y_valid


# Splitting data into training and validation sets
x_train, x_valid, y_train, y_valid = split_data(np.array(images), np.array(labels))


# 将训练集和验证集中的路径转成图片数组以及将标签转成字符数组
def encode_single_sample(img_path, label):
    # 1. 读图片文件
 	img = tf.io.read_file(img_path)
    # 2. 编码并转成灰阶
 	img = tf.io.decode_png(img, channels=1)
    # 3. 正则化在[0-1]之间
 	img = tf.image.convert_image_dtype(img, tf.float32)
    # 4. 转成我们想要的图片尺寸。
 	img = tf.image.resize(img, [img_height, img_width])
    # 5. 将字符转成整型数组
 	label = [num_to_char[i] for i in label]
    return img, label


# 把预测出来的整型数组转成字符串
def vec2text(vec):
    """
 还原标签(向量->字符串)
 """ text = []
    for c in vec:
        text.append(char_to_num[c.numpy()])
    return "".join(text)


# 获取训练集
def get_train_dataset(dataset_size):
    data_x = []
    data_y = []
    for index in range(dataset_size):
        x, y = encode_single_sample(x_train[index], y_train[index])
        data_x.append(x)
        data_y.append(y)

    data_x = numpy.asarray(data_x)
    data_y = to_categorical(data_y)
    data_x = data_x.reshape(-1, img_height, img_width, 1)  # normalize
 	return data_x, data_y
    # X_test = X_test.reshape(-1, 28, 28, 1)  # normalize


# 获取验证集
def get_valid_dataset(dataset_size):
    data_x = []
    data_y = []
    for index in range(dataset_size):
        x, y = encode_single_sample(x_valid[index], y_valid[index])
        data_x.append(x)
        data_y.append(y)

    data_x = numpy.asarray(data_x)
    data_y = to_categorical(data_y)
    data_x = data_x.reshape(-1, img_height, img_width, 1)  # normalize
 	return data_x, data_y


data_x, data_y = get_train_dataset(50)
data_x_test, data_y_test = get_valid_dataset(16)

# 模型
model = Sequential()
model.add(layers.Conv2D(input_shape=(img_height, img_width, 1),
                        filters=32,
                        kernel_size=(3, 3),
                        activation=tf.keras.activations.elu))
model.add(layers.MaxPooling2D(pool_size=(2, 2)))

model.add(layers.Conv2D(
    filters=64,
    kernel_size=(3, 3),
    activation=tf.keras.activations.tanh))
model.add(layers.MaxPooling2D(pool_size=(2, 2)))

model.add(layers.Flatten())
model.add(layers.Dense(1000, activation=tf.keras.activations.tanh))
model.add(layers.Dense(180, activation=tf.keras.activations.tanh))
model.add(layers.Dense(5 * 19, activation='softmax'))
model.add(layers.Reshape([5, 19]))

# 编译
model.compile(optimizer=tf.keras.optimizers.Adam(),
              loss=tf.keras.losses.CategoricalCrossentropy(),
              metrics=['accuracy'])
print(model.summary())
# 训练
history = model.fit(data_x, data_y, batch_size=50, epochs=100, verbose=2)

# 绘制训练历史记录
plt.plot(history.history["accuracy"], label='accuracy')
plt.plot(history.history['loss'], label='loss')
plt.legend()
plt.title('history')
plt.show()

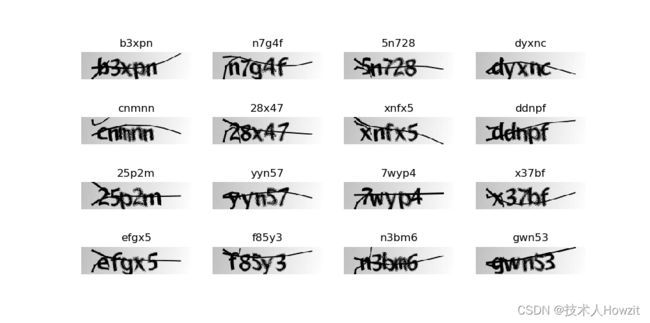
# 通过验证集进行预测
result = model.predict(data_x_test)
result1 = tf.argmax(result, axis=2)

# 预测结果可视化
_, ax = plt.subplots(4, 4, figsize=(10, 5))
for i in range(16):
    img = (data_x_test[i] * 255)
    # label = [char_to_num[c] for c in labels]
    ax[i // 4, i % 4].imshow(img[:, :, 0], cmap='gray')
    ax[i // 4, i % 4].set_title(vec2text(result1[i]))
    ax[i // 4, i % 4].axis("off")
plt.show()
欢迎点赞和交流!!!!!!!!!!!!!!!!!!!


