多目标跟踪DeepSORT 原理与源码理解
0.概述
监控摄像头在保护我们的家庭或企业安全方面起着至关重要的作用。这些相机非常廉价实惠,建立一套监控系统也是如此,其中唯一困难且昂贵的部分是监控。对于实时监控,通常必须指派安全人员或团队。这根本不能做到对任何人都可行。
但是借助计算机视觉和人工智能的力量,我们可以构建出不仅更便宜而且更可靠的东西。监控系统中存在各种CV问题,Object Tracking就是其中之一。
目标跟踪是一种利用空间和时间特征在整个帧中跟踪检测到目标的方法。在本博文中,我们将实现最流行的跟踪算法之一 DeepSORT和YOLOv5 ,并使用MOTA和其他指标在MOT17 数据集上对其进行测试。
1. 跟踪简介
深度学习中的跟踪是利用目标的空间和时间特征预测整个视频中目标位置的任务。从技术上讲,Tracking 是获取初始检测集,分配唯一 ID,并在保持分配的 ID 不变的同时跟踪视频源的整个帧。跟踪通常是一个两步的过程:
用于目标定位的检测模块:该模块负责使用 YOLOv4、CenterNet 等目标检测器检测和定位帧中的目标。
运动预测器:该模块负责使用其过去的信息预测目标的未来运动状态。
1.1 需要跟踪器
您一定会想到一些问题。为什么我们甚至需要一个目标跟踪器?为什么我们不能只使用目标检测器?好吧,你问的是正确的问题。需要跟踪器的原因有很多。
目标检测失败时跟踪:在很多情况下,目标检测器可能会失败。但是如果我们有一个目标跟踪器,它仍然能够预测帧中的目标。例如,考虑一个摩托车穿过树林的视频,我们应用检测器来检测摩托车。在这种情况下会发生以下情况:每当摩托车被树木遮挡或重叠时,检测器就会失效。但是,如果我们有一个跟踪器,我们仍然能够预测和跟踪摩托车。
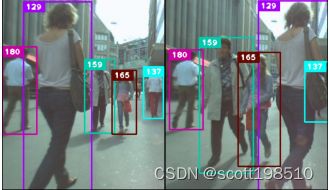
ID 分配:在使用检测器时,它只显示物体的位置,如果我们只看输出数组,我们将不知道哪个坐标属于哪个框。另一方面,跟踪器为它跟踪的每个目标分配一个 ID 并维护该 ID 直到该目标在该帧中的生命周期。
实时预测:跟踪器非常快,通常比检测器快。由于这个特性,Trackers可以在实时场景中使用,在现实世界中有很多应用。
1.2 跟踪的应用
如上一节所述,目标跟踪可以有许多实际应用。
交通监控:跟踪器可用于监控交通并跟踪道路上的车辆。它们可用于判断交通、检测违规行为等,从而产生诸如自动车牌识别系统之类的系统。
运动:跟踪器也可用于运动,如球跟踪或球员跟踪。这反过来又可以用来检测犯规、比赛中的得分手等等。
多机位监控:在Tracking中,可以应用多机位监控。其中,核心思想是Re-Identification。如果一个人在一个带有 id 的摄像机中被跟踪,并且这个人离开画面并在另一个摄像机中出现。然后这个人将保留他们以前拥有的相同身份。此应用程序可以帮助重新识别在不同相机中重新出现的目标,并可用于入侵检测。
2. 跟踪器的种类
跟踪器可以根据许多类别进行分类,例如跟踪方法或要跟踪的目标数量。在本节中,我们将通过一些示例看到不同的跟踪器类型。
2.1 单目标和多目标跟踪器
单目标跟踪器:
这些类型的跟踪器仅跟踪单个目标,即使帧中存在许多其他目标也是如此。他们的工作方式是首先在第一帧中初始化目标的位置,然后在整个帧序列中跟踪它。这些类型的跟踪方法非常快。其中一些是 CSRT、KCF 等,它们是使用传统计算机视觉构建的。然而,现在证明基于深度学习的跟踪器比传统跟踪器准确得多。例如,SiamRPN 和GOTURN 是基于深度学习的单目标跟踪器的例子。
多目标跟踪器:
这些类型的跟踪器可以跟踪帧中存在的多个目标。与传统跟踪器不同,多个目标跟踪器或 MOT 是在大量数据上训练的。因此,它们被证明更准确,因为它们可以同时跟踪多个目标,甚至是不同类别的目标,同时保持高速。一些算法包括 DeepSORT、JDE 和 CenterTrack,它们是非常强大的算法,可以处理跟踪器面临的大部分挑战。
2.2 检测跟踪和非检测跟踪
检测跟踪
这类跟踪算法是指通过目标检测器检测帧中的目标,然后跨帧执行数据关联以生成轨迹从而跟踪目标。这些类型的算法有助于跟踪多个目标和跟踪帧中引入的新目标。最重要的是,即使目标检测失败,它们也有助于跟踪目标。
无检测跟踪
手动初始化目标坐标然后在更多帧中跟踪目标的跟踪算法类型。如前所述,这种类型主要用于传统的计算机视觉算法。
3. DeepSORT简介
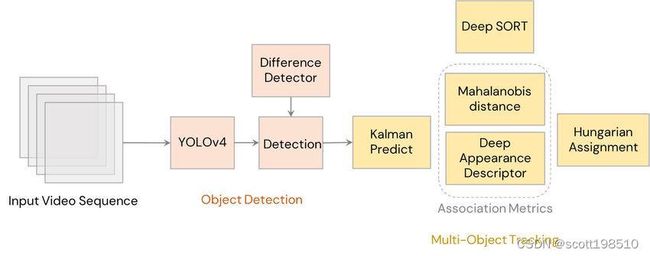
DeepSORT 是一种计算机视觉跟踪算法,用于跟踪目标,同时为每个目标分配一个 ID。DeepSORT 是 SORT(简单在线实时跟踪)算法的扩展。DeepSORT 将深度学习引入 SORT 算法,通过添加外观描述符来减少身份切换,从而使跟踪更加高效。要理解 DeepSORT,首先让我们看看 SORT 算法是如何工作的。
3.1 简单在线实时跟踪(SORT)
SORT 是一种目标跟踪方法,其中使用卡尔曼滤波器和匈牙利算法等基本方法来跟踪目标,并且声称比许多在线跟踪器更好。SORT 由 4 个关键组件组成,如下所示:
检测:这是跟踪模块的第一步。在此步骤中,目标检测器检测帧中要跟踪的目标。然后将这些检测传递到下一步。FrRCNN、YOLO 等检测器是最常用的。
估计:在这一步中,我们将检测从当前帧传播到下一帧,即使用恒速模型估计目标在下一帧中的位置。当检测与目标相关联时,检测到的边界框用于更新目标状态,其中速度分量通过卡尔曼滤波器框架得到最佳求解。
数据关联:我们现在有了目标边界框和检测到的边界框。因此,代价矩阵cost matrix被计算为每个检测与现有目标的所有预测边界框之间的交叉联合(IOU)距离。使用匈牙利算法最佳地解决了分配问题。如果检测和目标的 IOU 小于称为 IOUmin 的某个阈值,则该分配将被拒绝。该技术解决了遮挡问题并有助于维护 ID。
Track Identities的创建和删除:该模块负责ID的创建和移除。唯一身份根据 IOU min创建和销毁。如果检测和目标的重叠小于 IOU min,则表示未跟踪目标。如果在 阈值TLost 帧中未检测到,轨迹将被终止,可以自行指定 TLost 的帧数。如果一个目标重新出现,跟踪将隐式地以新的身份ID恢复。
可以使用击败许多最先进算法的 SORT 算法成功跟踪目标。检测器为我们提供检测,卡尔曼滤波器为我们提供轨迹,匈牙利算法执行数据关联。那么,为什么我们甚至需要 DeepSORT?让我们在下一节中看一下。
3.2 深度排序
SORT 在跟踪精度和准确性方面表现非常出色。但是 SORT 会返回具有大量 ID 切换的轨迹,并且在遮挡的情况下会失败。这是因为使用了关联矩阵。DeepSORT 使用更好的关联度量,结合了运动和外观描述符。DeepSORT 可以定义为一种跟踪算法,它不仅基于目标的速度和运动,还基于目标的外观来跟踪目标。
出于上述目的,在实施跟踪之前离线训练了一个区分度很好的特征嵌入模型。该网络模型在大规模人员重新识别re-identification数据集上进行训练,使其适用于跟踪上下文。在 DeepSORT 余弦度量学习方法中训练深度关联度量模型。根据 DeepSORT 的论文,“余弦距离考虑的外观信息对于在长期遮挡后运动辨别力较低时恢复身份特别有用。" 这意味着余弦距离是一种度量,可帮助模型在长期遮挡和运动估计也失败的情况下恢复身份。使用这些简单的东西可以使跟踪器更加强大和准确。
4. DeepSORT 实现
正如前面部分所讨论的,DeepSORT 可以用于各种现实生活中的应用程序,其中之一就是运动。在本节中,我们将在足球和 100 米赛跑等运动中实施 DeepSORT。与 DeepSORT 一起,YOLOv5 将用作检测器来检测所需的目标。该代码是在 Tesla T4 GPU 上的 Google Colab 上实现的。
这是一种基于锚点 anchor-based的方法。FairMOT 遵循无锚 MOT方法。
4.1 YOLOv5 实现
首先,我们将克隆 YOLOv5 官方代码库以访问功能和预训练权重。
$ mkdir ./yolov5_deepsort
$ git clone https://github.com/ultralytics/yolov5.git
安装要求
$ cd ./yolov5
$ pip install -r requirements.txt
现在我们已经准备好 YOLOv5,让我们将 DeepSORT 与其集成。
4.2 集成 DeepSORT
同样,我们将克隆 DeepSORT 的官方实现以访问其代码和功能。
$ git clone https://github.com/nwojke/deep_sort.git最后,一切就绪!但是 DeepSORT 将如何与检测器集成?YOLOv5的detect.py file负责推理。我们将使用该detect.py文件并将使用它的 DeepSORT 功能添加到新文件中detect_track.py.
%%writefile detect_track.py
# YOLOv5 ? by Ultralytics, GPL-3.0 license.
"""
Run inference on images, videos, directories, streams, etc.

Usage - sources:
    $ python path/to/detect.py --weights yolov5s.pt --source 0
 # webcam

 img.jpg      # image

 vid.mp4       # video

path/         # directory

path/*.jpg    # glob

'https://youtu.be/Zgi9g1ksQHc'  # YouTube

'rtsp://example.com/media.mp4'  # RTSP, RTMP, HTTP stream
"""

import argparse
import os
import sys
from pathlib import Path

import torch
import torch.backends.cudnn as cudnn

FILE = Path(__file__).resolve()
ROOT = FILE.parents[0]  # YOLOv5 root directory.
if str(ROOT) not in sys.path:
    sys.path.append(str(ROOT))  # Add ROOT to PATH.
ROOT = Path(os.path.relpath(ROOT, Path.cwd()))  # Relative.

# DeepSORT -> Importing DeepSORT.
from deep_sort.application_util import preprocessing
from deep_sort.deep_sort import nn_matching
from deep_sort.deep_sort.detection import Detection
from deep_sort.deep_sort.tracker import Tracker
from deep_sort.tools import generate_detections as gdet


from models.common import DetectMultiBackend
from utils.dataloaders import IMG_FORMATS, VID_FORMATS, LoadImages, LoadStreams
from utils.general import (LOGGER, check_file, check_img_size, check_imshow, check_requirements, colorstr, cv2,
                          increment_path, non_max_suppression, print_args, scale_coords, strip_optimizer, xyxy2xywh)
from utils.plots import Annotator, colors, save_one_box
from utils.torch_utils import select_device, time_sync


@torch.no_grad()
def run(
        weights=ROOT / 'yolov5s.pt',  # model.pt path(s)
        source=ROOT / 'data/images',  # file/dir/URL/glob, 0 for webcam
        data=ROOT / 'data/coco128.yaml',  # dataset.yaml path.
        imgsz=(640, 640),  # Inference size (height, width).
        conf_thres=0.25,  # Confidence threshold.
        iou_thres=0.45,  # NMS IOU threshold.
        max_det=1000,  # Maximum detections per image.
        device='',  # Cuda device, i.e. 0 or 0,1,2,3 or cpu.
        view_img=False,  # Show results.
        save_txt=False,  # Save results to *.txt.
        save_conf=False,  # Save confidences in --save-txt labels.
        save_crop=False,  # Save cropped prediction boxes.
        nosave=False,  # Do not save images/videos.
        classes=None,  # Filter by class: --class 0, or --class 0 2 3.
        agnostic_nms=False,  # Class-agnostic NMS.
        augment=False,  # Augmented inference.
        visualize=False,  # Visualize features.
        update=False,  # Update all models.
        project=ROOT / 'runs/detect',  # Save results to project/name.
        name='exp',  # Save results to project/name.
        exist_ok=False,  # Existing project/name ok, do not increment.
        line_thickness=3,  # Bounding box thickness (pixels).
        hide_labels=False,  # Hide labels.
        hide_conf=False,  # Hide confidences.
        half=False,  # Use FP16 half-precision inference.
        dnn=False,  # Use OpenCV DNN for ONNX inference.
):
    source = str(source)
    save_img = not nosave and not source.endswith('.txt')  # Save inference images.
    is_file = Path(source).suffix[1:] in (IMG_FORMATS + VID_FORMATS)
    is_url = source.lower().startswith(('rtsp://', 'rtmp://', 'http://', 'https://'))
    webcam = source.isnumeric() or source.endswith('.txt') or (is_url and not is_file)
    if is_url and is_file:
        source = check_file(source)  # Download.

    # DeepSORT -> Initializing tracker.
    max_cosine_distance = 0.4
    nn_budget = None
    model_filename = './model_data/mars-small128.pb'
    encoder = gdet.create_box_encoder(model_filename, batch_size=1)
    metric = nn_matching.NearestNeighborDistanceMetric("cosine", max_cosine_distance, nn_budget)
    tracker = Tracker(metric)

    # Directories.
    if not os.path.isdir('./runs/'):
      os.mkdir('./runs/')
    save_dir = os.path.join(os.getcwd(), "runs")
    print(save_dir)
    '''save_dir = increment_path(Path(project) / name, exist_ok=exist_ok)  # increment run
    (save_dir / 'labels' if save_txt else save_dir).mkdir(parents=True, exist_ok=True)  # make dir'''

    # Load model.
    device = select_device(device)
    model = DetectMultiBackend(weights, device=device, dnn=dnn, data=data, fp16=half)
    stride, names, pt = model.stride, model.names, model.pt
    imgsz = check_img_size(imgsz, s=stride)  # Check image size.

    # Dataloader.
    if webcam:
        view_img = check_imshow()
        cudnn.benchmark = True  # Set True to speed up constant image size inference.
        dataset = LoadStreams(source, img_size=imgsz, stride=stride, auto=pt)
        bs = len(dataset)  # batch_size.
    else:
        dataset = LoadImages(source, img_size=imgsz, stride=stride, auto=pt)
        bs = 1  # batch_size.
    vid_path, vid_writer = [None] * bs, [None] * bs

    # Run inference.
    model.warmup(imgsz=(1 if pt else bs, 3, *imgsz))  # Warmup.
    dt, seen = [0.0, 0.0, 0.0], 0
    frame_idx=0
    for path, im, im0s, vid_cap, s in dataset:
        t1 =  time_sync()
        im = torch.from_numpy(im).to(device)
        im = im.half() if model.fp16 else im.float()  # uint8 to fp16/32.        im /= 255  # 0 - 255 to 0.0 - 1.0
        if len(im.shape) == 3:
            im = im[None]  # Expand for batch dim.
        t2 = time_sync()
        dt[0] += t2 - t1

        # Inference.
        visualize = increment_path(save_dir / Path(path).stem, mkdir=True) if visualize else False
        pred = model(im, augment=augment, visualize=visualize)
        t3 = time_sync()
        dt[1] += t3 - t2

        # NMS.
        pred = non_max_suppression(pred, conf_thres, iou_thres, classes, agnostic_nms, max_det=max_det)
        dt[2] += time_sync() - t3

        # Second-stage classifier (optional).
        # pred = utils.general.apply_classifier(pred, classifier_model, im, im0s)

        frame_idx=frame_idx+1
        # Process predictions.
        for i, det in enumerate(pred):  # Per image.
            seen += 1
            if webcam:  # batch_size >= 1
                p, im0, frame = path[i], im0s[i].copy(), dataset.count
                s += f'{i}: '
            else:
                p, im0, frame = path, im0s.copy(), getattr(dataset, 'frame', 0)

            p = Path(p)  # To Path.
            print("stem", p.stem)
            print("dir", save_dir)
            save_path = os.path.join(save_dir, p.name)  # im.jpg
            txt_path = os.path.join(save_dir , p.stem) # im.txt
            s += '%gx%g ' % im.shape[2:]  # Print string.
            gn = torch.tensor(im0.shape)[[1, 0, 1, 0]]  # Normalization gain whwh.
            imc = im0.copy() if save_crop else im0  # For save_crop.
            annotator = Annotator(im0, line_width=line_thickness, example=str(names))

            if len(det):
                # Rescale boxes from img_size to im0 size.
                det[:, :4] = scale_coords(im.shape[2:], det[:, :4], im0.shape).round()

                # Print results.
                for c in det[:, -1].unique():
                    n = (det[:, -1] == c).sum()  # Detections per class.
                    s += f"{n} {names[int(c)]}{'s' * (n > 1)}, "  # Add to string.

                # DeepSORT -> Extracting Bounding boxes and its confidence scores.
                bboxes = []
                scores = []
                for *boxes, conf, cls in det:
                  bbox_left = min([boxes[0].item(), boxes[2].item()])
                  bbox_top = min([boxes[1].item(), boxes[3].item()])
                  bbox_w = abs(boxes[0].item() - boxes[2].item())
                  bbox_h = abs(boxes[1].item() - boxes[3].item())
                  box = [bbox_left, bbox_top, bbox_w, bbox_h]
                  bboxes.append(box)
                  scores.append(conf.item())

                # DeepSORT -> Getting appearance features of the object.
                features = encoder(im0, bboxes)
                # DeepSORT -> Storing all the required info in a list.
                detections = [Detection(bbox, score, feature) for bbox, score, feature in zip(bboxes, scores, features)]

                # DeepSORT -> Predicting Tracks.
                tracker.predict()
                tracker.update(detections)
                #track_time = time.time() - prev_time

                # DeepSORT -> Plotting the tracks.
                for track in tracker.tracks:
                  if not track.is_confirmed() or track.time_since_update > 1:
                      continue

                  # DeepSORT -> Changing track bbox to top left, bottom right coordinates.
                  bbox = list(track.to_tlbr())

                  # DeepSORT -> Writing Track bounding box and ID on the frame using OpenCV.
                  txt = 'id:' + str(track.track_id)
                  (label_width,label_height), baseline = cv2.getTextSize(txt , cv2.FONT_HERSHEY_SIMPLEX,1,1)
                  top_left = tuple(map(int,[int(bbox[0]),int(bbox[1])-(label_height+baseline)]))
                  top_right = tuple(map(int,[int(bbox[0])+label_width,int(bbox[1])]))
                  org = tuple(map(int,[int(bbox[0]),int(bbox[1])-baseline]))

                  cv2.rectangle(im0, (int(bbox[0]), int(bbox[1])), (int(bbox[2]), int(bbox[3])), (255,0,0), 1)
                  cv2.rectangle(im0, top_left, top_right, (255,0,0), -1)
                  cv2.putText(im0, txt, org, cv2.FONT_HERSHEY_SIMPLEX, 1, (255,255,255), 1)

                  # DeepSORT -> Saving Track predictions into a text file.
                  save_format = '{frame},{id},{x1},{y1},{w},{h},{x},{y},{z}\n'
                  print("txt: ", txt_path, '.txt')
                  with open(txt_path + '.txt', 'a') as f:
                    line = save_format.format(frame=frame_idx, id=track.track_id, x1=int(bbox[0]), y1=int(bbox[1]), w=int(bbox[2]- bbox[0]), h=int(bbox[3]-bbox[1]), x = -1, y = -1, z = -1)
                    f.write(line)

            # Stream results.
            im0 = annotator.result()

            # Save results (image with detections and tracks).
            if save_img:
                if dataset.mode == 'image':
                    cv2.imwrite(save_path, im0)
                else:  # 'video' or 'stream'
                    if vid_path[i] != save_path:  # New video.
                        vid_path[i] = save_path
                        if isinstance(vid_writer[i], cv2.VideoWriter):
                            vid_writer[i].release()  # Release previous video writer.
                        if vid_cap:  # video
                            fps = vid_cap.get(cv2.CAP_PROP_FPS)
                            w = int(vid_cap.get(cv2.CAP_PROP_FRAME_WIDTH))
                            h = int(vid_cap.get(cv2.CAP_PROP_FRAME_HEIGHT))
                        else:  # Stream.
                            fps, w, h = 30, im0.shape[1], im0.shape[0]
                        save_path = str(Path(save_path).with_suffix('.mp4'))  # Force *.mp4 suffix on results videos.
                        vid_writer[i] = cv2.VideoWriter(save_path, cv2.VideoWriter_fourcc(*'mp4v'), fps, (w, h))
                    vid_writer[i].write(im0)

        # Print time (inference-only).
        LOGGER.info(f'{s}Done. ({t3 - t2:.3f}s)')

    # Print results.
    t = tuple(x / seen * 1E3 for x in dt)  # Speeds per image.
    LOGGER.info(f'Speed: %.1fms pre-process, %.1fms inference, %.1fms NMS per image at shape {(1, 3, *imgsz)}' % t)
    if update:
        strip_optimizer(weights)  # Update model (to fix SourceChangeWarning).


def parse_opt():
    parser = argparse.ArgumentParser()
    parser.add_argument('--weights', nargs='+', type=str, default=ROOT / 'yolov5s.pt', help='model path(s)')
    parser.add_argument('--source', type=str, default=ROOT / 'data/images', help='file/dir/URL/glob, 0 for webcam')
    parser.add_argument('--data', type=str, default=ROOT / 'data/coco128.yaml', help='(optional) dataset.yaml path')
    parser.add_argument('--imgsz', '--img', '--img-size', nargs='+', type=int, default=[640], help='inference size h,w')
    parser.add_argument('--conf-thres', type=float, default=0.25, help='confidence threshold')
    parser.add_argument('--iou-thres', type=float, default=0.45, help='NMS IoU threshold')
    parser.add_argument('--max-det', type=int, default=1000, help='maximum detections per image')
    parser.add_argument('--device', default='', help='cuda device, i.e. 0 or 0,1,2,3 or cpu')
    parser.add_argument('--view-img', action='store_true', help='show results')
    parser.add_argument('--save-txt', action='store_true', help='save results to *.txt')
    parser.add_argument('--save-conf', action='store_true', help='save confidences in --save-txt labels')
    parser.add_argument('--save-crop', action='store_true', help='save cropped prediction boxes')
    parser.add_argument('--nosave', action='store_true', help='do not save images/videos')
    parser.add_argument('--classes', nargs='+', type=int, help='filter by class: --classes 0, or --classes 0 2 3')
    parser.add_argument('--agnostic-nms', action='store_true', help='class-agnostic NMS')
    parser.add_argument('--augment', action='store_true', help='augmented inference')
    parser.add_argument('--visualize', action='store_true', help='visualize features')
    parser.add_argument('--update', action='store_true', help='update all models')
    parser.add_argument('--project', default=ROOT / 'runs/detect', help='save results to project/name')
    parser.add_argument('--name', default='exp', help='save results to project/name')
    parser.add_argument('--exist-ok', action='store_true', help='existing project/name ok, do not increment')
    parser.add_argument('--line-thickness', default=3, type=int, help='bounding box thickness (pixels)')
    parser.add_argument('--hide-labels', default=False, action='store_true', help='hide labels')
    parser.add_argument('--hide-conf', default=False, action='store_true', help='hide confidences')
    parser.add_argument('--half', action='store_true', help='use FP16 half-precision inference')
    parser.add_argument('--dnn', action='store_true', help='use OpenCV DNN for ONNX inference')
    opt = parser.parse_args()
    opt.imgsz *= 2 if len(opt.imgsz) == 1 else 1  # Expand.
    print_args(vars(opt))
    return opt

def main(opt):
    check_requirements(exclude=('tensorboard', 'thop'))
    run(**vars(opt))

if __name__ == "__main__":
    opt = parse_opt()
    main(opt)
只需在检测器代码中添加几行代码,我们就集成了可以使用的 DeepSORT。根据 YOLOv5 的官方实现,结果保存在一个名为 runs 的新文件夹中,跟踪器结果和输出视频也将保存在同一文件夹中。让我们运行这个脚本,看看它是如何执行的。
4.3 推理
如前所述,此跟踪器将在运动场景中进行测试。detect_track 脚本有很多参数,但其中一些参数是必须传递的。
--weights: 这里传递权重的名称,会自动下载。我们将使用 YOLOv5m 中等网络。
--img: 指定图片大小,默认大小为640
--source:指定图像或视频文件、目录、网络摄像头或链接的路径。
--classes:指定类的索引。例如 0 代表人,32 代表运动球。更多类参考yolov5/data/coco.yaml。
--line-thickness:指定边界框厚度。
首先,让我们在下面的视频中对其进行测试。
$ python detect_track.py --weights yolov5m.pt --img 640 --source ./football-video.mp4 --classes 0 32 --line-thickness 1https://www.youtube.com/embed/l3NJNFmg09k?feature=oembed
哇!这很快,每张图像需要 20.6 毫秒进行推理,大致相当于 50 FPS。甚至输出看起来也不错。输出可以在下面看到。
https://www.youtube.com/embed/vUnuDTVHwGE?feature=oembed
检测器的工作非常出色。但是在球和球员的情况下,遮挡都没有处理好。此外,还有许多 ID switches,就是一个检测框ID不停地进行更换,缺乏准确性与鲁棒性。视频中的球员被很好地跟踪,但由于运动模糊,球甚至没有被检测到,也没有被正确跟踪。也许 DeepSORT 在密度较低的视频上表现更好。
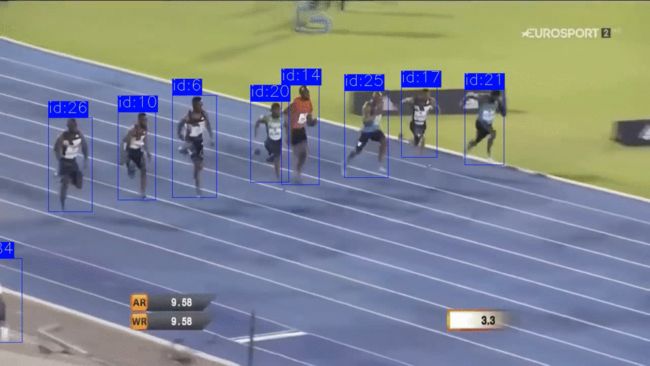
让我们在另一个短跑比赛的体育视频上进行测试。
https://www.youtube.com/embed/HeEvjehKLsU?feature=oembed
$ python detect_track.py --weights yolov5m.pt --img 640 --source ./sprint.mp4 --save-txt --classes 0--line-thickness 1速度仍然保持同样快,大约 52 FPS。输出还是很准确的,ID switches很少,但是遮挡的时候没法保持。输出可以在下面查看。
https://www.youtube.com/embed/hBVef59QWWo?feature=oembed
因此,我们可以从结果中得出结论,DeepSORT 不能很好地处理遮挡并可能导致 ID switches。
5.评价
在试验和测试新事物时,评估总是起着重要作用。同样,对于 DeepSORT,我们将根据一些标准指标来判断其性能。正如我们所知,DeepSORT 是一种多目标跟踪算法,因此要判断其性能我们需要特殊的指标和基准数据集。我们将使用 CLEARMOT 指标来判断我们的 DeepSORT 在 MOT17 数据集上的性能。我们在下一节中更深入地研究这些内容。
5.1 MOT 挑战基准
MOT Challenge benchmark是一个框架,它提供大量数据集,其中包含具有挑战性的现实世界序列、准确的注释和许多指标。MOT Challenge 由各种数据集组成,例如人物、物体、2D、3D 等等。更具体地说,每年都会发布数个数据集变体,例如引入 MOT15、MOT17 和 MOT20 来衡量多个目标跟踪器的性能。
MOT15,以及过去几年提交的众多最先进的结果
MOT16,其中包含新的具有挑战性的视频
MOT17,用更精确的标签扩展 MOT16 序列
MOT20,其中包含自上而下视图的视频
对于我们的模型评估,我们将使用 MOT17 数据集的一个子集。
数据集格式:
所有数据集变体都具有相同的格式,这为我们提供了
视频文件
seqinfo.ini – 有关文件的信息
gt.txt – 跟踪的地面实况注释
det.txt – 检测的地面实况注释
输出格式
为了评估性能,跟踪器的输出应采用特定格式,即 frame,id,x1,y1,x2,y2,1,-1,-1,-1,其中,
frame:帧数
id:被跟踪目标的id
x1, y1: 左上坐标
x2, y2: 右下坐标
真值格式
我们需要注释 zip 文件中的 gt.txt 文件进行评估。它可以从这里下载。
格式如下:Frame, ID, bbox, 是否忽略, classes, occlusion
Frame:视频的帧数
ID:被跟踪目标的ID
bbox:目标的边界框坐标
是否忽略:是否忽略目标,0表示忽略
类:包含行人、汽车、静态人等类。
遮挡:显示物体是否被其他物体覆盖或切割
5.2 ClearMOT 指标
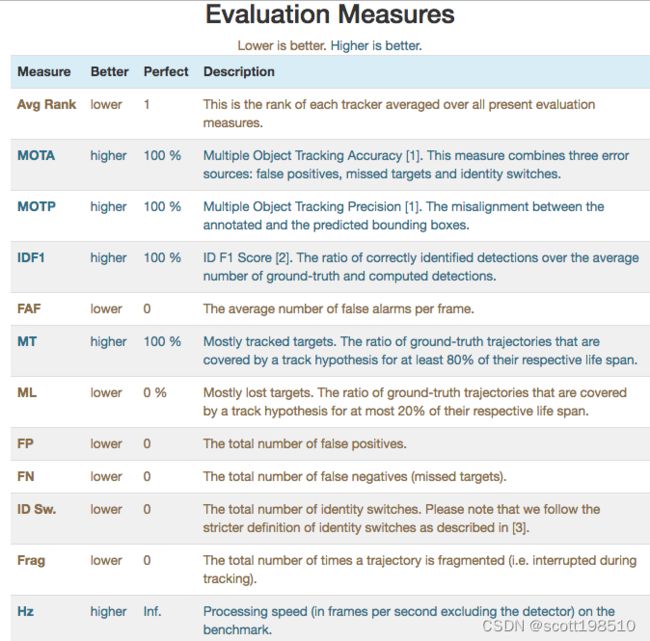
它是一个用于评估跟踪器在不同参数下的性能的框架。总共给出了 8 个不同的指标来评估目标检测、定位和跟踪性能。它还为我们提供了两个新指标:
多目标跟踪精确性Precision (MOTP)
多目标跟踪准确性Accuracy (MOTA)
这些指标有助于评估跟踪器的整体优势并判断其总体性能。其他措施如下:
对于人员跟踪,我们将根据 MOTA 评估我们的性能,它告诉我们检测、未命中和 ID switches的性能。跟踪器的准确性,MOTA(多目标跟踪精度)计算如下:
其中 FN 是假阴性的数量,FP 是假阳性的数量,IDS 是时间 t 的身份转换数量,GT 是基本事实。MOTA 也可以是负面的。
5.3 评估结果
如前所述,MOT17 将用于测试,您可以从此处下载视频序列。让我们一个一个地运行序列。
python detect_track.py --weights yolov5m.pt --img 640 --source ./videos/MOT17-02-DPM.mp4 --save-txt --class0--line-thickness 1$python detect_track.py --weights yolov5m.pt --img 640 --source ./videos/MOT17-04-DPM.mp4 --save-txt --class0--line-thickness 1$ python detect_track.py --weights yolov5m.pt --img 640 --source ./videos/MOT17-10-DPM.mp4 --save-txt --class0--line-thickness 1为了评估性能,我们将通过克隆来引用以下代码库。
$ git clone https://github.com/shenh10/mot_evaluation.git
$ cd ./mot_evaluation视频分辨率为960×540,标注分辨率为1920×1080。因此,需要根据视频分辨率修改注释。您可以从此处直接下载调整大小的ground truth注释。
我们将使用mot_evaluation下面的文件evaluate_tracking.py来评估结果。该脚本采用三个参数,如下所示:
--seqmap:此处指定要进行评估的视频文件名。
--track:指定跟踪结果文件夹的路径。
--gt:指定ground truth文件路径。
$python evaluate_tracking.py --seqmap './MOT17/videos'--track './yolov5/runs/'--gt './label_960x540'这给出了所有三个视频的准确性,并给出了所有视频的平均结果。这是结果。
6.结论
DeepSORT 在视觉上表现相当不错。然而,指标显示不太好的结果。DeepSORT 有许多缺点,如 ID 切换、糟糕的遮挡处理、运动模糊等等。我们得到的平均准确率为 28.6,非常低。但是,这里的好处之一是速度。所有的事情都可以通过使用最新的算法来解决。FairMOT 和 CentreTrack 等算法非常先进,可以显着减少 ID 切换并很好地处理遮挡。因此,请再尝试 DeepSORT 一段时间。尝试不同的场景,使用 YOLOv5 模型的其他变体或在自定义目标检测器上使用 DeepSORT。请随时与我们分享发现。
7. 参考资料
DeepSOR:arXiv:1703.07402
YOLOv5:https ://github.com/ultralytics/yolov5
ClearMOT:Bernardin, K., Stiefelhagen, R. 评估多目标跟踪性能:CLEAR MOT 指标。J Image Video Proc 2008, 246309 (2008)。https://doi.org/10.1155/2008/246309
MOT17 数据集:arXiv:1810.11780,https ://motchallenge.net/
MOT评估代码:https ://github.com/shenh10/mot_evaluation.git
DeepSORT 特征图片:Freepik.com
Video-1/足球跟踪演示图片:https ://youtu.be/QXhV148EryQ
Video-2/Sprint 比赛图片:https ://youtu.be/z4–4_Gzrb0
DeepSORT 架构图像:Parico、Addie Ira 和 Ahamed、Tofael。(2021)。使用 YOLOv4 模型和DeepSort深度的实时梨果实检测和计数。
评价措施图片:https ://motchallenge.net/
余弦度量学习:https ://github.com/nwojke/cosine_metric_learning


