联邦学习FedML伪分布式环境搭建实战
一、硬件环境
虚拟机版本:VMware_16.0.0
操作系统版本:Ubuntu 18.04.2 LTS(注意内存一定要开到8G以上,不然后面在执行样例时进程会被Killed)
Python版本: 3.7.4
二、下载框架
github地址:https://github.com/FedML-AI/FedML
将整个包下载并解压自己的用户目录
三、开始安装
可以进入到CI-install.sh所在目录直接运行脚本安装(不推荐)
sh CI-install.sh按照CI-install.sh的步骤一步一步来进行安装,可以理解每一步都干了些什么
安装pyflakes
# install pyflakes to do code error checking
pip3 install pyflakes --cache-dir $HOME/.pip-cache
安装Conda
# Conda Installation
wget https://repo.continuum.io/miniconda/Miniconda3-latest-Linux-x86_64.sh -O miniconda.sh
bash miniconda.sh -b -p $HOME/miniconda
source "$HOME/miniconda/etc/profile.d/conda.sh"
hash -r
conda config --set always_yes yes --set changeps1 no
conda update -q conda
conda info -a
建立环境fedml,即之后运行fedml的样例,都要在激活这个环境后运行,Python版本为3.7.4
conda create -n fedml python=3.7.4激活环境
conda activate fedml安装pytorch,MPI和WandB
WandB是作者推荐的可视化工具,可以直接用github账号授权登录,网址https://wandb.ai/,需要
建议使用清华镜像源,否则会出现下载过慢的情况
# 查看源
conda config --show-sources
# 添加仓库
conda config --add channels https://mirrors.tuna.tsinghua.edu.cn/anaconda/pkgs/free/
conda config --add channels https://mirrors.tuna.tsinghua.edu.cn/anaconda/pkgs/main/
conda config --set show_channel_urls yes
# 第三方源
conda config --add channels https://mirrors.tuna.tsinghua.edu.cn/anaconda/cloud/pytorch/
# Install PyTorch (please visit pytorch.org to check your version according to your physical machines
# conda install pytorch torchvision cudatoolkit=10.2 -c pytorch
# None GPU
conda install pytorch torchvision torchaudio cpuonly -c pytorch
# Install MPI
conda install -c anaconda mpi4py
# Install Wandb
pip install --upgrade wandb安装必要的包
# Install other required package
conda install scikit-learn
conda install numpy
conda install h5py
conda install setproctitle
conda install networkx
安装依赖(现在不清楚是否为伪分布式必须,因为放到了moblie的目录内)
cd ./fedml_mobile/server/executor
pip3 install -r requirements.txt
下载数据包: 直接运行脚本需要连接外网才可以下载,所以推荐自行下载数据然后解压到相应的目录
数据网址https://drive.google.com/file/d/1cU_LcBAUZvfZWveOMhG4G5Fg9uFXhVdf/(当然也需要)
参考论文: Federated Optimization in Heterogeneous Networks (https://arxiv.org/pdf/1812.06127.pdf). MLSys 2020.
# install the dataset
# 1. MNIST
cd ./data/MNIST
sh download_and_unzip.sh
cd ../../
解压后的目录结构
| MNIST

----| train

---- ----| all_data_0_niid_0_keep_10_train_9.json

----| test

---- ----| all_data_0_niid_0_keep_10_train_9.json

| README.md
查看数据集:
sh stats.sh train

####################################
DATASET: MNIST
1000 users
61664 samples (total)
61.66 samples per user (mean)
num_samples (std): 144.63
num_samples (std/mean): 2.35
num_samples (skewness): 8.18

num_sam num_users
0        447
20       241
40       105
60       50
80       33
100      20
120      15
140      9
160      9
180      11
四、测试样例
激活环境
# activate the fedml environment
source "$HOME/miniconda/etc/profile.d/conda.sh"
conda activate fedml
运行
sh run_fedavg_standalone_pytorch.sh 0 1000 1000 -1 mnist ./../../../data/mnist lr hetero 10 1 0.03 sgd 0参数值含义
GPU=$1
CLIENT_NUM=$2
WORKER_NUM=$3
BATCH_SIZE=$4 # -1意味着没有分
DATASET=$5
DATA_PATH=$6
MODEL=$7
DISTRIBUTION=$8
ROUND=$9
EPOCH=$10
LR=$11 # 学习率
OPT=$12
CI=$13
运行过程中会让你自己输入WandB的ID,需到自己主页查看
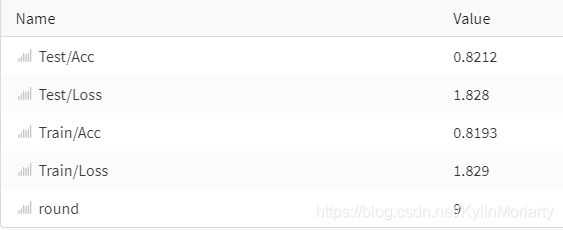
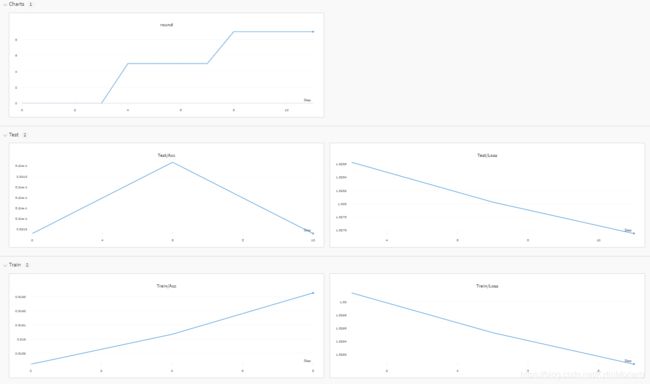
运行结果可在WandB fedml库中查看,如下:(登入WandB网站也需要连接外网)
至此FedML伪分布式环境搭建成功,下面将研究数据集的数据分布以及FedAvg算法的源码。

