augmentation 开源包
git地址:mirrors / albumentations-team / albumentations · GitCode
文档地址:Image augmentation for classification - Albumentations Documentation
调试工具地址: Streamlit
问答:
https://albumentations.ai/docs/faq/#why-do-you-call-cv2cvtcolorimage-cv2color_bgr2rgb-in-your-examples
一直没注意过这里。几个问题
BGR是怎么表现的?
看结果好像是: 0表示B, 1表示G,2表示R 转换为RGB就是 2 1 0。
测试:
if __name__ == '__main__':
    image = cv2.imread('D:\PycharmProjects\opencvtest\datasets\coco\images\\test2017\\000000000064.jpg')
    image = image[::2, 70:400]
    #  bgr 0, 1, 2 -> rgb 2, 1, 0
    image[:, :, 0], image[:, :, 2] = image[:, :, 2], image[:, :, 0]
    cv2.imshow('name', image)
是这样子。
问题2
按它给的列子:
    cmp = cv2.VideoCapture('D:\PycharmProjects\opencvtest\haizw.mp4')
    transform = A.ReplayCompose([
        A.HorizontalFlip(p=0.5, always_apply=True),
    ])
    random.seed(7)
    while cmp.isOpened():
        rot, frame = cmp.read()
        if frame is None:
            break
        if rot == True:
            transformed = transform(image=frame)
            transformed_image = A.ReplayCompose.replay(transformed['replay'], image=frame)
            cv2.imshow('name', transformed_image['image'])
        if cv2.waitKey(1) & 0xFF == ord('q'):
            break

    cv2.waitKey(0)
    cv2.destroyAllWindows()
可以发现:如果第一张图片翻转了,后面所有的图片都会翻转。
所以 the same way的意思就是:第一次确定了用什么方式增强(它都是设置了一个概率),后面都会以这种方式增强(概率只在第一次生效,后面就是确定了的)
问题3:
compose:也可以设置一个概率 0.9表示 只有90%会使用数据增强。但是设置always_apply=True则会100%会使用数据增强:
测验:
if __name__ == '__main__':
    image = cv2.imread('D:\PycharmProjects\opencvtest\datasets\coco\images\\test2017\\000000000064.jpg')
    # image = image[::2, 70:400]
    #  bgr 0, 1, 2 -> rgb 2, 1, 0
    # image[:, :, 0], image[:, :, 2] = image[:, :, 2], image[:, :, 0]
    transform = A.Compose([
        A.Resize(height=256, width=256, p=1.0),
    ],  p=0.1)
    transformed = transform(image=image)
    transformed_image = transformed["image"]
    cv2.imshow('name', transformed_image)
    cv2.waitKey(0)
    cv2.destroyAllWindows()
resize设置为1了,应该100% resize, 但是compose是0.1所以整体都没生效。
修改:
    transform = A.Compose([
        A.Resize(height=256, width=256, p=0, always_apply=True),
    ],  p=0)
概率都设置为0了,但是还是生效了。
问题4:
原文:Bounding boxes augmentation for object detection - Albumentations Documentation
翻译:问:如果使用一些标注工具,标注的一些目标框,或者其他格式的坐标数据。怎么在albumentations中使用。
答:你需要转换一下坐标, 参考如上文章。
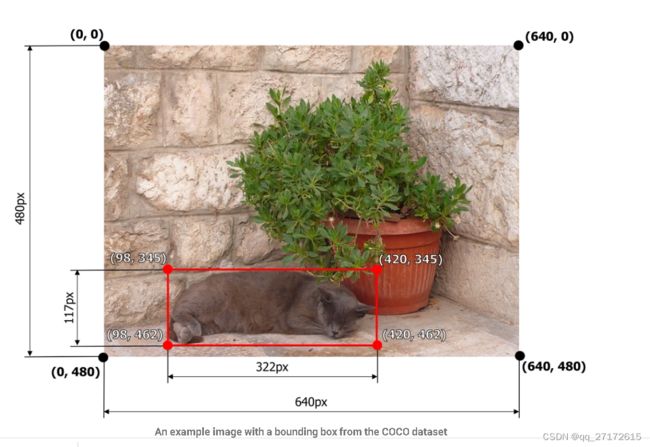
albumentations需要的数据格式: [x_min / w, y_min / h, x_max / w, h_max / h],
[98 / 640, 345 / 480, 420 / 640, 462 / 480]
coco: [98, 345, 322, 117] , [x_min, y_min, width, height]
转换: [98, 345, 98 + 322 = 420, 345 + 117=462] / (w, h)
yolo:[x_center, y_center, width, height]
转换 [(98 + 420) / 2, (345 + 420) / 2, 322, 117] / (w, h)


