Moveit +Gazebo:搭建单臂机械臂仿真平台
环境:Ubuntu20.04 ros-noetic
首先要先安装ROS 和 Moveit,ROS的安装就不说了,Moeit的安装参看官网教程
Getting Started — moveit_tutorials Noetic documentation
安装过程中,用到了命令:
rosdep update
最好在安装的时候能够科学上网
搭建单臂仿真平台主要分为4大步
1.准备urdf/xacro文件
2.通过moveit setup assistant进行配置
3.controller的配置
4.launch文件的编写
准备urdf/xacro文件
这里我采用了 panda机械臂的功能包,首先进行该功能包的安装,通过命令:
sudo apt install ros-noetic-franka-description
安装好之后呢就可以在目录/opt/ros/noetic/share/franka_description下找到要用的panda机械臂模型的xacro相关文件,这里在进行第二步之前呢,还需要对panda机械臂的xacro文件进行一点点修改,修改的目的主要是使模型具有gazebo仿真的相关标签和数据,这里可以直接使用我修改完成的。(需要安装franka-description包)
建议在moveit的工作空间下,新建一个功能包放置相关文件,比如
我在 moveit_ws/src下新建了panda_dual_arms的功能包,在panda_dual_arms/robot_description下放置了下面的模型文件left_arm.urdf
    true


    transmission_interface/SimpleTransmission

      hardware_interface/PositionJointInterface


      hardware_interface/PositionJointInterface


    true


    transmission_interface/SimpleTransmission

      hardware_interface/PositionJointInterface


      hardware_interface/PositionJointInterface


    true


    transmission_interface/SimpleTransmission

      hardware_interface/PositionJointInterface


      hardware_interface/PositionJointInterface


    true


    transmission_interface/SimpleTransmission

      hardware_interface/PositionJointInterface


      hardware_interface/PositionJointInterface


    true


    transmission_interface/SimpleTransmission

      hardware_interface/PositionJointInterface


      hardware_interface/PositionJointInterface


    true


    transmission_interface/SimpleTransmission

      hardware_interface/PositionJointInterface


      hardware_interface/PositionJointInterface


    true


    transmission_interface/SimpleTransmission

      hardware_interface/PositionJointInterface


      hardware_interface/PositionJointInterface


    true


    transmission_interface/SimpleTransmission

      hardware_interface/EffortJointInterface


      hardware_interface/EffortJointInterface


    true


    transmission_interface/SimpleTransmission

      hardware_interface/EffortJointInterface


      hardware_interface/EffortJointInterface


      /left_arm
Moveit setup assitant的配置
详细的配置介绍和过程参考官方教程:MoveIt Setup Assistant — moveit_tutorials Noetic documentation
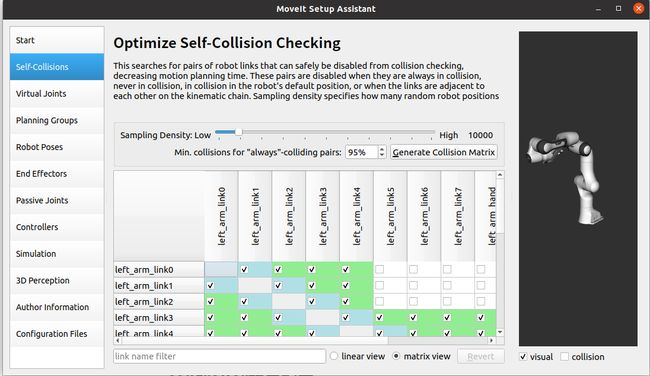
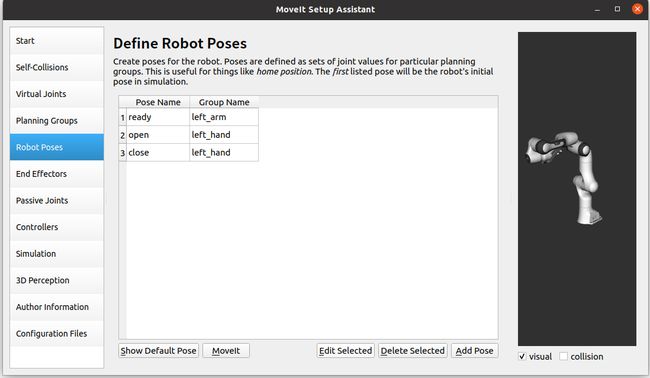
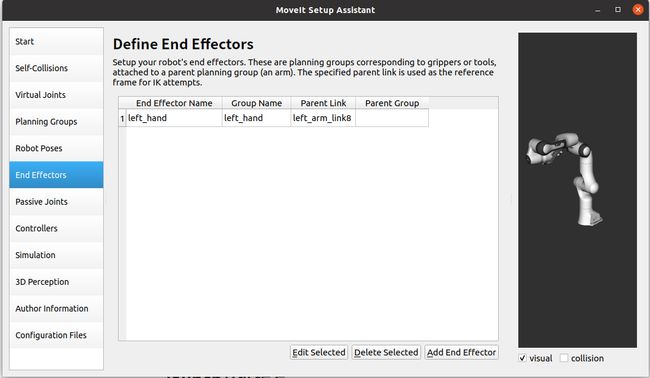
这里我贴上我的配置过程,进行了自碰撞矩阵、规划组、姿态、末端执行器的配置,关于虚拟关节和被动关节以及控制器的环节跳过即可。
自碰撞矩阵,按照默认情况生成即可
规划组分为arm和hand 两个组,arm组名我这里是:left_arm添加如图下所示的joint,hand是:left_hand,添加如图下所示的links
这里我还配置了几个pose,主要方便后期的编程,各个pose包含的关节值:
ready:{0.0, -0.785, 0.0, -2.356, 0.0, 1.571, 0.785}.
open:0.035
close:0.0
最后就是定义的末端执行器
完成后会得到一个 我命名为 left_arm_moveit_config的功能包
在工作空间下重新 catkin build 并 source
通过命令 roslaunch left_arm_moveit_config demo.launch能够运行,并且能够通过rviz对及机械臂进行规划则没有问题。
controller的配置
首先是joint_state_controller,主要作用是发布机器人的关节状态和TF变换
在panda_dual_arms/config 下创建 joint_state_controller.yaml
joint_state_controller:
    type: joint_state_controller/JointStateController
    publish_rate: 50
然后是trajectory_controller,Moveit完成运动规划后输出接口是一个命名为FollowJointTrajectory的action,其中包含一系列规划好的路径点轨迹,Trajectory Controller的作用就是将这些信息转化成Gzebo中机器人需要输入的joint位置。
在panda_dual_arms/config trajectory_controller.yaml
left_arm_trajectory_controller:
    type: "position_controllers/JointTrajectoryController"
    joints:
        - left_arm_joint1
        - left_arm_joint2
        - left_arm_joint3
        - left_arm_joint4
        - left_arm_joint5
        - left_arm_joint6
        - left_arm_joint7
    constraints:
        goal_time: 0.6
        stopped_velocity_tolerance: 0.05
        left_arm_joint1: {trajectory: 0.1, goal: 0.1}
        left_arm_joint2: {trajectory: 0.1, goal: 0.1}
        left_arm_joint3: {trajectory: 0.1, goal: 0.1}
        left_arm_joint4: {trajectory: 0.1, goal: 0.1}
        left_arm_joint5: {trajectory: 0.1, goal: 0.1}
        left_arm_joint6: {trajectory: 0.1, goal: 0.1}
        left_arm_joint7: {trajectory: 0.1, goal: 0.1}
    stop_trajectory_duration: 0.5
    state_publish_rate:  25
    action_monitor_rate: 10

#notice that the grippers joint2 mimics joint1
#this is why it is not listed under the hand controllers

left_hand_controller:
    type: "effort_controllers/JointTrajectoryController"
    joints:
        - left_arm_finger_joint1
    gains:
        left_arm_finger_joint1:  {p: 50.0, d: 1.0, i: 0.01, i_clamp: 1.0}
launch文件的编写
launch文件的个部分内容都有注释,主要就是启动gazebo,启动moveit,启动上面的controller,启动rviz
参考:Multiple Robot Arms — moveit_tutorials Noetic documentation


