pytorch学习笔记四:数据的预处理模块
transforms是pytorch中常用的图像预处理方法,这个在torchvision计算机视觉工具包中。在安装pytorch时顺便安装了torchvision,在torchvision中,有三个主要的模块:
● torchvision.transforms:常用的图像预处理方法,比如:标准化、中心化、旋转、翻转等;
● torchvision.datasets:常用的数据集的dataset实现,例如:MNIST、CIFAR-10、ImageNet等;
● torchvision.models:常用的预训练模型,AlexNet、VGG、ResNet等。
下面来详细了解一下transforms中图像预处理方法:
一、裁剪 —— Crop
1、随机裁剪:transforms.RandomCrop
transforms.RandomCrop(
    size,
    padding=None,
    pad_if_needed=False,
    fill=0,
    padding_mode='constant',
)
功能:根据给定的size进行随机裁剪
参数:
size-(sequence or int):若为sequence,则为(h, w),若为int,则为(int, int);
padding - (int or sequence, optional):此参数是设置填充多少个pixel;
若为int,表示图像上下左右均填充int个pixel,例如padding=4,表示图像上下左右均填充4个pixel,若为32×32,则图像填充后为40×40;
若为sequence,若为2个数,第一个数表示左右填充多少,第二个数表示上下填充多少;当有四个数时表示左、上、右、下
pad_if_needed:若图像小于设定的size,则填充;
fill:表示需要填充的值,默认为0.当值为int时,表示各通道均填充该值,当值为3时,表示RGB三个通道各需要填充的值;
padding_mode:填充模式,有4中填充模式:1、constant:常数填充;2、edge:图像的边缘值填充;3、reflect:镜像填充,最后一个像素不镜像,例如 [1, 2, 3, 4]. -> [3, 2, 1, 2, 3, 4, 3, 2];4、symmetric:镜像填充,最后一个元素填充,例如:[1, 2, 3, 4] -> [2, 1, 1, 2, 3, 4, 4, 3]
2、中心裁剪transforms.CenterCrop
torchvision.transforms.CenterCrop(size)
功能:依据给定的参数进行裁剪;
参数:
size:若为sequence,则为(h, w), 若为int, 则为(int, int)
3、随机长宽比裁剪transforms.RandomResizedCrop()
torchvision.transforms.RandomResizedCrop(
    size,
    scale=(0.08, 1.0),
    ratio=(0.75, 1.3333333333333333),
    interpolation=2,
)
功能:随机大小,随机长宽比裁剪原始图片,最后将图片 resize 到设定好的 size
参数:
size- 所需裁减图片尺寸
scale- 随机 crop 的大小区间,如 scale=(0.08, 1.0),表示随机 crop 出来的图片会在的 0.08
倍至 1 倍之间。
ratio- 随机长宽比设置
interpolation- 插值的方法,默认为双线性插值(PIL.Image.BILINEAR),插值方法有:PIL.Image.NEAREST、PIL.Image.BILINEAR、PIL.Image.BICUBIC
4、上下左右中心裁剪transforms.FiveCrop()
torchvision.transforms.FiveCrop(size)
功能:对图片进行上下左右以及中心裁剪,获得 5 张图片,返回一个 4D-tensor
参数:
size- (sequence or int),若为 sequence,则为(h,w),若为 int,则(size,size)
5、上下左右中心裁剪后翻转transforms.TenCrop()
torchvision.transforms.TenCrop(size, vertical_flip=False)
功能:对图片进行上下左右以及中心裁剪,然后全部翻转(水平或者垂直),获得 10 张图
片,返回一个 4D-tensor。
参数:
size- (sequence or int),若为 sequence,则为(h,w),若为 int,则(size,size)
vertical_flip (bool) - 是否垂直翻转,默认为 flase,即默认为水平翻转
注意!transforms.FiveCrop()和transforms.TenCrop()分别返回的是变换后的5张图片和10张图片,因此这两个方法返回的是tuple,而模型中处理的是tensor,需要将其转化为tensor,例如下面的转换
transforms.FiveCrop(112)
transforms.Lambda(lambda crops:torch.stack([(transforms.ToTensor()(crop)) for crop in crops]))
二、翻转和旋转——Flip and Rotation
1、依概率p进行水平翻转:transforms.RandomHorizontalFlip
torchvision.transforms.RandomHorizontalFlip(p=0.5)
功能:依据概率 p 对 PIL 图片进行水平翻转
参数:
p- 概率,默认值为 0.5
2、依概率p垂直翻转:transforms.RandomVerticalFlip
torchvision.transforms.RandomVerticalFlip(p=0.5)
功能:依据概率 p 对 PIL 图片进行垂直翻转
参数:
p- 概率,默认值为 0.5
3、随机旋转:transforms.RandomRotation
torchvision.transforms.RandomRotation(degrees, resample=False,
                                      expand=False, center=None)
功能:依 degrees 随机旋转一定角度
参数:
degress- (sequence or float or int) ,若为单个数,如 30,则表示在(-30,+30)之间随机旋转;若为sequence,如(30,60),则表示在 30-60 度之间随机旋转;
resample- 重采样方法选择,可选 PIL.Image.NEAREST, PIL.Image.BILINEAR, PIL.Image.BICUBIC,默认为最近邻;
expand: 是否扩大图片,以保持原图信息;
center: 设置旋转点,默认是中心旋转
三、图像变换
1、resize:transforms.Resize()
torchvision.transforms.Resize(size, interpolation=2)
功能:重置图像分辨率
参数:
size- If size is an int, if height > width, then image will be rescaled to (size * height / width,
size),所以建议 size 设定为 h*w
interpolation- 插值方法选择,默认为 PIL.Image.BILINEAR
2、标准化:transforms.Normalize
torchvision.transforms.Normalize(mean, std)
功能:对数据按通道进行标准化,即先减均值,再除以标准差,注意是 hwc
3、转化为Tensor:transforms.ToTensor
torchvision.transforms.ToTensor()
功能:将 PIL Image 或者 ndarray 转换为 tensor,并且归一化至[0-1]
注意事项:归一化至[0-1]是直接除以 255,若自己的 ndarray 数据尺度有变化,则需要自行
修改。
4、填充:transforms.Pad
torchvision.transforms.Pad(padding, fill=0, padding_mode='constant')
功能:对图像进行填充
参数:
padding-(sequence or int, optional),此参数是设置填充多少个 pixel。当为 int 时,图像上下左右均填充 int 个,例如 padding=4,则上下左右均填充 4 个 pixel,若为 3232,则会变成 4040。
padding_mode:填充模式,有4种模式,constant、edge、reflect和symmetric
fill:设置填充的像素值(R, G, B)或(GRAY)
5、修改亮度、对比度和饱和度:transforms.ColorJitter
torchvision.transforms.ColorJitter(brightness=0, contrast=0, saturation=0, hue=0)
功能:修改修改亮度、对比度、饱和度和色度
brightness:亮度调整因子,当为a时,从[max(0, 1-a), 1+a]中随机选择;当为(a, b)时,从[a, b]中随机选择
contrast:对比度参数,同brightness
saturation:饱和度参数;
hue:色度参数,当为a时,从[-a, a]中选择参数,注:0<= a<=0.5; 当为(a, b)时,从[a, b]中选择参数,注:-0.5 <= a <= b <= 0.5
6、转灰度图:transforms.Grayscale
torchvision.transforms.Grayscale(num_output_channels=1)
功能:将图片转换为灰度图
参数:
num_output_channels- (int) ,当为 1 时,正常的灰度图,当为 3 时, 3 channel with r == g == b
7、线性变换:transforms.LinearTransformation()
torchvision.transforms.LinearTransformation(transformation_matrix)
8、仿射变换:transforms.RandomAffine()
torchvision.transforms.RandomAffine(degrees, translate=None, scale=None, shear=None, resample=False, fillcolor=0)
功能:对图像进行仿射变换,仿射变换是二维的线形变换,由五种基本的原子变换构成,分别是旋转、平移、缩放、错切和翻转
degrees:旋转角度设置;
translate:平移区间设置,如(a,b),a设置宽,b设置高,图像在宽维度平移的区间为-img_width * a < dx < img_width *a
scale:缩放比例
fillcolor:填充颜色设置
shear:错切角度设置,有水平错切和垂直错切;若为a,仅在x轴错切,错切角度在(-a,a)之间;若为(a,b)则a设置为x轴的角度,b为y轴的角度;若为(a,b,c,d),则a,b设置为x轴角度,c,d设置为y轴角度;
resample:重采样方式,有NEAREST,BILINEAR,BICUBIC
9、依概率p转化为灰度图:transforms.RandomGrayscale
torchvision.transforms.RandomGrayscale(p=0.1)
功能:依概率 p 将图片转换为灰度图,若通道数为 3,则 3 channel with r == g == b
10、将数据转化为PILImage:transforms.ToPILImage
torchvision.transforms.ToPILImage(mode=None)
功能:将 tensor 或者 ndarray 的数据转换为 PIL Image 类型数据
参数:
mode- 为 None 时,为 1 通道, mode=3 通道默认转换为 RGB,4 通道默认转换为 RGBA
11、RandomErasing
torchvision.transforms.RandomErasing(p=0.5, scale=(0.02, 0.33), ratio=(0.3, 3.3), value=0, inplace=False)
功能:对图像进行随机遮挡
p:概率值,执行改操作的概率
scale:遮挡区域的面积
ratio:遮挡区域长款比
value:设置遮挡区域的像素值,(R,G,B)or (Gray)
12、transforms.Lambda
transforms.Lambda(lambd)
功能:用户自定义lambda方法
lambd:lambda匿名函数
四、对transforms 操作,使数据增强更灵活
1.transforms.RandomChoice(transforms)
功能:从给定的一系列 transforms 中选一个进行操作,randomly picked from a list
2.transforms.RandomApply(transforms, p=0.5)
功能:给一个 transform 加上概率,以一定的概率执行该操作
3.transforms.RandomOrder
功能:将 transforms 中的操作顺序随机打乱
五、自定义transforms
在人民币的二分类任务中对数据的预处理部分,使用transforms模块,进行debug,可以看到transforms的运行机制
class Compose(object):
   def __call__(self, img):
      for t in self.transforms:
         img = t(img)
      return img
对Compose里面的这些transforms方法执行一个for循环,每次挑取一个方法进行执行。也就是 transforms方法仅接收一个参数,返回一个参数,然后就是for循环中,上一个transforms的输出正好是下一个transforms的输入,所以数据类型要注意匹配。这就是自定义transforms的两个要素。
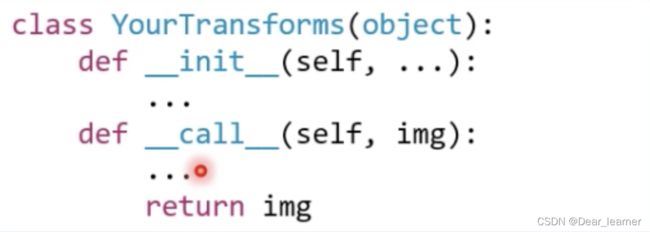
下面是自定义transforms的结构:
通过类实现多参数传入

总结:
数据增强策略原则:让训练集与测试集更接近。
- 空间位置上:可以选择平移
- 色彩上:灰度图,色彩抖动
- 形状:仿射变换
- 上下文场景:遮挡,填充
六、在二分类任务中用到的transforms方法及实现过程
在人民币二分类任务中,对数据的预处理中用到的transforms方法如下:
train_transform = transforms.Compose([
    transforms.Resize((32, 32)),
    transforms.RandomCrop(32, padding=4),
    transforms.ToTensor(),
    transforms.Normalize(norm_mean, norm_std),
])

valid_transform = transforms.Compose([
    transforms.Resize((32, 32)),
    transforms.ToTensor(),
    transforms.Normalize(norm_mean, norm_std),
])
其中transforms.Compose方法时将一系列的transforms方法进行有序组合包装,具体实现的时候依次用包装的方法对图像进行预处理。
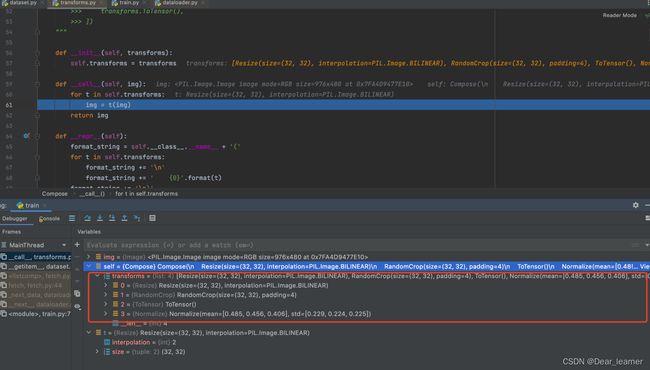
调试代码可以查看一下transforms的调用机制:
进入transforms.py文件中,在__call__里面是一系列数据预处理方法

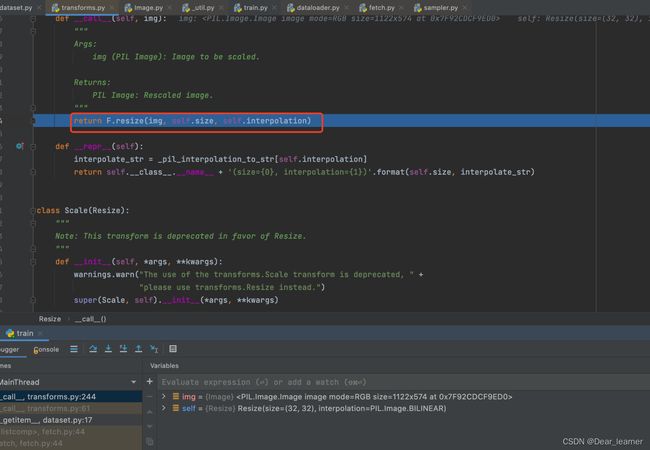
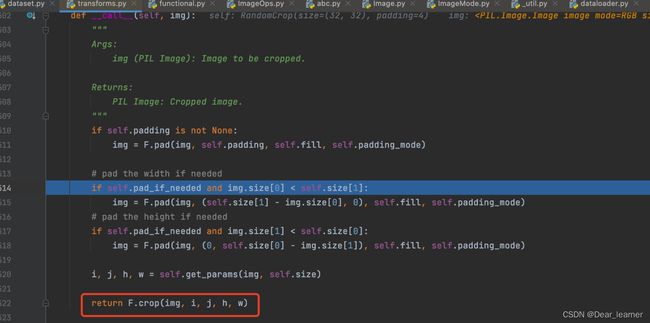
step into 可以看到transforms的预处理方法其实是调用torch.nn.function中的预处理方法的


其余方法类似。(可debug看一下详细的实现过程)
总结:pytorch的图像预处理模块transforms,集成了各种图像预处理方法,在实际应用中要根据需要选择合适的预处理方法,另外要注意训练集和测试集选择预处理方法的不同。