Paddle OCR文字检测(一)
本节以aie2023数据集为例,介绍PaddleOCR检测模型的训练、评估和测试。
1.数据和权重准备
①数据准备:参阅ocr_datasets。
②下载预训练模型:
首先下载预训练模型。PaddleOCR的检测模型目前支持3个backbone,分别是MobileNetV3、ResNet18_vd和ResNet50_vd。您可以根据需要使用PaddleClas中的模型替换 backbone。对应的backbone预训练权重下载链接见(https://github.com/PaddlePaddle/PaddleClas/blob/release%2F2.0/README_cn.md#resnet%E5%8F%8A%E5% 85%B6vd%E7%B3%BB%E5%88%97)。
cd PaddleOCR/
# Download the pre-trained model of MobileNetV3
wget -P ./pretrain_models/ https://paddleocr.bj.bcebos.com/pretrained/MobileNetV3_large_x0_5_pretrained.pdparams
# or, download the pre-trained model of ResNet18_vd
wget -P ./pretrain_models/ https://paddleocr.bj.bcebos.com/pretrained/ResNet18_vd_pretrained.pdparams
# or, download the pre-trained model of ResNet50_vd
wget -P ./pretrain_models/ https://paddleocr.bj.bcebos.com/pretrained/ResNet50_vd_ssld_pretrained.pdparams
2.训练
①创建训练配置文件configs/det/det_mv3_db_aie2023.yml
(本人在configs/det/det_mv3_db.yml上修改重命名为configs/det/det_mv3_db_aie2023.yml)
Global:
  use_gpu: true
  use_xpu: false
  use_mlu: false
  epoch_num: 120
  log_smooth_window: 20
  print_batch_step: 20
  save_model_dir: ./output/db_mv3_aie2023/
  save_epoch_step: 120
  # evaluation is run every 2000 iterations
  eval_batch_step: [0, 87]
  cal_metric_during_train: False
  pretrained_model: ./pretrain_models/MobileNetV3_large_x0_5_pretrained
  checkpoints:
  save_inference_dir:
  use_visualdl: False
  infer_img: ./train_data/aie2023/det/test/65_25_0197-01S-S200.bmp
  save_res_path: ./output/det_db_mv3_aie2023/predicts_db.txt

Architecture:
  model_type: det
  algorithm: DB
  Transform:
  Backbone:
    name: MobileNetV3
    scale: 0.5
    model_name: large
  Neck:
    name: DBFPN
    out_channels: 256
  Head:
    name: DBHead
    k: 50

Loss:
  name: DBLoss
  balance_loss: true
  main_loss_type: DiceLoss
  alpha: 5
  beta: 10
  ohem_ratio: 3

Optimizer:
  name: Adam
  beta1: 0.9
  beta2: 0.999
  lr:
    learning_rate: 0.00025
  regularizer:
    name: 'L2'
    factor: 0

PostProcess:
  name: DBPostProcess
  thresh: 0.3
  box_thresh: 0.6
  max_candidates: 1000
  unclip_ratio: 1.5

Metric:
  name: DetMetric
  main_indicator: hmean

Train:
  dataset:
    name: SimpleDataSet
    data_dir: ./train_data/aie2023/det/
    label_file_list:
      - ./train_data/aie2023/det/train.txt
    ratio_list: [1.0]
    transforms:
      - DecodeImage: # load image
          img_mode: BGR
          channel_first: False
      - DetLabelEncode: # Class handling label
      - IaaAugment:
          augmenter_args:
            - { 'type': Fliplr, 'args': { 'p': 0.5 } }
            - { 'type': Affine, 'args': { 'rotate': [-10, 10] } }
            - { 'type': Resize, 'args': { 'size': [0.5, 3] } }
      - EastRandomCropData:
          size: [640, 640]
          max_tries: 50
          keep_ratio: true
      - MakeBorderMap:
          shrink_ratio: 0.4
          thresh_min: 0.3
          thresh_max: 0.7
      - MakeShrinkMap:
          shrink_ratio: 0.4
          min_text_size: 8
      - NormalizeImage:
          scale: 1./255.
          mean: [0.485, 0.456, 0.406]
          std: [0.229, 0.224, 0.225]
          order: 'hwc'
      - ToCHWImage:
      - KeepKeys:
          keep_keys: ['image', 'threshold_map', 'threshold_mask', 'shrink_map', 'shrink_mask'] # the order of the dataloader list
  loader:
    shuffle: True
    drop_last: False
    batch_size_per_card: 4
    num_workers: 0
    use_shared_memory: True

Eval:
  dataset:
    name: SimpleDataSet
    data_dir: ./train_data/aie2023/det/
    label_file_list:
      - ./train_data/aie2023/det/val.txt
    transforms:
      - DecodeImage: # load image
          img_mode: BGR
          channel_first: False
      - DetLabelEncode: # Class handling label
      - DetResizeForTest:
          image_shape: [736, 1280]
      - NormalizeImage:
          scale: 1./255.
          mean: [0.485, 0.456, 0.406]
          std: [0.229, 0.224, 0.225]
          order: 'hwc'
      - ToCHWImage:
      - KeepKeys:
          keep_keys: ['image', 'shape', 'polys', 'ignore_tags']
  loader:
    shuffle: False
    drop_last: False
    batch_size_per_card: 1 # must be 1
    num_workers: 0
    use_shared_memory: True
②启动训练
如果安装了 CPU 版本,请在配置中将参数设置use_gpu为false。
python tools/train.py -c configs/det/det_mv3_db_aie2023.yml -o Global.pretrained_model=./pretrain_models/MobileNetV3_large_x0_5_pretrained在以上指令中,使用-c选择训练使用的configs/det/det_mv3_db_aie2023.yml配置文件。配置文件的详细解释请参考config。也可以-o在不修改yml文件的情况下使用来改变训练参数。例如调整训练学习率为0.0001。
# single GPU training
python tools/train.py -c configs/det/det_mv3_db_aie2023.yml -o   \
         Global.pretrained_model=./pretrain_models/MobileNetV3_large_x0_5_pretrained  \
         Optimizer.base_lr=0.0001

# multi-GPU training
# Set the GPU ID used by the '--gpus' parameter.
python -m paddle.distributed.launch --gpus '0,1,2,3'  tools/train.py -c configs/det/configs/det/det_mv3_db_aie2023.yml -o Global.pretrained_model=./pretrain_models/MobileNetV3_large_x0_5_pretrained

# multi-Node, multi-GPU training
# Set the IPs of your nodes used by the '--ips' parameter. Set the GPU ID used by the '--gpus' parameter.
python -m paddle.distributed.launch --ips="xx.xx.xx.xx,xx.xx.xx.xx" --gpus '0,1,2,3' tools/train.py -c configs/configs/det/det_mv3_db_aie2023.yml \
-o Global.pretrained_model=./pretrain_models/MobileNetV3_large_x0_5_pretrained注意:对于多Node多GPU训练,需要将ips上述命令中的值替换为自己机器的地址,并且机器之间必须能够ping通。此外,它需要在我们开始训练时分别在多台机器上激活命令。查看本机IP地址的命令为ifconfig.
如果想进一步加快训练速度,可以使用自动混合精度训练。单卡训练,命令如下:
python tools/train.py -c configs/det/det_mv3_db_aie2023.yml \
     -o Global.pretrained_model=./pretrain_models/MobileNetV3_large_x0_5_pretrained \
     Global.use_amp=True Global.scale_loss=1024.0 Global.use_dynamic_loss_scaling=True
③加载训练好的模型并继续训练
如果您希望加载训练好的模型并再次继续训练,您可以将参数指定Global.checkpoints为要加载的模型路径。例如:
python tools/train.py -c configs/det/det_mv3_db_aie2023.yml -o Global.checkpoints=./your/trained/model注意: Global.checkpoints的优先级高于Global.pretrained_model,即同时指定两个参数时,Global.checkpoints先加载指定的模型。如果指定的模型路径Global.checkpoints错误,则Global.pretrained_model加载指定的模型路径。
④用新骨干训练
待更
⑤混合精度训练和分布式训练
如果想进一步加快训练速度,可以选择混合精度训练
多机多GPU训练时,使用分布式训练
⑥知识蒸馏提高模型准确率
知识蒸馏
⑦微调
实际使用中,建议加载官方预训练模型,在自己的数据集中微调。检测模型的微调方法可以参考:模型微调教程。
注意:在下一篇文章Paddle OCR文字检测(二)中将介绍如何实施模型微调
3.评价与试验
①评价
PaddleOCR计算了三个指标来评估OCR检测任务的性能:Precision、Recall和Hmean(F-Score)。
运行以下代码计算评估指标。结果将保存在配置文件det_mv3_db_aie2023.yml中save_res_path指定的测试结果文件中。
评估时,设置后处理参数box_thresh=0.6, unclip_ratio=1.5. 如果你使用不同的数据集,不同的模型进行训练,这两个参数应该调整以获得更好的结果。
训练时的模型参数默认保存在该Global.save_model_dir目录下。在评估指标时,需要设置Global.checkpoints指向保存的参数文件。
python tools/eval.py -c configs/det/det_mv3_db_aie2023.yml  -o Global.checkpoints="{path/to/weights}/best_accuracy" PostProcess.box_thresh=0.6 PostProcess.unclip_ratio=1.5

例如:
python tools/eval.py -c configs/det/det_mv3_db_aie2023.yml  -o Global.checkpoints="output/db_mv3_aie2023/best_accuracy" PostProcess.box_thresh=0.6 PostProcess.unclip_ratio=1.5
注意:box_thresh和unclip_ratio是DB后处理需要的参数,评估EAST和SAST模型时不需要设置。
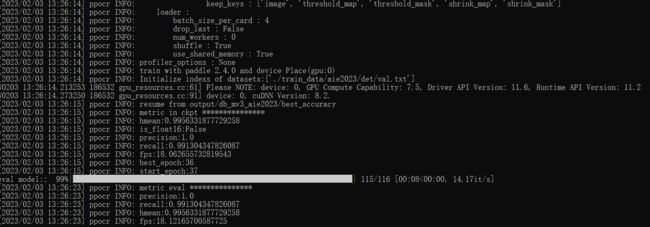
评估结果如下
②测试
在单张图片上测试检测结果:
python tools/infer_det.py -c configs/det/det_mv3_db_aie2023.yml -o Global.infer_img="./doc/imgs_en/img_10.jpg" Global.pretrained_model="./output/det_db/best_accuracy"

例如:
python tools/infer_det.py -c configs/det/det_mv3_db_aie2023.yml -o Global.infer_img="./train_data/aie2023/det/test/65_25_0197-01S-S200.bmp" Global.pretrained_model="./output/db_mv3_aie2023/best_accuracy"
单张图像测试结果如下:
测试DB模型时,调整后处理阈值:
python tools/infer_det.py -c configs/det/det_mv3_db_aie2023.yml -o Global.infer_img="./doc/imgs_en/img_10.jpg" Global.pretrained_model="./output/det_db/best_accuracy"  PostProcess.box_thresh=0.6 PostProcess.unclip_ratio=2.0

例如:
python tools/infer_det.py -c configs/det/det_mv3_db_aie2023.yml -o Global.infer_img="./train_data/aie2023/det/test/65_25_0197-01S-S200.bmp"  Global.pretrained_model="./output/db_mv3_aie2023/best_accuracy" PostProcess.box_thresh=0.6 PostProcess.unclip_ratio=2.0
在文件夹中的所有图片上测试检测结果:
python tools/infer_det.py -c configs/det/det_mv3_db_aie2023.yml -o Global.infer_img="./doc/imgs_en/" Global.pretrained_model="./output/det_db/best_accuracy"

例如:
python tools/infer_det.py -c configs/det/det_mv3_db_aie2023.yml -o Global.infer_img="./train_data/aie2023/det/test/" Global.pretrained_model="./output/db_mv3_aie2023/best_accuracy"
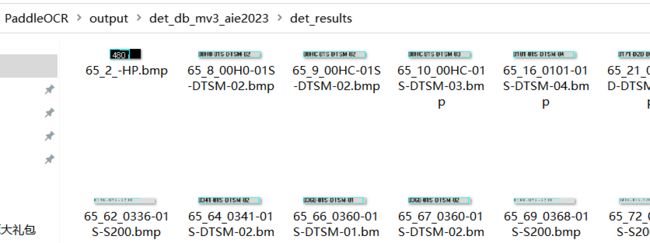
文件夹中图像测试结果:
4.推理
推理模型(保存的模型paddle.jit.save)一般是模型训练完成后保存的固化模型,多用于部署中的预测。
训练过程中保存的模型是checkpoints模型,保存模型的参数,多用于恢复训练。
与检查点模型相比,推理模型会额外保存模型的结构信息。因此,由于模型结构和模型参数已经固化在推理模型文件中,更易于部署,适合与实际系统集成。
①首先,我们可以将 DB 训练模型转换为推理模型:
python tools/export_model.py -c configs/det/det_mv3_db_aie2023.yml -o Global.pretrained_model="./output/det_db/best_accuracy" Global.save_inference_dir="./output/det_db_inference/"

例如:
python tools/export_model.py -c configs/det/det_mv3_db_aie2023.yml -o Global.pretrained_model="./output/db_mv3_aie2023/best_accuracy" Global.save_inference_dir="./output/det_db_inference_aie2023/"
DB训练模型转化的结果如下:
②检测推理模型预测:
python tools/infer/predict_det.py --det_algorithm="DB" --det_model_dir="./output/det_db_inference/" --image_dir="./doc/imgs/" --use_gpu=True

例如:
python tools/infer/predict_det.py --det_algorithm="DB" --det_model_dir="./output/det_db_inference_aie2023/"  --image_dir="./train_data/aie2023/det/test/" --use_gpu=True
推理结果如下:
如果是其他检测算法,比如EAST,需要修改det_algorithm参数为EAST,默认为DB算法:
python tools/infer/predict_det.py --det_algorithm="EAST" --det_model_dir="./output/det_db_inference/" --image_dir="./doc/imgs/" --use_gpu=True
例如:
python tools/infer/predict_det.py --det_algorithm="EAST" --det_model_dir="./output/det_db_inference_aie2023/" --image_dir="./train_data/aie2023/det/test/" --use_gpu=True
5. 常见问题
Q1:训练模型和推理模型的预测结果不一致?
A : 大多数问题是由于训练模型预测时的预处理和后处理参数与推理模型预测时的预处理和后处理参数不一致造成的。以det_mv3_db_aie2023.yml配置文件训练的模型为例,训练模型和推理模型预测结果不一致问题的解决方法如下:
检查训练好的模型预处理是否与推理模型的预测预处理函数一致。在评估算法时,输入图像的大小会影响精度。为了与论文保持一致,在训练icdar15配置文件中将图片resize为[736, 1280],但是推理模型预测时只有一组默认参数,会考虑到预测速度问题,默认情况下,图像的最长边限制为 960 以调整大小。训练模型预处理和推理模型的预处理函数位于ppocr/data/imaug/operators.py
检查训练模型的后处理是否与推理的后处理参数一致。
所以,在使用推理模型进行文字检测之前,需要将模型推理时设定的输入图像尺寸改成和模型训练时的图像尺寸一致,具体修改的参数和步骤如下:
①从det_mv3_db_aie2023.yml中可以看到模型训练时的输入图像尺寸为1280x736
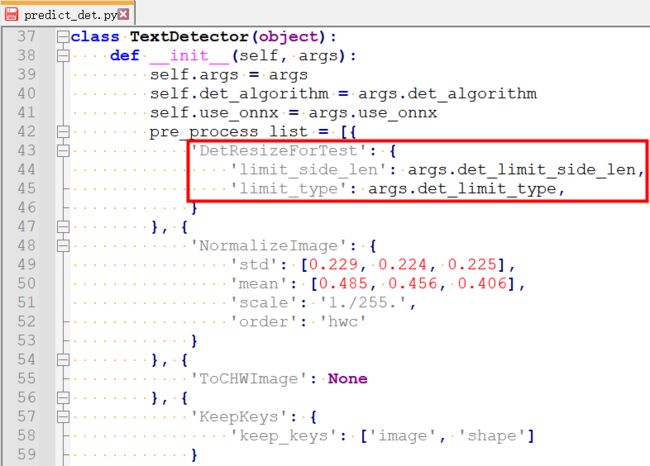
②从/tools/infer/predict_det.py中可以看到模型推理时输入图像的尺寸设置是文本检测器TextDetector初始话参数args.det_limit_side_len中的值
③从/tools/infer/utility.py中可以看到args.det_limit_side_len的值默认输入图像的长边最大值为960
④所以如果模型已经按照det_mv3_db_aie2023.yml的参数训练完成了的话,可以修改推理程序中的输入图像的尺寸和训练尺寸一致,按下图修改/tools/infer/predict_det.py和/tools/infer/utility.py即可
详情请参考
Paddle ocr文本检测https://github.com/PaddlePaddle/PaddleOCR/blob/release/2.6/doc/doc_en/detection_en.md#1-data-and-weights-preparation


