tensorflow2官方demo全流程详解
本文目的:本文主要用来学习tensorflow2的官方demo
本篇博客搭建环境为tensorflow2.4+ python3.6 + cuda11.0
官方demo地址:链接
不想去看官方文档或者想要更详细的解释可看本篇博客
一、tensorflow2介绍
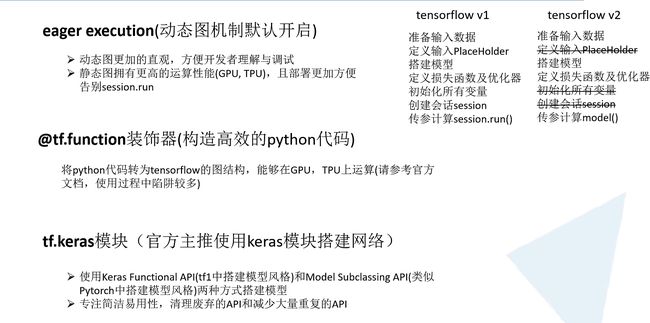
Tensorflow1与tensoflow2对比
tensorflow的一些细节
Tensorflow2.0需要注意的几点
1.tensorflowtensor的通道顺序为:[batch, height, width,channel]
2.一般tf2.0可选使用Keras Functional API(tf1中搭建模型的风格)和Model Subclassing API(类似pytorch中搭建模型的风格)两种方法搭建模型。
(本篇博客选用的是第二种方式,也正是官方文档的面向专家的快速入门)
查看tensorflowAPI或者教程可以到tensorflow官网:Release TensorFlow 2.4.0 ·tensorflow/tensorflow (github.com)
二、model.py
Model.py文件全部代码
from tensorflow.keras.layers import Dense, Conv2D, Flatten
from tensorflow.keras import models

class Mymodel(models):
    def __init__(self):
        super(Mymodel, self).__init__()
        self.conv1 = Conv2D(32, 3, activation='relu')
        self.flatten = Flatten()
        self.d1 = Dense(128, activation='relu')
        self.d2 = Dense(10, activation='softmax')
    def call(self, x):
        x = self.conv1(x)
        x = self.flatten(x)
        x = self.d1(x)
        return self.d2(x)
前面两行为导入需要用到的模块,包括全连接层,卷积层,拉直层,对于每个层可以在官方文档查看或者在pycharm中crtl + 左键可查看
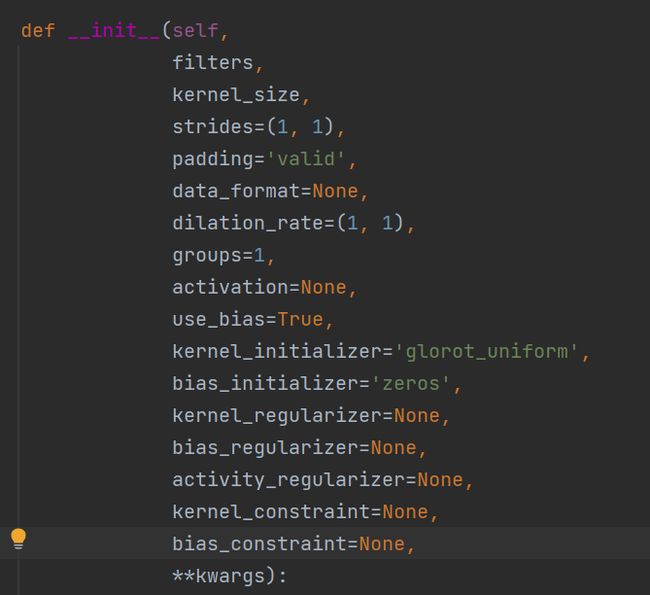
例如:在pycharm中crtl + 左键查看Conv2D
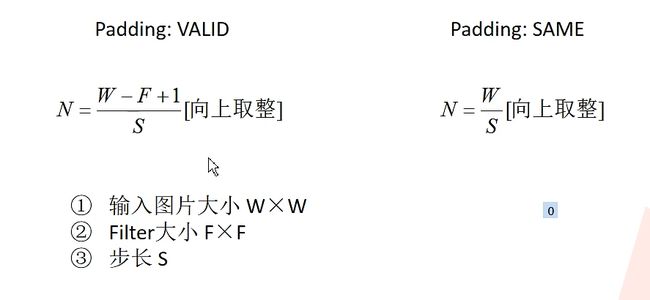
查看Conv2D层,第一个参数为卷积核个数、第二个参数为大小,第三个为步长,第四个为是否padding,padding有两个参数可选,分别为VALID,SAME,
下图中N为输出特征图高和宽大小计算公式,当选用VALID,表示不padding,当不能恰好做卷积,它会自动丢弃右边和下边参数来保证做卷积操作,选用SAME表示padding。
第五个参数是数据格式:默认channels_last=[batch,height,width, chanels] channels_first = [batch,channels, heighth width],如果不设置则为channels_last
其他参数就不具体看了
接下来是model模型的主体,使用的是Model Subclassing API这种方法来搭建的
__init__(self)表示构建模型所需要的模块,call方法定义网络正向传播过程,这里使用一个卷积层和两个全连接层
三.train.py
下载mnist手写数据集
1.以下为下载的代码:
from __future__ import absolute_import, division, print_function, unicode_literals
import tensorflow as tf
from model import Mymodel

mnist = tf.keras.datasets.mnist
# download data
(x_train, y_train), (x_test, y_test) = mnist.load_data()
x_train, x_test = x_train / 255.0, x_test / 255.0
运行该train.py,会下载数据集到C:\Users\用户名\.keras\datasets
2.查看测试集数据代码,运行我们可以查看测试集前三张图片
运行:
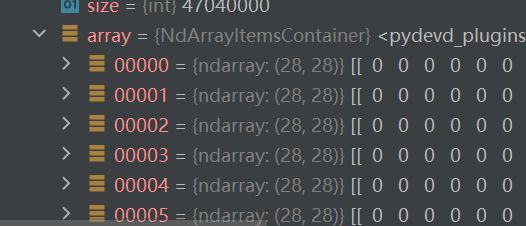
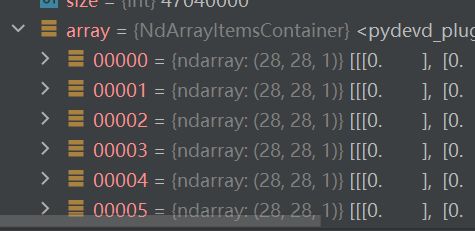
3.接下来增加通道信息,本来输入图片只有高和宽,拓展了一个维度,变成了高宽深三个维度,加上batch为四个维度
增加前:
增加后:
增加维度代码:
x_train = x_train[..., tf.newaxis]
x_test = x_test[..., tf.newaxis]
4.接下来数据增加迭代器,定义模型,损失,优化器,定义训练损失,准确率,测试损失,准确率
# create data generator
train_ds = tf.data.Dataset.from_tensor_slices(
    (x_train, y_train)).shuffle(10000).batch(32)
test_ds = tf.data.Dataset.from_tensor_slices((x_test, y_test)).batch(32)
# create model
model = Mymodel()
# define loss
loss_object = tf.keras.losses.SparseCategoricalCrossentropy()
# define optimizer
optimizer = tf.keras.optimizers.Adam()
# define train_loss and train_accuracy
train_loss = tf.keras.metrics.Mean(name='train_loss')
train_accuracy = tf.keras.metrics.SparseCategoricalAccuracy(name='train_accuracy')
# define test_loss and test_accuracy
test_loss = tf.keras.metrics.Mean(name='test_loss')
test_accuracy = tf.keras.metrics.SparseCategoricalAccuracy(name='test_accuracy')
一些细节:
1)其中,shuffle(10000)表示一次性读入内存10000张图片,在10000张图片中进行batch为32的随机采样。
2)一般shuffle中对应的数值越大越能体现整体数据的随机采样过程。但一般会受到内存的限制,不能设置过大
3)tf.keras.losses.SparseCategoricalCrossentropy()损失函数用来处理,非one-hot类型的标签值。而CategoricalCrossentropy()处理one-hot类型的标签值。
例如标签[0,1,2,3]为非one-hot类型
[1,0,0,0,0,0,0,0,0,0]
[0,1,0,0,0,0,0,0,0,0]
[0,0,1,0,0,0,0,0,0,0]
[0,0,0,1,0,0,0,0,0,0]
为对应的one-hot类型
再定义训练函数和测试函数
# define train function including calculating loss, applying gradient and calculating accuracy
@tf.function  # 加上这个表示使用tensorflow的图结构数据
def train_step(images, labels):
    with tf.GradientTape() as tape:
        predictions = model(images)
        loss = loss_object(labels, predictions)
    gradients = tape.gradient(loss, model.trainable_variables)
    optimizer.apply_gradients(zip(gradients, model.trainable_variables))
    train_loss(loss)
    train_accuracy(labels, predictions)

@tf.function
def test_step(images, labels):
    predictions = model(images)
    t_loss = loss_object(labels, predictions)
    test_loss(t_loss)
test_accuracy(labels, predictions)与Pytorch不同,tensorflow不会自动跟踪每一个可训练参数的梯度,所以需要使用tf.GradientTape()与with上下文管理器配合使用。
@tf.function作用:构建高效的python代码,将python代码转为tensorflow的图结构,能够在GPU,TPU上运算。加上@tf.function后的python代码部分不可以在函数内部设置断点进行调试,但训练速度会大大提升。
迭代5轮
epochs = 5
for epoch in range(epochs):
    train_loss.reset_states()
    train_accuracy.reset_states()
    test_loss.reset_states()
    test_accuracy.reset_states()
    for images, labels in train_ds:
        train_step(images, labels)
    for test_images, test_labels in test_ds:
        test_step(test_images, test_labels)
    template = 'epoch:{}, loss:{}, accuracy:{}, test_loss:{}, test_accuracy:{}'
    print(template.format(epoch + 1,
                          train_loss.result() * 100,
                          train_accuracy.result(),
                          test_loss.result() * 100,
                          test_accuracy.result()))
完整train.py代码如下
from __future__ import absolute_import, division, print_function, unicode_literals
import tensorflow as tf
from model import Mymodel
import numpy as np
import matplotlib.pyplot as plt
import os
os.environ['TF_XLA_FLAGS'] = '--tf_xla_enable_xla_devices'
os.environ['TF_CPP_MIN_LOG_LEVEL'] = '2'
mnist = tf.keras.datasets.mnist
# download data
(x_train, y_train), (x_test, y_test) = mnist.load_data()
x_train, x_test = x_train / 255.0, x_test / 255.0
# 查看数据集图片
# imgs = x_test[0:3]
# labels = y_test[0:3]
# print(labels)
# img_plot = np.hstack(imgs)
# plt.imshow(img_plot, cmap='gray')
# plt.show()
# add a channels dimension
x_train = x_train[..., tf.newaxis]
x_test = x_test[..., tf.newaxis]
# create data generator
train_ds = tf.data.Dataset.from_tensor_slices(
    (x_train, y_train)).shuffle(10000).batch(32)
test_ds = tf.data.Dataset.from_tensor_slices((x_test, y_test)).batch(32)
# create model
model = Mymodel()
# define loss
loss_object = tf.keras.losses.SparseCategoricalCrossentropy()
# define optimizer
optimizer = tf.keras.optimizers.Adam()
# define train_loss and train_accuracy
train_loss = tf.keras.metrics.Mean(name='train_loss')
train_accuracy = tf.keras.metrics.SparseCategoricalAccuracy(name='train_accuracy')
# define test_loss and test_accuracy
test_loss = tf.keras.metrics.Mean(name='test_loss')
test_accuracy = tf.keras.metrics.SparseCategoricalAccuracy(name='test_accuracy')

# define train function including calculating loss, applying gradient and calculating accuracy
@tf.function  # 加上这个表示使用tensorflow的图结构数据
def train_step(images, labels):
    with tf.GradientTape() as tape:
        predictions = model(images)
        loss = loss_object(labels, predictions)
    gradients = tape.gradient(loss, model.trainable_variables)
    optimizer.apply_gradients(zip(gradients, model.trainable_variables))
    train_loss(loss)
    train_accuracy(labels, predictions)

@tf.function
def test_step(images, labels):
    predictions = model(images)
    t_loss = loss_object(labels, predictions)
    test_loss(t_loss)
    test_accuracy(labels, predictions)

epochs = 5
for epoch in range(epochs):
    train_loss.reset_states()
    train_accuracy.reset_states()
    test_loss.reset_states()
    test_accuracy.reset_states()
    for images, labels in train_ds:
        train_step(images, labels)
    for test_images, test_labels in test_ds:
        test_step(test_images, test_labels)
    template = 'epoch:{}, loss:{}, accuracy:{}, test_loss:{}, test_accuracy:{}'
    print(template.format(epoch + 1,
                          train_loss.result() * 100,
                          train_accuracy.result(),
                          test_loss.result() * 100,
                          test_accuracy.result()))
运行后结果:
测试集准确率98.12%
