np.meshgrid, ravel(), np.c_, plt.contourf()函数的用法,以及决策边界的画法。
前言: 楼主最近在学机器学习时碰到的一些函数,用来画决策边界。记录现在的想法。
1: np.meshgrid的用法:
X,Y = np.meshgrid(x,y)是将x中的每个点与y中的每个点连起来成为坐标,例如x是(300,)的array, 比如x=array(1,2,......300),y是(200,)的array,y=array(1,2,.......200)。那么得到的X,Y都是(200,300)的array。X=array([[1,2,.....300],[1,2,.....300],[1,2,.....300],...........[1,2,.....300]],相当于把x的元素复制了len(y)的长度。而Y=array([[1,1,.........1],[2,........2],[3,.......3],......[200,........200]])。Y每一个一维向量长度都为len(x)。
import numpy as np

x = np.linspace(1, 300, 300)
y = np.linspace(1, 200, 200)
X, Y = np.meshgrid(x, y)


# 得到结果
'''
X = [[  1.   2.   3. ... 298. 299. 300.]
 [  1.   2.   3. ... 298. 299. 300.]
 [  1.   2.   3. ... 298. 299. 300.]
 ...
 [  1.   2.   3. ... 298. 299. 300.]
 [  1.   2.   3. ... 298. 299. 300.]
 [  1.   2.   3. ... 298. 299. 300.]]

Y=  [[  1.   1.   1. ...   1.   1.   1.]
 [  2.   2.   2. ...   2.   2.   2.]
 [  3.   3.   3. ...   3.   3.   3.]
 ...
 [198. 198. 198. ... 198. 198. 198.]
 [199. 199. 199. ... 199. 199. 199.]
 [200. 200. 200. ... 200. 200. 200.]]
'''
2:ravel()
ravel()的用法是把多维数组拉成一维数组:
import numpy as np

x = np.random.randn(5,4)
print(x)
print(x.shape)

'''
x=
[[ 0.17086596 -0.57977474  1.13563738  0.24395295]
 [ 0.30278266 -1.47973336  0.98314375  1.63522343]
 [-0.50617984 -0.21090076  0.11548333 -1.63088674]
 [-0.55658075 -0.34304816 -1.01107859 -1.63546229]
 [ 1.36377652 -2.03799223 -1.31337364 -0.86417854]]
x.shape = (5, 4)

y =
[ 0.17086596 -0.57977474  1.13563738  0.24395295  0.30278266 -1.47973336
  0.98314375  1.63522343 -0.50617984 -0.21090076  0.11548333 -1.63088674
 -0.55658075 -0.34304816 -1.01107859 -1.63546229  1.36377652 -2.03799223
 -1.31337364 -0.86417854]
y.shape = (20,)
'''
3: np.c_
np.c_的作用就是把数组按照列元素来连接,对于1维数组,如下:
import numpy as np

x = np.linspace(1, 5, 5)
y = np.linspace(2, 6, 5)
z = np.c_[x, y]
print(x, x.shape)
print(y, y.shape)
print(z, z.shape)

'''
x=
[1. 2. 3. 4. 5.] (5,)
y=
[2. 3. 4. 5. 6.] (5,)
z=
[[1. 2.]
 [2. 3.]
 [3. 4.]
 [4. 5.]
 [5. 6.]] (5, 2)
'''
对于2维数组:
import numpy as np

x = np.random.randint(1, 5, (2, 3))
y = np.random.randint(5, 8, (2, 3))
z = np.c_[x, y]
print(x, x.shape)
print(y, y.shape)
print(z, z.shape)

'''
x=
[[4 3 1]
 [3 2 3]] (2, 3)
y=
[[7 7 7]
 [5 6 7]] (2, 3)
z=
[[4 3 1 7 7 7]
 [3 2 3 5 6 7]] (2, 6)'''

# 可以看出z是由x, y按照一维拼接起来
对于高维数组:
import numpy as np

x = np.random.randint(1, 5, (2, 3, 2))
y = np.random.randint(5, 8, (2, 3, 2))
z = np.c_[x, y]
print(x, x.shape)
print(y, y.shape)
print(z, z.shape)

'''
x=
[[[1 3]
  [4 3]
  [2 4]]

 [[2 1]
  [3 2]
  [4 1]]] (2, 3, 2)
y=
[[[5 7]
  [5 7]
  [5 5]]

 [[7 6]
  [6 7]
  [6 7]]] (2, 3, 2)
z=
[[[1 3 5 7]
  [4 3 5 7]
  [2 4 5 5]]

 [[2 1 7 6]
  [3 2 6 7]
  [4 1 6 7]]] (2, 3, 4)'''
import numpy as np
x = np.random.randint(1, 5, (2, 3, 2, 3))
y = np.random.randint(5, 8, (2, 3, 2, 3))
z = np.c_[x, y]
print(x, x.shape)
print(y, y.shape)
print(z, z.shape)
'''
x=
[[[[2 4 3]
[4 4 4]]
[[2 3 3]
[3 1 1]]
[[1 3 1]
[4 1 2]]]
[[[3 4 1]
[1 2 1]]
[[1 4 1]
[4 1 4]]
[[2 4 3]
[1 1 1]]]] (2, 3, 2, 3)
y=
[[[[6 5 5]
[5 7 7]]
[[7 7 6]
[7 7 6]]
[[5 6 7]
[7 6 5]]]
[[[6 6 7]
[6 6 7]]
[[5 6 6]
[6 5 6]]
[[6 6 5]
[6 6 5]]]] (2, 3, 2, 3)
z=
[[[[2 4 3 6 5 5]
[4 4 4 5 7 7]]
[[2 3 3 7 7 6]
[3 1 1 7 7 6]]
[[1 3 1 5 6 7]
[4 1 2 7 6 5]]]
[[[3 4 1 6 6 7]
[1 2 1 6 6 7]]
[[1 4 1 5 6 6]
[4 1 4 6 5 6]]
[[2 4 3 6 6 5]
[1 1 1 6 6 5]]]] (2, 3, 2, 6)'''综上:可以看出np.c_连接两个数组的最后一维的列向量。
4:plt.contourf的用法
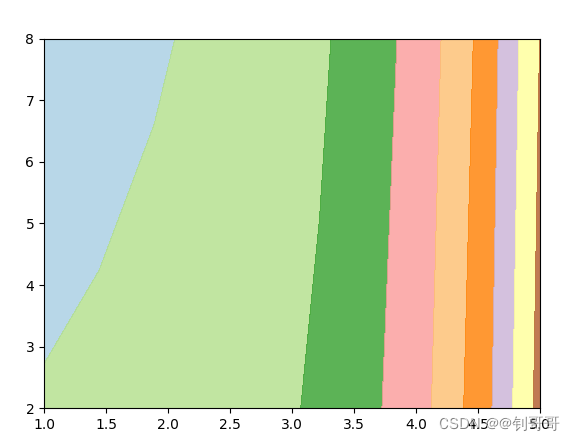
作用:绘制轮廓线与等高线 。例如:
import numpy as np
import matplotlib.pyplot as plt

x = np.linspace(1, 5, 10)
y = np.linspace(2, 8, 10)
xx, yy = np.meshgrid(x, y)

z = np.exp(xx)-yy

plt.contourf(x, y, z, cmap=plt.cm.Paired, alpha=0.8)
plt.show()
5:应用
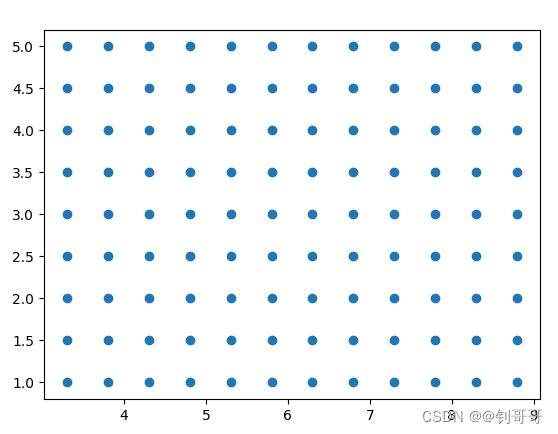
把上述函数连接起来用,就能在二维平面生成许多的等顺序排列的点
import numpy as np
import matplotlib.pyplot as plt

h = 0.5              # 为了便于观察h设的很大
x1min = 3.3
x1max = 8.9
x2min = 1.0
x2max = 5.4
xx, yy = np.meshgrid(np.arange(x1min, x1max, h),
                   np.arange(x2min, x2max, h))

'''
xx=[[3.3 3.8 4.3 4.8 5.3 5.8 6.3 6.8 7.3 7.8 8.3 8.8]
 [3.3 3.8 4.3 4.8 5.3 5.8 6.3 6.8 7.3 7.8 8.3 8.8]
 [3.3 3.8 4.3 4.8 5.3 5.8 6.3 6.8 7.3 7.8 8.3 8.8]
 [3.3 3.8 4.3 4.8 5.3 5.8 6.3 6.8 7.3 7.8 8.3 8.8]
 [3.3 3.8 4.3 4.8 5.3 5.8 6.3 6.8 7.3 7.8 8.3 8.8]
 [3.3 3.8 4.3 4.8 5.3 5.8 6.3 6.8 7.3 7.8 8.3 8.8]
 [3.3 3.8 4.3 4.8 5.3 5.8 6.3 6.8 7.3 7.8 8.3 8.8]
 [3.3 3.8 4.3 4.8 5.3 5.8 6.3 6.8 7.3 7.8 8.3 8.8]
 [3.3 3.8 4.3 4.8 5.3 5.8 6.3 6.8 7.3 7.8 8.3 8.8]]
yy=[[1.  1.  1.  1.  1.  1.  1.  1.  1.  1.  1.  1. ]
 [1.5 1.5 1.5 1.5 1.5 1.5 1.5 1.5 1.5 1.5 1.5 1.5]
 [2.  2.  2.  2.  2.  2.  2.  2.  2.  2.  2.  2. ]
 [2.5 2.5 2.5 2.5 2.5 2.5 2.5 2.5 2.5 2.5 2.5 2.5]
 [3.  3.  3.  3.  3.  3.  3.  3.  3.  3.  3.  3. ]
 [3.5 3.5 3.5 3.5 3.5 3.5 3.5 3.5 3.5 3.5 3.5 3.5]
 [4.  4.  4.  4.  4.  4.  4.  4.  4.  4.  4.  4. ]
 [4.5 4.5 4.5 4.5 4.5 4.5 4.5 4.5 4.5 4.5 4.5 4.5]
 [5.  5.  5.  5.  5.  5.  5.  5.  5.  5.  5.  5. ]]
'''

t = np.c_[xx.ravel(), yy.ravel()]
print(t)

plt.scatter(xx, yy)
plt.show()
得到图形:
在sklearn中的iris数据集中,
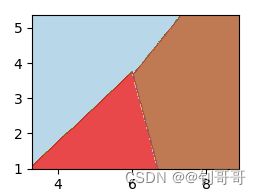
这时候就可以把两个图结合,把第一个图的每个点带入预测函数里,得到标签,这时候上图的点就能被分成三部分:
这时候就得到了决策边界,成功把数据集划分。


