Spring面试八股文最后一篇
大家好,我是路人zhang,今天分享的是Spring面试的最后一篇,关于SpringMVC和Springboot,后续会整理到面试手册中。在公众号回复“面试手册”,获取面试手册PDF版,在线版已更新:www.mianshi.online
推荐阅读:
-
Spring面试八股文第四弹
-
JVM面试八股文第三弹(完结)
-
面试八股文系列
-
程序人生系列
文章目录:
-
SpringMVC
-
什么是SpringMVC
-
SpringMVC的优点
-
SpringMVC的工作原理
-
Springboot
-
什么是Springboot
-
Springboot的特点(Springboot和Spring有什么区别)
-
Spring Boot 自动配置原理
-
Spring Boot 配置加载顺序
-
Spring Boot 的核心注解是哪个?它主要由哪几个注解组成的?
-
Spring Boot 打成的 jar 和普通的 jar 有什么区别 ?
SpringMVC
什么是SpringMVC
Spring MVC 是 Spring 提供的一个基于 MVC 设计模式的轻量级 Web 开发框架,本质上相当于 Servlet。它将model、view、controller分离,对web层进行解耦,把复杂的web应用分成逻辑清晰的几部分,简化开发,减少出错,方便组内开发人员之间的配合。
MVC设计模式,Model View Controller,Model表示一个存取数据的对象,View表示模型包含数据的可视化,Controller用于控制数据流向模型对象,并在数据变化时更新视图,使用MVC设计模式可以将模型、视图、控制器分离,对业务系统各个组件进行解耦,提高系统的可维护性和扩展性。
SpringMVC的优点
这部分参考网络博客,主要是简单几下前几个就差不多了
-
清晰的角色划分,控制器(controller)、验证器(validator)、命令对象(command obect)、表单对象(form object)、模型对象(model object)、Servlet分发器(DispatcherServlet)、处理器映射(handler mapping)、试图解析器(view resoler)等等。每一个角色都可以由一个专门的对象来实现。
-
代码可重用性高,可以使用现有的业务对象作为命令或表单对象,而不需要去扩展某个特定框架的基类。
-
强大而直接的配置方式:将框架类和应用程序类都能作为JavaBean配置,支持跨多个context的引用,例如,在web控制器中对业务对象和验证器validator)的引用。
-
可适配、非侵入:可以根据不同的应用场景,选择何事的控制器子类(simple型、command型、from型、wizard型、multi-action型或者自定义),而不是一个单一控制器(比如Action/ActionForm)继承。
-
可定制的绑定(binding)和验证(validation):比如将类型不匹配作为应用级的验证错误,这可以保证错误的值。再比如本地化的日期和数字绑定等等。在其他某些框架中,你只能使用字符串表单对象,需要手动解析它并转换到业务对象。
-
灵活的model转换:在Springweb框架中,使用基于Map的键/值对来达到轻易的与各种视图技术集成。
SpringMVC的工作原理
这是非常重要的一个知识点,也是面试过程中经常会问的
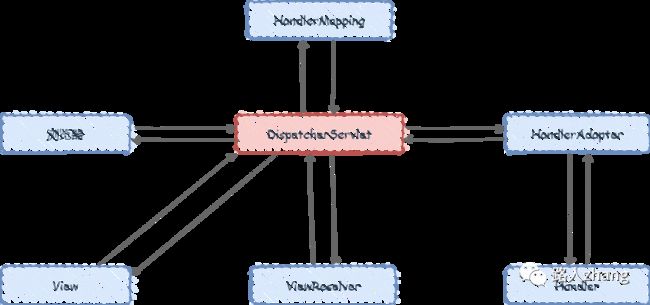
流程图如下:
流程说明:
(1)客户端发出一个http请求,web应用服务器接收到这个请求,如果匹配到DispatcherServlet的请求映射路径,web容器会将这个http请求交给DispatcherServlet处理
(2)-(3)DispatcherServlet接收到请求后,根据请求的信息与HandlerMapping的配置找到处理请求的Handler
(4)-(5)DispatcherServlet找到Handler后,通过HandlerAdapter对Handler进行封装,然后再调用Handler
(6)-(7)Handler处理业务逻辑,并返回ModelAndView到DispatcherServlet,ModelAndView包含了视图逻辑名和模型数据信息
(8)-(9)ModelAndView包含的并非真正的视图对象,DispatcherServlet借助ViewResolver完成逻辑视图名到真实视图对象的解析工作
(10)-(11)DispatcherServlet通过真实视图对象View对ModelAndView中的模型数据进行视图渲染
(12)将渲染的结果返回给客户端
Springboot
什么是Springboot
Springboot是一个Java开源框架,其目的主要是用来简化Spring应用的开发过程。
Springboot的特点(Springboot和Spring有什么区别)
-
内嵌tomcat和jetty容器,不需要部署war文件到Web容器就可以独立运行应用
-
提供许多基于Maven的pom配置模板来简化工程配置
-
可以实现自动化配置
-
开箱即用,不需要xml等配置文件
Spring Boot 自动配置原理
这是一个面试高频题
Springboot相比于Spring最大的区别就是简化了各种配置,只需要一行@SpringBootApplication注解,项目就能启动起来,非常方便。那么Springboot是如何实现自动配置的呢?
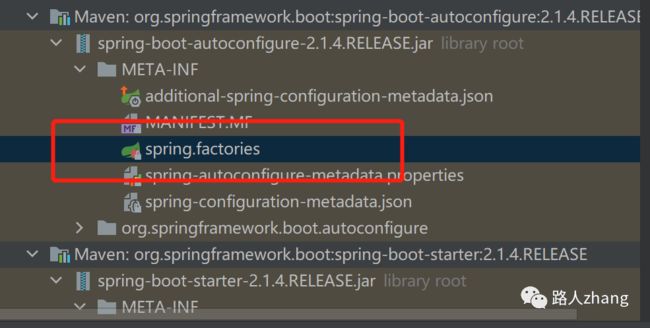
简单来说就是@SpringBootApplication注解会对jar包下的spring.factories文件进行扫描,这个文件中包含了可以进行自动配置的类,当满足@Condition注解指定的条件时,便在依赖的支持下进行实例化,注册到Spring容器中。
下面看看具体是怎么实现的?点开@SpringBootApplication注解,发现里面又包含了很多注解,如下
@Target({ElementType.TYPE})
@Retention(RetentionPolicy.RUNTIME)
@Documented
@Inherited
@SpringBootConfiguration
@EnableAutoConfiguration
@ComponentScan(
    excludeFilters = {@Filter(
    type = FilterType.CUSTOM,
    classes = {TypeExcludeFilter.class}
), @Filter(
    type = FilterType.CUSTOM,
    classes = {AutoConfigurationExcludeFilter.class}
)}
)
public @interface SpringBootApplication {
    @AliasFor(
        annotation = EnableAutoConfiguration.class
    )
    Class[] exclude() default {};

    @AliasFor(
        annotation = EnableAutoConfiguration.class
    )
    String[] excludeName() default {};

    @AliasFor(
        annotation = ComponentScan.class,
        attribute = "basePackages"
    )
    String[] scanBasePackages() default {};

    @AliasFor(
        annotation = ComponentScan.class,
        attribute = "basePackageClasses"
    )
    Class[] scanBasePackageClasses() default {};
}
可以很容易看到@EnableAutoConfiguration注解的名字和自动配置是非常相近的,这也是Springboot实现自动配置的关键,点开@EnableAutoConfiguration注解,如下
@Target({ElementType.TYPE})
@Retention(RetentionPolicy.RUNTIME)
@Documented
@Inherited
@AutoConfigurationPackage
@Import({AutoConfigurationImportSelector.class})
public @interface EnableAutoConfiguration {
    String ENABLED_OVERRIDE_PROPERTY = "spring.boot.enableautoconfiguration";

    Class[] exclude() default {};

    String[] excludeName() default {};
}
这里需要重点关注的是@Import注解,点开如下,截取两个比较重要的方法
    public String[] selectImports(AnnotationMetadata annotationMetadata) {
        if (!this.isEnabled(annotationMetadata)) {
            return NO_IMPORTS;
        } else {
            //加载自动配置的元信息
            AutoConfigurationMetadata autoConfigurationMetadata = AutoConfigurationMetadataLoader.loadMetadata(this.beanClassLoader);
            AutoConfigurationImportSelector.AutoConfigurationEntry autoConfigurationEntry = this.getAutoConfigurationEntry(autoConfigurationMetadata, annotationMetadata);
            return StringUtils.toStringArray(autoConfigurationEntry.getConfigurations());
        }
    }

    protected AutoConfigurationImportSelector.AutoConfigurationEntry getAutoConfigurationEntry(AutoConfigurationMetadata autoConfigurationMetadata, AnnotationMetadata annotationMetadata) {
        if (!this.isEnabled(annotationMetadata)) {
            return EMPTY_ENTRY;
        } else {
            AnnotationAttributes attributes = this.getAttributes(annotationMetadata);
            //获取候选的配置类
            List configurations = this.getCandidateConfigurations(annotationMetadata, attributes);
            //去掉重复的配置类
            configurations = this.removeDuplicates(configurations);
            //获得注解中被exclude和excludeName排除的类的集合
            Set exclusions = this.getExclusions(annotationMetadata, attributes);
            this.checkExcludedClasses(configurations, exclusions);
            //从候选配置类中去除掉被排除的类
            configurations.removeAll(exclusions);
            //根据条件过滤
            configurations = this.filter(configurations, autoConfigurationMetadata);
            this.fireAutoConfigurationImportEvents(configurations, exclusions);
            //返回符合条件的自动配置类的全限定名数组
            return new AutoConfigurationImportSelector.AutoConfigurationEntry(configurations, exclusions);
        }
    }
从上述代码可以看到符合条件的自动配置类也是经过很多条件筛选出来的,看到获取配置类的方法是getCandidateConfigurations,打开如下
    protected List getCandidateConfigurations(AnnotationMetadata metadata, AnnotationAttributes attributes) {
        List configurations = SpringFactoriesLoader.loadFactoryNames(this.getSpringFactoriesLoaderFactoryClass(), this.getBeanClassLoader());
        Assert.notEmpty(configurations, "No auto configuration classes found in META-INF/spring.factories. If you are using a custom packaging, make sure that file is correct.");
        return configurations;
    }
这时又看到了loadFactoryNames方法,继续打开,
    public static List loadFactoryNames(Class factoryClass, @Nullable ClassLoader classLoader) {
        String factoryClassName = factoryClass.getName();
        return (List)loadSpringFactories(classLoader).getOrDefault(factoryClassName, Collections.emptyList());
    }

    private static Map> loadSpringFactories(@Nullable ClassLoader classLoader) {
        MultiValueMap result = (MultiValueMap)cache.get(classLoader);
        if (result != null) {
            return result;
        } else {
            try {
                //获取配置类的url
                Enumeration urls = classLoader != null ? classLoader.getResources("META-INF/spring.factories") : ClassLoader.getSystemResources("META-INF/spring.factories");
                LinkedMultiValueMap result = new LinkedMultiValueMap();

                while(urls.hasMoreElements()) {
                    URL url = (URL)urls.nextElement();
                    UrlResource resource = new UrlResource(url);
                    //封装成Properties对象
                    Properties properties = PropertiesLoaderUtils.loadProperties(resource);
                    Iterator var6 = properties.entrySet().iterator();

                    while(var6.hasNext()) {
                        Entry entry = (Entry)var6.next();
                        String factoryClassName = ((String)entry.getKey()).trim();
                        String[] var9 = StringUtils.commaDelimitedListToStringArray((String)entry.getValue());
                        int var10 = var9.length;

                        for(int var11 = 0; var11 < var10; ++var11) {
                            String factoryName = var9[var11];
                            result.add(factoryClassName, factoryName.trim());
                        }
                    }
                }

                cache.put(classLoader, result);
                return result;
            } catch (IOException var13) {
                throw new IllegalArgumentException("Unable to load factories from location [META-INF/spring.factories]", var13);
            }
        }
    }
终于看到了获取spring.factories的代码,上述代码主要就是通过SpringFactoriesLoader加载器加载META-INF/spring.factories文件,首先通过这个文件获取到每个配置类的url,再通过这些url将它们封装成Properties对象,最后解析内容存于Map中
回到前面,就是通过getCandidateConfigurations方法调用loadFactoryNames方法,loadFactoryNames方法调用loadFactoryNames方法方法,获取到了原始的配置类,然后再经过去重过滤等操作通过selectImports()方法返回一个自动配置类的全限定名数组。
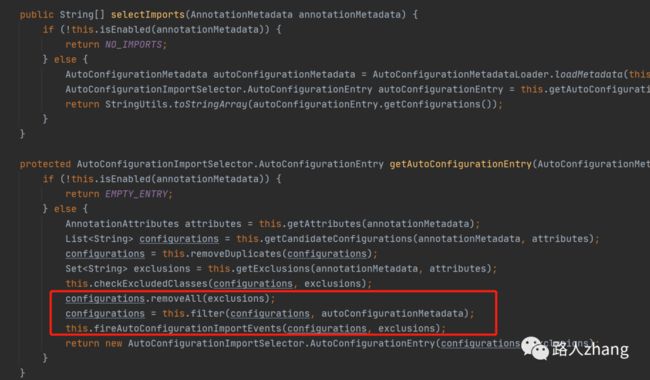
因为前有个过滤配置类的地方,如下
所以还有一些可以配置过滤条件的注解,如下
-
@ConditionalOnJava,使用指定的 Java 版本时生效
-
@ConditionalOnNotWebApplication,当前应用不是 web 应用时生效
-
@ConditionalOnWebApplication,当前应用是 web 应用时生效
-
@ConditionalOnBean,容器中存在指定的 Bean 时生效
-
@ConditionalOnResource,类路径下存在指定的资源文件时生效
-
@ConditionalOnExpression, 满足指定的 SpEL 表达式时生效
-
@ConditionalOnProperty,系统中指定属性存在指定的值时生效
-
@ConditionalOnClass,存在指定的类时生效
-
@ConditionalOnSingleCandidate ,当指定的bean在容器中只有一个,或者存在多个时但指定了首选的bean
Spring Boot 配置加载顺序
关于这个问题,官网有着比较详细的说明,https://docs.spring.io/spring-boot/docs/2.1.11.RELEASE/reference/html/boot-features-external-config.html
简单总结下
情况1
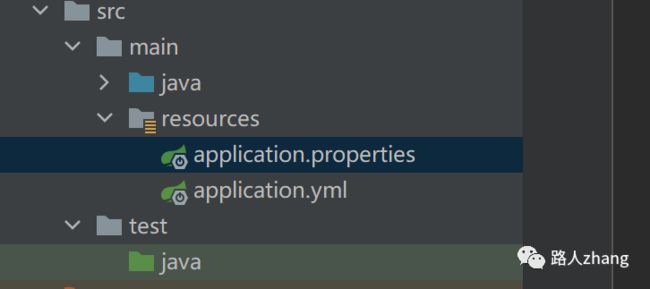
当同目录同时存在application.properties和application.yml时,哪个优先级会更高呢?我试了以下
结论是application.properties,也就是说两个文件存在相同配置,application.properties会覆盖application.yml
情况2
当在这四个位置同时存在配置文件,它们的优先级是什么样的呢?
结论是1423,官方原文如下:
-
A
/configsubdirectory of the current directory -
The current directory
-
A classpath
/configpackage -
The classpath root
就是1处的配置文件的优先级最高
情况3
外部配置优先级,从高到底,官方原文如下:
-
Devtools global settings properties on your home directory (
~/.spring-boot-devtools.propertieswhen devtools is active). -
@TestPropertySourceannotations on your tests. -
propertiesattribute on your tests. Available on@SpringBootTestand the test annotations for testing a particular slice of your application. -
Command line arguments.
-
Properties from
SPRING_APPLICATION_JSON(inline JSON embedded in an environment variable or system property). -
ServletConfiginit parameters. -
ServletContextinit parameters. -
JNDI attributes from
java:comp/env. -
Java System properties (
System.getProperties()). -
OS environment variables.
-
A
RandomValuePropertySourcethat has properties only inrandom.*. -
Profile-specific application properties outside of your packaged jar (
application-{profile}.propertiesand YAML variants). -
Profile-specific application properties packaged inside your jar (
application-{profile}.propertiesand YAML variants). -
Application properties outside of your packaged jar (
application.propertiesand YAML variants). -
Application properties packaged inside your jar (
application.propertiesand YAML variants). -
@PropertySourceannotations on your@Configurationclasses. Please note that such property sources are not added to theEnvironmentuntil the application context is being refreshed. This is too late to configure certain properties such aslogging.*andspring.main.*which are read before refresh begins. -
Default properties (specified by setting
SpringApplication.setDefaultProperties).
在网上找了个翻译过的,如下
1、开发者工具 `Devtools` 全局配置参数;

2、单元测试上的 `@TestPropertySource` 注解指定的参数;

3、单元测试上的 `@SpringBootTest` 注解指定的参数;

4、命令行指定的参数,如 `java -jar springboot.jar --name="Java技术栈"`;

5、命令行中的 `SPRING_APPLICATION_JSONJSON` 指定参数, 如 `java -Dspring.application.json='{"name":"Java技术栈"}' -jar springboot.jar`

6、`ServletConfig` 初始化参数;

7、`ServletContext` 初始化参数;

8、JNDI参数(如 `java:comp/env/spring.application.json`);

9、Java系统参数(来源:`System.getProperties()`);

10、操作系统环境变量参数;

11、`RandomValuePropertySource` 随机数,仅匹配:`ramdom.*`;

12、JAR包外面的配置文件参数(`application-{profile}.properties(YAML)`)

13、JAR包里面的配置文件参数(`application-{profile}.properties(YAML)`)

14、JAR包外面的配置文件参数(`application.properties(YAML)`)

15、JAR包里面的配置文件参数(`application.properties(YAML)`)

16、`@Configuration`配置文件上 `@PropertySource` 注解加载的参数;

17、默认参数(通过 `SpringApplication.setDefaultProperties` 指定);
Spring Boot 的核心注解是哪个?它主要由哪几个注解组成的?
Springboot最核心的注解是@SpringBootApplication,主要包含了三个注解
-
@SpringBootConfiguration:组合了 @Configuration 注解,实现配置文件的功能
-
@EnableAutoConfiguration:打开自动配置的功能
-
@ComponentScan:Spring组件扫描
Spring Boot 打成的 jar 和普通的 jar 有什么区别 ?
Springboot打包成的jar包是可执行的,可以通过java-jar xxx.jar命令执行,普通的jar包是不能被执行的,但Springboot打包成的jar包是不可以被依赖的,而普通的jar包是可以被依赖的。
