1. GitHub/Gitee
- 为开发者提供远程仓库的托管服务,让开发者与朋友、同事、陌生人共享代码的场所,同时也提供一些高效率的功能,同时也能实现软件版本管理。
- Issue:是将一个任务或问题分配给一个Issue进行追踪和管理的功能。
- Wiki:能够随时对一遍文章进行更改并保存,常用于开发文档或手册的编写。
- Pull Request:推送更改或功能添加,请求合并到仓库中。
2. 安装Git
- 下载地址:https://git-scm.com/download/win,一路默认安装即可了。
- 安装完成后,选择右键菜单选项Git Bash Here,打开git控制台。

- 输入命令设置姓名和邮箱地址,该信息将会用在Git的提交日志中,因为是公开的,请不要使用不便公开的隐私信息,尽量不要使用中文名称,以免出现编码错误。
git config --global user.name "Firstname Lastname"
git config --global user.email "[email protected]"
3. 访问仓库
- 通常,作为程序开发者,我们把远程仓库的代码下载到本地仓库中,并修改/调试/增加代码后,然后将本地代码上传到远程仓库中,完成版本管理。那么我们可以通过SSH等方式连接远程仓库,此时需要一个密钥才能安全连接。
ssh-keygen -t ed25519 -C "[email protected]"
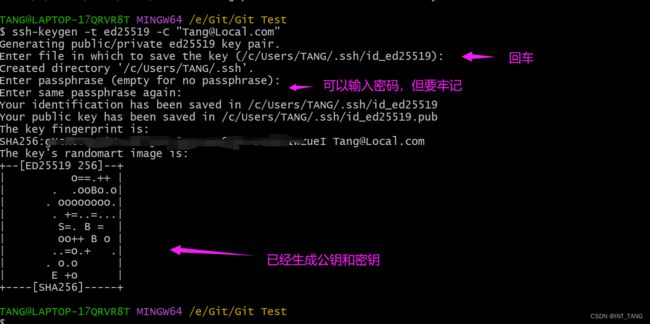
cat ~/.ssh/id_ed25519.pub
- gitee的操作
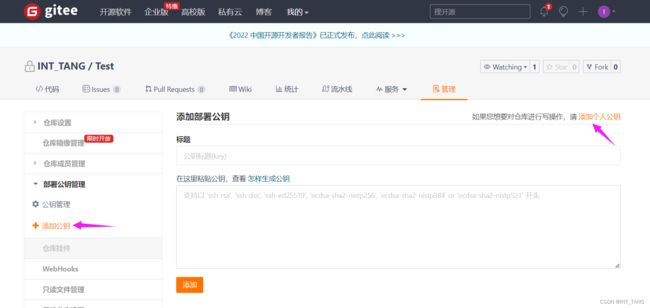
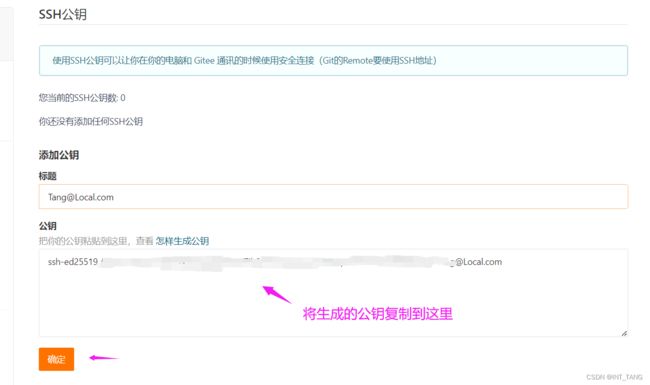
- github操作
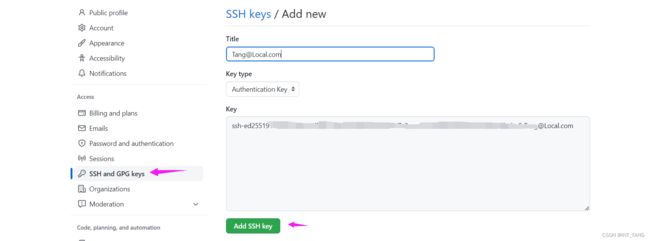
- Git配置多个SSH-Key,在 ~/.ssh 目录下新建一个 config 文件,添加如下内容(其中 Host 和 HostName 填写 git 服务器的域名,IdentityFile 指定私钥的路径),配置后我们可以切换访问GitHub或者gitee。
Host gitee.com
HostName gitee.com
PreferredAuthentications publickey
IdentityFile ~/.ssh/id_ed25519
Host github.com
HostName github.com
PreferredAuthentications publickey
IdentityFile ~/.ssh/id_ed25519
ssh-keygen -t rsa -C 'xxxxx' -f ~/.ssh/gitee_id_rsa
ssh-keygen -t rsa -C 'xxxxx' -f ~/.ssh/github_id_rsa
- 测试SSH连接
ssh -T [email protected]
ssh -T [email protected]
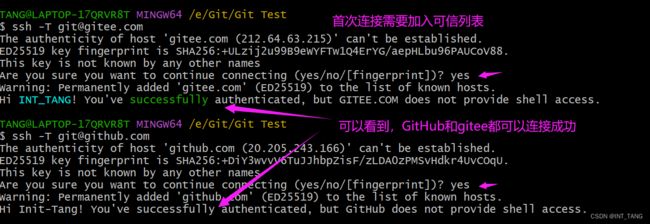
- 克隆远程已有仓库到本地仓库
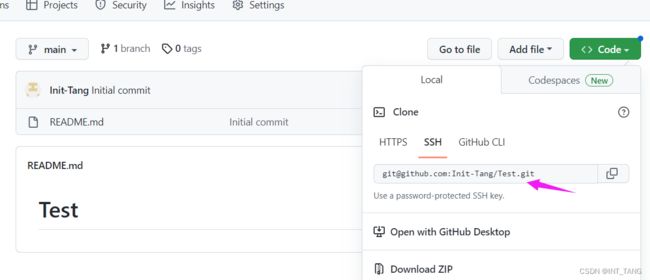

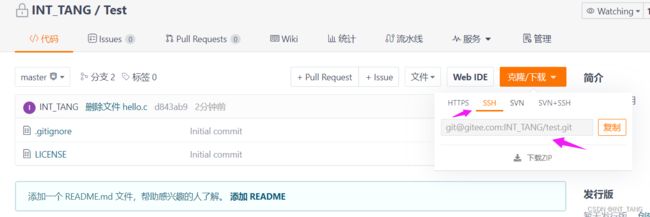

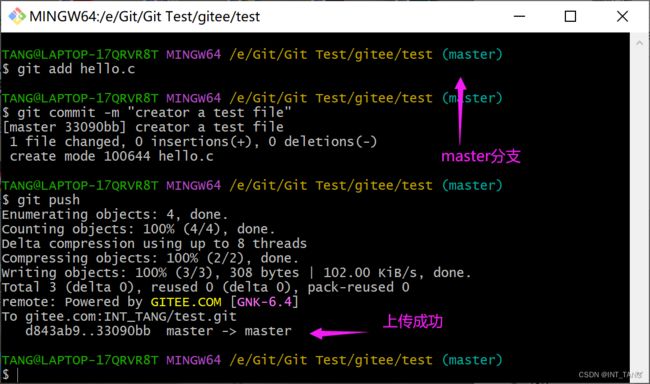
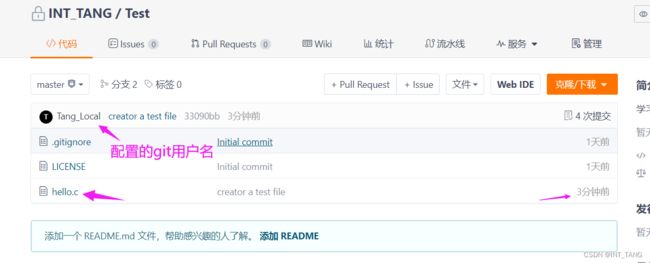
- 试验一下,在克隆后的目录新建一个hello.c文件,并推送到远程仓库中,使用以下的命令。
git add hello.c
git commit -m "creator a test file"
git push

4. Git常用命令
git init 初始化仓库
git init
Initialized empty Git repository in E:/Git/Git Test/gituser/.git/
git status 查看仓库状态
git status
On branch master
Your branch is up to date with 'origin/master'.
nothing to commit, working tree clean
git add 向暂存区添加文件,成为Git仓库管理对象。
git add README.MD
git commit 保存仓库的历史记录
git commit -m "creator a test file"
git diff 查看更改前后的差别
git diff
diff --git a/hello.c b/hello.c
index e69de29..2220740 100644
--- a/hello.c
+++ b/hello.c
@@ -0,0 +1 @@
+12346
\ No newline at end of file
git diff HEAD
git log 查看日志信息- 分支:在进行多个并行作业时,会用到分支,master为默认的分支,从该分支可以派生其他分支,到最后可以合并在一起。
git branch 显示分支一览表
git branch
* master
git checkout 创建切换分支
git checkout -b dev1
Switched to a new branch 'dev1'
git merge 合并分支
git merge --no-ff dev1
Merge made by the 'ort' strategy.
13.c | 0
1 file changed, 0 insertions(+), 0 deletions(-)
create mode 100644 13.c
git reset 回溯历史版本
git reset --hard 33090bb4c1b655f291d8138a39e25b973aa45bc1
HEAD is now at 33090bb creator a test file
git remote add 添加远程仓库
git remote add [email protected]:INT_TANG/test.git
usage: git remote add [<options>] <name> <url>

    -f, --fetch           fetch the remote branches
    --tags                import all tags and associated objects when fetching
                          or do not fetch any tag at all (--no-tags)
    -t, --track <branch>  branch(es) to track
    -m, --master <branch>
                          master branch
    --mirror[=(push|fetch)]
                          set up remote as a mirror to push to or fetch from
git push 推送至远程仓库
git push -u origin dev1
Enumerating objects: 3, done.
Counting objects: 100% (3/3), done.
Delta compression using up to 8 threads
Compressing objects: 100% (2/2), done.
Writing objects: 100% (2/2), 303 bytes | 151.00 KiB/s, done.
Total 2 (delta 0), reused 0 (delta 0), pack-reused 0
remote: Powered by GITEE.COM [GNK-6.4]
remote: Create a pull request for 'dev1' on Gitee by visiting:
remote: https://gitee.com/INT_TANG/test/pull/new/INT_TANG:dev1...INT_TANG:master
To gitee.com:INT_TANG/test.git
* [new branch] dev1 -> dev1
branch 'dev1' set up to track 'origin/dev1'.
git clone 获取远程仓库
git clone [email protected]:Init-Tang/Test.git
git pull 获取最新的远程仓库分支
git pull origin develop
From gitee.com:INT_TANG/test
 * branch            develop    -> FETCH_HEAD
Already up to date.
5. 一般Pull Request流程
- 当我们发现bug或代码修改增加等,就需要使用Pull Request来更新仓库内容。
- 如果是我们自己创建的远程仓库,直接clone到本地仓库修改提交就行了,因为我们拥有自己仓库的所有权。
- 如果是别人的仓库,首先把别人的仓库Fork到自己的远程仓库中,因为我们没有被授权操作该仓库。

- 此时我们的远程仓库就存有与他人仓库相同的代码,然后将复制(Fork)的仓库clone到本地中。
- 然后在本地仓库中新建一个分支来操作(重要),然后开始修改代码/修复bug等操作。

- 修改完成后提交git暂存和管理。
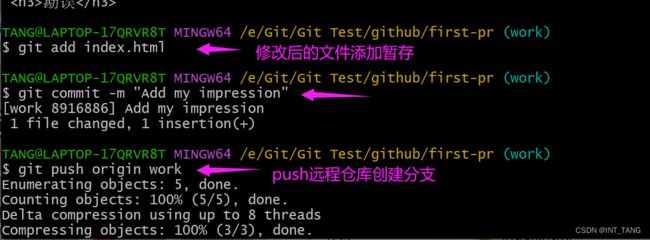

- 创建Pull Request。

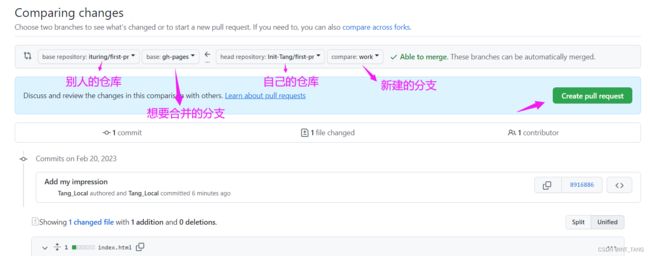
- 接下来等待他人的审核,就完成了Pull Request,如果是团队合作开发,那么应该使用为每个开发者添加公钥获取仓库权限的开发方式更方便。


