Pytorch入门(二) 第3章 张量 tensor
Pytorch入门(二) 第3章 张量 tensor
- 目标
- 3.1 浮点数 floating numbers
- 3.2 Tensors
- 3.3 Indexing tensors 索引
- 3.4 Named tensors 命名
- 3.5 Tensor element types 元素类型
- 3.6 Tensor API
- 3.7 从存储的角度分析tensor
- 3.8 Size, offset, and stride
- 3.9 将tensors转移到GPU
- 3.10 与NumPy互操作
声明:本文是阅读《Deep Learning With Pytorch》所做的笔记,以方便学习pytorch,详细内容请阅读原书。
首先要将输入的数据转为浮点数 floating- point number,本章主要学习如何用张量来处理浮点数。
目标
- 张量是什么?
- 张量的操作
- 与NumPy中多维数组的互换
- 通过GPU为计算提速
3.1 浮点数 floating numbers
首先必须深刻理解PyTorch如何处理和储存数据,包括 输入 input、中间表示 intermediate representations、输出 output
tensor 也就是将数组扩展到多维,也叫多维数组 multidimensional array。一个tensor的维度就是指一个tensor内标量值的个数。
3.2 Tensors
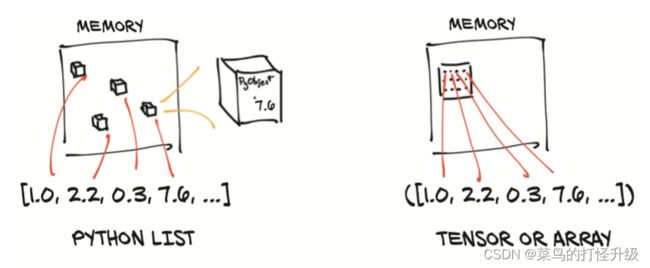
!!!tensor 的本质

Python列表或数字元组是在内存中单独分配的Python对象的集合,如上图左边所示。而 Pytorch 的 Tensors 或 Numpy 数组(通常)是连续的内存块。 正如上图右边所示,每个元素都是32位(4字节)的浮点数,这意味着存储1,000,000浮点数的一维张量将需要恰好4,000,000的连续字节,以及一些小开销(例如维度和数字类型)。
3.3 Indexing tensors 索引
和python中对list的索引操作一样。
3.4 Named tensors 命名
- 对每个维度进行命名
# input
> weights_named = torch.tensor([0.2126, 0.7152, 0.0722], names=['channels'])
> weights_named.sum('channels')

# output
tensor(1.)
- 给已有的tensor加上名字:refine_names
# input
> img_t = torch.randn(3, 5, 5) # shape [channels, rows, columns]
> img_named = img_t.refine_names(..., 'channels', 'rows', 'columns')
> print("img named:", img_named.shape, img_named.names)

# output
img named: torch.Size([3, 5, 5]) ('channels', 'rows', 'columns')
- 维度对齐: align_as
# input
> weights_aligned = weights_named.align_as(img_named)
> weights_aligned.shape, weights_aligned.names

# output
(torch.Size([3, 1, 1]), ('channels', 'rows', 'columns'))
⚠️ 如果结合不同名字的维度,会报错!
- 去掉名字: renamed(None)
# input
> weights = weights_named.rename(None)
> weights.names

# output
(None,)
3.5 Tensor element types 元素类型
python中的数字是对象,存储和处理相对于大量输血计算来说是低效的,因此应依靠 Numpy或者 PyTorch 中的Tensor 来处理,会更高效。为此,一个tensor中的对象必须都是相同类型的数字,并且PyTorch要跟踪此数字类型。
- 指定数据类型: dtype
PyTorch默认的数据类型是 32位浮点数。主要的数字类型为 float32 和 int64。
| represent | meaning |
|---|---|
| torch.float32 or torch.float | 32-bit floating-point |
| torch.float64 or torch.double | 64-bit, double-precision floating-point |
| torch.float16 or torch.half | 16-bit, half-precision floating-point |
| torch.int8 | signed 8-bit integers |
| torch.uint8 | unsigned 8-bit integers |
| torch.int16 or torch.short | signed 16-bit integers |
| torch.int32 or torch.int | signed 32-bit integers |
| torch.int64 or torch.long | signed 64-bit integers |
| torch.bool | Boolean |
- 管理 tensor 数据类型的属性
- 指定数据类别
# input
> double_points = torch.ones(10, 2, dtype=torch.double)
> double_points.dtype

# output
torch.float64
> short_points = torch.ones(10, 2).short()
> double_points = torch.zeros(10, 2).to(torch.double)
3.6 Tensor API
| tensor operation | example |
|---|---|
| creation | ones, from_numpy |
| Indexing,slicing, joining, mutating | transpose |
| pointwise | abs, cos |
| reduction | mean, std, norm |
| comparison | equal, max |
| spectral | stft, hamming_window |
| Other | trace |
| BLAS and LAPACK | |
| rabdom ampling | randn, normal |
| serialiazation | load, save |
| parallelism | set_num_threads |
3.7 从存储的角度分析tensor
# input
> points = torch.tensor([[4.0, 1.0], [5.0, 3.0], [2.0, 1.0]])
> points.storage()

# output
 4.0
 1.0
 5.0
 3.0
 2.0
 1.0
[torch.FloatStorage of size 6]
在内存里,实际是以一个大小为6 的连续数组。因此,我们不能通过两个指数去定位一个2维tensor的存储。存储结构永远是一维数组。
# input
points_storage = points.storage()
points_storage[0]

# output
4.0
通过改变存储位置的值,就会使得相应tensor也发生变化。
# input
> points_storage[0] = 2.0
> points

# Output
tensor([[2., 1.], [5., 3.], [2., 1.]])
3.8 Size, offset, and stride

size:每个维度元素的个数
offset:相对第一个元素的索引
stride:在每个维度下,索引+1所需要跳过的元素个数。
> second = points[0]
> second.storage_offset()
0

> second = points[1]
> second.storage_offset()
2

> second = points[2]
> second.storage_offset()
4

> points.stride()
(2,1)
⚠️注意,second是points的子张量,对second的改变会影响points的改变。
> second[0]=7.0
> points
tensor([[10.,  1.],
        [ 5.,  3.],
        [ 7.,  1.]])
所以,最好克隆子张量成为一个新的张量。
> third = points[1].clone()
> third[0] = 20
> points
tensor([[10.,  1.],
        [ 5.,  3.],
        [ 7.,  1.]])
- transposing without copying: t function
> points_t = points.t()
> points_t
tensor([[10.,  5.,  7.],
        [ 1.,  3.,  1.]])
此时,两个tensor是相同的存储位置,它们只是shape和stride不一样。
> id(points.storage()) == id(points_t.storage())
True

> points.stride(), points_t.stride()
((2, 1), (1, 2))
- 高维 transposing:可指定在哪两个维度进行转换
> some = torch.ones(3,4,5)
> some.stride()
(20, 5, 1)

> some_t = some.transpose(0,2)
> some_t.stride()
(1, 5, 20)
- 连续性tensor
在PyTorch中,有一些操作是要求tensor是连续的,如view,在上面的例子中,points是连续的,但points_t是不连续的。
> points.is_contiguous
True

> points_t.is_contiguous()
False
我们可以通过 contiguous 方法从不连续的tensors获得连续的tensors。
> points.stride()
(2, 1)

> points_t.stride()
(1, 2)

> points_t_cont = points_t.contiguous()
> points_t_cont
tensor([[10.,  5.,  7.],
        [ 1.,  3.,  1.]])

> points_t_cont.stride()
(3, 1)
3.9 将tensors转移到GPU
- 在GPU上创建tensor
> points_gpu = torch.tensor([[4.0, 1.0], [5.0, 3.0], [2.0, 1.0]], device='cuda')
- 复制的方式转移到GPU
> points_gpu = points.to(device='cuda')
- 多个GPU的情况下,选择哪块GPU进行操作
> points_gpu = points.to(device='cuda:0')
- 将GPU上的数据转回CPU
> points_cpu = points_gpu.to(device='cpu')
- 其他方法
> points_gpu = points.cuda()
> points_gpu = points.cuda(0)
> points_cpu = points_gpu.cpu()
3.10 与NumPy互操作
> points_np = points.numpy()
> points = torch.from_numpy(points_np)
该数组与tensor共享存储空间,因此对该数组的修改也会影响对应tensor的结果

