Python计算机视觉(三)—— 图像映射
文章目录
- 一、图像到图像的映射
- 二、单应性变换
-
-
- 2.1 直接线性变换算法
- 2.2 仿射变换
-
- 三、图像扭曲
-
-
- 3.1 图像中的图像
- 3.2 分段仿射扭曲
-
一、图像到图像的映射
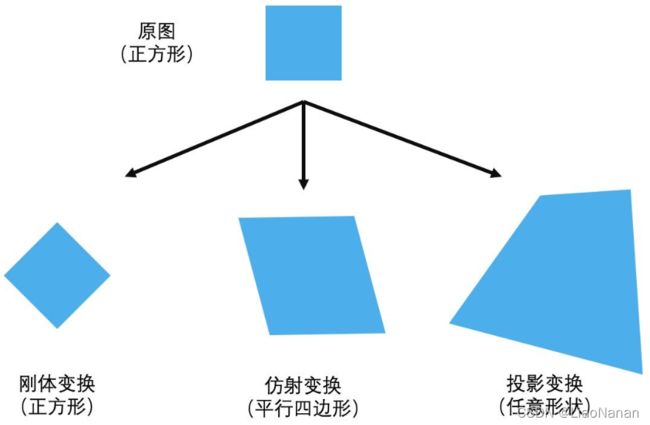
图像映射的基本类型:
- translation(位移)
- rotation(旋转)
- scale(尺度/大小)
- affine(仿射)
- Perspective(透视)
二、单应性变换
定义:单应性变换是将一个平面内的点映射到另一个平面内的二维投影变换。在这里,平面是指图像或者三维中的平面表面。单应性变换具有很强的实用性,比如图像配准、 图像纠正和纹理扭曲,以及创建全景图像。我们将频繁地使用单应性变换。本质上, 单应性变换 H H H,按照下面的方程映射二维中的点(齐次坐标意义下):

对于图像平面内的点,齐次坐标是个非常有用的表示方式。点的齐次坐标是依赖于其尺度定义的,所以 x = [ x , y , w ] = [ α x , α y , α w ] = [ x / w , y / w , 1 ] x=[x,y,w]=[αx,αy,αw]=[x/w,y/w,1] x=[x,y,w]=[αx,αy,αw]=[x/w,y/w,1]都表示同一个二维点。因此,单应性矩阵 H H H也仅依赖尺度定义,所以,单应性矩阵具有 8 个独立的自由度。

我们通常使用 w = 1 w=1 w=1来归一化点,这样,点具有唯一的图像坐标 x x x和 y y y 。这个额外的坐标使得我们可以简单地使用一个矩阵来表示变换。
根据对应点约束,每个对应点可以写出两个方程,分别对应于 x 和 y 坐标。因此,计算单应性矩阵 H 需要4个对应点对
对点进行归一化和转换齐次坐标的功能:
def normallize(points):
    """在齐次坐标意义下,对点集进行归一化,是最后一行为1"""
    for row in points:
        row /= points[-1]
    return points

def make_homog(points):
    """将点集(dim×n的数组)转换为齐次坐标表示"""
    return vstack((points,ones((1, points.shape[1]))))
2.1 直接线性变换算法
DLT(Direct Linear Transformation,直接线性变换)是给定4个或者更多对应点对 矩阵,来计算单应性矩阵 H H H的算法。将单应性矩阵 H H H作用在对应点对上,重新写出该方程,我们可以得到下面的方程:

或者 A h = 0 Ah=0 Ah=0,其中 A A A 是一个具有对应点对二倍数量行数的矩阵。将这些对应点对方程的系数堆叠到一个矩阵中,我们可以使用 SVD(Singular Value Decomposition, 奇异值分解)算法找到 H H H 的最小二乘解。
def H_from_points(fp, tp):
    """使用线性DLT方法,计算单应性矩阵H,使fp映射到tp。点自动进行归一化"""
    if fp.shape != tp.shape:
        raise RuntimeError('number of points do not match')

    # 对点进行归一化(对数值计算很重要)
    # --- 映射起始点 ---
    m = mean(fp[:2], axis=1)
    maxstd = max(std(fp[:2], axis=1)) + 1e-9
    C1 = diag([1/maxstd, 1/maxstd, 1])
    C1[0][2] = -m[0]/maxstd
    C1[1][2] = -m[1]/maxstd
    fp = dot(C1,fp)

    # --- 映射对应点 ---
    m = mean(tp[:2], axis=1)
    maxstd = max(std(tp[:2], axis=1)) + 1e-9
    C2 = diag([1 / maxstd, 1 / maxstd, 1])
    C2[0][2] = -m[0] / maxstd
    C2[1][2] = -m[1] / maxstd
    tp = dot(C2, tp)

    # 创建用于线性方法的矩阵,对于每个对应对,在矩阵中会出现两行数值
    nbr_correspondences = fp.shape[1]
    A = zeros((2 * nbr_correspondences, 9))
    for i in range(nbr_correspondences):
        A[2*i] = [-fp[0][i], -fp[1][i],-1,0,0,0,
                  tp[0][i]*fp[0][i],tp[0][i]*fp[1][i],tp[0][i]]
        A[2*i+1] = [0,0,0,-fp[0][i],-fp[1][i],-1,
                    tp[1][i]*fp[0][i],tp[1][i]*fp[1][i],tp[1][i]]

    U,S,V = linalg.svd(A)
    H = V[8].reshape((3,3))

    #反归一化
    H = dot(linalg.inv(C2),dot(H,C1))

    #归一化,然后返回
    return H / H[2,2]
函数对这些点进行归一化操作,使其均值为 0,方差为 1。然后使用对应点对来构造矩阵 A A A。矩阵 SVD 分解后所得矩阵 V V V的最后一行为最小二乘解该行经过变形后得到矩阵 H H H。然后对这个矩阵进行处理和归一化,返回输出。
因为算法的稳定性取决于坐标的表示情况和部分数值计算的问题,所以归一化操作非常重要。
2.2 仿射变换
仿射变换可以写为如下矩阵形式:

由于仿射变换具有 6 个自由度,因此我们需要三个对应点对来估计矩阵 H H H,仿射变换可以用上面的 DLT 算法估计得出。
三、图像扭曲
对图像块应用仿射变换,我们将其称为图像扭曲(或者仿射扭曲)。
扭曲操作可以使用 SciPy 工具包中的 ndimage 包来简单完成。命令:
transformed_im = ndimage.affine_transform(im,A,b,size)
A:线性变换;	b:平移向量;	size:指定输出图像的大小(默认输出图像设置为和原始图像同样大小)
代码演示:
from scipy import ndimage
from PIL import Image
from pylab import *

im = array(Image.open(r'img/JMU.jpg').convert('L'))
H = array([[1.4,0.05,-100],[0.05,1.5,-100],[0,0,1]])
im2 = ndimage.affine_transform(im,H[:2,:2],(H[0,2],H[1,2]))

figure()
gray()
subplot(121)
imshow(im)
subplot(122)
imshow(im2)
show()
3.1 图像中的图像
仿射扭曲的一个简单例子是,将图像或者图像的一部分放置在另一幅图像中,使得它们能够和指定的区域或者标记物对齐。
函数 image_in_image():输入参数为两幅图像和 一个坐标。该坐标为将第一幅图像放置到第二幅图像中的角点坐标
def image_in_image(im1, im2, tp):
    """使用仿射变换将im1放置在im2上,使im1图像的角和tp尽可能的靠近
        tp是齐次表示的,并且是按照从左上角逆时针计算的"""

    # 扭曲的点
    m,n = im1.shape[:2]
    fp = array([0,m,m,0],[0,0,n,n],[1,1,1,1])

    # 计算仿射变换,并且将其应用于图像im1中
    H = homography.Haffine_from_points(tp, fp)
    im1_t = ndimage.affine_transform(im1,H[:2,:2],
                                     (H[0,2],H[1,2]),im2.shape[:2])
    alpha = (im1_t > 0)
    return (1-alpha)*im2 + alpha*im1_t
效果演示:
from PCV.geometry import warp, homography
from PIL import Image
from pylab import *
from scipy import ndimage

# 将im1仿射扭曲到im2的指定位置
im1 = array(Image.open(r'img/JMU.jpg').convert('L'))
im2 = array(Image.open(r'img/display.png').convert('L'))
# 选定指定的位置,即目标点
tp = array([[25,391,391,26],[677,677,26,26],[1,1,1,1]])
# 调用的warp.py的image_in_image函数,从而实现仿射变换
im3 = warp.image_in_image(im1, im2, tp)
figure()
gray()
subplot(131)
axis('off')
imshow(im1)
subplot(132)
axis('off')
imshow(im2)
subplot(133)
axis('off')
imshow(im3)
axis('off')
show()
3.2 分段仿射扭曲
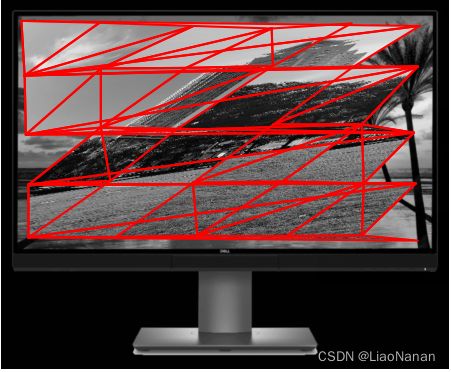
分段仿射扭曲是通过给定任意图像的标记点,通过将这些点进行三角剖分,然后使用仿射扭曲来扭曲每个三角形,然后将图像和另一幅图像的对应标记点扭曲对应。
三角剖分函数:
# 三角剖分的函数
def triangulate_points(x, y):
    """二维点的 Delaunay 三角剖分"""
    tri = Delaunay(np.c_[x, y]).simplices
    return tri
分段仿射图像扭曲的通用扭曲函数
def pw_affine(fromim,toim,fp,tp,tri):
    """ Warp triangular patches from an image.
        fromim = image to warp
        toim = destination image
        fp = from points in hom. coordinates
        tp = to points in hom.  coordinates
        tri = triangulation. """

    im = toim.copy()

    # check if image is grayscale or color
    is_color = len(fromim.shape) == 3

    # create image to warp to (needed if iterate colors)
    im_t = zeros(im.shape, 'uint8')

    for t in tri:
        # compute affine transformation
        H = homography.Haffine_from_points(tp[:,t],fp[:,t])

        if is_color:
            for col in range(fromim.shape[2]):
                im_t[:,:,col] = ndimage.affine_transform(
                    fromim[:,:,col],H[:2,:2],(H[0,2],H[1,2]),im.shape[:2])
        else:
            im_t = ndimage.affine_transform(
                    fromim,H[:2,:2],(H[0,2],H[1,2]),im.shape[:2])

        # alpha for triangle
        alpha = alpha_for_triangle(tp[:,t],im.shape[0],im.shape[1])

        # add triangle to image
        im[alpha>0] = im_t[alpha>0]

    return im
绘制三角形函数
def plot_mesh(x,y,tri):
""" Plot triangles. """
for t in tri:
         t_ext = [t[0], t[1], t[2], t[0]]
         plot(x[t_ext],y[t_ext],'r')
效果演示:
from PCV.geometry import warp, homography
from PIL import Image
from pylab import *
from scipy import ndimage

# 打开图像,并将其扭曲
fromim = array(Image.open(r'img/JMU.jpg').convert('L'))
x,y = meshgrid(range(5),range(6))
x = (fromim.shape[1]/4) * x.flatten()
y = (fromim.shape[0]/5) * y.flatten()
# 三角剖分
tri = warp.triangulate_points(x, y)
# 打开图像
im = array(Image.open(r'img/display.png').convert('L'))
gray()
imshow(im)
# 手工选取目标点
tp = plt.ginput(30)
for i in range(0, len(tp)):
    tp[i] = list(tp[i])
    tp[i][0] = int(tp[i][0])
    tp[i][1] = int(tp[i][1])
tp = array(tp)

# 将点转换成齐次坐标
fp = vstack((y, x, ones((1, len(x)))))
tp = vstack((tp[:, 1], tp[:, 0], ones((1, len(tp)))))
# 扭曲三角形
im = warp.pw_affine(fromim, im, fp, tp, tri)
# 绘制图像
figure()
imshow(im)
# 绘制三角形
warp.plot_mesh(tp[1], tp[0], tri)
axis('off')
show()


