使用Git将代码上传到Github
本文仅当做个人的工作笔记,如有错误,请指教。该方案适合于Linux系统操作。
① 首先,需要在你的本机上安装git,安装命令是:
sudo apt-get install git② 接着,在github上创建你自己的新的repository,如名称是RepTest:


③ 在本机上配置你的git环境,所配置的信息都存在~/.gitconfig文件中:
git config --global user.name "yourname"   # yourname是你的自定义用户名
git config --global user.email  "[email protected]"  # [email protected]自定义邮箱
git config --global color.ui true  # 设置命令代码多颜色显示
git config --list  # 查看已配置的环境信息

# git config --global --unset user.name  # 如果需要时,删除user.name环境信息
④ 然后cd命令,进入你想要上传的文件夹的目录内。比如,你想要上传本地的Test文件夹的所有内容,那么先要进入到cd Test。注意,github不支持大于100M的文件上传,因此,你要将相应大内存的文件删除。接着,进行git环境的初始化:
$cd Test
$Test> rm -f XXXX
$Test> git init
⑤ 将本地的git仓库和Github官网仓库通过密匙进行连接。主要是先在本地进行命令:
ssh-keygen -t rsa -C "[email protected]" # 该邮箱是你的Github注册邮箱,建议和本地git环境中的邮箱相同。该命令尽量直接一路enter,都使用默认值。结果会产生在~/.ssh中。
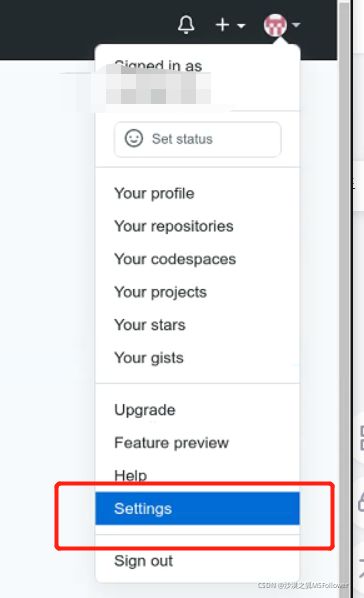
cat ~/.ssh/id_rsa.pub # 查看生成的公匙,并对其进行复制。或者直接找到id_rsa.pub文件,复制其内容⑥ 在"Setting"的"SSH and GPG keys"中新建"New SSH keys",并将⑤中复制的内容粘贴到相应的文本框。结束后可以看到:

⑦ 处理⑥之后,我们通过如下命令进行与Github的连接测试,并收到相应连接成功的反馈。
ssh -T [email protected]![]()
在该步有可能会遇到如下问题:
sign_and_send_pubkey: signing failed: agent refused operation
Permission denied (publickey).
此时,我们可以使用以下命令来解决:
ssh-agent -s
ssh-add
⑧ 接着,我们通过建立新的repository时github提供的命令,来将本地仓库的代码上传到github上来:

git init
git add .   # add后面跟的是你上传的文件名称,如果是.表示选择了全部文件。该命令主要将文件加载进缓存
# 若要删除某文件缓存, git rm --cached  /XXX/文件路径
git commit -m  "commit"  # commit是你自定义的上传记录名称
git branch -M main  # 在本地建立一个reposiroty的分支
git remote add origin git@XXX  # 建立github上对应项目的链接
# 若要删除可用命令:  git remote rm origin
git push -u origin main  # 将本地分支上传到github上
⑨ 如果在git push -u origin main之后,出现以下错误:
ERROR: You're using an RSA key with SHA-1, which is no longer allowed. Please use a newer client or a different key type.
Please see https://github.blog/2021-09-01-improving-git-protocol-security-github/ for more information.

fatal: Could not read from remote repository.

Please make sure you have the correct access rights
and the repository exists.
那么其实是因为github不再支持SHA-1的加密方式了,需要将加密方式改为ECDSA。具体的处理方法是将步骤⑤改为以下内容,其他步骤不变。
ssh-keygen -t ecdsa -b 521 -C "[email protected]"
cat ~/.ssh/id_ecdsa.pub
⑩ git是不能传送超过100MB的大文件的,因此我们在上传之前需要将大于100MB的文件进行删除。如果没有在git初始化之前将文件删除,那么这些大文件将被添加到git的缓存中,导致无法上传。
remote: error: See http://git.io/iEPt8g for more information.
remote: error: File XXXXXXX/pytorch_model.bin is 392.51 MB; this exceeds GitHub's file size limit of 100.00 MB
remote: error: File XXXXXXX/tf_model.h5 is 456.15 MB; this exceeds GitHub's file size limit of 100.00 MB
remote: error: File XXXXXXX/flax_model.msgpack is 390.21 MB; this exceeds GitHub's file size limit of 100.00 MB
remote: error: GH001: Large files detected. You may want to try Git Large File Storage - https://git-lfs.github.com.
To [email protected]:XXXXXXX.git
针对大文件被添加到缓存中,这里有两种不同的方法进行处理:
1)当本次上传不是第一次使用commit时,我们可以借助以下编码将commit记录回溯到添加大文件之前,然后重新进行git add .。
# 查看提交记录
$ git log
# 找到提交前的commit,重置
$ git reset xxxxx
2) 当本次上传是第一次使用commit时,这时我们无法找到添加大文件之前的commit记录,因此无法重新将文件添加到git仓库中。这时,我们需要首先在缓存中找到大文件的地址,然后将其从缓存中删除。
# 首先找出这些大文件的地址和编码
git rev-list --all | xargs -rL1 git ls-tree -r --long | sort -uk3 | sort -rnk4 | head -10

# 比如输出如下:
100644 blob 6ee3c76a33df60e4033ff5a98b14e676699e0244 478309336	XXXX/tf_model.h5
100644 blob 3a7c6799461da36e15918851c62a788c55eb706d 411577189	XXXX/pytorch_model.bin
100644 blob 8126450f7d3d2ae1e5e6f2860d6b11567122c178 409168515	XXXX/flax_model.msgpack
100644 blob dd9401af0a4713df0e75066ae78d5bf6fa6c7116  268943	XXXX/tokenizer.json
100644 blob ca4f9781030019ab9b253c6dcb8c7878b6dc87a5  109540	XXXX/vocab.txt
100644 blob cedb2cfcd1ec944c66ed225d5c17fb518ce89a27   13040	XXXX.py
100644 blob b9c50bdd028023e1700d666ed6164121f881bf49   11941	XXXX.py
100644 blob d041bf56d0bd787e30f880f2758d6377660147e1   11910	XXXX.py
100644 blob 115ef72ec166a04e5d995921464533458b78b15b   10975	XXXX.py
100644 blob bc04a2f1d150e681721b4fe18c963467a2315b21    9938	XXXX.py
然后利用以下语句删除特定的文件(以XXXX/pytorch_model.bin为例):
git filter-branch --force --index-filter 'git rm -r --cached --ignore-unmatch XXXX/pytorch_model.bin' --prune-empty --tag-name-filter cat -- --all

# 或者

git filter-branch --index-filter 'git rm --cached --ignore-unmatch XXXX/pytorch_model.bin'
处理之后,再进行远程上传就可以了:
git push -u origin main⑪ 通常情况下,Git仓库历史有个缓存期,如果不主动回收、清理仓库历史,它会暂存一段时间。如果我们要主动收回资源,那么可以使用以下的命令段:
rm -rf .git/refs/original/
git reflog expire --expire=now --all
git gc --prune=now
git gc --aggressive --prune=now
参考文献:
Linux 使用 git 上传代码到 GitHub_疯狂的蜗牛-CSDN博客
码云使用教程--Linux下用git命令上传和下载项目 - 云+社区 - 腾讯云
git删除commit的历史大文件记录_木易如月的博客-CSDN博客_git删除历史大文件
.git文件过大!删除大文件 - loutao - 博客园
Git删除已提交的文件 - Wan-deuk-i - 博客园
fatal: Authentication failed for ‘https://github.com_算法恩仇录的博客-CSDN博客_github cloning with http
如有错误,敬请指正。谢谢。