Flume高级组件、性能优化和进程监控
文章目录
- Flume高级组件
-
- Source Interceptors
-
- 对采集到的数据按天按类型分目录存储
- Channel Sectors
-
- Replicating Channel Selector
- Multiplexing Channel Selector
- Sink Processors
-
- Load balancing Sink Processor 负载均衡
- Failover Sink Processor 故障转移
- Flume性能优化
- Flume进程监控
- 参考文献
Flume高级组件
Source Interceptors
- Timestamp Interceptor:向event中的header里面添加timestamp 时间戳信息
- Host Interceptor:向event中的header里面添加host属性,host的值为当前机器的主机名或者ip
- Search and Replace Interceptor:根据指定的规则查询Event中body里面的数据,然后进行替换,这个拦截器会修改event中body的值,也就是会修改原始采集到的数据内容
- Static Interceptor:向event中的header里面添加固定的key和value
- Regex Extractor Interceptor:根据指定的规则从Event中的body里面抽取数据,生成key和value,再把key和value添加到header中
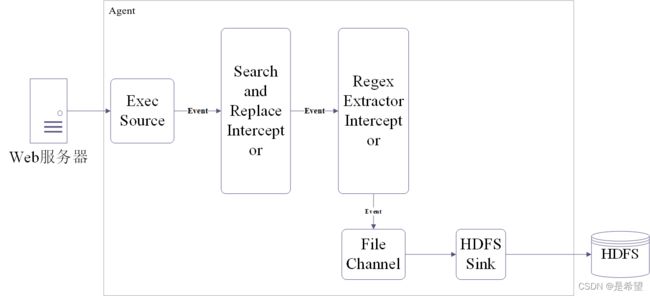
对采集到的数据按天按类型分目录存储
测试数据:
/**
这份数据中有三种类型的数据,视频信息、用户信息、礼物信息,数据都是json格式的,
这些数据还有一个共性就是里面都有一个type字段,type字段的值代表数据类型
*/
video_info
{"id":"14943445328940974601","uid":"840717325115457536","lat":"53.530598","lnt":"-2.5620373","hots":0,"title":"0","status":"1","topicId":"0","end_time":"1494344570","watch_num":0,"share_num":"1","replay_url":null,"replay_num":0,"start_time":"1494344544","timestamp":1494344571,"type":"video_info"}
user_info
{"uid":"861848974414839801","nickname":"mick","usign":"","sex":1,"birthday":"","face":"","big_face":"","email":"abc@qq.com","mobile":"","reg_type":"102","last_login_time":"1494344580","reg_time":"1494344580","last_update_time":"1494344580","status":"5","is_verified":"0","verified_info":"","is_seller":"0","level":1,"exp":0,"anchor_level":0,"anchor_exp":0,"os":"android","timestamp":1494344580,"type":"user_info"}
gift_record
{"send_id":"834688818270961664","good_id":"223","video_id":"14943443045138661356","gold":"10","timestamp":1494344574,"type":"gift_record"}
- Source使用Exec Source
- 使用Search and Replace Interceptor对原始数据中type的值进行转换
- 使用Regex Extractor Interceptor指定规则获取type字段的值,添加到header中
- Channle使用File Channle
- Sink使用Hdfs Sink
Agent配置:
# agent的名称是a1
# 指定source组件、channel组件和Sink组件的名称
a1.sources = r1
a1.channels = c1
a1.sinks = k1

# 配置source组件
a1.sources.r1.type = exec
# 测试数据路径
a1.sources.r1.command = tail -F /data/log/moreType.log

# 配置拦截器 [多个拦截器按照顺序依次执行]
a1.sources.r1.interceptors = i1 i2 i3 i4
# 拦截video_info
a1.sources.r1.interceptors.i1.type = search_replace
a1.sources.r1.interceptors.i1.searchPattern = "type":"video_info"
a1.sources.r1.interceptors.i1.replaceString = "type":"videoInfo"
# 拦截user_info
a1.sources.r1.interceptors.i2.type = search_replace
a1.sources.r1.interceptors.i2.searchPattern = "type":"user_info"
a1.sources.r1.interceptors.i2.replaceString = "type":"userInfo"
# 拦截gift_info
a1.sources.r1.interceptors.i3.type = search_replace
a1.sources.r1.interceptors.i3.searchPattern = "type":"gift_info"
a1.sources.r1.interceptors.i3.replaceString = "type":"giftRecord"

# 获取type字段的值,添加到header中
a1.sources.r1.interceptors.i4.type = regex_extractor
a1.sources.r1.interceptors.i4.regex = "type":"(\\w+)"
a1.sources.r1.interceptors.i4.serializers = s1
a1.sources.r1.interceptors.i4.serializers.s1.name = logType

# 配置channel组件
a1.channels.c1.type = file
a1.channels.c1.checkpointDir = /data/soft/apache-flume-1.9.0-bin/data/moreType/checkpoint
a1.channels.c1.dataDirs = /data/soft/apache-flume-1.9.0-bin/data/moreType/data
# 配置sink组件
a1.sinks.k1.type = hdfs
a1.sinks.k1.hdfs.path = hdfs://192.168.182.100:9000/moreType/%Y%m%d/%{logType}
a1.sinks.k1.hdfs.fileType = DataStream
a1.sinks.k1.hdfs.writeFormat = Text
a1.sinks.k1.hdfs.rollInterval = 3600
a1.sinks.k1.hdfs.rollSize = 134217728
a1.sinks.k1.hdfs.rollCount = 0
a1.sinks.k1.hdfs.useLocalTimeStamp = true
#增加文件前缀和后缀
a1.sinks.k1.hdfs.filePrefix = data
a1.sinks.k1.hdfs.fileSuffix = .log
# 把组件连接起来
a1.sources.r1.channels = c1
a1.sinks.k1.channel = c1
Channel Sectors
Channel Selectors类型包括:
- Replicating Channel Selector:默认的channel 选择器,将Source采集过来的Event发往所有Channel
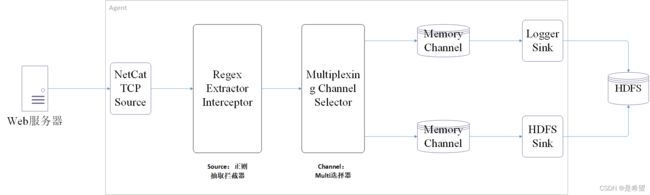
- Multiplexing Channel Selector:表示会根据Event中header里面的值将Event发往不同的Channel
Replicating Channel Selector
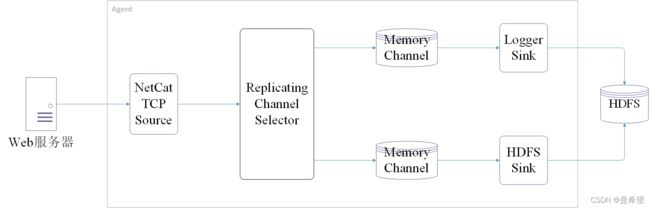
Agent配置:
# agent的名称是a1
# 指定source组件、channel组件和Sink组件的名称
a1.sources = r1
a1.channels = c1 c2
a1.sinks = k1 k2

# 配置source组件
a1.sources.r1.type = netcat
a1.sources.r1.bind = 0.0.0.0
a1.sources.r1.port = 44444

# 配置channle选择器[默认就是replicating,所以可以省略]
a1.sources.r1.selector.type = replicating

# 配置channel组件
# 配置c1 Memory Channel
a1.channels.c1.type = memory
a1.channels.c1.capacity = 1000
a1.channels.c1.transactionCapacity = 100
# 配置c2 Memory Channel
a1.channels.c2.type = memory
a1.channels.c2.capacity = 1000
a1.channels.c2.transactionCapacity = 100

# 配置sink组件
# 配置k1 Logger Sink
a1.sinks.k1.type = logger

# 配置k2 HDFS Sink
a1.sinks.k2.type = hdfs
a1.sinks.k2.hdfs.path = hdfs://192.168.182.100:9000/replicating
a1.sinks.k2.hdfs.fileType = DataStream
a1.sinks.k2.hdfs.writeFormat = Text
a1.sinks.k2.hdfs.rollInterval = 3600
a1.sinks.k2.hdfs.rollSize = 134217728
a1.sinks.k2.hdfs.rollCount = 0
a1.sinks.k2.hdfs.useLocalTimeStamp = true
a1.sinks.k2.hdfs.filePrefix = data
a1.sinks.k2.hdfs.fileSuffix = .log


# 把组件连接起来
a1.sources.r1.channels = c1 c2
a1.sinks.k1.channel = c1
a1.sinks.k2.channel = c2
Multiplexing Channel Selector
在这个案例中我们使用Multiplexing选择器,将Source采集到的数据按照一定规则发送给两个Channle,最终再把不同Channel中的数据存储到不同介质中。
测试数据如下:
{"name":"jack","age":19,"city":"bj"}
{"name":"tom","age":26,"city":"sh"}
# agent的名称是a1
# 指定source组件、channel组件和Sink组件的名称
a1.sources = r1
a1.channels = c1 c2
a1.sinks = k1 k2

# 配置source组件
a1.sources.r1.type = netcat
a1.sources.r1.bind = 0.0.0.0
a1.sources.r1.port = 44444

# 配置source拦截器
a1.sources.r1.interceptors = i1
a1.sources.r1.interceptors.i1.type = regex_extractor
a1.sources.r1.interceptors.i1.regex = "city":"(\\w+)"
a1.sources.r1.interceptors.i1.serializers = s1
a1.sources.r1.interceptors.i1.serializers.s1.name = city

# 配置channle选择器
a1.sources.r1.selector.type = multiplexing
a1.sources.r1.selector.header = city
a1.sources.r1.selector.mapping.bj = c1
a1.sources.r1.selector.default = c2

# 配置channel组件
# 配置c1
a1.channels.c1.type = memory
a1.channels.c1.capacity = 1000
a1.channels.c1.transactionCapacity = 100
# 配置c2
a1.channels.c2.type = memory
a1.channels.c2.capacity = 1000
a1.channels.c2.transactionCapacity = 100

# 配置sink组件
# 配置s1
a1.sinks.k1.type = logger
# 配置s2
a1.sinks.k2.type = hdfs
a1.sinks.k2.hdfs.path = hdfs://192.168.182.100:9000/multiplexing
a1.sinks.k2.hdfs.fileType = DataStream
a1.sinks.k2.hdfs.writeFormat = Text
a1.sinks.k2.hdfs.rollInterval = 3600
a1.sinks.k2.hdfs.rollSize = 134217728
a1.sinks.k2.hdfs.rollCount = 0
a1.sinks.k2.hdfs.useLocalTimeStamp = true
a1.sinks.k2.hdfs.filePrefix = data
a1.sinks.k2.hdfs.fileSuffix = .log

# 把组件连接起来
a1.sources.r1.channels = c1 c2
a1.sinks.k1.channel = c1
a1.sinks.k2.channel = c2
Sink Processors
Sink Processors类型包括:
- Default Sink Processor是默认处理器,不用配置sinkgroup,形式为一个Channel后面接一个Sink的形式
- Load balancing Sink Processor是负载均衡处理器,一个channle后面可以接多个sink,这多个sink属于一个sink group,根据指定的算法进行轮询或者随机发送,减轻单个sink的压力
- Failover Sink Processor是故障转移处理器,一个channle后面可以接多个sink,这多个sink属于一个sink group,按照sink的优先级,默认先让优先级高的sink来处理数据,如果这个sink出现了故障,则用优先级低一点的sink处理数据,可以保证数据不丢失
Load balancing Sink Processor 负载均衡

bigdata04负载均衡Agent配置
# agent的名称是a1
# 指定source组件、channel组件和Sink组件的名称
a1.sources = r1
a1.channels = c1
a1.sinks = k1 k2

# 配置source组件
a1.sources.r1.type = netcat
a1.sources.r1.bind = 0.0.0.0
a1.sources.r1.port = 44444


# 配置channel组件
a1.channels.c1.type = memory
a1.channels.c1.capacity = 1000
a1.channels.c1.transactionCapacity = 100


# 配置sink组件,[为了方便演示效果,把batch-size设置为1]
# 配置s1
a1.sinks.k1.type=avro
a1.sinks.k1.hostname=192.168.182.101
a1.sinks.k1.port=41414
a1.sinks.k1.batch-size = 1

# 配置s2
a1.sinks.k2.type=avro
a1.sinks.k2.hostname=192.168.182.102
a1.sinks.k2.port=41414
a1.sinks.k2.batch-size = 1


# 配置sink策略
a1.sinkgroups = g1
a1.sinkgroups.g1.sinks = k1 k2
# 使用负载均衡策略
a1.sinkgroups.g1.processor.type = load_balance
# 开启后故障节点进入黑名单
a1.sinkgroups.g1.processor.backoff = true
# 指定Sink group的数据发送策略,这里使用轮询(round_robin)的方式,也可采用随机(random)的方式
a1.sinkgroups.g1.processor.selector = round_robin


# 把组件连接起来
a1.sources.r1.channels = c1
a1.sinks.k1.channel = c1
a1.sinks.k2.channel = c1
Failover Sink Processor 故障转移

bigdata04故障转移Agent配置
# agent的名称是a1
# 指定source组件、channel组件和Sink组件的名称
a1.sources = r1
a1.channels = c1
a1.sinks = k1 k2

# 配置source组件
a1.sources.r1.type = netcat
a1.sources.r1.bind = 0.0.0.0
a1.sources.r1.port = 44444


# 配置channel组件
a1.channels.c1.type = memory
a1.channels.c1.capacity = 1000
a1.channels.c1.transactionCapacity = 100

# 配置sink组件,[为了方便演示效果,把batch-size设置为1]
# 配置k1
a1.sinks.k1.type = avro
a1.sinks.k1.hostname = 192.168.182.101
a1.sinks.k1.port = 41414
a1.sinks.k1.batch-size = 1
# 配置k2
a1.sinks.k2.type = avro
a1.sinks.k2.hostname = 192.168.182.102
a1.sinks.k2.port = 41414
a1.sinks.k2.batch-size = 1

# 配置Sink故障转移策略
a1.sinkgroups = g1
a1.sinkgroups.g1.sinks = k1 k2
a1.sinkgroups.g1.processor.type = failover
# 设置k1的优先级
a1.sinkgroups.g1.processor.priority.k1 = 5
# 设置k2的优先级
a1.sinkgroups.g1.processor.priority.k2 = 10
# 发生故障后最长等待时间
a1.sinkgroups.g1.processor.maxpenalty = 10000


# 把组件连接起来
a1.sources.r1.channels = c1
a1.sinks.k1.channel = c1
a1.sinks.k2.channel = c1
Flume性能优化
- 调整Flume进程的内存大小,建议设置1G~2G,太小的话会导致频繁垃圾回收GC。 一般建议启动的单个Flume进程(或者说单个Agent)内存设置为1G~2G,内存太小的话影响Agent的执行效率。
使用以下命令可查看相关信息:
jstat -gcutil PID 1000
[root@bigdata04 ~]# jstat -gcutil 2799 1000
S0     S1     E      O      M     CCS    YGC     YGCT    FGC    FGCT     GCT
100.00   0.00  17.54  42.80  96.46  92.38      8    0.029     0    0.000    0.029
100.00   0.00  17.54  42.80  96.46  92.38      8    0.029     0    0.000    0.029
100.00   0.00  17.54  42.80  96.46  92.38      8    0.029     0    0.000    0.029
100.00   0.00  17.54  42.80  96.46  92.38      8    0.029     0    0.000    0.029
100.00   0.00  17.54  42.80  96.46  92.38      8    0.029     0    0.000    0.029
100.00   0.00  17.54  42.80  96.46  92.38      8    0.029     0    0.000    0.029
100.00   0.00  17.54  42.80  96.46  92.38      8    0.029     0    0.000    0.029
100.00   0.00  17.54  42.80  96.46  92.38      8    0.029     0    0.000    0.029
- YGC:表示新生代堆内存GC的次数,如果每隔几十秒产生一次,也还可以接受,如果每秒都会发生一次YGC,那说明需要增加内存了
- YGCT:表示新生代堆内存GC消耗的总时间
- FGC:FULL GC发生的次数,注意,如果发生FUCC GC,则Flume进程会进入暂停状态,FUCC GC执行完以后Flume才会继续工作,所以FUCC GC是非常影响效率的,这个指标的值越低越好,没有更好。
- GCT:所有类型的GC消耗的总时间
如果需要调整Flume进程内存的话,需要调整flume-env.sh脚本中的JAVA_OPTS参数
export JAVA_OPTS="-Xms1024m -Xmx1024m -Dcom.sun.management.jmxremote"
建议这里的Xms和Xmx设置为一样大,避免进行内存交换。
- 在一台服务器启动多个agent的时候,建议修改配置区分日志文件。建议拷贝多个conf目录,然后修改对应conf目录中
log4j.properties日志的文件名称(可以保证多个agent的日志分别存储),并且把日志级别调整为warn(减少垃圾日志的产生),默认info级别会记录很多日志信息。这样在启动Agent的时候分别通过–conf参数指定不同的conf目录,后期分析日志就方便了,每一个Agent都有一个单独的日志文件。
Flume进程监控
进程监控思路:
- 首先需要有一个配置文件,配置文件中指定你现在需要监控哪些Agent
- 有一个脚本负责读取配置文件中的内容,定时挨个检查Agent对应的进程还在不在,如果发现对应的进程不在,则记录错误信息,然后告警(发短信或者发邮件) 并尝试重启
创建一个文件monlist.conf
- 第一列指定一个Agent的唯一标识,后期需要根据这个标识过滤对应的Flume进程,所以一定要保证至少在一台机器上是唯一的,
- 等号后面是一个启动Flume进程的脚本,这个脚本和Agent的唯一标识是一一对应的,后期如果根据Agent标识没有找到对应的进程,那么就需要根据这个脚本启动进程
example=startExample.sh
startExample.sh代码
#!/bin/bash
# 使用绝对路径
flume_path=/data/soft/apache-flume-1.9.0-bin
nohup ${flume_path}/bin/flume-ng agent --name a1 --conf ${flume_path}/conf/ --conf-file ${flume_path}/conf/example.conf  &
monlist.sh代码
#!/bin/bash
monlist=`cat monlist.conf`
echo "start check"
for item in ${monlist}
do
	# 设置字段分隔符
	OLD_IFS=$IFS
	IFS="="
	# 把一行内容转成多列[数组]
	arr=($item)
	# 获取等号左边的内容
	name=${arr[0]}
	# 获取等号右边的内容
	script=${arr[1]}

	echo "time is:"`date +"%Y-%m-%d %H:%M:%S"`" check "$name
	# 判断FLume进程是否挂了
	if [ `jps -m|grep $name | wc -l` -eq 0 ]
	then
		# 发短信或者邮件告警
		echo `date +"%Y-%m-%d %H:%M:%S"`$name "is none"
		# 重新启动
		sh -x ./${script}
	fi
done
设置定时执行
* * * * * root /bin/bash /data/soft/monlist.sh
参考文献
慕课网 https://www.imooc.com/wiki/BigData