Scrapy-Redis分布式爬虫项目实战
点击上方“Python学习开发”,选择“加为星标”
第一时间关注Python技术干货!
![]()
Scrapy 是一个通用的爬虫框架,但是不支持分布式,Scrapy-redis是为了更方便地实现Scrapy分布式爬取,而提供了一些以redis为基础的组件(仅有组件)。
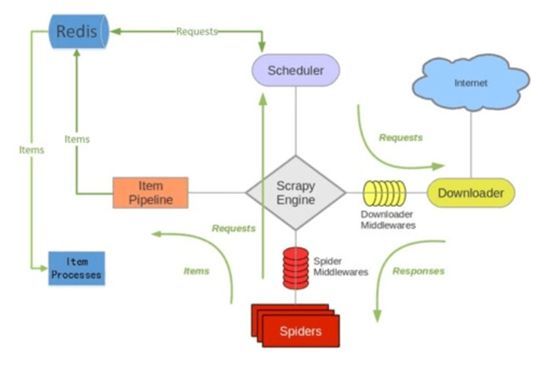
scrapy-redis在scrapy的架构上增加了redis,基于redis的特性拓展了如下四种组件:
Scheduler
Duplication Filter
Item Pipeline
Base Spider
scrapy-redis架构
 scrapy-redis架构
Scheduler
Scrapy原本的queue是不支持多个spider共享一个队列的,scrapy-redis通过将queue改为redis实现队列共享。
Duplication Filter
Scrapy中通过Python中的集合实现request指纹去重,在scrapy-redis中去重是由Duplication Filter组件来实现的,它通过redis的set不重复的特性,巧妙的实现了DuplicationFilter去重。
Item Pipeline
引擎将(Spider返回的)爬取到的Item给Item Pipeline,scrapy-redis 的Item Pipeline将爬取到的 Item 存入redis的 items queue。修改过Item Pipeline可以很方便的根据 key 从 items queue提取item,从而实现 items processes集群。
Base Spider
不再使用scrapy原有的Spider类,重写的RedisSpider继承了Spider和RedisMixin这两个类,RedisMixin是用来从redis读取url的类。
当我们生成一个Spider继承RedisSpider时,调用setup_redis函数,这个函数会去连接redis数据库,然后会设置signals(信号):一个是当spider空闲时候的signal,会调用spider_idle函数,这个函数调用schedule_next_request函数,保证spider是一直活着的状态,并且抛出DontCloseSpider异常。一个是当抓到一个item时的signal,会调用item_scraped函数,这个函数会调用schedule_next_request函数,获取下一个request
安装Scrapy-Redis
python3.6 -m pip install scrapy-redis
项目练习
首先修改配置文件
BOT_NAME = 'cnblogs'
SPIDER_MODULES = ['cnblogs.spiders']
NEWSPIDER_MODULE = 'cnblogs.spiders'
# Obey robots.txt rules
ROBOTSTXT_OBEY = False

# Configure maximum concurrent requests performed by Scrapy (default: 16)
#CONCURRENT_REQUESTS = 32

# See also autothrottle settings and docs
#DOWNLOAD_DELAY = 3
DOWNLOAD_DELAY = 2 # 等待2s
MY_USER_AGENT = ["Mozilla/5.0+(Windows+NT+6.2;+WOW64)+AppleWebKit/537.36+(KHTML,+like+Gecko)+Chrome/45.0.2454.101+Safari/537.36",
    "Mozilla/5.0+(Windows+NT+5.1)+AppleWebKit/537.36+(KHTML,+like+Gecko)+Chrome/28.0.1500.95+Safari/537.36+SE+2.X+MetaSr+1.0",
    "Mozilla/5.0+(Windows+NT+6.1;+WOW64)+AppleWebKit/537.36+(KHTML,+like+Gecko)+Chrome/50.0.2657.3+Safari/537.36"]
# Enable or disable downloader middlewares
# See https://doc.scrapy.org/en/latest/topics/downloader-middleware.html
DOWNLOADER_MIDDLEWARES = {
   'cnblogs.middlewares.UserAgentMiddleware': 543,
}
LOG_LEVEL = "ERROR"

ITEM_PIPELINES = {
   'cnblogs.pipelines.MongoPipeline': 300,
}
#将结果保存到Mongo数据库
MONGO_HOST = "127.0.0.1"  # 主机IP
MONGO_PORT = 27017  # 端口号
MONGO_DB = "spider_data"  # 库名
MONGO_COLL = "cnblogs_title"  # collection名

#需要将调度器的类和去重的类替换为 Scrapy-Redis 提供的类
SCHEDULER = "scrapy_redis.scheduler.Scheduler"
DUPEFILTER_CLASS = "scrapy_redis.dupefilter.RFPDupeFilter"
REDIS_HOST = '127.0.0.1'
REDIS_PORT = 7001 #Redis集群中其中一个节点的端口

#配置持久化
#Scrapy-Redis 默认会在爬取全部完成后清空爬取队列和去重指纹集合。
#SCHEDULER_PERSIST = True

#设置重爬
#SCHEDULER_FLUSH_ON_START = True
代码要改的地方有两处:
第一处是继承的RedisSpider
第二处就是start_urls改为了redis_key。
# -*- coding: utf-8 -*-
import scrapy
import datetime
from scrapy_redis.spiders import RedisSpider
class CnblogSpider(RedisSpider):
    name = 'cnblog'
    redis_key = "myspider:start_urls"
    #start_urls = [f'https://www.cnblogs.com/c-x-a/default.html?page={i}' for i in range(1,2)]

    def parse(self, response):
        main_info_list_node = response.xpath('//div[@class="forFlow"]')
        content_list_node = main_info_list_node.xpath(".//a[@class='postTitle2']/text()").extract()
        for item in content_list_node:
            url = response.url
            title=item
            crawl_date = datetime.datetime.now().strftime('%Y-%m-%d %H:%M:%S')
            item = {}
            item['url'] = url
            item['title'] = title.strip() if title else title
            item['crawl_date'] = crawl_date
            yield item
因为Scrapy-Redis是以Redis为队列进行消息共享的,所以我们的任务需要提前插入到数据库,它的key就叫我们指定的"myspider:start_urls"。
在之前创建好的redis集群中插入任务,首先使用集群的模式连接数据库,关于redis集群的文件可以看昨天我写的 使用Mac搭建Redis5.0集群笔记
redis-cli -c -p 7000 #我的redis集群的一个Master节点端口
执行下面的语句插入任务
lpush myspider:start_urls https://www.cnblogs.com/c-x-a/default.html?page=1
lpush myspider:start_urls https://www.cnblogs.com/c-x-a/default.html?page=2
然后查看
lrange myspider:start_urls 0 10
看到我们的任务,好了任务插入成功了。
接下来就是运行代码了,运行完代码之后,去查看三处。
第一处,查看redis的任务发现任务已经没有了
(empty list or set)
第二处,查看mongo数据库,发现我们成功保存了结果。

第三处,你会发现的你爬虫程序并没有结束,这个其实是正常的,因为我们使用了scrapy-redis之后,爬虫程序会一直取redis中的任务,如果没有任务了就等待,如果在redis插入了新的任务他就会继续进行爬虫程序,之后又进入等待任务的状态。
关注本公众号,后台回复: redis 即可获取源码。
参考资料
https://segmentfault.com/a/1190000014333162?utm_source=channel-hottest
推荐阅读
Python 爬虫面试题 170 道:2019 版
redis学习之redis的安装和简介
使用Mac搭建Redis5.0集群笔记
添加微信[gopython3].回复:回复Go或者Python加对应技术群。点击阅读原文进入我的博客园看代码更方便哦!