疑问❓
既然已经引入了spring-boot-starter-parent作为父工程,为什么还需要加父工程 里已有的打包插件,同理spring-boot-dependencies也已经添加好依赖了,为什么在自己的springboot项目还要加依赖
- spring-boot-dependencies中的依赖是放在
标签中的,如果子项目没有声明依赖,这些在 标签中的依赖是不会自动引入在子项目的。
疑问❓
使用了thymeleaf模板引擎技术的的HTML页面也是通过model对象传递数据到前端页面,和JSP技术好像也是一样,具体有什么区别?
疑问❓
springboot为什么可以打成jar包,直接运行?
- 内部引用了tomcat,实际上也是通过tomcat来启动项目
SpringBoot
为什么要有SpringBoot?
- 使用原先的SSM方式去搭建项目效率较低,需要配置大量的依赖和配置文件,以及考虑依赖之间的兼容性问题。
- 有了SpringBoot就可以简化项目的配置和依赖的使用,提高开发效率
约定优于配置(Convention over Configuration),又称按约定编程,是一种软件设计范式。
本质上是说,系统、类库或框架应该假定合理的默认值,而非要求提供不必要的配置。比如说模型中有一个名为User的类,那么数据库中对应的表就会默认命名为user。只有在偏离这一个约定的时候,例如想要将该表命名为person,才需要写有关这个名字的配置。
Spring优缺点分析
优点:
Spring是Java企业版(Java Enterprise Edition,JEE,也称J2EE)的轻量级代替品。无需开发重量级的Enterprise Java Bean(EJB),Spring为企业级Java开发提供了一种相对简单的方法,通过依赖注入和面向切面编程,用简单的Java对象(Plain Old Java Object,POJO)实现了EJB的功能。
缺点:
虽然Spring的组件代码是轻量级的,但它的配置却是重量级的**。一开始,Spring用XML配置,而且是很多XML配 置。Spring 2.5引入了基于注解的组件扫描,这消除了大量针对应用程序自身组件的显式XML配置。Spring 3.0引入 了基于Java的配置,这是一种类型安全的可重构配置方式,可以代替XML。所有这些配置都代表了开发时的损耗。因为在思考Spring特性配置和解决业务问题之间需要进行思维切换,所以编写配置挤占了编写应用程序逻辑的时间。和所有框架一样,Spring实用,但与此同时它要求的回报也不少。
项目的依赖管理也是一件耗时耗力的事情。在环境搭建时,需要分析要导入哪些库的坐标,而且还需要分析导入与之有依赖关系的其他库的坐标,一旦选错了依赖的版本,随之而来的不兼容问题就会严重阻碍项目的开发进度
SSM整合:Spring、Spring MVC、Mybatis、Spring-Mybatis整合包、数据库驱动,引入依赖的数量繁多、容易存在版本冲突。
SpringBoot的两大特点
- 起步依赖
- 起步依赖本质上是一个Maven项目对象模型(Project Object Model,POM),定义了对其他库的传递依赖,这些东西加在一起即支持某项功能。
- 也就是每个springboot项目都会依赖一个配置好的springboot父工程,父工程已经做好了依赖的版本控制,编码格式等默认配置
- 自动配置
- springboot会自动将一些配置类的bean注册进ioc容器,我们可以需要的地方使用@autowired或者@resource等注解来使用它。如果需要个性化的配置只需要在application.yml文件中配置即可。
SpringBoot快速入门
-
POM文件
org.springframework.boot spring-boot-starter-parent 2.3.4.RELEASE org.springframework.boot spring-boot-starter-web org.springframework.boot spring-boot-maven-plugin -
启动类
/** * SpringBoot的启动类通常放在二级包中,比如:com.lagou.SpringBootDemo1Application * 因为SpringBoot项目在做包扫描,会扫描启动类所在的包及其子包下的所有内容。 */ //标识当前类为SpringBoot项目的启动类 @SpringBootApplication public class SpringBootDemo1Application { public static void main(String[] args) { //样板代码 SpringApplication.run(SpringBootDemo1Application.class,args); } } -
Controller
@RestController
@RequestMapping("/hello")
public class HelloController {
    @RequestMapping("/boot")
    public String helloBoot(){
        return "Hello Spring Boot";
    }
}
默认启动项目的端口是8080,可以在application.yml文件中修改
单元测试
-
在pom.xml文件中添加测试依赖
org.springframework.boot spring-boot-starter-test test -
测试类
/**
 * SpringJUnit4ClassRunner.class:Spring运行环境
 * JUnit4.class:JUnit运行环境
 * SpringRunner.class:Spring Boot运行环境
 */
@RunWith(SpringRunner.class) //@RunWith:运行器
@SpringBootTest //标记为当前类为SpringBoot测试类
class Springbootdemo2ApplicationTests {
    /*** 需求:调用HelloController的hello方法 */
    @Autowired private HelloController helloController;
    @Test void contextLoads() {
        String result = helloController.hello();
        System.out.println(result);
    }
}
热部署:在修改完代码之后,不需要重新启动容器,就可以实现更新。
使用步骤
1)添加SpringBoot的热部署依赖启动器
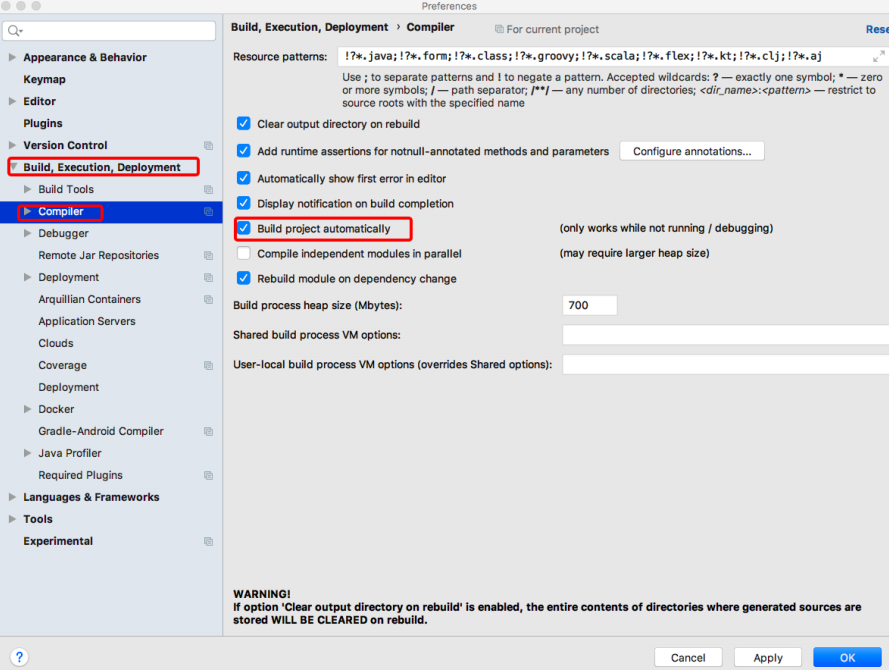
2)开启Idea的自动编译
3)开启Idea的在项目运行中自动编译的功能
-
POM文件
org.springframework.boot spring-boot-devtools -
IDEA工具热部署设置
选择IDEA工具界面的【File】->【Settings】选项,打开Compiler面板设置页面
在项目任意页面中使用组合快捷键“Ctrl+Shift+Alt+/”打开Maintenance选项框,选中并打开Registry页面,
[图片上传失败...(image-803e98-1603627257896)]
使用application.yml文件给bean对象注入数据
- 实体类
@Component
//将配置文件中所有以person开头的配置信息注入当前类中
//前提1:必须保证配置文件中person.xx与当前Person类的属性名一致
//前提2:必须保证当前Person中的属性都具有set方法
@ConfigurationProperties(prefix = "person")
public class Person {
    private int id; //id
    private String name; //名称
    private List hobby; //爱好
    private String[] family; //家庭成员
    private Map map;
    private Pet pet; //宠物
    //省略了 对应属性的 set方法...
}
-
配置文件
#对实体类对象Person进行属性配置
person:
  id: 1
  name: 王二麻子
  family:
      - 妻
      - 妾
  hobby:
      - play
      - read
      - sleep
  map:
      k1: value1
      k2: value2
  pet:
      type: 狗
      name: 哈士奇
如果有多个配置文件,默认.properties的优先级最高,根据在父工程中引入的pom文件
也可以使用@value注解给属性赋值,但是只可以给string类型的属性赋值
@Component
public class Student {
    @Value("${person.id}")
    private int id;
    @Value("${person.name}")
    private String name; //名称
    //省略set方法
}
自定义配置
- 使用@PropertySource加载配置文件
- 可以不使用spring boot默认给的配置文件,自己创建配置文件,如my.properties
#对实体类对象MyProperties进行属性配置
test.id=110
test.name=test
创建一个配置类MyProperties,提供test.properties自定义配置文件中对应的属性,并根据@PropertySource注解的使用进行相关配置
@Component // 自定义配置类
@PropertySource("classpath:test.properties") // 指定自定义配置文件位置和名称
@ConfigurationProperties(prefix = "test") // 指定配置文件注入属性前缀
public class MyProperties {
    private int id;
    private String name;
    // 省略属性getXX()和setXX()方法
    // 省略toString()方法 }
- 使用@Configuration编写自定义配置类
@Configuration // 定义该类是一个配置类
public class MyConfig {
    @Bean // 将返回值对象作为组件添加到Spring容器中,该组件id默认为方法名
    public MyService myService(){
        return new MyService();
    }
}
为什么导入dependency时不需要指定版本?
- 每个spring boot项目都有父依赖spring-boot-starter-parent,而spring-boot-starter-parent POM文件中又引入了spring-boot-dependencies父依赖,在这个父依赖中声明了当前项目的所有可能需要的依赖的版本,所以在自己的项目中不需要指定版本,spring boot已经帮你配置好版本了
Spring Boot****到底是如何进行自动配置的,都把哪些组件进行了自动配置?
|- @SpringBootConfiguration
    |- @Configuration //通过javaConfig的方式来添加组件到IOC容器中
|- @EnableAutoConfiguration
    |- @AutoConfigurationPackage //自动配置包,与@ComponentScan扫描到的添加到IOC
    |- @Import(AutoConfigurationImportSelector.class) //到META- INF/spring.factories中定义的bean添加到IOC容器中
|- @ComponentScan //包扫描
疑问❓
mybatis-plus插件的使用,没有看到sql的编写,是怎么实现的?
SpringCloud
项目中遇到的问题✔
- order是关键字,不能用来作为表名
- 使用host文件配置域名映射时,只能映射到ip上,不能加端口号,默认是80端口
- nginx配置反向代理的时候也是需要使用80端口
- nginx的默认轮询策略是一个接口调两次再换另一个接口
@PathVariable的作用?
- 在默认情况下,@PathVariable注解的参数可以是一些基本的简单类型:int,long,Date,String等,Spring能根据URL变量的具体值以及函数参数的类型来进行转换
- 识别url中占位符的数据,并自动赋值到同名形参变量上
SpringCloud 核心组件
- Eureka 注册中心
- Ribbon 负载均衡
- Hystrix 熔断器
- Feign (远程调用+Ribbon+Hystrix)
- Gateway 网关
- Spring Cloud Config 配置中心
单例注册中心
- 父工程中加入spring cloud的依赖
                org.springframework.cloud
                spring-cloud-dependencies
                Greenwich.RELEASE
                pom
                import
- eureka工程中加入eureka的依赖
            org.springframework.cloud
            spring-cloud-starter-netflix-eureka-server
- 配置文件application.yml
server:
  port: 9300
spring:
  application:
    name: lagou-cloud-eureka # 应用名称,会在Eureka中作为服务的id标识(serviceId)
eureka:
  instance:
    hostname: localhost
  client:
    service-url:
      # 客户端与EurekaServer交互的地址,如果是集群,也需要写其它Server的地址
      defaultZone: http://${eureka.instance.hostname}:${server.port}/eureka/
    register-with-eureka: false # 自己就是服务不需要注册自己
    fetch-registry: false #自己就是服务不需要从Eureka Server获取服务信息,默认为true,置为false
- 创建启动类EurekaApplication,加入注解@EnableEurekaServer
- 访问localhost:9300
集群注册中心
- 在单例的基础上,复制出另一个工程,把端口号+1
- 在本地测试的时候,修改host文件
127.0.0.1 LagouCloudEurekaServerA
127.0.0.1 LagouCloudEurekaServerB
- 修改配置文件
server:
  port: 9300
spring:
  application:
    name: lagou-cloud-eureka # 应用名称,会在Eureka中作为服务的id标识(serviceId)
eureka:
  instance:
    hostname: LagouCloudEurekaServerA
    #hostname: LagouCloudEurekaServerB 另一项目
  client:
    service-url:
      # 客户端与EurekaServer交互的地址,如果是集群,也需要写其它Server的地址
      defaultZone: http://LagouCloudEurekaServerB:9301/eureka
      #defaultZone: http://LagouCloudEurekaServerA:9300/eureka 另一项目
    register-with-eureka: false # 自己就是服务不需要注册自己
    fetch-registry: false #自己就是服务不需要从Eureka Server获取服务信息,默认为true,置为false
微服务注册到注册中心
- 在项目中加入eureka-client的依赖
            org.springframework.cloud
            spring-cloud-starter-netflix-eureka-client
- 配置application.yaml文件
server:
  port: 9100 # 后期该微服务多实例,9000(10个以内)
spring:
  #解决bean重复注册问题
  main:
    allow-bean-definition-overriding: true
  application:
    name: lagou-service-order
  datasource:
    driver-class-name: com.mysql.cj.jdbc.Driver
    url: jdbc:mysql://localhost:3306/lagou?useUnicode=true&characterEncoding=utf8&serverTimezone=UTC
    username: root
    password: 123456
  cloud:
    #config客户端配置,和ConfigServer通信,并告知ConfigServer希望获取的配置信息在哪个文件中
    config:
      name: application
      profile:
      label: master #分支名称
      uri:  http://localhost:9400 #ConfigServer配置中心地址
  #通知刷新
  rabbitmq:
    host: 192.168.64.128
    username: roger
    password: 123456
# 向注册中心声明
eureka:
  client:
    serviceUrl: # eureka server的路径
      defaultZone: http://LagouCloudEurekaServerA:9300/eureka,http://LagouCloudEurekaServerB:9301/eureka
  instance:
    #使用ip注册,否则会使用主机名注册了(此处考虑到对老版本的兼容,新版本经过实验都是ip)
    prefer-ip-address: true
    #自定义实例显示格式,加上版本号,便于多版本管理,注意是ip-address,早期版本是ipAddress
    instance-id: ${spring.cloud.client.ip-address}:${spring.application.name}:${server.port}:@project.version@
- 启动类上加注解 @EnableDiscoveryClient
- 启动后就能在注册中心发现已注册
Ribbon使用,不加Feign
使用
- 在消费者项目的RestTemplate方法上加@loadBalance
- 在提供者项目编写一个获取当前项目端口的方法,并且提供者项目做集群。
- 在消费者调用提供者
Hystrix
疑问❓
配置在application文件中的熔断器配置指定了并发执行的最大线程数和最大队列数,是所有接口用一个线程池还是每个接口用一个
Feign使用
- 父工程引入openfeign依赖
            org.springframework.cloud
            spring-cloud-starter-openfeign
- 消费者启动类加上@EnableFeignClients
- 创建一个接口,用来远程调用,需要提供者的同名方法,类上加@FeignClient("提供者注册名")
@FeignClient("lagou-service-goods",fallback = GoodFeignFallback.class)
public interface GoodFeign {
    // 要带上父路径!!!!
    @RequestMapping("/good/queryByIds")
    public List queryByIds(@RequestBody List ids);
}
使用Feign,整合Ribbon
- 父工程引入 OpenFeign依赖
org.springframework.cloud
spring-cloud-starter-openfeign
- 消费者项目配置文件
#针对的被调用方微服务名称,不加就是全局生效
lagou-service-goods:
  ribbon:
    #请求连接超时时间
    ConnectTimeout: 2000
    #请求处理超时时间
    ReadTimeout: 15000
    #对所有操作都进行重试
    OkToRetryOnAllOperations: true
    ####根据如上配置,当访问到故障请求的时候,它会再尝试访问一次当前实例(次数由MaxAutoRetries配置),
    ####如果不行,就换一个实例进行访问,如果还不行,再换一次实例访问(更换次数由MaxAutoRetriesNextServer配置),
    ####如果依然不行,返回失败信息。
    MaxAutoRetries: 0 #对当前选中实例重试次数,不包括第一次调用
    MaxAutoRetriesNextServer: 0 #切换实例的重试次数
    NFLoadBalancerRuleClassName: com.netflix.loadbalancer.ZoneAvoidanceRule #负载策略调整
使用Feign,整合Hystrix
- 父工程添加hystrix依赖
org.springframework.cloud
spring-cloud-starter-netflix-hystrix
- 配置消费者项目配置文件
# 配置熔断策略:
hystrix:
  command:
    default:
      circuitBreaker:
        # 强制打开熔断器,如果该属性设置为true,强制断路器进入打开状态,将会拒绝所有的请求。 默认false关闭的
        forceOpen: false
        # 触发熔断错误比例阈值,默认值50%
        errorThresholdPercentage: 50
        # 熔断后休眠时长,默认值5秒
        sleepWindowInMilliseconds: 3000
        # 熔断触发最小请求次数,默认值是20
        requestVolumeThreshold: 2
      execution:
        isolation:
          thread:
            # 熔断超时设置,默认为1秒,超过五秒还未返回结果就降级处理
            timeoutInMilliseconds: 5000
  threadpool:
    default:
      coreSize: 16 #并发执行的最大线程数,默认10
      maxQueueSize: 1000 #BlockingQueue的最大队列数,默认值-1
      queueSizeRejectionThreshold: 600 #即使maxQueueSize没有达到,达到 queueSizeRejectionThreshold该值后,请求也会被拒绝,默认值5
#开启Feign对熔断器支持
feign:
  hystrix:
    enabled: true
  #开启请求和响应的压缩设置,默认是不开启的
  compression:
    request:
      enabled: true
      mime-types: text/xml,application/xml,application/json  #默认值
      min-request-size: 2048
    response:
      enabled: true
- 创建降级处理类,实现feign接口,加@component
@Component
public class GoodFeignFallback implements GoodFeign {
    @Override
    public List queryByIds(List ids) {
        return Collections.EMPTY_LIST;
    }
Gateway网关
一个请求—>网关根据一定的条件匹配—匹配成功之后可以将请求转发到指定的服务地址;而在这 个过程中,我们可以进行一些比较具体的控制(限流、日志、黑白名单)
- 单独创建网关项目,导入依赖
        org.springframework.boot
        spring-boot-starter-parent
        2.1.6.RELEASE


            org.springframework.cloud
            spring-cloud-commons


            org.springframework.cloud
            spring-cloud-starter-netflix-eureka-client


            org.springframework.cloud
            spring-cloud-starter-gateway


            org.springframework.boot
            spring-boot-starter-webflux


            org.springframework.boot
            spring-boot-starter-logging


            org.springframework.boot
            spring-boot-starter-test
            test


            org.projectlombok
            lombok
            1.18.4
            provided


            com.sun.xml.bind
            jaxb-core
            2.2.11


            javax.xml.bind
            jaxb-api


            com.sun.xml.bind
            jaxb-impl
            2.2.11


            org.glassfish.jaxb
            jaxb-runtime
            2.2.10-b140310.1920


            javax.activation
            activation
            1.1.1


            org.springframework.boot
            spring-boot-starter-actuator


            org.springframework.boot
            spring-boot-devtools
            true


            org.springframework.cloud
            spring-cloud-starter-sleuth


            org.springframework.cloud
            spring-cloud-starter-zipkin


                org.springframework.cloud
                spring-cloud-dependencies
                Greenwich.RELEASE
                pom
                import


                org.apache.maven.plugins
                maven-compiler-plugin

                    11
                    11
                    utf-8


                org.springframework.boot
                spring-boot-maven-plugin
- 创建application.yaml配置文件
server:
  port: 9000
eureka:
  client:
    serviceUrl: # eureka server的路径
      defaultZone: http://LagouCloudEurekaServerA:9300/eureka,http://LagouCloudEurekaServerB:9301/eureka
  instance:
    prefer-ip-address: true
    instance-id: ${spring.cloud.client.ip-address}:${spring.application.name}:${server.port}:@project.version@
spring:
  application:
    name: lagou-cloud-gateway
  #网关的配置
  cloud:
    gateway:
      routes: #配置路由
        - id: service-order-router
          #动态路由:从注册中心获取对应服务的实例
          uri: lb://lagou-service-order
          predicates:
            - Path=/order/**
        - id: service-goods-router
          uri: lb://lagou-service-goods
          predicates:
            - Path=/good/**
#          filters:
#            - StripPrefix=1
- 如果要实现过滤器功能,可以继承Ordered,GlobalFilter,自定义过滤方法
Spring Cloud Config分布式配置中心
Server 端:提供配置文件的存储、以接口的形式将配置文件的内容提供出去,通过使用 @EnableConfigServer注解在 Spring boot 应用中非常简单的嵌入
Client 端:通过接口获取配置数据并初始化自己的应用
步骤
- 创建github或gitee项目,如lagou-config
- 上传application.yaml文件
- 创建Config Server项目,导入依赖
            org.springframework.cloud
            spring-cloud-starter-netflix-eureka-client


            org.springframework.cloud
            spring-cloud-config-server


            org.springframework.cloud
            spring-cloud-starter-bus-amqp
- 配置启动类,使用注解@EnableConfigServer开启配置中心服务器功能
- 创建配置文件
server:
  port: 9400
#注册到Eureka服务中心
eureka:
  client:
    service-url:
      defaultZone: http://LagouCloudEurekaServerA:9300/eureka,http://LagouCloudEurekaServerB:9301/eureka
  instance:
    prefer-ip-address: true
    instance-id: ${spring.cloud.client.ip-address}:${spring.application.name}:${server.port}:@project.version@
spring:
  application:
    name: lagou-cloud-config
  cloud:
    config:
      server:
        #git配置:uri、用户名、密码、分支....
        git:
          uri: https://gitee.com/rogerjack/lagou-config.git  #配置git地址
          username: rogerjack
          password: 123456
          search-paths:
            - lagou-config
      label: master
  rabbitmq:
    host: 192.168.64.128
    username: roger
    password: 123456

#建议暴露所有的端口
management:
  endpoints:
    web:
      exposure:
        include: "*"
- 需要获取配置数据的项目都是client,需要引入config client的依赖
            org.springframework.cloud
            spring-cloud-config-client
- 把客户端项目的application配置文件改为bootstrap.yaml文件,bootstrap的优先级更高,启动项目时会先加载该级别的配置文件,并编写配置
  spring:
      cloud:
        #config客户端配置,和ConfigServer通信,并告知ConfigServer希望获取的配置信息在哪个文 件中
        config:
          name: application
          profile:
          label: master #分支名称
          uri:  http://localhost:9400 #ConfigServer配置中心地址
- 在controller中用@value依赖注入需要的数据
- 为了能实现自动刷新更新的数据,还需要引入rabbitmq的组件
- 在客户端和服务端引入消息总线支持的依赖
            org.springframework.cloud
            spring-cloud-starter-bus-amqp
- 在客户端和服务端配置
#通知刷新
  spring:
      rabbitmq:
        host: 192.168.64.128
        username: rabbitmq的用户账号
        password: 密码
- 客户端需要配置暴露端口
# springboot中暴露健康检查等断点接口
management:
  endpoints:
    web:
      exposure:
        include: "*"
  # 暴露健康接口的细节
  endpoint
    health:
      show-details: always
- 当git上的数据发生变化后,只需要用POST请求去请求服务端接口如
http://127.0.0.1:9400/actuator/bus-refresh就可以自动刷新所有服务端数据;如果想单独刷新某个客户端,可以在接口后面加服务名:端口号即可,如http://localhost:9006/actuator/bus-refresh/lagou-service-page:9100
使用Nginx实现GateWay网关的高可用
- 先配置好单例的网关项目
- 复制出另一个网关项目,把端口号加一
- 在本地测试需要在host文件配置映射域名,如
192.168.64.128 www.lagou.com - 再在Nginx的配置文件中配置反向代理
    #反向代理配置
    #upstream中的server是真正处理请求的应用服务器地址
    upstream roger{
        #用server定义HTTP地址,注意不能使用localhost或者127.0.0.1,因为是在虚拟机上
        server 192.168.0.104:9000;#网关的ip:host
        server 192.168.0.104:9002;#网关的ip:host
    }
    server {
        listen       80;    #这里要用80
        server_name  www.lagou.com; #host文件中配置的映射域名
        location / {
            # 利用 proxy_ pass可以将请求代理到upstream命名的HTTP服务
            proxy_pass http://roger;  #转发到的地址
            index  index.html index.htm;
        }
    }