pytorch学习笔记(二)Tensor和autograd
文章目录
- Tensors(张量)
- autograd
-
- Tensor类
- function类
- 小结
Tensors(张量)
Tensors其实就是多维数组,Tensors类似于NumPy的ndarrays,同时Tensors可以使用GPU进行计算。
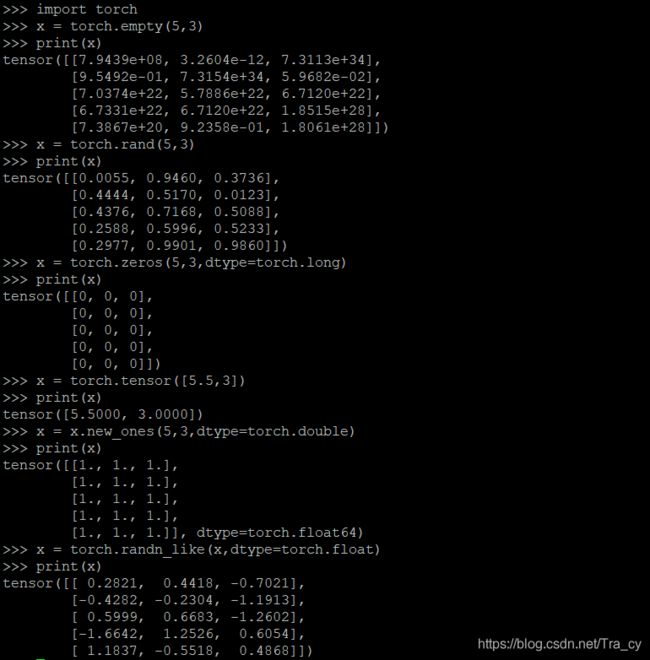
- 构造一个5*3矩阵
import torch
x = torch.empty(5,3)  #不初始化
x = torch.rand(5,3)   #随机初始化
x = torch.zeros(5,3,dtype=torch.long)   #元素全为0,数据类型为long
x = torch.tensor([5.5,3])   #构造一个张量,直接使用数据
x = x.new_ones(5,3,dtype=torch.double)  #基于一个已经存在的tensor创建一个tensor
x = torch.randn_like(x,dtype=torch.float)  #结果与上面的x是相同规模
- 获取x的维度信息
print(x.size()) #获取x的维度信息
- 加法操作
y = torch.rand(5,3)
print(x+y)   #方式一
print(torch.add(x,y))   #方式二

result = torch.empty(5,3)   #提供一个输出tensor作为参数
torch.add(x,y,out=result)
print(result)

y.add_(x)   #adds x to y
print(y)
Note:任何使张量会发生变化的操作都有一个前缀’’。例如:x.copy(y),x.t_()等将会改变x。
- 可以使用标准的NumPy类似的索引操作
print(x[:,1])
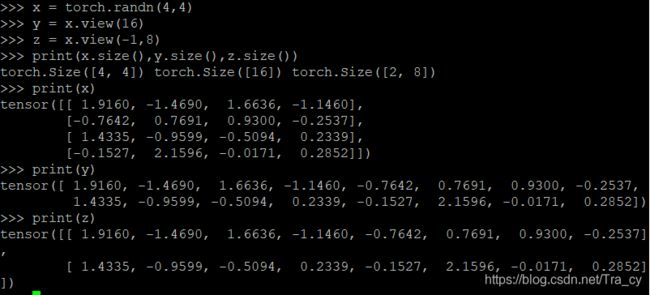
- 改变一个tensor的大小
x = torch.randn(4, 4)
y = x.view(16)
z = x.view(-1, 8)  # the size -1 is inferred from other dimensions
print(x.size(), y.size(), z.size())
- 如果有一个元素tensor,使用.item()来获得这个value
x = torch.randn(1)
print(x)
print(x.item())
autograd
autograd包是PyTorch种所有神经网络的核心。它为Tensors上的所有操作提供自动微分。它是一个自定义的框架,这意味着以代码运行方式定义后向传播,并且每次迭代都可以不同。
Tensor类
torch.Tensor是包的核心类。如果将其属性.requires_grad设置为Ture,则会开始跟踪针对tensor的所有操作。完成计算后,可以调用.backward()来自动计算所有梯度。该张量的梯度将累积到.grad属性中。
.detach():停止tensor历史记录的跟踪,它将其与计算历史记录分离,并防止将来的计算被跟踪。
要停止跟踪历史记录(和使用内存),我们还可以将代码块使用with torch.no_grad():包装起来,这在评估模型时特别有用,因为模型在训练阶段具有requires_grad = True的可训练参数有利于调参,但在评估阶段我们不再需要梯度。
function类
Function类也是autograd一个非常重要的类,Tensor 和 Function 互相连接并构建一个非循环图,它保存整个完整的计算过程的历史信息。每个张量都有一个 .grad_fn 属性保存着创建了张量的 Function 的引用,(如果用户自己创建张量,则grad_fn 是 None )。
如果你想计算导数,你可以调用 Tensor.backward()。如果 Tensor 是标量(即它包含一个元素数据),则不需要指定任何参数backward(),但是如果它有更多元素,则需要指定一个gradient 参数来指定张量的形状。
import torch
#创建一个张量,设置 requires_grad=True 来跟踪与它相关的计算
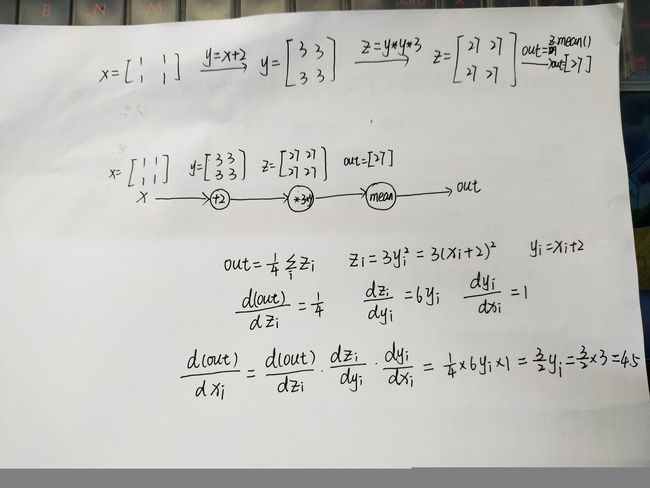
x = torch.ones(2, 2, requires_grad=True)
print(x)
#针对张量做一个操作
y = x + 2
print(y)

y作为操作的结果。是被创建的张量,所以有grad_fn属性,对于用户自己创建的x张量,它的grad_fn的值是none。
# Do more operations on y
z = y * y * 3
out = z.mean()
print(z, out)
# ``.requires_grad_( ... )`` changes an existing Tensor's ``requires_grad``
# flag in-place. The input flag defaults to ``False`` if not given.
a = torch.randn(2, 2)
a = ((a * 3) / (a - 1))
print(a.requires_grad)
a.requires_grad_(True)
print(a.requires_grad)
b = (a * a).sum()
print(b.grad_fn)
# Gradients
# ---------
# Let's backprop now
# Because ``out`` contains a single scalar, ``out.backward()`` is
# equivalent to ``out.backward(torch.tensor(1.))``.

out.backward()
# print gradients d(out)/dx
print(x.grad)
x = torch.randn(3, requires_grad=True)

y = x * 2
while y.data.norm() < 1000:
    y = y * 2

print(y)

现在在这种情况下,y 不再是一个标量。torch.autograd 不能够直接计算整个雅可比,但是如果我们只想要雅可比向量积,只需要简单的传递向量给 backward 作为参数。
# Now in this case ``y`` is no longer a scalar. ``torch.autograd``
# could not compute the full Jacobian directly, but if we just
# want the Jacobian-vector product, simply pass the vector to
# ``backward`` as argument:
v = torch.tensor([0.1, 1.0, 0.0001], dtype=torch.float)
y.backward(v)

print(x.grad)

可以通过将代码包裹在 with torch.no_grad(),来停止对从跟踪历史中 的 .requires_grad=True 的张量自动求导。
# You can also stop autograd from tracking history on Tensors
# with ``.requires_grad=True`` by wrapping the code block in
# ``with torch.no_grad()``:
print(x.requires_grad)
print((x ** 2).requires_grad)

with torch.no_grad():
	print((x ** 2).requires_grad)
小结
主要内容:
- Tensor的创建和简单的操作方法
- 计算Tensor梯度的方法:将Tensor属性.requires_grad设置为Ture,则会开始跟踪针对tensor的所有操作,完成计算后,可以调用.backward()来自动计算所有梯度,该张量的梯度将保存在.grad属性中。
- autograd.Function:每个通过Function函数计算的变量都有一个.grad_fn属性,用户自定义的变量该属性为none,用于向前传播的计算。


