阿里云服务器centos7环境搭建gitLab&jenkins
gitLab搭建
yum install lokkit
yum install -y curl policycoreutils-python openssh-server cronie
systemctl start postfix
开机自启动
chkconfig postfix on centos7 systemctl enable postfix.service
这句是用来做防火墙的,在防火墙里开放http跟ssh端口
lokkit -s http -s ssh
遇到的坑 postfix跑不起来
发现配置为:
inet_interfaces = localhost
inet_protocols = all
改成:
inet_interfaces = all
inet_protocols = all
重新启动
systemctl postfix start
下载安装gitlab
wget https://mirrors.tuna.tsinghua.edu.cn/gitlab-ce/yum/el7/gitlab-ce-10.0.0-ce.0.el7.x86_64.rpm

rpm -i gitlab-ce-10.0.0-ce.0.el7.x86_64.rpm

修改gitlab配置文件指定服务器ip和自定义端口:
vim  /etc/gitlab/gitlab.rb
external_url 'http://47.110.137.132:8081'
nginx['listen_port'] = 8081

gitlab-ctl reconfigure
gitlab-ctl restart

初始账户: root 密码:5iveL!fe
首次登陆需要更改密码

设置开机自启动  systemctl enable gitlab-runsvdir.service
取消开机自启动  systemctl disable gitlab-runsvdir.service
配置邮件
不建议163邮箱 推荐qq邮箱
用途
有合并请求时,邮件通知 有账号注册,邮件验证 修改密码时,邮件修改
配置步骤
开启QQ邮箱的smtp服务 修改gitlab配置 测试邮件服务是否正常
先配置qq邮箱
登录qq邮箱》设置》账户》SMTP》得到授权码 XXXXX

在配置gitlab 配置三个地方
vim  /etc/gitlab/gitlab.rb

 gitlab_rails['smtp_enable'] = true
 gitlab_rails['smtp_address'] = "smtp.qq.com"
 gitlab_rails['smtp_port'] = 465
 gitlab_rails['smtp_user_name'] = "[email protected]"
 gitlab_rails['smtp_password'] = "授权码 XXXXX"
 gitlab_rails['smtp_domain'] = "qq.com"
 gitlab_rails['smtp_authentication'] = "login"
 gitlab_rails['smtp_enable_starttls_auto'] = true
 gitlab_rails['smtp_tls'] = true

 user['git_user_email'] = "[email protected]"

 gitlab_rails['gitlab_email_from'] = '[email protected]'
测试是否配置成功
[root@iZbp1g1c3fleimcdq021n3Z ~]# gitlab-rails console
Loading production environment (Rails 4.2.8)
irb(main):001:0> Notify.test_email('[email protected]','title','aska').deliver_now
成功如下
gitLab 账号注册与分组
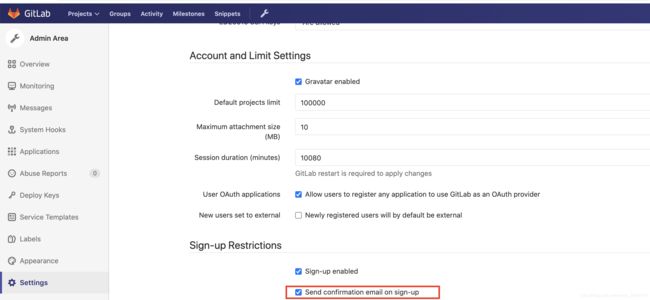
设置不能随意账号注册的配置 开启邮箱验证功能!
admin area --》setting--》Sign-up restrictions--》勾选Send confirmation email on sign-up
创建组
首页 ->group ->create a group 访问级别 Private:只有组成员才能看到
Internal:只要登录的用户就能看到
Public:所有人都能看到
Guest:可以创建issue、发表评论,不能读写版本库
Reporter:可以克隆代码,不能提交
Developer:可以克隆代码、开发、提交、push
Master:可以创建项目、添加tag、保护分支、添加项目成员、编辑项目
Owner:可以设置项目访问权限 - Visibility Level、删除项目、迁移项目、管理组成员
配置秘钥 在本地git 命令行中键入命令:ssh-keygen -t rsa 提醒你输入key的名称,输入如id_rsa
在C:\Users\用户.ssh下产生两个文件:id_rsa 私钥 和id_rsa.pub 公钥
用记事本打开id_rsa.pub文件,复制内容,在gitlab.com的网站上到ssh密钥管理页面,添加新公钥,随便取个名字,内容粘贴刚才复制的内容。
gitLab分支 以及标签保护
- 为什么要保护分支?
- 保护特定的分支不被随便合并,以免影响相应的分支
- 进入项目–> repository–>branches–>project setting–>Protected Branches
- 注意 能push 就能merge ,相应的权限把握好(master分支设置只能masters可以合并)
开始Jenkins
什么是持续集成?
持续集成是一种软件开发实践,即团队开发成员经常集成他们的工作,通过每个成员每天至少集成一次,也就意味着每天可能会发生多次集成。每次集成都通过自动化的构建(包括编译,发布,自动化测试)来验证,从而尽早地发现集成错误。
!
好处 节省人力成本 加快软件开发进度 实时交付 整体流程
成员通过git提交代码–》持续集成引擎来去代码并使用构建工具自动构建–》发布项目 重要组成部分 git gitlab jenkins
持续集成引擎 maven 构建工具 sonarqube 代码质量管理 junit 自动执行单元测试 JDK Tomcat
jdk+maven 安装
vim /etc/profile
         在最下面,按i进入insert模式,添加一下内容
            JAVA_HOME=/usr/local/jdk1.8.0_91
            export JAVA_HOME
            CLASSPATH=.:$JAVA_HOME/lib
            export CLASSPATH
            PATH=$PATH:$JAVA_HOME/bin:$CLASSPATH
            export PATH
         按esc进入命令行模式,再按:wq保存退出
         激活配置
            source /etc/profile
    5.解压maven
         tar -zxvf apache-maven-3.5.3-bin.tar.gz -C /usr/local/
    6.配置maven环境变量
         vim /etc/profile
         在最下面,按i进入insert模式,添加一下内容
            MAVEN_HOME=/usr/local/apache-maven-3.5.3
            export MAVEN_HOME
            PATH=$PATH:$MAVEN_HOME/bin
            export PATH
        按esc进入命令行模式,再按:wq保存退出
         激活配置
            source /etc/profile
maven私服 Nexus的安装
下载nexus
https://www.sonatype.com/download-oss-sonatype
tar -zxvf nexus-3.12.1-01-unix.tar.gz -C /usr/local/
修改配置文件
vim /usr/local/nexus-3.12.1-01/etc/nexus-default.properties 修改对应的端口 修改防火墙 vim /etc/sysconfig/iptables -A INPUT -m state --state NEW -m tcp -p tcp --dport 8081 -j ACCEPT
浏览器打开并登陆
http://192.168.56.102:8081/
账号admin 密码 admin123 System Requirement: max file descriptors [4096] likely too low, increase to at least [65536].
修改ulimit
vim /etc/security/limits.conf
新增
* soft nofile 65535
* hard nofile 65535
配置开机自启动
su - nexus -c '/usr/local/nexus-3.12.1-01/bin/nexus start'
su 用户名 指到Bin目录 nexut start脚本启动
proxy:代理仓库,用于代理远程仓库 group:仓库组,通常包含了多个代理仓库和宿主仓库,在项目中只要引入仓库组就可以下载到代理仓库和宿主仓库中的包 hosted:宿主仓库,内部项目、付费jar releases 发布内部release版本的仓库 snapshots 发布内部snapshots版本的仓库 third 自建第三方jar
配置代理
选择阿里云http://maven.aliyun.com/nexus/content/groups/public/
本地maven配置
修改maven目录下的conf/setting.xml
<?xml version="1.0" encoding="UTF-8"?>
<settings xmlns="http://maven.apache.org/SETTINGS/1.0.0" xmlns:xsi="http://www.w3.org/2001/XMLSchema-instance" xsi:schemaLocation="http://maven.apache.org/SETTINGS/1.0.0 http://maven.apache.org/xsd/settings-1.0.0.xsd">
<pluginGroups/>
<proxies/>
<servers>
<server>
<id>xdclass-releases</id>
<username>admin</username>
<password>admin123</password>
</server>
<server>
<id>xdclass-snapshots</id>
<username>admin</username>
<password>admin123</password>
</server>
</servers>
<mirrors/>
<profiles>
<profile>
<id>xdclass</id>
<activation>
<activeByDefault>false</activeByDefault>
</activation>
<!-- 私有库地址-->
<repositories>
<repository>
<id>xdclass</id>
<url>http://192.168.56.101:8081/repository/maven-public/</url>
<releases>
<enabled>true</enabled>
</releases>
<snapshots>
<enabled>true</enabled>
</snapshots>
</repository>
</repositories>
<!--插件库地址-->
<pluginRepositories>
<pluginRepository>
<id>xdclass</id>
<url>http://192.168.56.101:8081/repository/maven-public/</url>
<releases>
<enabled>true</enabled>
</releases>
<snapshots>
<enabled>true</enabled>
</snapshots>
</pluginRepository>
</pluginRepositories>
</profile>
</profiles>
<activeProfiles>
<activeProfile>xdclass</activeProfile>
</activeProfiles>
</settings>
修改编辑器中maven的配置,将配置指向setting.xml
修改pom
<!--pom.xml 远程仓库的配置 id要跟本地maven的setting.xml相同 -->
<distributionManagement>
<repository>
<id>xdclass-releases</id>
<name>Ruizhi Release Repository</name>
<url>http://192.168.56.101:8081/repository/maven-releases/</url>
</repository>
<snapshotRepository>
<id>xdclass-snapshots</id>
<name>Ruizhi Snapshot Repository</name>
<url>http://192.168.56.101:8081/repository/maven-snapshots/</url>
</snapshotRepository>
</distributionManagement>
测试是否nexus搭建成功
pom添加本地没有的依赖,看nexus会不会代理 mvn deploy 看是否成功推送至nexus
mysql 安装
jenkins
前置条件
JDK、tomcat
安装tomcat
下载地址: https://tomcat.apache.org/download-90.cgi
useradd tomcat --新增一个名为tomcat的用户
passwd tomcat --给tomcat用户设置密码
tar -zxvf apache-tomcat-9.0.8.tar.gz -C /usr/local/ --将tomcat解压到相应目录
tar *** -c /usr/local -C代表change目录的意思,本例中指定解压文件到/usr/local下
chown -R tomcat:tomcat /usr/local/apache-tomcat-9.0.8
--将整个目录的所属权转移给前面是tomcat用户、 后面是tomcat组
安装Jenkins
下载地址: https://jenkins.io/download/
将Jenkins上传到tomcat的webapp目录
chown tomcat:tomcat Jenkins.war 修改Jenkinswar包为tomcat用户所有
启动tomcat --通过浏览器无法访问tomcat
1.看tomcat是否存活 ps aux | grep tomcat
2.看端口 netstat -tlun 看到8080端口已经使用了
3.检查防火墙 vim /etc/sysconfig/iptables 加入8080
4.查看tomcat日志 --》出现异常,地址已经被使用 log下的catalina.log文件
5.关闭tomcat --》 查看端口(步骤2)--》发现8080依旧存在
6.断定8080被其他程序占用 --》netstat -tlunp | grep 8080 -->看到被gitlab相关的程序使用了 7.修改tomcat端口 vim conf/server.xml ,找到8080 --》将8080改成不被占用的9999端口
8.防火墙开启9999端口
9.可以正常访问tomcat
浏览器打开http://192.168.56.101:9999/jenkins
more /home/tomcat/.jenkins/secrets/initialAdminPassword 将里面的内容复制粘贴
此时发现提示Jenkins离线
访问 http://192.168.56.101:9999/jenkins/pluginManager/advanced
拉到最底下,将https--》改成http,之后提交 重启tomcat 浏览器打开http://192.168.56.101:9999/jenkins
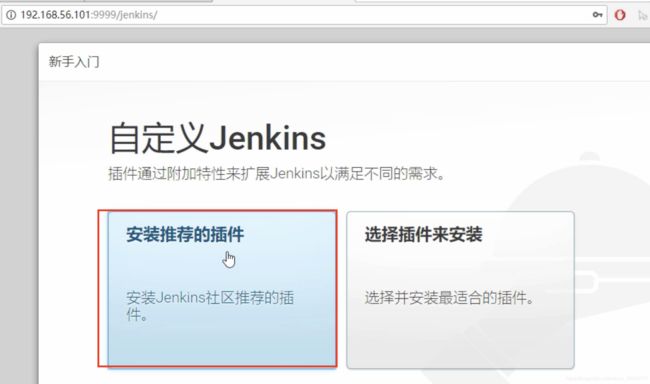
more /home/tomcat/.jenkins/secrets/initialAdminPassword 选择默认安装
设置完用户名密码后需要再次重启 tomcat
Jenkins插件安装及配置
插件安装
系统管理--》插件管理
1.安装Maven Integration plugin
2.安装SonarQube Scanner
3.Publish Over SSH --发布到远程服务器
系统配置
系统管理--》全局工具配置
1.配置jdk
2.配置maven
3.配置sonar
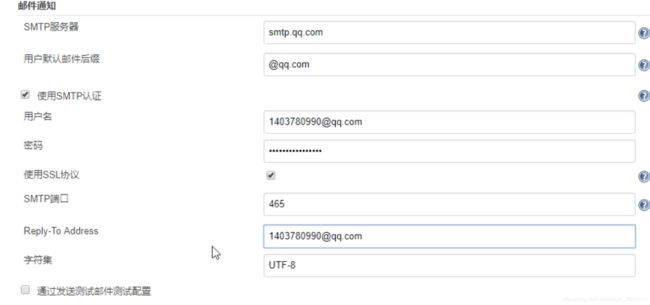
4.邮件配置 系统管理--》系统设置--》邮件通知--》 smtp服务器 smtp.qq.com
用户默认邮件后缀 @qq.com 点击高级
勾选ssl Reply-To Address发件者邮箱 之后测试一下配置,无误即可
默认发送者是系统管理员 也需要修改
配置gitlab授权登录
Credentials--》system--》Global credentials
配置免密登陆
使用ssh-keygen生成私钥和公钥
yum -y install openssh-clients
ssh-keygen -t rsa -- 产生私钥 配置git登陆 将Jenkins所在机子的公钥
more ~/.ssh/id_rsa.pub 的内容拷贝到gitlab项目上
jenkins 仪表盘简介
用户 --显示Jenkins里的用户 构建历史 --以时间轴的形式,显示项目的构建历史 系统管理 --跟Jenkins相关的配置都在里面
3.1 系统设置 全局设置相关的都在里面(maven、邮件、ssh服务器等都在里面配置)
3.2 全局安全配置 用户权限、是否允许用户登录等配置
3.3 configure credentials 配置证书相关的
3.4 全局工具配置 JDK Git Maven 等都在里面配置
3.5 读取配置 放弃当前配置,而读取配置文件
3.6 管理插件 所有的插件都是在此处管理的,安装,升级
3.7 系统信息 系统相关的信息
3.8 系统日志 系统日志,帮助定位问题
3.9 负载统计
3.10 Jenkins cli
3.11 脚本命令行
3.12 管理节点
3.13 关于Jenkins
3.14 manage old data
3.15 管理用户 Jenkins用户的管理 我的视图 --我们配置的要构建的项目 Credentials --证书相关,授权相关
nohup 的用途就是让提交的命令忽略 hangup 信号,那什么叫做hangup信号?这里给出了答案
0:标准输入 1:标准输出,2:标准错误
--本地手动构建
新建job并配置
General --可不配 源码管理 --按项目所使用的源码管理选择,课程使用git 填写项目地址,Credentials选择配置好的认证 选择分支 可以是项目中的任意分支 构建触发器 触发远程构建 (例如,使用脚本) 其他工程构建后触发 -- 在Jenkins中其他项目构建之后,触发本项目构建,一般用于项目间有依赖关系,一方修改,另一方需实时感知 定时构建 --定时进行构建,无论是否有变更 (类似cron表达式) GitHub hook trigger for GITScm polling --github的hook触发构建,一般不使用 轮询 SCM --设置定时检查源码变更,有更新就构建(类似cron表达式)
定时表达式含义
* * * * * --五个字段
分 时 天 月 周
构建环境
Delete workspace before build starts:在构建之前清空工作空间
Abort the build if it's stuck:如果构建出现问题则终止构建
Add timestamps to the Console Output:给控制台输出增加时间戳
Use secret text(s) or file(s):使用加密文件或者文本
执行shell
#!/bin/bash
mv target/*.jar /root/demo/
cd /root/demo
BUILD_ID = java -jar springboot-demo.jar >log 2>&1 &
nohup java -jar springboot-demo.jar >log 2>&1 &
由于此处不识别nohup命令
保存后就可手动构建
sonarqube整合
required metadata
#projectKey项目的唯一标识,不能重复
sonar.projectKey=xdclass
sonar.projectName=xdclass
sonar.projectVersion=1.0
sonar.sourceEncoding=UTF-8
sonar.modules=java-module
# Java module
java-module.sonar.projectName=test
java-module.sonar.language=java
# .表示projectBaseDir指定的目录
java-module.sonar.sources=src
java-module.sonar.projectBaseDir=.
java-module.sonar.java.binaries=target/
本地gitlab触发构建
安装 gitLab插件
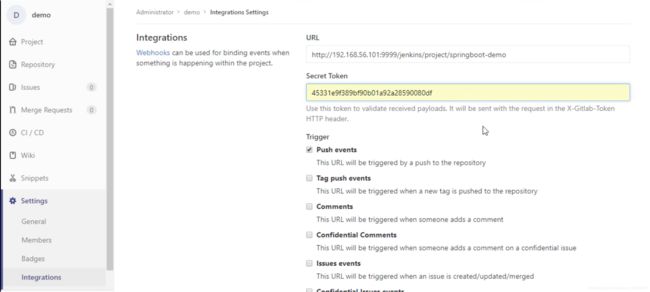
创建 gitLab钩子 得到个秘钥 拿着秘钥去gitlab上设置下
配置gitlab webhook
系统管理员登陆 http://192.168.56.101:8888/admin/application_settings settings Outbound requests 勾选Allow requests to the local network from hooks and services


